iOS开发:通过经纬度获得城市、省份等信息
iOS系统自带定位,用CLLocationManager就可以轻松的实现定位的操作,获得的是一组经纬度,当然,也可以根据给出的经纬度获取相应的省份、城市、街道等信息,下面就看一个根据经纬度获得城市的demo:
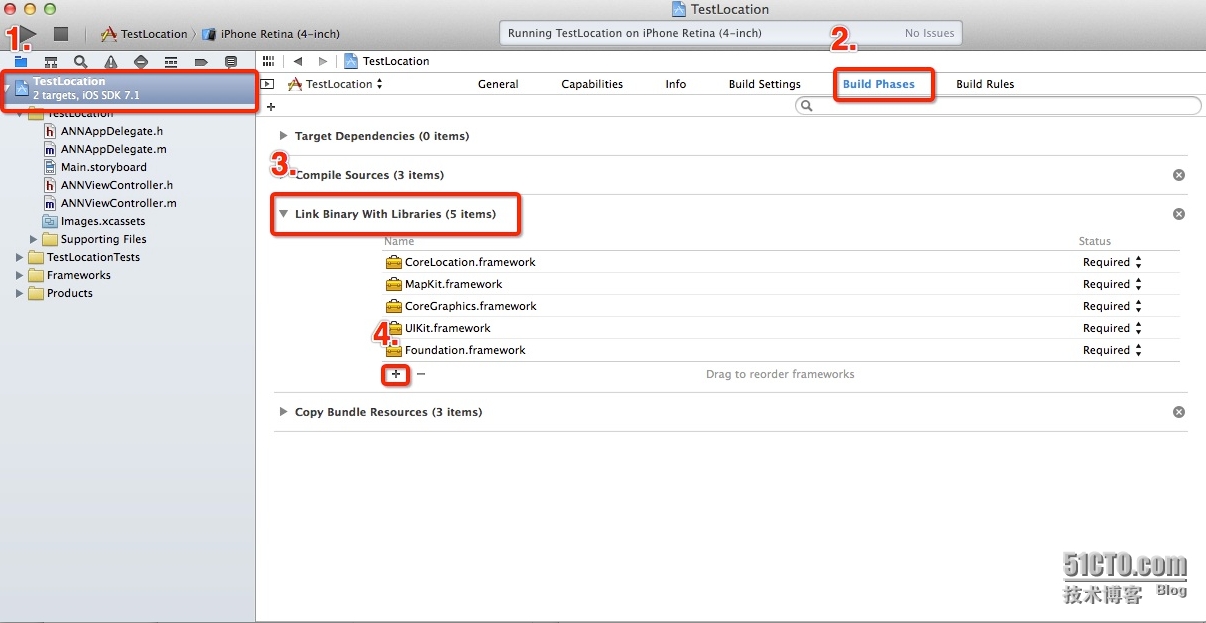
因为获取经纬度需要CLLocationManager类,而这个类包含在CoreLocation框架中,获取城市信息需要mapKit框架,所以需要首先在工程中导入这两个框架:
导入框架的步骤:选择1.target——2.Build Phases——3.Link Binary With Libraries ——4.点击“+”号:如图所示步骤:
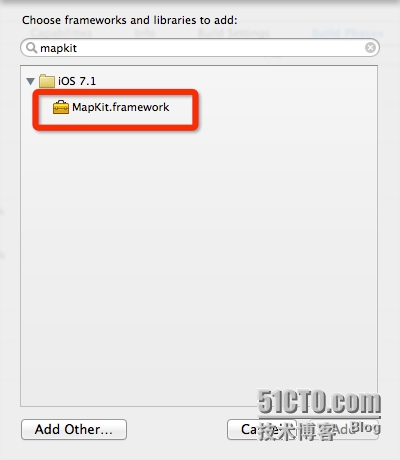
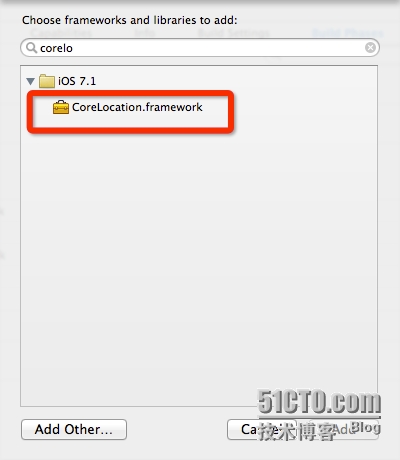
点击加号之后在搜索框里输入相应的框架,即可搜索到,如图所示:
下面就该写代码了,首先在视图控制器中导入:
|
1
2
|
#import <CoreLocation/CoreLocation.h>#import <MapKit/MapKit.h> |
两个头文件,然后.m中的具体代码如下:
|
1
2
3
4
5
6
7
8
9
10
11
12
13
14
15
16
17
18
19
20
21
22
23
24
25
26
27
28
29
30
31
32
33
34
35
36
37
38
39
40
41
42
43
44
45
46
47
48
49
50
51
52
53
54
55
56
57
58
59
60
61
62
63
64
65
66
67
68
69
70
71
72
73
|
#import "ANNViewController.h"@interface ANNViewController ()@property (strong, nonatomic) IBOutlet UILabel *longitude;@property (strong, nonatomic) IBOutlet UILabel *latitude;@property (strong, nonatomic) IBOutlet UILabel *location;@property (strong, nonatomic) CLLocationManager *locationManager;@end@implementation ANNViewController- (void)viewDidLoad{ [super viewDidLoad]; // Do any additional setup after loading the view, typically from a nib. self.view.backgroundColor = [UIColor whiteColor]; //创建CLLocationManager对象 self.locationManager = [[CLLocationManager alloc] init]; //设置代理为自己 self.locationManager.delegate = self; }- (IBAction)locationButton:(UIButton *)sender { [self.locationManager startUpdatingLocation];}- (void)locationManager:(CLLocationManager *)manager didUpdateToLocation:(CLLocation *)newLocation fromLocation:(CLLocation *)oldLocation{ //将经度显示到label上 self.longitude.text = [NSString stringWithFormat:@"%lf", newLocation.coordinate.longitude]; //将纬度现实到label上 self.latitude.text = [NSString stringWithFormat:@"%lf", newLocation.coordinate.latitude]; // 获取当前所在的城市名 CLGeocoder *geocoder = [[CLGeocoder alloc] init]; //根据经纬度反向地理编译出地址信息 [geocoder reverseGeocodeLocation:newLocation completionHandler:^(NSArray *array, NSError *error) { if (array.count > 0) { CLPlacemark *placemark = [array objectAtIndex:0]; //将获得的所有信息显示到label上 self.location.text = placemark.name; //获取城市 NSString *city = placemark.locality; if (!city) { //四大直辖市的城市信息无法通过locality获得,只能通过获取省份的方法来获得(如果city为空,则可知为直辖市) city = placemark.administrativeArea; } NSLog(@"city = %@", city); } else if (error == nil && [array count] == 0) { NSLog(@"No results were returned."); } else if (error != nil) { NSLog(@"An error occurred = %@", error); } }]; //系统会一直更新数据,直到选择停止更新,因为我们只需要获得一次经纬度即可,所以获取之后就停止更新 [manager stopUpdatingLocation];} |
主要就是直辖市的城市获得需要拐个弯,iOS7添加了一个新的方法,代替了上面这个方法:
|
1
2
3
4
5
6
7
8
9
|
- (void)locationManager:(CLLocationManager *)manager didUpdateLocations:(NSArray *)locations{ NSLog(@"longitude = %f", ((CLLocation *)[locationslastObject]).coordinate.longitude); NSLog(@"latitude = %f", ((CLLocation *)[locations lastObject]).coordinate.latitude); [manager stopUpdatingLocation];} |
后面的处理和上面的方法一样,大家可以看一下。
另外还有一些CLGeocoder的属性如下:
|
1
2
3
4
5
6
7
8
9
10
11
12
13
14
15
16
|
@property (nonatomic, readonly) NSDictionary *addressDictionary;// address dictionary properties@property (nonatomic, readonly) NSString *name; // eg. Apple Inc.@property (nonatomic, readonly) NSString *thoroughfare; // street address, eg. 1 Infinite Loop@property (nonatomic, readonly) NSString *subThoroughfare; // eg. 1@property (nonatomic, readonly) NSString *locality; // city, eg. Cupertino@property (nonatomic, readonly) NSString *subLocality; // neighborhood, common name, eg. Mission District@property (nonatomic, readonly) NSString *administrativeArea; // state, eg. CA@property (nonatomic, readonly) NSString *subAdministrativeArea; // county, eg. Santa Clara@property (nonatomic, readonly) NSString *postalCode; // zip code, eg. 95014@property (nonatomic, readonly) NSString *ISOcountryCode; // eg. US@property (nonatomic, readonly) NSString *country; // eg. United States@property (nonatomic, readonly) NSString *inlandWater; // eg. Lake Tahoe@property (nonatomic, readonly) NSString *ocean; // eg. Pacific Ocean@property (nonatomic, readonly) NSArray *areasOfInterest; // eg. Golden Gate Park |


