Linux(CentOS):安装JDK + MySQL + FTP
一.JDK的安装
1.查看目前系统的JDK
1)指令:rpm -qa | grep jdk
2)结果:
[root@dc-01 java]# rpm -qa | grep jdk
java-1.6.0-openjdk-1.6.0.0-1.45.1.11.1.el6.i686
2.卸载
1)指令:yum -y remove java-1.6.0-openjdk-1.6.0.0-1.45.1.11.1.el6.i686
2)结果:等一段时间就Complete了
3.下载Sun的JDK:比如jdk-6u37-linux-i586-rpm.bin(X84——》32位)/jdk-6u37-linux-x64-rpm.bin(X64——》64位)
3.存放目录(可自定义制定)
1)把下载好的JDK放到制定的目录
2)将这个文件变为可执行的文件(chmod 777):chmod 777 jdk-6u37-linux-i586-rpm.bin
4.然后执行这个文件进行安装
1)指令:./jdk-6u37-linux-i586-rpm.bin
2)结果:
Unpacking...
Checksumming...
Extracting...
UnZipSFX 5.50 of 17 February 2002, by Info-ZIP (Zip-Bugs@lists.wku.edu).
inflating: jdk-6u37-linux-i586.rpm
inflating: sun-javadb-common-10.6.2-1.1.i386.rpm
inflating: sun-javadb-core-10.6.2-1.1.i386.rpm
inflating: sun-javadb-client-10.6.2-1.1.i386.rpm
inflating: sun-javadb-demo-10.6.2-1.1.i386.rpm
inflating: sun-javadb-javadoc-10.6.2-1.1.i386.rpm
Preparing... ########################################### [100%]
1:jdk ########################################### [100%]
Unpacking JAR files...
rt.jar...
jsse.jar...
charsets.jar...
tools.jar...
localedata.jar...
plugin.jar...
javaws.jar...
deploy.jar...
Installing JavaDB
Preparing... ########################################### [100%]
1:sun-javadb-common ########################################### [ 17%]
2:sun-javadb-core ########################################### [ 33%]
3:sun-javadb-client ########################################### [ 50%]
4:sun-javadb-demo ########################################### [ 67%]
5:sun-javadb-docs ########################################### [ 83%]
6:sun-javadb-javadoc ########################################### [100%]
Java(TM) SE Development Kit 6 successfully installed.
Product Registration is FREE and includes many benefits:
* Notification of new versions, patches, and updates
* Special offers on Oracle products, services and training
* Access to early releases and documentation
Product and system data will be collected. If your configuration
supports a browser, the JDK Product Registration form will
be presented. If you do not register, none of this information
will be saved. You may also register your JDK later by
opening the register.html file (located in the JDK installation
directory) in a browser.
For more information on what data Registration collects and
how it is managed and used, see:
http://java.sun.com/javase/registration/JDKRegistrationPrivacy.html
Press Enter to continue.....
3)这个时候按一下回车——》出现Done——》至此安装结束
5.配置JDK
1)打开profile文件——》vim /etc/profile
2)在profile文件的末尾加上(JAVA_HOME后面不能加空格):
JAVA_HOME=/usr/java/jdk1.6.0_37
PATH=$JAVA_HOME/bin:$PATH
CLASSPATH=.:$JAVA_HOME/lib/dt.jar:$JAVA_HOME/lib/tools.jar
export JAVA_HOME
export PATH
export CLASSPATH
3)保存并关闭profile文件,执行source /etc/profile命令让修改生效
4)运行下java -version看一下java版本——》java -version:
[root@dc-01 java]# java -version
java version "1.6.0_37"
Java(TM) SE Runtime Environment (build 1.6.0_37-b06)
Java HotSpot(TM) Client VM (build 20.12-b01, mixed mode, sharing)
6.至此,整个安装过程完毕
二.MySQL的安装
1.下载版本——》mysql-5.1.68.tar.gz 数据库
2.安装过程
1)检查
<1>是否已经安装了MySQL——》rpm -aq|grep mysql / rpm -e --nodeps mysql-libs-5.1.73-3.el6_5.x86_64
<2>查找有MySQL字样的文件或目录——》find / -name mysql
<3>查找MySQL的配置文件——》find / -name my.cnf
<4>找到后全部删除
2)开始安装
<1>创建用户和用户组(安装MySQL前必须创建用户,创建用户主要是为了方便管理)
<2>创建MySQL用户组——》groupadd mysql
<3>创建MySQL用户,并指定所属的用户组,并制定MySQL用户的主目录——》useradd -g mysql mysql
<4>设置用户密码——》passwd mysql
<5>解压——》tar zxvf mysql-5.1.68.tar.gz
<6>进入MySQL目录——》cd mysql-5.1.68
<7>指定安装目录及路径——》./configure --prefix=/media/sdb3/mysql(或者如下的都行)
- (./configure --prefix=/media/ sdb3/mysql --localstatedir=/media/sdb3/mysql/data -enable-large-files --with-big-tables --with-plugins=partition --with-charset=utf8)
- (./configure --prefix=/media/sdb3/mysql --localstatedir=/media/sdb3/mysql/data -enable-large-files --with-big-tables --with-plugins=partition --with-charset=utf8)
- (./configure --prefix=/media/sdb3/mysql --localstatedir=/media/sdb3/mysql/data --with-charset=utf8)
- (./configure --prefix=/media/mysql --localstatedir=/media/mysql/data --enable-large-files --with-big-tables --with-plugins=partition --with-charset=utf8)
<8>编译MySQL的过程中报错
- /bin/rm: cannot remove `libtoolt': No such file or directory
- 在configure里面 RM='$RM -f' 这里的$RM后面一定有一个空格。如果后面没有空格,直接连接减号,就依然会报错。把RM='$RM'改为RM='$RM -f'
- 确认libtool是否已经安装,如果没有安装的话,则先安装libtool——》yum -y install libtool
- 分别执行以下三条命令
- autoreconf --force --install
- libtoolize --automake --force
- automake --force --add-missing
- checking for termcap functions library... configure: error: No curses/termcap library found
- 原因:缺少ncurses安装包
- 下载安装相应软件包:
- 如果你的系统是RedHat系列
- yum list|grep ncurses
- yum -y install ncurses-devel
- yum install ncurses-devel
- 如果你的系统是Ubuntu或Debian
- apt-cache search ncurses
- apt-get install libncurses5-dev
- 如果你的系统是RedHat系列
- 在做LAMP的时候,我把编译前准备做完后,做make这一步的时候报错,把我前面做的也贴出来;我用的mysql是mysql-5.0.22——》./configure--prefix=/usr/local/mysql/——》然后我就make了——》开始提示——》../depcomp:line571:exec:g++:notfound make[1]:***[my_new.o]错误127 make[1]:Leavingdirectory`/home/justme/software/mysql-5.1.30/mysys's make:***[all-recursive]错误1
- 下载安装gcc-c++-4.1.2-33.i386.rpm(yum install gcc-c++)
- 我没用安装g++,然后我把g++给装了
- 重新编译还是不行
- ../include/my_global.h:909:错误:对C++内建类型'bool'的重声明 make[2]:***[my_new.o]错误1 make[2]:Leavingdirectory`/usr/local/mysql-5.0.22/mysys' make[1]:***[all-recursive]错误1 make[1]:Leavingdirectory`/usr/local/mysql-5.0.22' make:***[all]错误2
- 重新编译了一回就好了,直接rm-rfmysql-5.0.22,然后重新tar解压后,重新编译就好了!
- no acceptable C compiler found in $PATH
- 解决方法:yum install gcc
<9>编译源代码#安装——》make && make install
<10>复制配置文件模板
- cp support-files/my-medium.cnf /etc/my.cnf
- cp support-files/my-medium.cnf /etc/mysql.cnf
- cp support-files/mysql.server /etc/init.d/mysql
- cp support-files/mysql.server /etc/init.d/mysqld
- chmod 755 /etc/init.d/mysqld
- chkconfig --add mysqld
- chkconfig mysqld on
- service mysqld restart
<11>初始化安装mysql数据库——》cd /media/sdb3/mysql > bin/mysql_install_db --user=mysql
<12>
- chown -R mysql.mysql /media/sdb3/mysql
- chmod -R 777 /media/sdb3/mysql
- 修改当前目录的属主为root——》chown -R root .
- 修改当前目录属组为mysql——》chgrp -R mysql .
- 使用用户mysql安全启动mysql程序并放到后台执行——》bin/mysqld_safe --user=mysql &
3)更改mysql的root密码
- /usr/local/bin/mysqladmin -u root password root
- 为进入mysql数据库添加一个用户以及密码,假如用户为”root”,密码为”root”(注意:这个和系统root是两个概念)
4)设置mysql开机自启动
- 在/etc/rc.d/rc.local添加——》/media/db/mysql/bin/mysqld_safe --user=mysql &
5)至此mysql5.1已经安装完成了
- 关闭防火墙——》/etc/init.d/iptables stop
- 禁止防火墙在系统启动时启动——》/sbin/chkconfig --level 2345 iptables off
- 重新打开防火墙——》//sbin/chkconfig --level 2345 iptables on
- 设置mysql登陆用户——》./mysql -u root -p
- 输入你设置的密码——》mysql>use mysql
- 删除用于本机匿名连接的空密码帐号——》mysql>delete from user where password="";
- 注意:默认安装mysql的root用户是不允许远程登录的,解决办法如下:
三.MySQL加innodb引擎
首先确定,在mysql的'plugin_dir'下有ha_innodb_plugin.so和ha_innodb.so两个文件

查询'plugin_dir'的路径可以用以下命令

mysql> show variables like 'plugin_dir';

+---------------+-----------------------------------+

| Variable_name | Value                             |

+---------------+-----------------------------------+

| plugin_dir    | /usr/local/mysql/lib/mysql/plugin |

+---------------+-----------------------------------+

1 row in set (0.01 sec)

如果没有找到,在您的mysql编译目录里有下面的目录文件(内置的innodb和innodb_plugin)

storage/innobase/.libs/ha_innodb.so

storage/innodb_plugin/.libs/ha_innodb_plugin.so

您需要把它们(ha_innodb_plugin.so和ha_innodb.so)拷贝到mysql的plugin目录中(/usr/local/mysql/lib/mysql/plugin)

接下来就是在mysql命令行安装一下

# mysql

Welcome to the MySQL monitor.  Commands end with ; or \g.

Your MySQL connection id is 18

Server version: 5.1.36-log Source distribution

Type 'help;' or '\h' for help. Type '\c' to clear the current input statement.

mysql> show engines;

+------------+---------+-----------------------------------------------------------+--------------+------+------------+

| Engine     | Support | Comment                                                   | Transactions | XA   | Savepoints |

+------------+---------+-----------------------------------------------------------+--------------+------+------------+

| MRG_MYISAM | YES     | Collection of identical MyISAM tables                     | NO           | NO   | NO         |

| CSV        | YES     | CSV storage engine                                        | NO           | NO   | NO         |

| MEMORY     | YES     | Hash based, stored in memory, useful for temporary tables | NO           | NO   | NO         |

| MyISAM     | DEFAULT | Default engine as of MySQL 3.23 with great performance    | NO           | NO   | NO         |

+------------+---------+-----------------------------------------------------------+--------------+------+------------+

4 rows in set (0.00 sec)

mysql> INSTALL PLUGIN InnoDB SONAME 'ha_innodb.so';

Query OK, 0 rows affected (0.69 sec)

mysql>+------------+---------+------------------------------------------------------------+--------------+------+------------+

| Engine     | Support | Comment                                                    | Transactions | XA   | Savepoints |

+------------+---------+------------------------------------------------------------+--------------+------+------------+

| InnoDB     | YES     | Supports transactions, row-level locking, and foreign keys | YES          | YES  | YES        |

| CSV        | YES     | CSV storage engine                                         | NO           | NO   | NO         |

| MRG_MYISAM | YES     | Collection of identical MyISAM tables                      | NO           | NO   | NO         |

| MyISAM     | DEFAULT | Default engine as of MySQL 3.23 with great performance     | NO           | NO   | NO         |

| MEMORY     | YES     | Hash based, stored in memory, useful for temporary tables  | NO           | NO   | NO         |

+------------+---------+------------------------------------------------------------+--------------+------+------------+

5 rows in set (0.00 sec)


OK,大功告成
四.ftp服务器搭建
1.首先判断你服务器上是否安装了vsftpd

2.安装vsftpd

3.安装完成之后就要重启vsftpd服务

4.到vsftpd的主配置文件里面

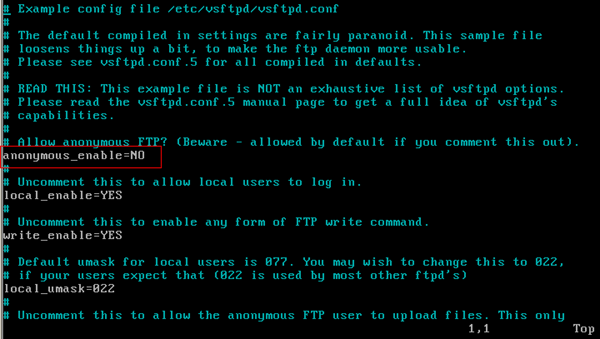
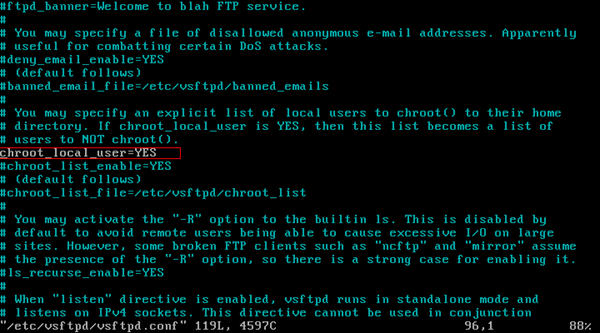
5.把这个改为NO 默认是YES (改为NO 就是禁止匿名用户登录,不需要注释),不可以让ftp用户跳出自己的家目录,否则太危险了,需要做限制。默认是注释掉的,把#号去掉 然后重启vsftpd

6.创建ftp用户

7.(yuanfei这个用户智能连接ftp无法登录系统,默认家目录是在var/www/html 文件夹下面),给yuanfei这个用户设置密码

8.然后给家目录修改权限,否则你无法上传文件

9.修改selinux /etc/selinux/config,默认是enforcing 把他修改为disabled

10.因为修改selinu后需要重启服务,因为服务器不可以重启所以执行上面这个命令,临时修改selinux的策略,无需重启!

11.重启vsftpd服务,并且下次自动启动或者

12.关闭防火墙

13.然后用软件来链接ftp测试一下


