前端常见跨域解决方案
什么是跨域
跨域是指一个域下的文档或脚本试图去请求另一个域下的资源,这里跨域是广义的。
广义的跨域:
- 资源跳转:A链接、重定向、表单提交
- 资源嵌入:
<link>、<script>、<img>、<frame>等dom标签,还有样式中background:url()、@font-face()等文件外链 - 脚本请求:js发起的ajax请求、dom和js对象的跨域操作等
其实我们通常所说的跨域是狭义的,是由浏览器同源策略限制的一类请求场景。
一些跨域场景
还是上文的例子,例如:http://store.company.com/dir/page.html 请求以下地址的资源
| URL | 结果 | 原因 |
|---|---|---|
| https://store.company.com/secure.html | 失败 | 不同协议 ( https 和 http ) |
| http://store.company.com:81/dir/etc.html | 失败 | 不同端口 ( http:// 80是默认的) |
| http://news.company.com/dir/other.html | 失败 | 不同域名 ( news 和 store ) |
失败的原因就是浏览器同源策略的限制,也就是所说的狭义的跨域
特别说明
第一:如果是协议和端口造成的跨域问题“前台”是无能为力的。
第二:在跨域问题上,仅仅是通过“URL的首部”来识别而不会根据域名对应的IP地址是否相同来判断。“URL的首部”可以理解为“协议, 域名和端口必须匹配”。
这里你或许有个疑问:请求跨域了,那么请求到底发出去没有?
跨域并不是请求发不出去,请求能发出去,服务端能收到请求并正常返回结果,只是结果被浏览器拦截了。你可能会疑问明明通过表单的方式可以发起跨域请求,为什么 Ajax 就不会?因为归根结底,跨域是为了阻止用户读取到另一个域名下的内容,Ajax 可以获取响应,浏览器认为这不安全,所以拦截了响应。但是表单并不会获取新的内容,所以可以发起跨域请求。同时也说明了跨域并不能完全阻止 CSRF,因为请求毕竟是发出去了。
这里引自浪里行舟
跨域解决方案
- 通过jsonp跨域
- 跨域资源共享(CORS)
- nginx代理跨域
- nodejs中间件代理跨域
- WebSocket协议跨域
JSONP
- JSONP(JSON with Padding) 是 json 的一种"使用模式",
- 是应用JSON的一种新方法,是一种跨域解决方案
- 可以让网页从别的域名(网站)那获取资料,即跨域读取数据。
JSONP 由两部分组成:回调函数和数据。
- 回调函数是当响应到来时应该在页面中调用的函数,
- 而数据就是传入回调函数中的json数据
JSONP原理
<script>带有 src 属性可以跨域访问,网页可以得到从其他来源动态产生的 JSON 数据。JSONP请求需要请求资源所在服务器配合。
JSONP 优缺点
- 优点是简单兼容性好,可用于解决主流浏览器的跨域数据访问的问题。
- 缺点是仅支持get方法具有局限性,不安全可能会遭受XSS攻击。
一个简单的例子
当访问http://localhost:3000/11-jsonp.html可以拿到https://www.runoob.com/try/ajax/jsonp.php?jsoncallback=callbackFunction提供的数据,并进行处理。
备注:
- https://www.runoob.com/try/ajax/jsonp.php?jsoncallback=callbackFunction访问得到的数据是
callbackFunction(["customername1","customername2"])
准备工作
- 在本地建立一个 jsonp 文件夹
- 新建 11-jsonp.html
- 新建 100-server1.js
100-server1.js
let express = require('express');
let app = express();
app.use(express.static(__dirname));
app.listen(3000);
11-jsonp.html
<!DOCTYPE html>
<html>
	<head>
		<meta charset="utf-8">
		<title></title>
	</head>
	<body>
		<script type="text/javascript">
			var script = document.createElement('script');
			script.type = 'text/javascript';

			// 传参一个回调函数名给后端,方便后端返回时执行这个在前端定义的回调函数
			script.src = 'https://www.runoob.com/try/ajax/jsonp.php?jsoncallback=callbackFunction';
			document.head.appendChild(script);

			// 回调执行函数
			const callbackFunction = function(data) {
				console.log(data)
			}
		</script>

	</body>
</html>
运行:
- 在 jsonp 目录下,git bash
- 如果没有安装 express,首先
npm install express - node 100-server1.js
- 在浏览器中输入
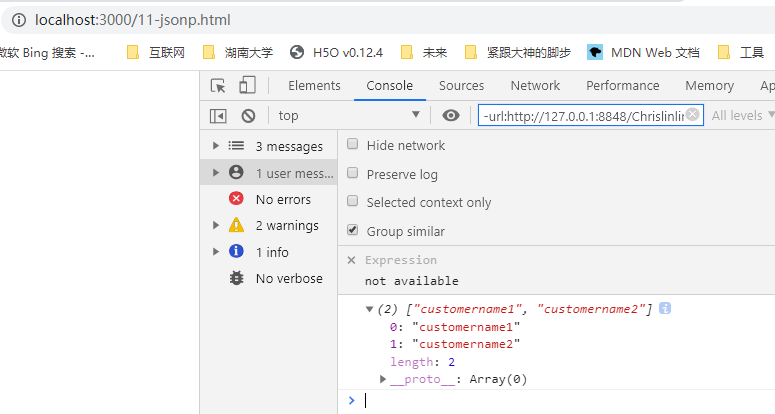
http://localhost:3000/11-jsonp.html - 打开浏览器的控制台,可以看到输出
["customername1", "customername2"]
如图
解释:
var script = document.createElement('script');
script.type = 'text/javascript';
script.src = 'https://www.runoob.com/try/ajax/jsonp.php?jsoncallback=callbackFunction';
document.head.appendChild(script);

以上这段代码相当于在 <head> 标签内增加
<script type="text/javascript" src="https://www.runoob.com/try/ajax/jsonp.php?jsoncallback=callbackFunction"></script>
如图
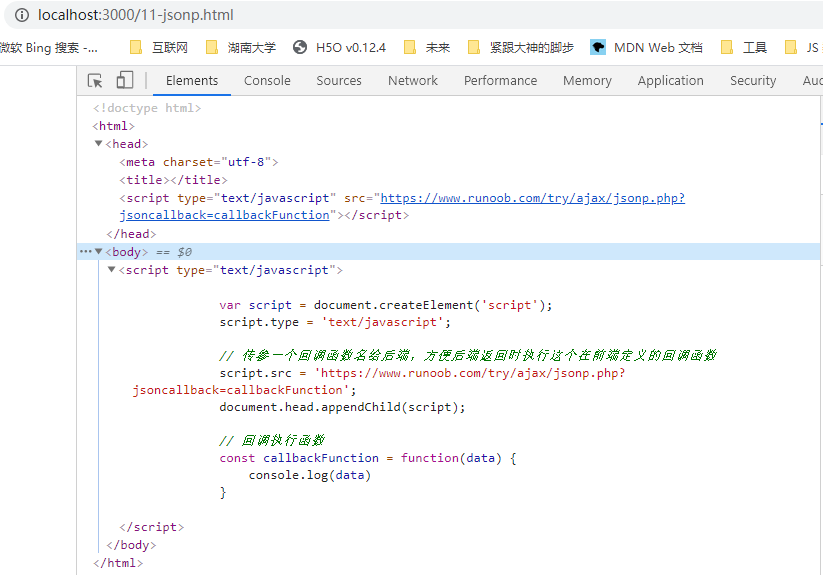
<script>带有 src 属性可以跨域访问,所以可以拿到 src 属性值所指的地址,拿到数据,并进行处理callbackFunction可以自定义,需要创建与之相同的处理函数jsoncallback是与后端商量好的接口
进阶1-封装 jsonp 函数
新建 12-jsonp.html
<!DOCTYPE html>
<html>
	<head>
		<meta charset="utf-8">
		<title></title>
	</head>
	<body>
		<script type="text/javascript">
			// https://www.runoob.com/try/ajax/jsonp.php?jsoncallback=callbackFunction
			function jsonp({
				url,
				jsoncallback
			}) {
				return new Promise((resolve, reject) => {
					let script = document.createElement('script')
					window[jsoncallback] = function(data) {
						resolve(data)
						document.body.removeChild(script)
					}
					script.src = `${url}?jsoncallback=${jsoncallback}`
					document.body.appendChild(script)
				})
			}
			jsonp({
				url: 'https://www.runoob.com/try/ajax/jsonp.php',
				jsoncallback: 'callbackFunction'
			}).then(data => {
				console.log(data)
			})
		</script>
	</body>
</html>
进阶2-随机产生函数名
jsoncallback 如果一样, 会被覆盖掉;为了解决这个问题,可以随机产生函数名
<!DOCTYPE html>
<html>
	<head>
		<meta charset="utf-8">
		<title></title>
	</head>
	<body>
		<script type="text/javascript">
			// https://www.runoob.com/try/ajax/jsonp.php?jsoncallback=linXXXXX
			function jsonp({
				url,
				jsoncallback
			}) {
				return new Promise((resolve, reject) => {
					let script = document.createElement('script')
					window[jsoncallback] = function(data) {
						resolve(data)
						document.body.removeChild(script)
					}
					script.src = `${url}?jsoncallback=${jsoncallback}`
					console.log(script.src)
					document.body.appendChild(script)
				})
			}
			// 每次请求之前,产生一个随机的函数名
			// 目的是,服务端接收到请求之后,返回一个 callbackName([JOSN格式的数据])
			let callbackName = 'lin' + Math.floor(Math.random() * 100000);
			console.log(callbackName)
			jsonp({
				url: 'https://www.runoob.com/try/ajax/jsonp.php',
				jsoncallback: callbackName
			}).then(data => {
				console.log(data)
			})
		</script>
	</body>
</html>
进阶3-请求地址中携带参数
在这个例子中,对之前的流程进行一些改变。当访问http://localhost:3000/14-jsonp.html可以拿到http://localhost:4001/say?wd=hello&jsoncallback=linXXXXX提供的数据,并进行处理。
准备工作
- 新建 14-jsonp.html
- 新建 101-server2.js
14-jsonp.html
<!DOCTYPE html>
<html>
	<head>
		<meta charset="utf-8">
		<title></title>
	</head>
	<body>
		<script type="text/javascript">
			// http://localhost:4001/say?wd=hello&jsoncallback=linXXXXX
			function jsonp({
				url,
				params,
				jsoncallback
			}) {
				return new Promise((resolve, reject) => {
					let script = document.createElement('script')
					window[jsoncallback] = function(data) {
						resolve(data)
						document.body.removeChild(script)
					}
					if(params){
						params = { ...params,
							jsoncallback
						} // wd=hello&jsoncallback=linXXXXX
						let arrs = []
						for (let key in params) {
							arrs.push(`${key}=${params[key]}`)
						}
						script.src = `${url}?${arrs.join('&')}`
					}else{
						script.src = `${url}?jsoncallback=${jsoncallback}`
					}
					console.log(script.src)
					document.body.appendChild(script)
				})
			}
			// 每次请求之前,产生一个随机的函数名
			// 目的是,服务端接收到请求之后,返回一个 callbackName([JOSN格式的数据])
			let callbackName = 'lin' + Math.floor(Math.random() * 100000);
			console.log(callbackName)
			jsonp({
				url: 'http://localhost:4001/say',
				params: {
					wd: 'hello'
				},
				jsoncallback: callbackName
			}).then(data => {
				console.log(data)
			})
		</script>
	</body>
</html>
101-server2.js
let express = require('express')
let app = express()
app.get('/say', function(req, res) {
	let {
		wd,
		jsoncallback
	} = req.query
	console.log(wd) // hello
	console.log(jsoncallback) // linXXXXX
	res.end(`${jsoncallback}(["customername1","customername2"])`)
})
app.listen(4001)
运行:
- node 100-server1.js
- node 101-server2.js
- 在浏览器中输入
http://localhost:3000/14-jsonp.html - 打开浏览器的控制台,可以看到输出
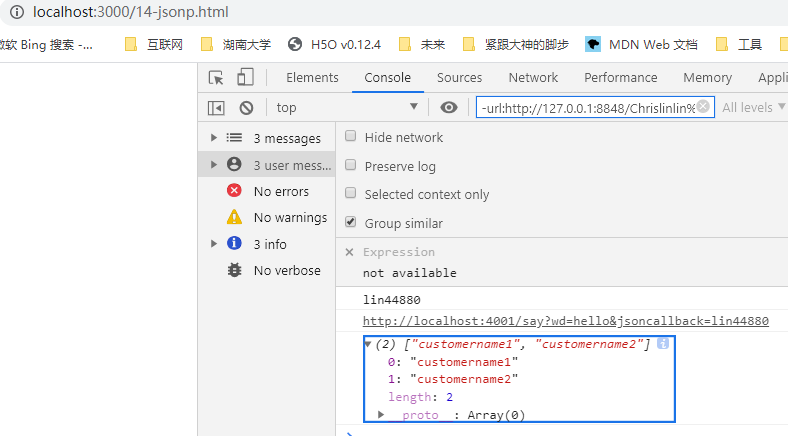
总结
- 创建一个回调函数,其函数名(如 linXXXXX )当做参数值,要传递给跨域请求数据的服务器,函数形参为要获取目标数据(服务器返回的data);
- 创建一个 script 标签,把需要请求资源的地址,赋值给 script 的 src , 还要在这个地址中向服务器传递该函数名;
- 服务器接收到请求后,需要把传递进来的函数名和它需要传递的数据进行拼接 如:
linXXXXX(["customername1","customername2"])。 - 最后服务器把准备的数据通过 HTTP 协议返回给客户端,客户端再调用执行之前声明的回调函数 linXXXXX,对返回的数据进行处理。
跨域资源共享 CORS
CORS[Cross-Origin Resource Sharing] 是主流的跨域解决方案。目前,所有浏览器都支持该功能(IE8+:IE8/9需要使用 XDomainRequest 对象来支持CORS)。分为简单请求和非简单请求。
简单请求
何为简单请求
- 请求方法为 GET/HEAD/POST 之一
- 仅能使用 CORS 安全的头部:Accept、Accept-Language、Content-Language、Content-Type
- Content-Type 值只能是: text/plain、multipart/form-data、application/x-www-form-urlencoded 三者其中之一
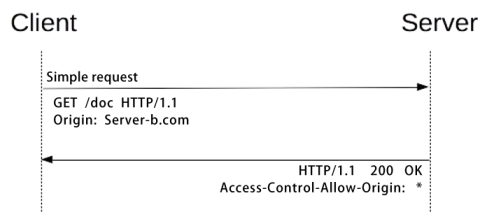
简单请求的跨域访问
- 请求中携带 Origin 头部告知来自哪个域
- 响应中携带 Access-Control-Allow-Origin 头部表示允许哪些域
- 浏览器放行
test
- 【效果】开启
http://localhost:3000/4-index.html页面,跨域访问http://localhost:4000/getData,并拿到数据。
代码实现
4-index.html
<!DOCTYPE html>
<html>
	<head>
		<meta charset="utf-8">
		<title></title>
	</head>
	<body>
		<script type="text/javascript">
			let xhr = new XMLHttpRequest()
			xhr.open('GET', 'http://localhost:4000/getData', true)
			xhr.onreadystatechange = function() {
				if (xhr.readyState === 4) {
					if ((xhr.status >= 200 && xhr.status < 300) || xhr.status === 304) {
						console.log(xhr.response)
					}
				}
			}
			xhr.send()
		</script>
	</body>
</html>
4-server1.js
let express = require('express');
let app = express();
app.use(express.static(__dirname));
app.listen(3000);
4-server2.js
let express = require('express')
let app = express()

app.use(function(req, res, next) {
	// 设置允许的域
	res.setHeader('Access-Control-Allow-Origin', 'http://localhost:3000')
	next()
})
app.get('/getData', function(req, res) {
	console.log(req.headers)
	res.end('goodbye')
})
app.use(express.static(__dirname))
app.listen(4000)
- 开启2个 本机 cors 目录下的 git bash,分别运行
node 4-server1.js和node 4-server2.js - 在浏览器中输入
http://localhost:3000/4-index.html - 在浏览器控制台中可以看到输出 goodbye
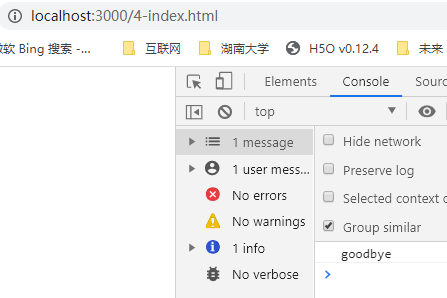
4-server2.js 运行终端中输出
{
  host: 'localhost:4000',
  connection: 'keep-alive',
  'user-agent': 'Mozilla/5.0 (Windows NT 10.0; Win64; x64) ' +
    'AppleWebKit/537.36 (KHTML, like Gecko) ' +
    'Chrome/81.0.4044.138 Safari/537.36',
  accept: '*/*',
  origin: 'http://localhost:3000',
  'sec-fetch-site': 'same-site',
  'sec-fetch-mode': 'cors',
  'sec-fetch-dest': 'empty',
  referer: 'http://localhost:3000/4-index.html',
  'accept-encoding': 'gzip, deflate, br',
  'accept-language': 'zh-CN,zh;q=0.9,en;q=0.8'
}
非简单请求
- 非简单请求是那种对服务器有特殊要求的请求,比如请求方法是PUT或DELETE,或者Content-Type字段的类型是application/json。
- 非简单请求的CORS请求,会在正式通信之前,增加一次HTTP查询请求,称为"预检"请求(preflight)。
- 浏览器先询问服务器,当前网页所在的域名是否在服务器的许可名单之中,以及可以使用哪些HTTP动词和头信息字段。只有得到肯定答复,浏览器才会发出正式的XMLHttpRequest请求,否则就报错。
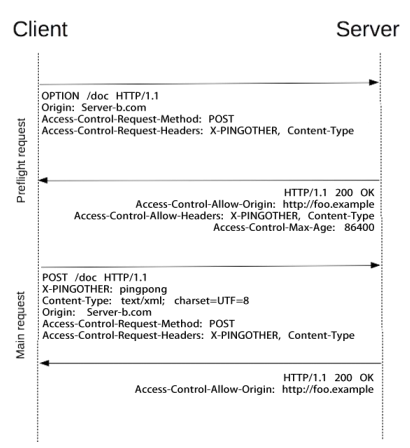
预检请求头部
- Origin(RFC6454):一个页面的资源可能来自于多个域名,在 AJAX 等子请求中标明来 源于某个域名下的脚本,以通过服务器的安全校验
- Access-Control-Request-Method
- 在 preflight 预检请求 (OPTIONS) 中,告知服务器接下来的请求会使用哪些方法
- Access-Control-Request-Headers
- 在 preflight 预检请求 (OPTIONS) 中,告知服务器接下来的请求会传递哪些头部
预检响应头部
- Access-Control-Allow-Origin
- 告知浏览器允许哪些域访问当前资源,*表示允许所有域。为避免缓存错乱,响应中需要携带 Vary: Origin
- Access-Control-Allow-Methods
- 在 preflight 预检请求的响应中,告知客户端后续请求允许使用的方法
- Access-Control-Allow-Headers
- 在 preflight 预检请求的响应中,告知客户端后续请求允许携带的头部
- Access-Control-Max-Age
- 在 preflight 预检请求的响应中,告知客户端该响应的信息可以缓存多久
- Access-Control-Expose-Headers
- 告知浏览器哪些响应头部可以供客户端使用,默认情况下只有 Cache-Control、Content-Language、 Content-Type、Expires、Last-Modified、Pragma 可供使用
- Access-Control-Allow-Credentials
- 告知浏览器是否可以将 Credentials 暴露给客户端使用,Credentials 包含 cookie、authorization 类头部、 TLS证书等。
test
- 【效果】开启
http://localhost:3000/5-index.html页面,跨域访问http://localhost:4000/getData,并拿到数据。
代码实现
5-index.html
<!DOCTYPE html>
<html>
	<head>
		<meta charset="utf-8">
		<title></title>
	</head>
	<body>
		<script type="text/javascript">
			let xhr = new XMLHttpRequest()
			document.cookie = 'name=lin' // cookie不能跨域
			xhr.withCredentials = true // 前端设置是否带cookie
			xhr.open('PUT', 'http://localhost:4000/getData', true)
			xhr.setRequestHeader('name', 'lin')
			xhr.onreadystatechange = function() {
			  if (xhr.readyState === 4) {
			    if ((xhr.status >= 200 && xhr.status < 300) || xhr.status === 304) {
			      console.log(xhr.response)
			      //得到响应头,后台需设置Access-Control-Expose-Headers
			      console.log(xhr.getResponseHeader('name'))
			    }
			  }
			}
			xhr.send()
		</script>
	</body>
</html>
5-server1.js
let express = require('express');
let app = express();
app.use(express.static(__dirname));
app.listen(3000);
5-server2.js
let express = require('express')
let app = express()
let whitList = ['http://localhost:3000'] //设置白名单
app.use(function(req, res, next) {
	let origin = req.headers.origin
	if (whitList.includes(origin)) {
		// 告知浏览器允许哪些域访问当前资源
		res.setHeader('Access-Control-Allow-Origin', origin)
		// 告知客户端后续请求允许携带的头部
		res.setHeader('Access-Control-Allow-Headers', 'name')
		// 告知客户端后续请求允许使用的方法
		res.setHeader('Access-Control-Allow-Methods', 'PUT')
		// 告知浏览器是否可以将 Credentials 暴露给客户端使用,Credentials 包含 cookie、authorization 类头部、 TLS证书等
		res.setHeader('Access-Control-Allow-Credentials', true)
		// 告知客户端该响应的信息可以缓存多久
		res.setHeader('Access-Control-Max-Age', 6)
		// 告知浏览器哪些响应头部可以供客户端使用
		res.setHeader('Access-Control-Expose-Headers', 'name')
		if (req.method === 'OPTIONS') {
			res.end() // OPTIONS 请求不做任何处理
		}
	}
	next()
})
app.put('/getData', function(req, res) {
	console.log(req.headers)
	res.setHeader('name', 'js') //返回一个响应头,后台需设置
	res.end('goodbye')
})
app.get('/getData', function(req, res) {
	console.log(req.headers)
	res.end('goodbye')
})
app.use(express.static(__dirname))
app.listen(4000)
- 开启2个 本机 cors 目录下的 git bash,分别运行
node 5-server1.js和node 5-server2.js - 在浏览器中输入
http://localhost:3000/5-index.html - 在浏览器控制台中可以看到输出
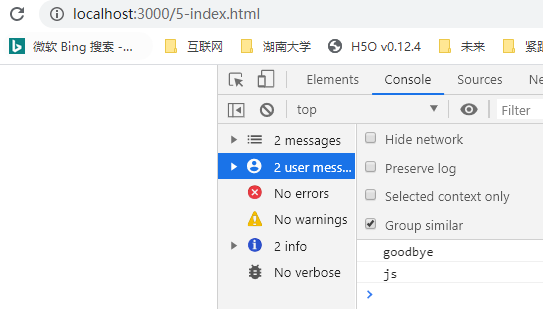
5-server2.js 运行终端中输出
{
  host: 'localhost:4000',
  connection: 'keep-alive',
  'content-length': '0',
  name: 'lin',
  'user-agent': 'Mozilla/5.0 (Windows NT 10.0; Win64; x64) ' +
    'AppleWebKit/537.36 (KHTML, like Gecko) ' +
    'Chrome/81.0.4044.138 Safari/537.36',
  accept: '*/*',
  origin: 'http://localhost:3000',
  'sec-fetch-site': 'same-site',
  'sec-fetch-mode': 'cors',
  'sec-fetch-dest': 'empty',
  referer: 'http://localhost:3000/5-index.html',
  'accept-encoding': 'gzip, deflate, br',
  'accept-language': 'zh-CN,zh;q=0.9,en;q=0.8',
  cookie: 'name=lin'
}
思考
- 什么是跨域?
- 为什么会有跨域?
- 什么是同源策略?
- 为什么会有同源策略?
- 跨域的几种解决方案


