Flink SideOutput 和 Filter 分流对比
Flink 分流有Filter、Split(已经废弃移除)、Side Output进行分流,到底时有什么区别,哪个种更好呢?
对比
代码对比
直接上代码对比:
import org.apache.flink.streaming.api.datastream.DataStreamSource;
import org.apache.flink.streaming.api.datastream.SingleOutputStreamOperator;
import org.apache.flink.streaming.api.environment.StreamExecutionEnvironment;
import org.apache.flink.streaming.api.functions.ProcessFunction;
import org.apache.flink.streaming.api.functions.source.SocketTextStreamFunction;
import org.apache.flink.util.Collector;
import org.apache.flink.util.OutputTag;

public class FlinkSideOutput {
    public static void main(String[] args) throws Exception {
        StreamExecutionEnvironment executionEnvironment = StreamExecutionEnvironment.getExecutionEnvironment();
        executionEnvironment.setParallelism(1);
        DataStreamSource<String> streamSource = executionEnvironment.addSource(new SocketTextStreamFunction("localhost", 9999, "\n", 1));
        OutputTag<String> zero = new OutputTag<String>("zero") {
        };
        SingleOutputStreamOperator<String> process = streamSource.process(new ProcessFunction<String, String>() {
            @Override
            public void processElement(String s, ProcessFunction<String, String>.Context context, Collector<String> collector) throws Exception {
                System.out.println("SideOuput:" + s);
                if (Integer.parseInt(s) % 2 == 0) {
                    context.output(zero, s);
                } else {
                    collector.collect(s);
                }
            }
        });
        process.print();
        process.getSideOutput(zero).print();
        System.out.println(executionEnvironment.getExecutionPlan());
        executionEnvironment.execute();
    }
}
import org.apache.flink.streaming.api.datastream.DataStreamSource;
import org.apache.flink.streaming.api.environment.StreamExecutionEnvironment;
import org.apache.flink.streaming.api.functions.source.SocketTextStreamFunction;


public class FlinkStreamFilter {
    public static void main(String[] args) throws Exception {
        StreamExecutionEnvironment executionEnvironment = StreamExecutionEnvironment.getExecutionEnvironment();
        executionEnvironment.setParallelism(1);
        DataStreamSource<String> streamSource = executionEnvironment.addSource(new SocketTextStreamFunction("localhost", 9999, "\n", 1));
        streamSource.filter(s -> {
            System.out.println("filter % 2 == 0 ,value:" + s);
            return Integer.parseInt(s) % 2 == 0;
        }).print();
        streamSource.filter(s -> {
            System.out.println("filter % 2 != 0 ,value:" + s);
            return Integer.parseInt(s) % 2 != 0;
        }).print();
        System.out.println(executionEnvironment.getExecutionPlan());
        executionEnvironment.execute();
    }
}
从代码上看,SideOutput的写法更为麻烦,且对于代码理解上Filter 更容易去理解,如果了解Spark的可能会想到Filter 这边可能会对 streamSource 进行两次计算。
执行图对比
当全局 parallelism = 1 时
从SideOutput 这个执行图Name看到
Custom Source -> Process , Process 分流到两个Sink:Print
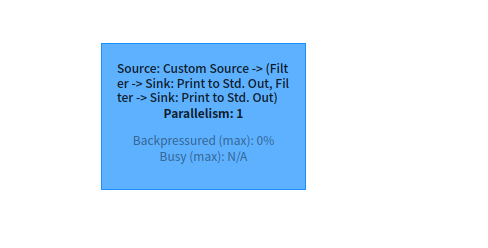
从Filter 这个执行图的Name 可以看到
Custom Source 分成两个流,Custom Source -> Filter -> Sink:Print , Custom Source -> Filter -> Sink:Print
当把 Sink的 Parallelism = 8 ,刚刚说的就更明显了。
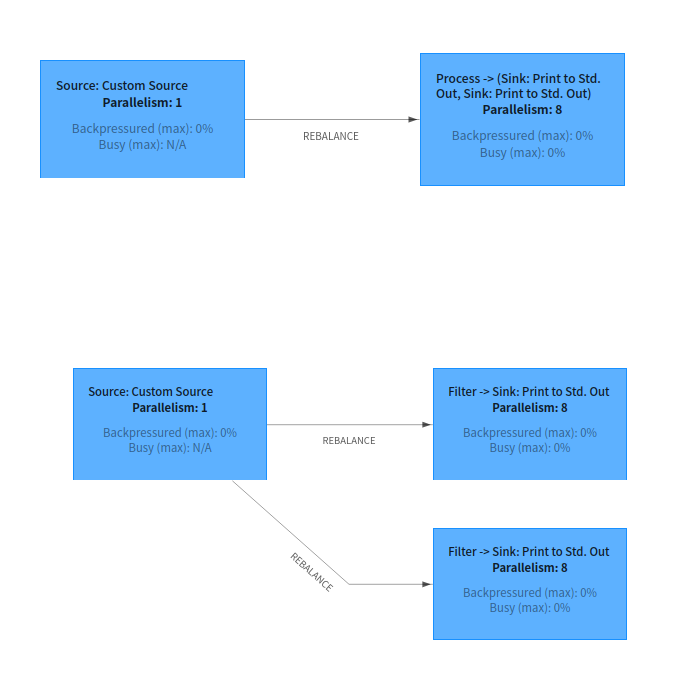
比Operator 图对比
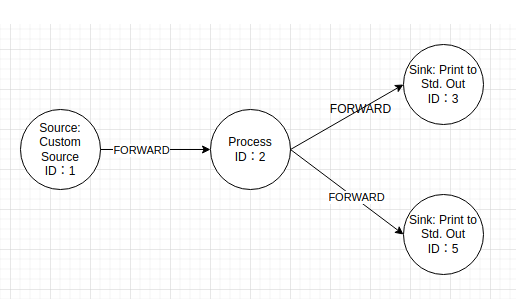
通过打印计划
executionEnvironment.getExecutionPlan()
SideOuput:
{
  "nodes" : [ {
    "id" : 1,
    "type" : "Source: Custom Source",
    "pact" : "Data Source",
    "contents" : "Source: Custom Source",
    "parallelism" : 1
  }, {
    "id" : 2,
    "type" : "Process",
    "pact" : "Operator",
    "contents" : "Process",
    "parallelism" : 1,
    "predecessors" : [ {
      "id" : 1,
      "ship_strategy" : "FORWARD",
      "side" : "second"
    } ]
  }, {
    "id" : 3,
    "type" : "Sink: Print to Std. Out",
    "pact" : "Data Sink",
    "contents" : "Sink: Print to Std. Out",
    "parallelism" : 1,
    "predecessors" : [ {
      "id" : 2,
      "ship_strategy" : "FORWARD",
      "side" : "second"
    } ]
  }, {
    "id" : 5,
    "type" : "Sink: Print to Std. Out",
    "pact" : "Data Sink",
    "contents" : "Sink: Print to Std. Out",
    "parallelism" : 1,
    "predecessors" : [ {
      "id" : 2,
      "ship_strategy" : "FORWARD",
      "side" : "second"
    } ]
  } ]
}
对应的图就是:
Filter:
{
  "nodes" : [ {
    "id" : 1,
    "type" : "Source: Custom Source",
    "pact" : "Data Source",
    "contents" : "Source: Custom Source",
    "parallelism" : 1
  }, {
    "id" : 2,
    "type" : "Filter",
    "pact" : "Operator",
    "contents" : "Filter",
    "parallelism" : 1,
    "predecessors" : [ {
      "id" : 1,
      "ship_strategy" : "FORWARD",
      "side" : "second"
    } ]
  }, {
    "id" : 4,
    "type" : "Filter",
    "pact" : "Operator",
    "contents" : "Filter",
    "parallelism" : 1,
    "predecessors" : [ {
      "id" : 1,
      "ship_strategy" : "FORWARD",
      "side" : "second"
    } ]
  }, {
    "id" : 3,
    "type" : "Sink: Print to Std. Out",
    "pact" : "Data Sink",
    "contents" : "Sink: Print to Std. Out",
    "parallelism" : 1,
    "predecessors" : [ {
      "id" : 2,
      "ship_strategy" : "FORWARD",
      "side" : "second"
    } ]
  }, {
    "id" : 5,
    "type" : "Sink: Print to Std. Out",
    "pact" : "Data Sink",
    "contents" : "Sink: Print to Std. Out",
    "parallelism" : 1,
    "predecessors" : [ {
      "id" : 4,
      "ship_strategy" : "FORWARD",
      "side" : "second"
    } ]
  } ]
}
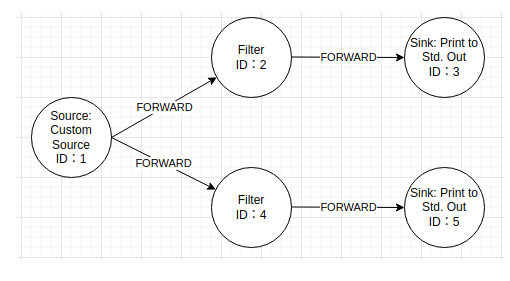
这样就很明显了,Filter分流,Source会把数据发两次,一次给ID=2 的FilterOperator ,一次给ID=4 的FilterOperator,然后进行过滤分别转发给下一个Sink,而 SideOutput,Source直接把数据分发给Process,Process然后分别在内部根据逻辑转发给不同的Sink。
这下就很清楚了,SideOutput 是优于Filter ,Filter的方式会对数据进行两个过滤,SideOutput是只有一次。
验证
nc -lk 9999
1
2
3
4
5
6
7
8
9
10
执行代码
SideOutput输出:
SideOuput:1
1
SideOuput:2
2
SideOuput:3
3
SideOuput:4
4
SideOuput:5
5
SideOuput:6
6
SideOuput:7
7
SideOuput:8
8
SideOuput:9
9
SideOuput:0
0
Filter输出:
filter % 2 == 0 ,value:1
filter % 2 != 0 ,value:1
1
filter % 2 == 0 ,value:2
2
filter % 2 != 0 ,value:2
filter % 2 == 0 ,value:3
filter % 2 != 0 ,value:3
3
filter % 2 == 0 ,value:4
4
filter % 2 != 0 ,value:4
filter % 2 == 0 ,value:5
filter % 2 != 0 ,value:5
5
filter % 2 == 0 ,value:6
6
filter % 2 != 0 ,value:6
filter % 2 == 0 ,value:7
filter % 2 != 0 ,value:7
7
filter % 2 == 0 ,value:8
8
filter % 2 != 0 ,value:8
filter % 2 == 0 ,value:9
filter % 2 != 0 ,value:9
9
filter % 2 == 0 ,value:0
0
filter % 2 != 0 ,value:0
结果和我们说的一样
结论
Filter 不建议使用在分流场景,只是一个过滤器
SideOutput 推荐使用分流场景


【推荐】国内首个AI IDE,深度理解中文开发场景,立即下载体验Trae
【推荐】编程新体验,更懂你的AI,立即体验豆包MarsCode编程助手
【推荐】抖音旗下AI助手豆包,你的智能百科全书,全免费不限次数
【推荐】轻量又高性能的 SSH 工具 IShell:AI 加持,快人一步
· TypeScript + Deepseek 打造卜卦网站:技术与玄学的结合
· Manus的开源复刻OpenManus初探
· AI 智能体引爆开源社区「GitHub 热点速览」
· 从HTTP原因短语缺失研究HTTP/2和HTTP/3的设计差异
· 三行代码完成国际化适配,妙~啊~
2020-03-08 ElasticSearch 入门