【一】time模块
【1】表示时间的三种方式
- 时间戳
- 元组(struct_time)
- 格式化的时间字符串:
- 格式化的时间字符串(Fromat String):'1999-12-06'
【2】时间转换
(1)导入时间模块
import time
(2)时间戳
[1]生成时间戳
import time
time_str = time.time()
print(time_str, type(time_str))
- 时间戳是指格林威治时间1970年01月01日00时00分00秒(北京时间1970年01月01日08时00分00秒)起至现在的总秒数。
- 时间戳是使用数字签名技术产生的数据,签名的对象包括了原始文件信息、签名参数、签名时间等信息。
- 时间戳系统用来产生和管理时间戳,对签名对象进行数字签名产生时间戳,以证明原始文件在签名时间之前已经存在。
[2]时间戳转换为时间元组(UTC时间)
import time
time_str = time.time()
print(time.gmtime(time_str))
[3]时间戳转换为时间元组(当地时间)
- 当地时间。例如我们现在在北京执行这个方法:与UTC时间相差8小时,UTC时间+8小时 = 北京时间
import time
time_str = time.time()
print(time.localtime(time_str))
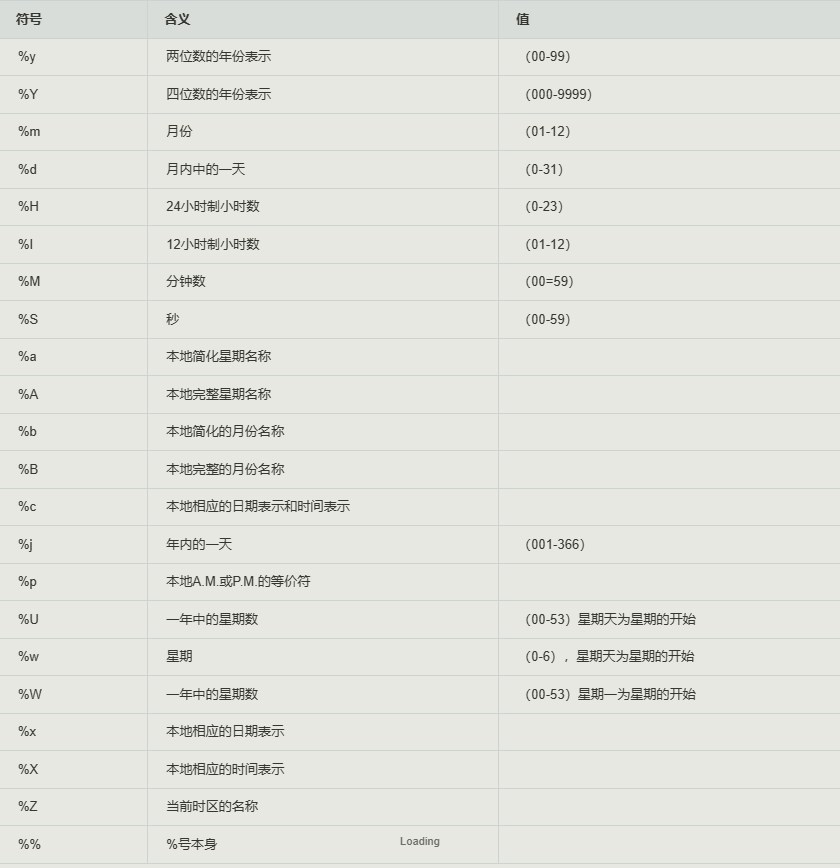
(3)时间字符串(strftime)
import time
time_now = time.strftime("%Y-%m-%d %X")
print(time_now)
time_now_new = time.strftime("%Y-%m-%d %H-%M-%S")
print(time_now_new)
(4)时间元组
- localtime将一个时间戳转换为当前时区的struct_time
import time
date_time = time.localtime()
print(date_time)
print(date_time.tm_year)
print(date_time.tm_mon)
print(date_time.tm_mday)
print(date_time.tm_wday)
print(date_time.tm_yday)
print(date_time[0])
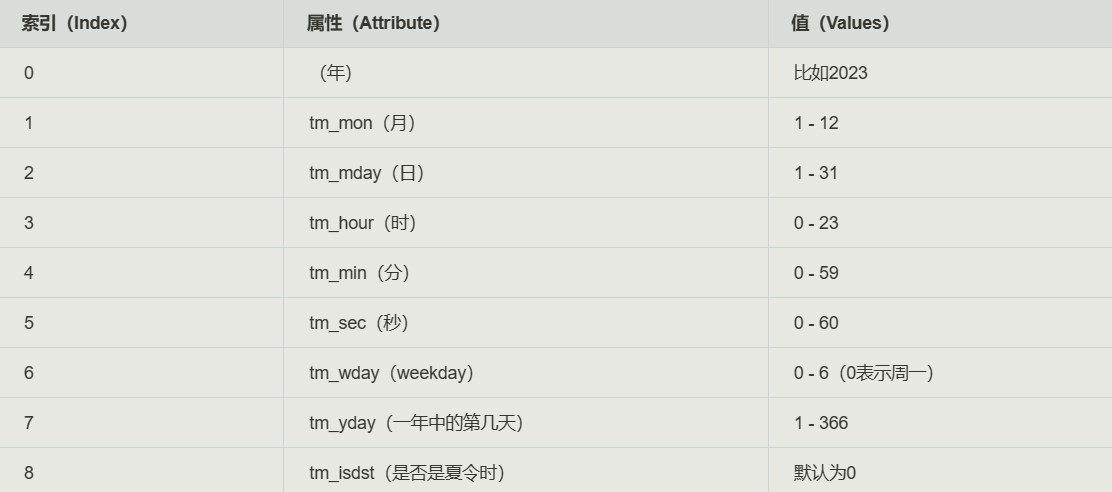
- struct_time 元组共有9个元素共九个元素:
- (年,月,日,时,分,秒,一年中第几周,一年中第几天等)
(5)结构化时间
[1]time.strftime(结构化时间--->时间字符串)
import time
time_str = time.strftime("%Y-%m-%d %X")
print(time_str)
print(time.localtime(time.time()))
time_local = time.strftime("%Y-%m-%d", time.localtime(time.time()))
print(time_local)
[2]time.mktime(时间戳--->元组时间戳)
import time
print(time.time())
time_tuple = time.localtime(time.time())
time_str = time.mktime(time_tuple)
print(time_str)
[3]time.strptime(时间字符串-->时间元组)
import time
time_str = time.strptime("2024-4-19", "%Y-%m-%d")
print(time_str)
time_local = time.strptime("4/19/2024", "%m/%d/%Y")
print(time_local)
[4]time.asctime(结构化时间--> %a %b %d %H:%M:%S %Y串)
import time
time_str = time.asctime(time.localtime(time.time()))
print(time_str)
time_local = time.asctime()
print(time_local)
- time.ctime(时间戳)
- 时间戳 --> %a %b %d %H:%M:%S %Y串
- 如果不传参数,直接返回当前时间的格式化串
import time
time_str = time.ctime(time.time())
print(time_str)
time_local = time.ctime()
print(time_local)
【3】总结
【二】datetime模块
(1)导入模块
import datetime
(2)自定义日期并格式化
res = datetime.date(2020,8,9)
print(res)
(3)获取本地时间
[1]年月日
import datetime
now_date = datetime.date.today()
print(now_date)
[2]年月日时分秒
import datetime
now_time = datetime.datetime.today()
print(now_time)
- 无论是年月日,还是年月日时分秒对象
- 都可以调用以下方法获取针对性的数据
[3]timedelta 时间对象
import datetime
now_day = datetime.date.today()
time_change = datetime.timedelta(days=8)
print(now_day + time_change)
print(now_day - time_change)
[4]日期对象与timedelta之间的关系
- 日期对象 = 日期对象 +/- timedelta对象
- timedelta对象 = 日期对象 +/- 日期对象
import datetime
day_now = datetime.date.today()
day_to = datetime.timedelta(days=6)
print(day_now)
print(day_to)
now_date = day_now + day_to
print(now_date)
print(type(now_date))
lta2 = day_now - now_date
print(lta2)
print(type(lta2))
birthday = datetime.date(1976, 11, 24)
now_date = datetime.date.today()
today = datetime.date.today()
days = now_date - birthday
print('生日:{}'.format(birthday))
print('今天的日期:{}'.format(today))
print('距离生日还有{}天'.format(days))
【三】os模块
【1】文件路径相关的操作
(1)获取当前文件绝对路径(abspath)
import os
file_path = os.path.abspath(__file__)
print(file_path)
(2)获取当前文件所在文件夹路径(dirname)
import os
file_path = os.path.dirname(__file__)
print(file_path)
(3)判断当前路径是否存在(exists)
import os
file_path_one = r'E:\PythonProjects\07常用模块学习'
is_true_one = os.path.exists(file_path_one)
print(is_true_one)
file_path_two = r'E:\PythonProjects\07常用模块学习\img'
is_true_two = os.path.exists(file_path_two)
print(is_true_two)
(4)拼接文件路径(join)
import os
BASE_DIR = os.path.dirname(__file__)
print(BASE_DIR)
file_name = 'img'
file_path = os.path.join(BASE_DIR, file_name)
print(file_path)
(5)切割路径(split)
import os
BASE_DIR = os.path.abspath(__file__)
file_path_list = os.path.split(BASE_DIR)
print(file_path_list)
(6)获取结尾文件/文件夹名(basename)
import os
BASE_DIR = os.path.dirname(__file__)
file_path = os.path.join(BASE_DIR, 'img')
print(file_path)
is_true = os.path.basename(file_path)
print(is_true)
file_path_one = os.path.abspath(__file__)
print(file_path_one)
print(os.path.basename(file_path_one))
(7)当前路径是否是文件(isfile)
import os
BASE_DIR = os.path.dirname(__file__)
print(BASE_DIR)
file_path = os.path.abspath(__file__)
print(file_path)
is_true_one = os.path.isfile(BASE_DIR)
print(is_true_one)
is_true_two = os.path.isfile(file_path)
print(is_true_two)
8)当前路径是否为绝对路径(isabs)
import os
file_path_one = r'E:\PythonProjects\07常用模块学习'
file_path_two = r'../07常用模块学习'
is_true_one = os.path.isabs(file_path_one)
print(is_true_one)
is_true_two = os.path.isabs(file_path_two)
print(is_true_two)
(9)当前文件目录是否存在
import os
file_path_one = r'E:\PythonProjects\07常用模块学习'
file_path_two = r'../07常用模块学习'
is_true_one = os.path.isdir(file_path_one)
print(is_true_one)
is_true_two = os.path.isdir(file_path_two)
print(is_true_two)
(10)获取当前文件或目录的最后访问时间(getatime)
import os, time
BASE_DIR = os.path.dirname(__file__)
file_path = os.path.abspath(__file__)
file_base_time = os.path.getatime(BASE_DIR)
print(file_base_time)
print(time.strftime("%Y-%m-%d %H-%M-%S", time.localtime(file_base_time)))
file_time = os.path.getatime(file_path)
print(time.strftime("%Y-%m-%d %H-%M-%S", time.localtime(file_time)))
(11)获取当前文件或者目录的创建时间(getctime)
import os, time
BASE_DIR = os.path.dirname(__file__)
file_path = os.path.abspath(__file__)
file_base_time = os.path.getctime(BASE_DIR)
print(file_base_time)
print(time.strftime("%Y-%m-%d %H-%M-%S", time.localtime(file_base_time)))
file_time = os.path.getctime(file_path)
print(time.strftime("%Y-%m-%d %H-%M-%S", time.localtime(file_time)))
(12)返回当前文件或路径的最后修改时间(getmtime)
import os, time
BASE_DIR = os.path.dirname(__file__)
file_path = os.path.abspath(__file__)
file_base_time = os.path.getmtime(BASE_DIR)
print(file_base_time)
print(time.strftime("%Y-%m-%d %H-%M-%S", time.localtime(file_base_time)))
file_time = os.path.getmtime(file_path)
print(time.strftime("%Y-%m-%d %H-%M-%S", time.localtime(file_time)))
(13)返回当前文件的大小(getsize)
import os
BASE_DIR = os.path.dirname(__file__)
file_path = os.path.abspath(__file__)
file_base_time = os.path.getsize(BASE_DIR)
print(file_base_time)
file_time = os.path.getsize(file_path)
print(file_time)
【补充】获取当前系统信息
print(os.sep)
print(os.linesep)
print(os.pathsep)
print(os.name)
【记住的重点】
【四】random模块
import random
【1】随即小数
print(random.random())
print(random.uniform(1, 3))
【2】随机整数
(1)随机区间整数(randint)
import random
res = random.randint(1, 5)
print(res)
(2)随机区间奇偶数(randrange)
import random
res_one = random.randrange(1, 10, 2)
print(res_one)
【3】随机返回值
(1)随机返回一个(choice)
import random
choice = ["Chosen", 'chosen', 'Meng', 18]
res = random.choice(choice)
print(res)
(2)随机指定个数(sample)
import random
choice = ["Chosen", 'chosen', 'Meng', 18]
res = random.sample(choice,k=3)
print(res)
【4】打乱顺序(shuffle)
import random
item = [1, 3, 5, 7, 9]
random.shuffle(item)
print(item)
random.shuffle(item)
print(item)
【5】随机生成验证码
import random
def get_verify_code(n):
code = ''
for i in range(n):
random_int = str(random.randint(0, 9))
random_upper = chr(random.randint(65, 90))
random_lower = chr(random.randint(97, 122))
temp = random.choice([random_int, random_upper, random_lower])
code += temp
return code
res = get_verify_code(6)
print(res)
【五】logging模块
import logging
import logging.config
import os
import sys
try:
import coloredlogs
except Exception as e:
if str(e) == "No module named 'coloredlogs'":
pass
CONSOLE_LOG_LEVEL = "INFO"
FILE_LOG_LEVEL = "DEBUG"
STANDARD_FORMAT = '[%(asctime)s][%(threadName)s:%(thread)d][task_id:%(name)s][%(filename)s:%(lineno)d][%(levelname)s][%(message)s]'
SIMPLE_FORMAT = '[%(levelname)s][%(asctime)s][%(filename)s:%(lineno)d]%(message)s'
'''
参数详解:
-1.%(asctime)s: 时间戳,表示记录时间
-2.%(threadName)s: 线程名称
-3.%(thread)d: 线程ID
-4.task_id:%(name)s: 任务ID,即日志记录器的名称
-5.%(filename)s: 发出日志调用的源文件名
-6.%(lineno)d: 发出日志调用的源代码行号
-7.%(levelname)s: 日志级别,如DEBUG、INFO、WARNING、ERROR、CRITICAL等
-8.%(message)s: 日志消息正文
'''
BASE_DIR = os.path.dirname(__file__)
LOG_PATH = os.path.join(BASE_DIR, "logs")
os.makedirs(LOG_PATH, exist_ok=True)
LOG_FILE_PATH = os.path.join(LOG_PATH, 'Logs.log')
LOGGING_DIC = {
'version': 1,
'disable_existing_loggers': False,
'formatters': {
'standard': {
'format': STANDARD_FORMAT,
'datefmt': '%Y-%m-%d %H:%M:%S'
},
'simple': {
'format': SIMPLE_FORMAT
},
},
'filters': {},
'handlers': {
'console': {
'level': CONSOLE_LOG_LEVEL,
'class': 'logging.StreamHandler',
'formatter': 'simple'
},
'default': {
'level': FILE_LOG_LEVEL,
'class': 'logging.handlers.RotatingFileHandler',
'formatter': 'standard',
'filename': LOG_FILE_PATH,
'maxBytes': 1024 * 1024 * 5,
'backupCount': 5,
'encoding': 'utf-8',
},
},
'loggers': {
'': {
'handlers': ['default', 'console'],
'level': 'DEBUG',
'propagate': True,
},
},
}
def set_logging_color(name='', ):
logging.config.dictConfig(LOGGING_DIC)
logger = logging.getLogger(name)
coloredlogs.install(logger=logger)
logger.propagate = False
coloredFormatter = coloredlogs.ColoredFormatter(
fmt='[%(name)s] %(asctime)s %(funcName)s %(lineno)-3d %(message)s',
level_styles=dict(
debug=dict(color='white'),
info=dict(color='blue'),
warning=dict(color='yellow', bright=True),
error=dict(color='red', bold=True, bright=True),
critical=dict(color='black', bold=True, background='red'),
),
field_styles=dict(
name=dict(color='white'),
asctime=dict(color='white'),
funcName=dict(color='white'),
lineno=dict(color='white'),
)
)
ch = logging.StreamHandler(stream=sys.stdout)
ch.setFormatter(fmt=coloredFormatter)
logger.addHandler(hdlr=ch)
logger.setLevel(level=logging.DEBUG)
return logger
def get_logger(name='', ):
'''
:param name: 日志等级
:return:
'''
logging.config.dictConfig(LOGGING_DIC)
logger = logging.getLogger(name)
return logger
if __name__ == "__main__":
logger_nor = get_logger(name='user')
logger_nor.info(msg="this is a info message")
logger_col = set_logging_color()
logger_col.info(msg="this is a debug message")
【六】hashlib模块
【1】摘要算法
- 摘要算法又称哈希算法、散列算法。
- 它通过一个函数,把任意长度的数据转换为一个长度固定的数据串(通常用16进制的字符串表示)。
- 摘要算法就是通过摘要函数f()对任意长度的数据data计算出固定长度的摘要digest
- 摘要算法之所以能指出数据是否被篡改过,就是因为摘要函数是一个单向函数
- 计算f(data)很容易,但通过digest反推data却非常困难。
- 而且,对原始数据做一个bit的修改,都会导致计算出的摘要完全不同。
【2】基础
import hashlib
import json
def one():
data = 'my name is dream'
data = data.encode('utf-8')
md5 = hashlib.md5()
md5.update(data)
print(md5.hexdigest())
print(md5.digest())
return md5.hexdigest()
【3】加盐
- 如果以明文保存用户口令,如果数据库泄露,所有用户的口令就落入黑客的手里。
- 此外,网站运维人员是可以访问数据库的,也就是能获取到所有用户的口令。
- 正确的保存口令的方式是不存储用户的明文口令,而是存储用户口令的摘要
- 由于常用口令的MD5值很容易被计算出来
- 所以,要确保存储的用户口令不是那些已经被计算出来的常用口令的MD5
- 这一方法通过对原始口令加一个复杂字符串来实现,俗称“加盐”
import random
def get_verify_code(n):
code = ''
for i in range(n):
random_int = str(random.randint(0, 9))
random_upper = chr(random.randint(65, 90))
random_lower = chr(random.randint(97, 122))
temp = random.choice([random_int, random_upper, random_lower])
code += temp
return code
def two():
code = get_verify_code(6)
data = 'my name is dream'
data = data.encode('utf-8')
code = code.encode('utf-8')
md5 = hashlib.md5()
md5.update(code)
md5.update(data)
print(md5.hexdigest())
print(md5.digest())
return md5.hexdigest()
'''
one = one()
two = two()
print(one) # a9824cf2cad8240003dd8071a4b315d3
print(two)
# 78e3b0d87878746c81a6aee148139459
# c0cd81c3993a68867f1ebeeb7e0b2535
# df200c13893926f399290212fbf8dc26
# b44c1a5212b71ee2bde885dfd8e0484e
'''
【4】案例
def save_data(data):
    with open('user_data.json', 'w') as fp:
        json.dump(obj=data, fp=fp)


def read_data():
    with open('user_data.json', 'r') as fp:
        data = json.load(fp=fp)

    return data


def get_username_password():
    username = input("username :>>>> ").strip()
    password = input("password :>>>> ").strip()
    return username, password


def encrypt_password(password, salt):
    data = password + salt
    data = data.encode()
    md5 = hashlib.md5()
    md5.update(data)
    return md5.hexdigest()


def register():
    username, password = get_username_password()
    print(password)
    salt = get_verify_code(6)
    password = encrypt_password(password, salt)
    save_data({'username': username, "password": password,'salt':salt})


def login():
    username, password = get_username_password()
    user_data_dict = read_data()
    print(password)
    salt = user_data_dict['salt']
    password = encrypt_password(password, salt)
    if username == user_data_dict['username'] and password == user_data_dict['password']:
        print(f"登录成功!")
    else:
        print("登录失败")
register()
login()


【推荐】国内首个AI IDE,深度理解中文开发场景,立即下载体验Trae
【推荐】编程新体验,更懂你的AI,立即体验豆包MarsCode编程助手
【推荐】抖音旗下AI助手豆包,你的智能百科全书,全免费不限次数
【推荐】轻量又高性能的 SSH 工具 IShell:AI 加持,快人一步
· 25岁的心里话
· 闲置电脑爆改个人服务器(超详细) #公网映射 #Vmware虚拟网络编辑器
· 基于 Docker 搭建 FRP 内网穿透开源项目(很简单哒)
· 零经验选手,Compose 一天开发一款小游戏!
· 一起来玩mcp_server_sqlite,让AI帮你做增删改查!!