Minimal Api<四>修改服务层并调用仓储层实现操作数据库
一、第二节的时候我们把服务层命名了application。现在改一下,换成Module层会好些。排除application项目,新增Module类库。结构如下。

 public class SysUserServer : IServerBase
    {
        public ISysUserRepository sysUserRepository { get; set; }

        public void AddServiceRoute(IEndpointRouteBuilder app)
        {
            app.MapGet("/api/helloapp", () => "Hello app!");

            app.MapPost("/api/AddUser", () =>
            {
                using (var serviceScope = app.ServiceProvider.CreateScope()) //手动高亮
                {
                    //这里要使用serviceScope.ServiceProvider
                    sysUserRepository = serviceScope.ServiceProvider.GetRequiredService<ISysUserRepository>();
                    Core.Entity.SysUser user = new Core.Entity.SysUser();
                    user.Id = Guid.NewGuid().ToString();
                    user.Name = "admin";
                    user.Password = "admin888";
                    sysUserRepository.Insert(user);
                    return new HttpResult<Core.Entity.SysUser>() { code = 200, message = "新增成功。" };
                }
            });

            app.MapPut("/api/helloapp", () => "Hello app!");

            app.MapDelete("/api/helloapp", () => "Hello app!");
        }
    }
 public static class ServerMapExtensions
    {
        public static IServiceCollection AddService(this IServiceCollection services,ConfigurationManager configure)
        {
            var results = GetAssemblys(configure);
            if (results != null)
            {
                IEnumerable<Type> servers = results.SelectMany(x => x.GetTypes()
                .Where(t => !t.IsAbstract && typeof(IServerBase).IsAssignableFrom(t) &&
                             t != typeof(IServerBase) && t.IsPublic
                             ));
                foreach (var server in servers)
                {
                    services.AddSingleton(typeof(IServerBase), server);
                }
            }
            return services;
        }

        public static void MapService(this IEndpointRouteBuilder builder)
        {
            foreach (var newCarterModule in builder.ServiceProvider.GetServices<IServerBase>())
            {
                newCarterModule.AddServiceRoute(builder);
            }
        }

        public static HashSet<Assembly> GetAssemblys(ConfigurationManager configure)
        {
            var path = Directory.GetCurrentDirectory();
            string[] fileInfos = Directory.GetFiles(path).Where(f => f.IndexOf("Module.dll", StringComparison.OrdinalIgnoreCase) >= 0).ToArray();
            var env = configure.GetSection("Environment");
            if (env!=null&&env.Value.ToString().Equals("DEV", StringComparison.OrdinalIgnoreCase))
            {
                fileInfos = Directory.GetFiles(path + @"/bin/Debug/net6.0").Where(f => f.IndexOf("Module.dll", StringComparison.OrdinalIgnoreCase) >= 0).ToArray();
            }
            if (fileInfos == null || fileInfos.Length <= 0)
            {
                return default(HashSet<Assembly>);
            }
            var _AssemblyLoadContext = new AssemblyLoadContext(Guid.NewGuid().ToString("N"), true);
            var assemblys = new HashSet<Assembly>();
            foreach (var file in fileInfos)
            {
                using (var fs = new FileStream(file, FileMode.Open, FileAccess.Read))
                {
                    var assembly = _AssemblyLoadContext.LoadFromStream(fs);
                    assemblys.Add(assembly);
                }
            }
            return assemblys;
        }
    }
二、注入到管道
builder.Services.AddService(builder.Configuration);
app.MapService();
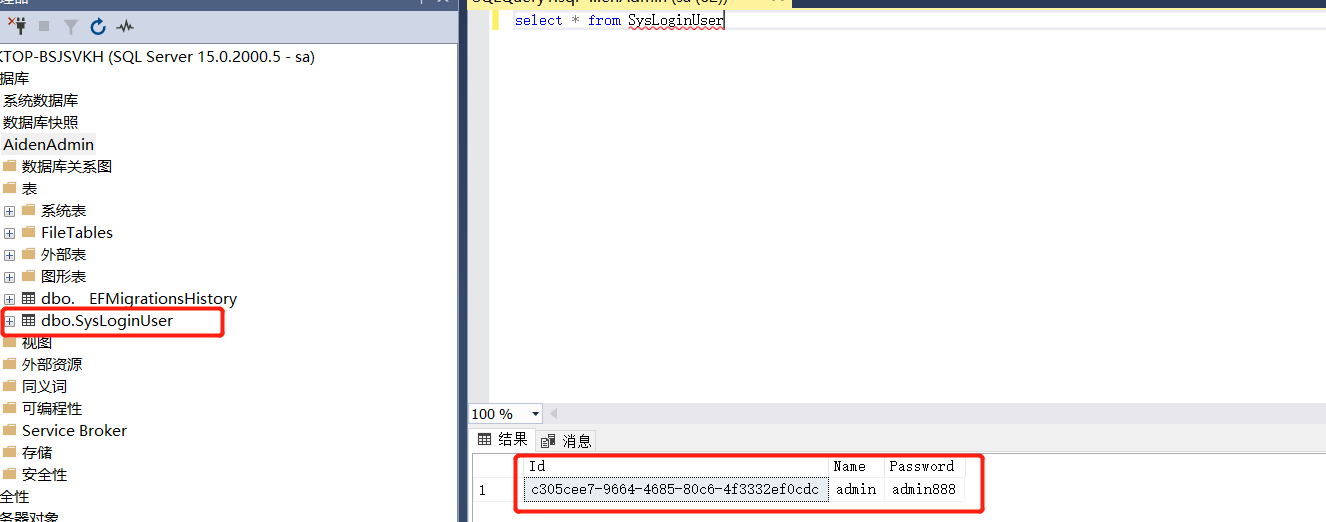
三、修改一下修改一下EF相关,由于第一节创建的表SysUsers和sqlserver的系统表有冲突。改一下名字。然后执行codefirst的命令生成新的表名。
 public class AidenDbContext:DbContext
    {
        /// <summary>
        ///
        /// </summary>
        /// <param name="options"></param>
        public AidenDbContext(DbContextOptions<AidenDbContext> options) : base(options)
        {

        }
        /// <summary>
        ///
        /// </summary>
        public DbSet<SysUser> SysLoginUser{ get; set; }


    }
四、在给entity类定义一个基类,SysUser继承它。

 public interface IEntity
    {
    }
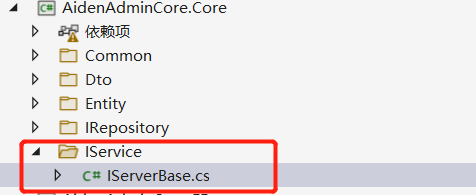
五、删掉原来的severProxy文件夹,新增IService文件夹

    public interface IServerBase
    {
        /// <summary>
        /// 添加api路由进管道
        /// </summary>
        /// <param name="app"></param>
        void AddServiceRoute(IEndpointRouteBuilder app);
    }
六、做完上面那些,运行一下,运行adduser,返回新增成功的消息,说明成功了。

七、查看下数据表,数据是否真的插入成功了。


