UITableView 分组显示数据与搜索,数据源plist [xcode 4.4.1]
本篇学习目标:
1. 学习使用读取plist
2. UITableView 分组显示数据
3. UITableView 加上搜索功能
不‘费’话,直接跟我一起来,进行如下操作:
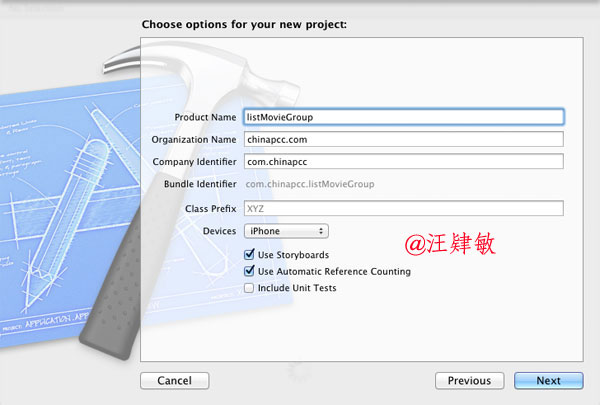
1. 创建项目,在此略过,可以参考前篇文章,在此只显示一个项目的图:
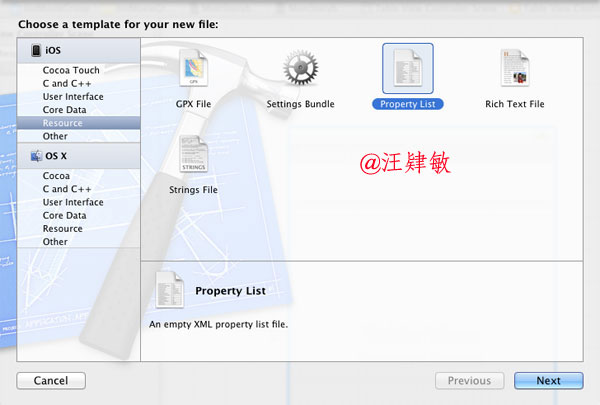
2. 添加plist 文件
PS: plist文件是什么呢? 它全名是:Property List,属性列表文件,它是一种用来存储串行化后的对象的文件。属性列表文件的扩展名为.plist,因此通常被称为plist文件。文件是xml格式 的。Plist文件通常用于储存用户设置,也可以用于存储捆绑的信息。
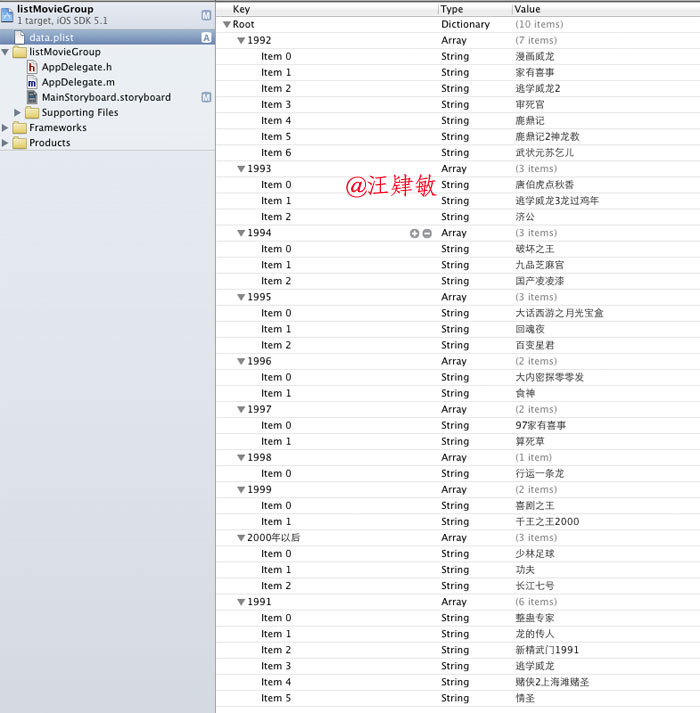
data.plist 文件图片如下:
查看源代码,如下
 View Code

<!DOCTYPE plist PUBLIC "-//Apple//DTD PLIST 1.0//EN" "http://www.apple.com/DTDs/PropertyList-1.0.dtd">
<plist version="1.0">
<dict>
<key>1992</key>
<array>
<string>漫画威龙</string>
<string>家有喜事</string>
<string>逃学威龙2</string>
<string>审死官</string>
<string>鹿鼎记</string>
<string>鹿鼎记2神龙教</string>
<string>武状元苏乞儿</string>
</array>
<key>1993</key>
<array>
<string>唐伯虎点秋香</string>
<string>逃学威龙3龙过鸡年</string>
<string>济公</string>
</array>
<key>1994</key>
<array>
<string>破坏之王</string>
<string>九品芝麻官</string>
<string>国产凌凌漆</string>
</array>
<key>1995</key>
<array>
<string>大话西游之月光宝盒</string>
<string>回魂夜</string>
<string>百变星君</string>
</array>
<key>1996</key>
<array>
<string>大内密探零零发</string>
<string>食神</string>
</array>
<key>1997</key>
<array>
<string>97家有喜事</string>
<string>算死草</string>
</array>
<key>1998</key>
<array>
<string>行运一条龙</string>
</array>
<key>1999</key>
<array>
<string>喜剧之王</string>
<string>千王之王2000</string>
</array>
<key>2000年以后</key>
<array>
<string>少林足球</string>
<string>功夫</string>
<string>长江七号</string>
</array>
<key>1991</key>
<array>
<string>整蛊专家</string>
<string>龙的传人</string>
<string>新精武门1991</string>
<string>逃学威龙</string>
<string>赌侠2上海滩赌圣</string>
<string>情圣</string>
</array>
</dict>
</plist>
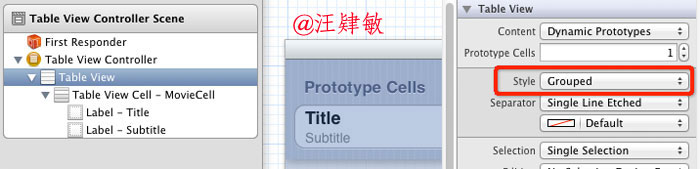
3. 删除默认的ViewController,添加TableViewController(如果不清楚,请查看前篇文章)。
属性设置如下:
- Style: 显示风格,上篇我们使用是基本的Basic,这里我们使用Subtitle,简单的讲,就是标题与字幕的显示。
- Identifier: cell 的身份ID,这个是必须设置,我们这里设置成MovieCell
- Accessory: 详细内容时的图标,我们这里设置成Detail Disclosure

4. 添加myDataViewController类,继承于UITableViewController,先修改 myDataViewController.h 文件
// myDataViewController.h
// listMovieGroup
//
// Created by tony on 12-8-31.
// Copyright (c) 2012年 chinapcc.com. All rights reserved.
//
#import <UIKit/UIKit.h>
@interface myDataViewController : UITableViewController
{
// 电影标题数据字典
NSDictionary *movieTitles;
// 年份的数组
NSArray *years;
}
// 属性:电影标题数据字典
@property (nonatomic,retain) NSDictionary *movieTitles;
// 属性:年份的数组
@property (nonatomic,retain) NSArray *years;
@end
5. 修改 myDataViewController.m 文件
添加属性与加载时的代码:
@synthesize movieTitles;
- (void)viewDidLoad
{
// 获取plist资源文件地址
NSString *path = [[NSBundle mainBundle] pathForResource:@"data" ofType:@"plist"];
// 这是写入日记,为了调试,不是必须的
NSLog(@"资源文件路径: %@",path);
// 根据文件路径获取字典内容
NSDictionary *dict = [[NSDictionary alloc] initWithContentsOfFile:path];
self.movieTitles = dict;
// 根据字典,获得年份的数组
NSArray *array = [[movieTitles allKeys] sortedArrayUsingSelector:@selector(compare:)];
self.years = array;
// 原来应该有如下两句,xcode 4.2以后,启用ARC之后,就不需要了
//[dict release];
//[array release];
[super viewDidLoad];
}
- (void)viewDidUnload
{
self.movieTitles = nil;
self.years = nil;
[super viewDidUnload];
}
6. 绑定数据源
{
// 返回节点数,就是显示几个组,我们这里是按年份显示数据
return [years count];
}
- (NSInteger)tableView:(UITableView *)tableView numberOfRowsInSection:(NSInteger)section
{
// 获取当前节点的年份
NSString *year = [years objectAtIndex:section];
// 根据节点的年份,获取字节点的数组
NSArray *movieSection = [movieTitles objectForKey:year];
// 返回当前字节的数量
return [movieSection count];
}
- (UITableViewCell *)tableView:(UITableView *)tableView cellForRowAtIndexPath:(NSIndexPath *)indexPath
{
static NSString *CellIdentifier = @"MovieCell";
UITableViewCell *cell = [tableView dequeueReusableCellWithIdentifier:CellIdentifier];
// 获取节点的年份
NSString *year = [years objectAtIndex:[indexPath section]];
// 获取年份内所有电影数组
NSArray *movie = [movieTitles objectForKey:year];
// 根据数组获取电影的标题
cell.textLabel.text = [movie objectAtIndex:[indexPath row]];
cell.detailTextLabel.text = @"主演:周星驰";
return cell;
}
-(NSString *)tableView:(UITableView *)tableView titleForHeaderInSection:(NSInteger)section
{
// 获取年份
NSString *year = [years objectAtIndex:section];
return year;
}
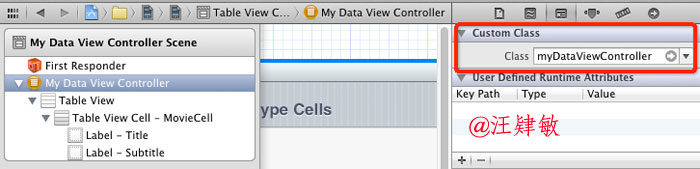
7. 不要忘记以下两个地方需要设置一下:
设置显示分组风格:
设置与控制器绑定:
8. 恭喜你完成,可以看一看效果

9. 结束了吗?还没有,还要有一个搜索,接下来吧。。。添加一个搜索框
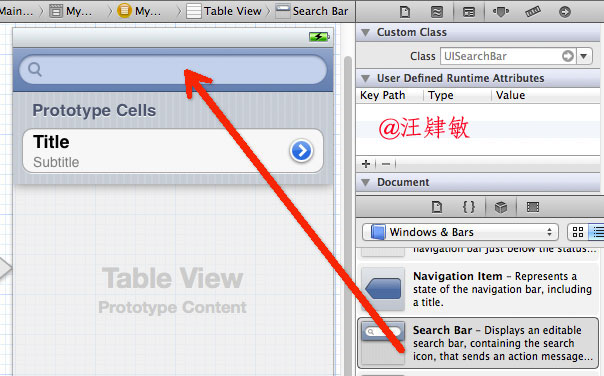
10. 修改 myDataViewController.h 文件
View Code
// myDataViewController.h
// listMovieGroup
//
// Created by tony on 12-8-31.
// Copyright (c) 2012年 chinapcc.com. All rights reserved.
//
#import <UIKit/UIKit.h>
// 这里要实现一个委托 UISearchBarDelegate
@interface myDataViewController : UITableViewController<UISearchBarDelegate>
{
// 电影标题数据字典
NSDictionary *movieTitles;
// 年份的数组
NSArray *years;
// 这是与搜索框关联的对像
IBOutlet UISearchBar *searchBar;
// 标识:是否在搜索状态中
BOOL isSearchOn;
// 标识:是否能选择行
BOOL canSelectRow;
// 所有电影列表
NSMutableArray *listOfMovies;
// 搜索结果列表
NSMutableArray *searchResult;
}
// 属性:电影标题数据字典
@property (nonatomic,retain) NSDictionary *movieTitles;
// 属性:年份的数组
@property (nonatomic,retain) NSArray *years;
// 属性:搜索框
@property (nonatomic,retain) UISearchBar *searchBar;
// 方法:搜索电影列表
-(void) searchMoviesTableView;
@end
11. 修改 myDataViewController.m 文件 注解在代码中,请大家仔细看清楚
View Code
// myDataViewController.m
// listMovieGroup
//
// Created by tony on 12-8-31.
// Copyright (c) 2012年 chinapcc.com. All rights reserved.
//
#import "myDataViewController.h"
@interface myDataViewController ()
@end
@implementation myDataViewController
@synthesize years;
@synthesize movieTitles;
@synthesize searchBar;
- (id)initWithStyle:(UITableViewStyle)style
{
self = [super initWithStyle:style];
if (self) {
// Custom initialization
}
return self;
}
- (void)viewDidLoad
{
// 获取plist资源文件地址
NSString *path = [[NSBundle mainBundle] pathForResource:@"data" ofType:@"plist"];
// 这是写入日记,为了调试,不是必须的
NSLog(@"资源文件路径: %@",path);
// 根据文件路径获取字典内容
NSDictionary *dict = [[NSDictionary alloc] initWithContentsOfFile:path];
self.movieTitles = dict;
// 根据字典,获得年份的数组
NSArray *array = [[movieTitles allKeys] sortedArrayUsingSelector:@selector(compare:)];
self.years = array;
// 原来应该有如下两句,xcode 4.2以后,启用ARC之后,就不需要了
//[dict release];
//[array release];
// 设置视图的搜索框
self.tableView.tableHeaderView = searchBar;
searchBar.autocorrectionType = UITextAutocorrectionTypeYes;
// 初始化电影列表
listOfMovies = [[NSMutableArray alloc]init];
for(NSString *year in array)
{
NSArray *movies = [movieTitles objectForKey:year];
for (NSString *title in movies) {
[listOfMovies addObject:title];
}
}
// 初始化搜索结果数组
searchResult = [[NSMutableArray alloc] init];
// 设置状态
isSearchOn = NO;
canSelectRow = YES;
[super viewDidLoad];
}
- (void)viewDidUnload
{
self.movieTitles = nil;
self.years = nil;
self.searchBar = nil;
[super viewDidUnload];
}
- (BOOL)shouldAutorotateToInterfaceOrientation:(UIInterfaceOrientation)interfaceOrientation
{
return (interfaceOrientation == UIInterfaceOrientationPortrait);
}
#pragma mark - Table view data source
- (NSInteger)numberOfSectionsInTableView:(UITableView *)tableView
{
// 返回节点数,就是显示几个组,我们这里是按年份显示数据
if (isSearchOn) {
return 1; // 进入搜索状态,只有一个节点
} else {
return [years count];
}
}
- (NSInteger)tableView:(UITableView *)tableView numberOfRowsInSection:(NSInteger)section
{
if (isSearchOn)
{
return [searchResult count]; // 搜索结果的数量
}
else
{
// 获取当前节点的年份
NSString *year = [years objectAtIndex:section];
// 根据节点的年份,获取字节点的数组
NSArray *movieSection = [movieTitles objectForKey:year];
// 返回当前字节的数量
return [movieSection count];
}
}
- (UITableViewCell *)tableView:(UITableView *)tableView cellForRowAtIndexPath:(NSIndexPath *)indexPath
{
static NSString *CellIdentifier = @"MovieCell";
UITableViewCell *cell = [tableView dequeueReusableCellWithIdentifier:CellIdentifier];
if (isSearchOn) {
NSString *title = [searchResult objectAtIndex:indexPath.row];
cell.textLabel.text = title;
} else {
// 获取节点的年份
NSString *year = [years objectAtIndex:[indexPath section]];
// 获取年份内所有电影数组
NSArray *movie = [movieTitles objectForKey:year];
// 根据数组获取电影的标题
cell.textLabel.text = [movie objectAtIndex:[indexPath row]];
cell.detailTextLabel.text = @"主演:周星驰";
}
return cell;
}
-(NSString *)tableView:(UITableView *)tableView titleForHeaderInSection:(NSInteger)section
{
if (isSearchOn)
{
return nil;
}
else
{
// 获取年份
NSString *year = [years objectAtIndex:section];
return year;
}
}
/*
// Override to support conditional editing of the table view.
- (BOOL)tableView:(UITableView *)tableView canEditRowAtIndexPath:(NSIndexPath *)indexPath
{
// Return NO if you do not want the specified item to be editable.
return YES;
}
*/
/*
// Override to support editing the table view.
- (void)tableView:(UITableView *)tableView commitEditingStyle:(UITableViewCellEditingStyle)editingStyle forRowAtIndexPath:(NSIndexPath *)indexPath
{
if (editingStyle == UITableViewCellEditingStyleDelete) {
// Delete the row from the data source
[tableView deleteRowsAtIndexPaths:@[indexPath] withRowAnimation:UITableViewRowAnimationFade];
}
else if (editingStyle == UITableViewCellEditingStyleInsert) {
// Create a new instance of the appropriate class, insert it into the array, and add a new row to the table view
}
}
*/
/*
// Override to support rearranging the table view.
- (void)tableView:(UITableView *)tableView moveRowAtIndexPath:(NSIndexPath *)fromIndexPath toIndexPath:(NSIndexPath *)toIndexPath
{
}
*/
/*
// Override to support conditional rearranging of the table view.
- (BOOL)tableView:(UITableView *)tableView canMoveRowAtIndexPath:(NSIndexPath *)indexPath
{
// Return NO if you do not want the item to be re-orderable.
return YES;
}
*/
#pragma mark - Table view delegate
- (void)tableView:(UITableView *)tableView didSelectRowAtIndexPath:(NSIndexPath *)indexPath
{
// Navigation logic may go here. Create and push another view controller.
/*
<#DetailViewController#> *detailViewController = [[<#DetailViewController#> alloc] initWithNibName:@"<#Nib name#>" bundle:nil];
// ...
// Pass the selected object to the new view controller.
[self.navigationController pushViewController:detailViewController animated:YES];
*/
}
#pragma mark - 添加搜索方法与事件
// 事件:搜索框开始输入字符
-(void)searchBarTextDidBeginEditing:(UISearchBar *)searchBar
{
// 进入搜索状态
isSearchOn = YES;
// 不能选择行
canSelectRow = NO;
// 关闭滚动条的显示
self.tableView.scrollEnabled = NO;
}
// 事件:搜索框中文字发生变化触发
-(void) searchBar:(UISearchBar *)searchBar textDidChange:(NSString *)searchText
{
if ([searchText length]>0)
{
isSearchOn = YES;
canSelectRow = YES;
self.tableView.scrollEnabled = YES;
[self searchMoviesTableView];
}
else
{
isSearchOn = NO;
canSelectRow = NO;
self.tableView.scrollEnabled = NO;
}
[self.tableView reloadData];
}
// 方法:搜索结果
-(void) searchMoviesTableView
{
[searchResult removeAllObjects];
for (NSString *str in listOfMovies) {
NSRange titleResultsRange=[str rangeOfString:searchBar.text
options:NSCaseInsensitiveSearch];
if(titleResultsRange.length>0)
[searchResult addObject:str];
}
}
// 事件:键盘上的搜索按钮事件
-(void)searchBarSearchButtonClicked:(UISearchBar *)searchBar
{
[self searchMoviesTableView];
}
// 事件:搜索框里取消按钮事件
-(void)searchBarCancelButtonClicked:(UISearchBar *)searchBar
{
isSearchOn = NO;
canSelectRow = YES;
self.tableView.scrollEnabled = YES;
self.navigationItem.rightBarButtonItem = nil;
[self.searchBar resignFirstResponder];
[self.tableView reloadData];
}
@end
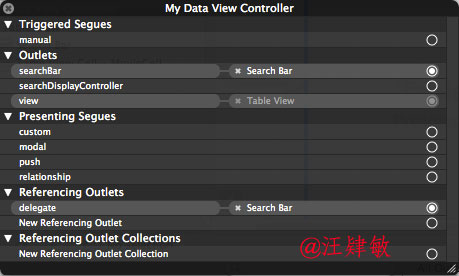
12. View与Controller 绑定一下关系(如何绑定?如有不懂的童鞋,请找谷老师)
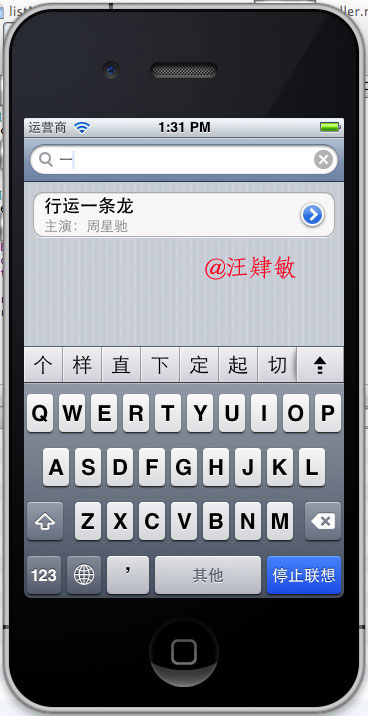
13. 最终效果图如下:
14. 附上代码地址:源代码
搞定,收工,开周例会
