abp(net core)+easyui+efcore实现仓储管理系统——使用 WEBAPI实现CURD (十二)
abp(net core)+easyui+efcore实现仓储管理系统目录
abp(net core)+easyui+efcore实现仓储管理系统——ABP总体介绍(一)
abp(net core)+easyui+efcore实现仓储管理系统——解决方案介绍(二)
abp(net core)+easyui+efcore实现仓储管理系统——领域层创建实体(三)
abp(net core)+easyui+efcore实现仓储管理系统——定义仓储并实现 (四)
abp(net core)+easyui+efcore实现仓储管理系统——创建应用服务(五)
abp(net core)+easyui+efcore实现仓储管理系统——展现层实现增删改查之控制器(六)
abp(net core)+easyui+efcore实现仓储管理系统——展现层实现增删改查之列表视图(七)
abp(net core)+easyui+efcore实现仓储管理系统——展现层实现增删改查之增删改视图(八)
abp(net core)+easyui+efcore实现仓储管理系统——展现层实现增删改查之菜单与测试(九)
abp(net core)+easyui+efcore实现仓储管理系统——使用 WEBAPI实现CURD (十一)
上接(abp(net core)+easyui+efcore实现仓储管理系统——使用 WEBAPI实现CURD (十一)),在这一篇文章中我们创建服务接口与服务实现类,并创建控制器类。
二、定义应用服务接口需要用到的分页类
为了在进行查询时使用, PagedSupplierResultRequestDto被用来将模块数据传递到基础设施层.
1. 在Visual Studio 2017的“解决方案资源管理器”中,右键单击“ABP.TPLMS.Application”项目,在弹出菜单中选择“添加” > “新建文件夹”,并重命名为“Suppliers”
2. 使用鼠标右键单击我们刚才创建的“Suppliers”文件夹,在弹出菜单中选择“添加” > “新建文件夹”,并重命名为“Dto”。
3.右键单击“Dto”文件夹,然后选择“添加” > “类”。 将类命名为 PagedSupplierResultRequestDto,然后选择“添加”。代码如下。
using Abp.Application.Services.Dto;
using System;
using System.Collections.Generic;
using System.Text;


namespace ABP.TPLMS.Supplier.Dto
{
     public class PagedSupplierResultRequestDto : PagedResultRequestDto
    {
        public string Keyword { get; set; }
     }
}
4.右键单击“Dto”文件夹,然后选择“添加” > “类”。 将类命名为 SupplierDto,然后选择“添加”。代码如下。
using Abp.Application.Services.Dto;
using Abp.AutoMapper;
using ABP.TPLMS.Entitys;
using System;
using System.Collections.Generic;
using System.Text;

namespace ABP.TPLMS.Suppliers.Dto
{

    [AutoMapFrom(typeof(Supplier))]
    public class SupplierDto : EntityDto<int>
    {

        public string Address { get; set; }

        public string Name { get; set; }
        public string Email { get; set; }

        public string Code { get; set; }
        public int Sex { get; set; }

        public string LinkName { get; set; }

        public int Status { get; set; }
        public string Tel { get; set; }
        public string Mobile { get; set; }

        public DateTime CreationTime { get; set; }
    }
}
5.右键单击“Dto”文件夹,然后选择“添加” > “类”。 将类命名为 CreateUpdateSupplierDto,然后选择“添加”。代码如下。
using Abp.Application.Services.Dto;
using Abp.AutoMapper;
using ABP.TPLMS.Entitys;
using System;
using System.Collections.Generic;
using System.ComponentModel.DataAnnotations;
using System.Text;


namespace ABP.TPLMS.Suppliers.Dto
{

    [AutoMapTo(typeof(Supplier))]
    public  class CreateUpdateSupplierDto : EntityDto<int>
    {

        public const int MaxLength = 255;
        [StringLength(MaxLength)]
        public string Address { get; set; }

        [Required]
        [StringLength(MaxLength)]
        public string Name { get; set; }

        [Required]
        [StringLength(MaxLength)]
        public string Email { get; set; }

        [Required]
        [StringLength(50)]
        public string Code { get; set; }
        public int Sex { get; set; }

        [StringLength(MaxLength)]
        public string LinkName { get; set; }
        public int Status { get; set; }

        [Required]
        [StringLength(MaxLength)]
        public string Tel { get; set; }

        [StringLength(MaxLength)]
        public string Mobile { get; set; }
    }
}
三、定义ISupplierAppService接口
6. 在Visual Studio 2017的“解决方案资源管理器”中,鼠标右键单击“Suppliers”文件夹,然后选择“添加” > “新建项”,在弹出对话框中选择“接口”。为应用服务定义一个名为 ISupplierAppService 的接口。代码如下。
using Abp.Application.Services;
using ABP.TPLMS.Suppliers.Dto;
using System;
using System.Collections.Generic;
using System.Text;

namespace ABP.TPLMS.Suppliers
{
    public interface ISupplierAppService : IAsyncCrudAppService<//定义了CRUD方法
             SupplierDto, //用来展示供应商
             int, //Supplier实体的主键
             PagedSupplierResultRequestDto, //获取供应商的时候用于分页
             CreateUpdateSupplierDto, //用于创建供应商
             CreateUpdateSupplierDto> //用于更新供应商
    {
    }
}
四、实现ISupplierAppService
7.在Visual Studio 2017的“解决方案资源管理器”中,右键单击“Suppliers”文件夹,然后选择“添加” > “新建项”,在弹出对话框中选择“类”。为应用服务定义一个名为 SupplierAppService 的服务类。代码如下。
using Abp.Application.Services;
using Abp.Domain.Repositories;
using ABP.TPLMS.Entitys;
using ABP.TPLMS.Suppliers.Dto;
using System;
using System.Collections.Generic;
using System.Text;


namespace ABP.TPLMS.Suppliers
{

   public class SupplierAppService :AsyncCrudAppService<Supplier, SupplierDto, int, PagedSupplierResultRequestDto,
                            CreateUpdateSupplierDto, CreateUpdateSupplierDto>,ISupplierAppService

    {

        public SupplierAppService(IRepository<Supplier, int> repository)
            : base(repository)
    {

    }

        public override Task<SupplierDto> Create(CreateUpdateSupplierDto input)
        {
            var sin = input;
            return base.Create(input);
        }
    }
}
五 创建SupplierController继承自TPLMSControllerBase
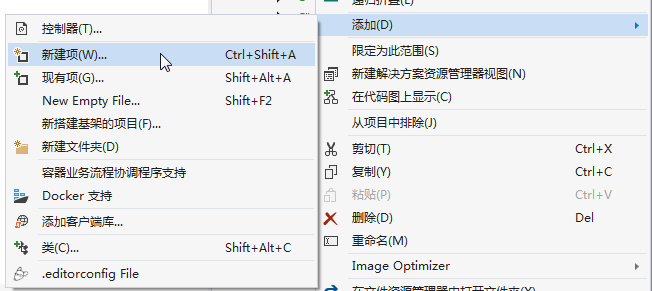
1. 在Visual Studio 2017的“解决方案资源管理器”中,右键单击在领域层“ABP.TPLMS.Web.Mvc”项目中的Controller目录。 选择“添加” > “新建项…”。如下图。

2. 在弹出对话框“添加新项-ABP.TPLMS.Web.Mvc”中选择“控制器类”,然后在名称输入框中输入“SupplierController”,然后点击“添加”按钮。如下图。

3.在SupplierController.cs文件中输入如下代码,通过构造函数注入对应用服务的依赖。
using System;
using System.Collections.Generic;
using System.Linq;
using System.Threading.Tasks;
using Abp.Application.Services.Dto;
using Abp.AspNetCore.Mvc.Authorization;
using Abp.Runtime.Validation;
using ABP.TPLMS.Controllers;
using ABP.TPLMS.Suppliers;
using ABP.TPLMS.Suppliers.Dto;
using ABP.TPLMS.Web.Models.Supplier;
using Microsoft.AspNetCore.Mvc;
using Microsoft.EntityFrameworkCore;


namespace ABP.TPLMS.Web.Controllers
{

    [AbpMvcAuthorize]
    public class SupplierController : TPLMSControllerBase
    {
        const int MaxNum= 10;
        // GET: /<controller>/
        public async Task<IActionResult> Index()
        {

            var module = (await _supplierAppService.GetAll(new PagedSupplierResultRequestDto { MaxResultCount = MaxNum })).Items;
           // Paging not implemented yet
            SupplierDto cuModule = module.First();
            var model = new SupplierListViewModel
            {

                Supplier = cuModule,
                Suppliers=module

            };
            return View(model);
        }

        private readonly ISupplierAppService _supplierAppService;

        public SupplierController(ISupplierAppService supplierAppService)
        {
            _supplierAppService = supplierAppService;

        }
        public async Task<ActionResult> EditSupplierModal(int moduleId)

        {
            var module = await _supplierAppService.Get(new EntityDto<int>(moduleId));
            CreateUpdateSupplierDto cuSupplier = AutoMapper.Mapper.Map<CreateUpdateSupplierDto>(module);
            var model = new EditSupplierModalViewModel
            {
                Supplier = cuSupplier

            };
            return View("_EditSupplierModal", model);
        }
    }
}


 浙公网安备 33010602011771号