Spring框架的基本使用(IOC部分)
Spring是一个轻量级的控制反转(IoC)和面向切面(AOP)的容器框架。
-
Spring的好处
1.方便解耦,简化开发:
- Spring就是一个大工厂,专门负责生成Bean,可以将所有对象创建和依赖关系维护由Spring管理
2.AOP编程的支持:
- Spring提供面向切面编程,可以方便的实现对程序进行权限拦截、运行监控等功能
- 声明式事务的支持:只需要通过配置就可以完成对事务的管理,而无需手动编程
3.方便程序的测试:
- Spring对Junit4支持,可以通过注解方便的测试Spring程序
4.方便集成各种优秀框架:
- Spring不排斥各种优秀的开源框架,其内部提供了对各种优秀框架(如:Struts、Hibernate、MyBatis、Quartz等)的支持
5.降低JavaEE API的使用难度Spring:
- 对JavaEE开发中一些难用的API(JDBC、JavaMail、远程调webservice用等),都提供了封装,使这些API应用难度大大降低
-
控制反转IOC
Inverse of Control 反转控制的概念,就是将原本在程序中手动创建UserService对象的控制权,交由Spring框架管理,简单说,就是创建UserService对象控制权被反转到了Spring框架。
示例:
/src/beans.xml
<?xml version ="1.0"encoding ="UTF-8"?>
<beans xmlns= "http://www.springframework.org/schema/beans"
        xmlns:xsi = "http://www.w3.org/2001/XMLSchema-instance"
        xsi:schemaLocation = "http://www.springframework.org/schema/beans
        http://www.springframework.org/schema/beans/spring-beans.xsd" >
    <bean id="userService" class="com.chichung.service.impl.UserServiceImpl">
    </bean>
</beans>
如果表示层需要new一个service对象,则:
public class Test {
    public static void main(String[] args) {
//        UserService service = new UserServiceImpl();     // 原来创建service对象的方式
//        service.add();
        // Spring框架创建对象的方式
        ApplicationContext context = new ClassPathXmlApplicationContext("beans.xml");
        UserService userService1 = (UserService) context.getBean("userService");
        userService1.add();
    }
}
-
依赖注入DI(xml)
Dependency Injection 依赖注入,在Spring框架负责创建Bean对象时,动态的将依赖对象注入到Bean组件。
示例:
在UserService中提供一个get/set的name方法,在beans.xml中通过property去注入
public class UserServiceImpl implements UserService {
    private String name;

    public String getName() {
        return name;
    }

    public void setName(String name) {
        this.name = name;
    }

    @Override
    public void add() {
        System.out.println("业务层"+name);
    }
}
/src/beans.xml
<?xml version ="1.0"encoding ="UTF-8"?>
<beans xmlns= "http://www.springframework.org/schema/beans"
        xmlns:xsi = "http://www.w3.org/2001/XMLSchema-instance"
        xsi:schemaLocation = "http://www.springframework.org/schema/beans
        http://www.springframework.org/schema/beans/spring-beans.xsd" >
    <bean id="userService" class="com.chichung.service.impl.UserServiceImpl">
        <property name="name" value="chichung"></property>
    </bean>
</beans>
还有另一种方法是用命名空间p来注入,很少用
<?xml version ="1.0"encoding ="UTF-8"?>
<beans xmlns= "http://www.springframework.org/schema/beans"
        xmlns:xsi = "http://www.w3.org/2001/XMLSchema-instance"
        xmlns:p = "http://www.springframework.org/schema/p"
        xsi:schemaLocation = "http://www.springframework.org/schema/beans
        http://www.springframework.org/schema/beans/spring-beans.xsd" >
    <bean id="userService" class="com.chichung.service.impl.UserServiceImpl" p:name="chichung">
    </bean>
</beans>
如果没有setter方法,也可以通过构造方法来注入。
例如有一个Student类
public class Student {
    private String name;
    private String password;
    private int age;

    public Student(String name, String password) {
        this.name = name;
        this.password = password;
    }

    public Student(String name, int age) {
        this.name = name;
        this.age = age;
    }

    @Override
    public String toString() {
        return "Student{" +
                "name='" + name + '\'' +
                ", password='" + password + '\'' +
                ", age=" + age +
                '}';
    }
}
有两种方式:
1.示例:
<bean id="stu" class="com.chichung.Bean.Student">
        <constructor-arg name="name" value="chichung"></constructor-arg>
        <constructor-arg name="password" value="123"></constructor-arg>
</bean>
2.示例:
<bean id="stu" class="com.chichung.Bean.Student">
        <constructor-arg index="0" value="chichung" type="java.lang.String"></constructor-arg>
        <constructor-arg index="1" value="123" type="int"></constructor-arg>
</bean>
-
加载Spring容器的三种方式
1.类路径获取配置文件(常用)
public class Test {
    public static void main(String[] args) {
        ApplicationContext context = new ClassPathXmlApplicationContext("beans.xml");
        UserService userService1 = (UserService) context.getBean("userService");
        userService1.add();
    }
}
2.文件系统路径获取配置文件
public class Test {
    public static void main(String[] args) {
        ApplicationContext context = new FileSystemXmlApplicationContext("/home/chichung/桌面/JavaeePr/MavenTest2/target/classes/beans.xml");
        UserService service = (UserService) context.getBean("userService");
        service.add();
    }
}
3.使用BeanFactory(少用)
public class Test {
    public static void main(String[] args) {
        BeanFactory BeanFactory = new XmlBeanFactory(new FileSystemResource("/home/chichung/桌面/JavaeePr/MavenTest2/target/classes/beans.xml"));
        UserService service = (UserService) BeanFactory.getBean("userService");
        service.add();
    }
}
注意:
BeanFactory 采取延迟加载,第一次getBean时才会初始化Bean。而ApplicationContext是即时加载的。
-
装配Bean(xml)的三种方式
1.new 实现类
Bean类:
public class UserServiceImpl implements UserService {

    @Override
    public void add() {
        System.out.println("业务层");
    }
}
xml写法:
<bean id="userService" class="com.chichung.service.impl.UserServiceImpl">
    </bean>
2.通过静态工厂创建对象
静态工厂:
public class UserServiceStaticFactory {
    public static UserService createUserService(){
        return new UserServiceImpl();
    }
}
xml写法:
<bean id="userService2" class="com.chichung.factory.UserServiceStaticFactory" factory-method="createUserService">
取得Spring容器的对象:
public class Test {
    public static void main(String[] args) {
        ApplicationContext context = new ClassPathXmlApplicationContext("beans.xml");
        UserService service2 = (UserService) context.getBean("userService2");
        service2.add();
    }
}
3.通过实例工厂创建对象
实例工厂:
public class UserServiceFactory {
    public UserService createUserService(){
        return new UserServiceImpl();
    }
}
xml写法:
<bean id="factory" class="com.chichung.factory.UserServiceFactory"></bean>
    <bean id="userService3" factory-bean="factory" factory-method="createUserService"></bean>
取得Spring容器的对象:
public class Test {
    public static void main(String[] args) {
        ApplicationContext context = new ClassPathXmlApplicationContext("beans.xml");
        UserService service3 = (UserService) context.getBean("userService3");
        service3.add();
    }
}
-
Bean的作用域
| 类别 | 说明 |
| singleton |
在Spring IoC容器中仅存在一个Bean实例,Bean以单例方式存在,默认值 |
| prototype |
每次从容器中调用Bean时,都返回一个新的实例,即每次调用getBean()时 ,相当于执行new XxxBean() |
| request |
每次HTTP请求都会创建一个新的Bean,该作用域仅适用于WebApplicationContext环境 |
| session |
同一个HTTP Session 共享一个Bean,不同Session使用不同Bean,仅适用于WebApplicationContext 环境 |
| globalSession |
一般用于Portlet应用环境,该作用域仅适用于WebApplicationContext 环境 |
示例:

-
Spring表达式(SpEL)
#{123}、#{'jack'} : 数字、字符串
#{beanId}:另一个bean引用
#{beanId.propName}:操作数据
#{beanId.toString()}:执行方法
#{T(类).字段|方法}:静态方法或字段
-
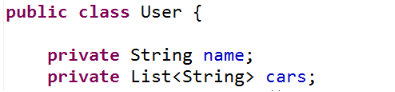
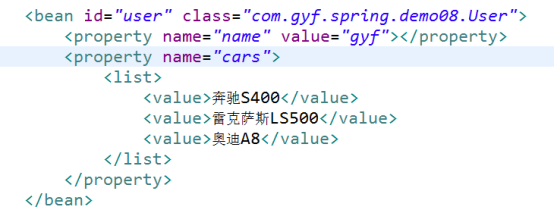
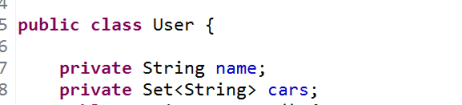
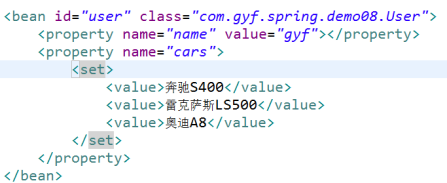
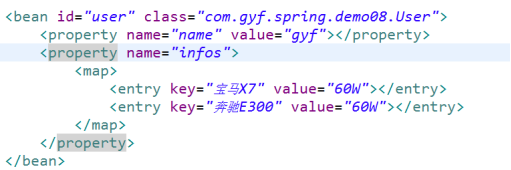
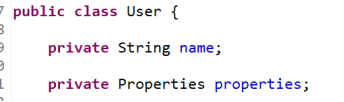
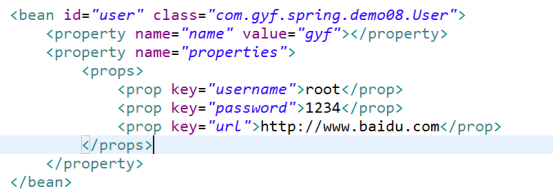
集合注入
1.List
2. Set
3.Map
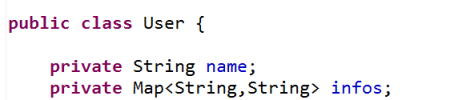
4.Properties
5.数组

-
反转控制(注解方式)
使用注解方式需要先开启注解。
beans.xml:
<?xml version ="1.0"encoding ="UTF-8"?>
<beans xmlns= "http://www.springframework.org/schema/beans"
       xmlns:xsi = "http://www.w3.org/2001/XMLSchema-instance"
       xmlns:context = "http://www.springframework.org/schema/context"
       xsi:schemaLocation = "http://www.springframework.org/schema/beans
                             http://www.springframework.org/schema/beans/spring-beans.xsd
                             http://www.springframework.org/schema/context
                             http://www.springframework.org/schema/context/spring-context.xsd">
    <!--开启注解-->
    <context:annotation-config></context:annotation-config>
    <!--注解的位置-->
    <context:component-scan base-package="com.chichung.Bean"></context:component-scan>
</beans>
1.@Component可以取代<bean class="">
示例:
bean.java
@Component
public class Student {
...
}
test.java
public class Test {
    public static void main(String[] args) {
        ApplicationContext context = new ClassPathXmlApplicationContext("beans.xml");
        Student student = context.getBean(Student.class);
        System.out.println(student);
    }
}
2.@Component("[id]")可以取代<bean id="" class="">
bean.java
@Component("stu")
public class Student {
...
}
test.java
public class Test1 {
    public static void main(String[] args) {
        ApplicationContext context = new ClassPathXmlApplicationContext("beans.xml");
        Student student = (Student) context.getBean("stu");
        System.out.println(student);
    }
}
3.对于web开发的三层架构,提供了@Respository、@Service、@Controller快速使用。
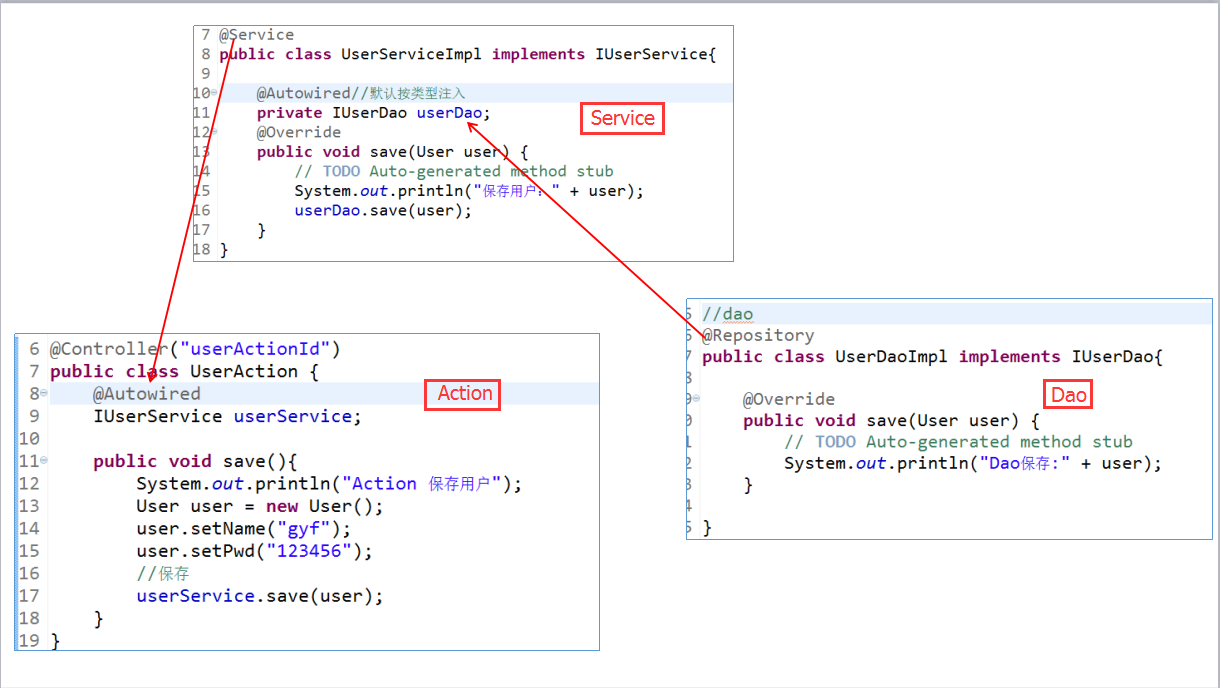
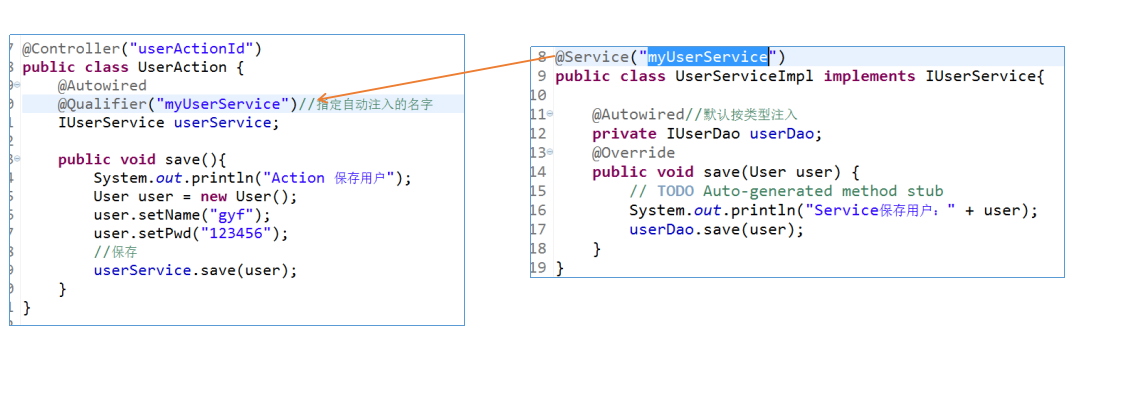
4.除了@Autowired,还可以用@Qualifier("")或者@Resource("")指定自动注入的名字

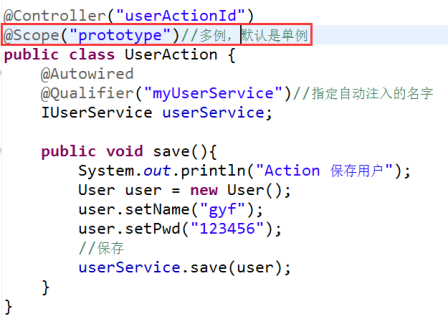
5.注解设置Bean的作用域@Scope

 浙公网安备 33010602011771号