L2TP over IPsec
1.查看系统版本和IP地址。
[root@BYGD-VPN /]# cat /etc/redhat-release
CentOS Linux release 7.4.1708 (Core)
[root@BYGD-VPN /]# ifconfig
eth0: flags=4163<UP,BROADCAST,RUNNING,MULTICAST> mtu 1500
inet 172.20.14.161 netmask 255.255.240.0 broadcast 172.20.15.255
ether 00:16:3e:00:4d:c5 txqueuelen 1000 (Ethernet)
RX packets 117524 bytes 88933018 (84.8 MiB)
RX errors 0 dropped 0 overruns 0 frame 0
TX packets 47421 bytes 8344709 (7.9 MiB)
TX errors 0 dropped 0 overruns 0 carrier 0 collisions 0
lo: flags=73<UP,LOOPBACK,RUNNING> mtu 65536
inet 127.0.0.1 netmask 255.0.0.0
loop txqueuelen 1 (Local Loopback)
RX packets 0 bytes 0 (0.0 B)
RX errors 0 dropped 0 overruns 0 frame 0
TX packets 0 bytes 0 (0.0 B)
TX errors 0 dropped 0 overruns 0 carrier 0 collisions 0
2.安装所需的软件包
yum install -y make gcc gmp-devel xmlto bison flex xmlto libpcap-devel lsof vim-enhanced man
yum install xl2tpd -y
yum install libreswan -y
3.修改IPSEC配置文件
/etc/ipsec.conf
config setup
protostack=netkey
dumpdir=/var/run/pluto/
nat_traversal=yes
virtual_private=%v4:10.0.0.0/8,%v4:192.168.0.0/16,%v4:172.16.0.0/12,%v4:25.0.0.0/8,%v4:100.64.0.0/10,%v6:fd00::/8,%v6:fe80::/10
include /etc/ipsec.d/*.conf
/etc/ipsec.d/l2tp_psk.conf
conn L2TP-PSK-NAT
rightsubnet=vhost:%priv
also=L2TP-PSK-noNAT
conn L2TP-PSK-noNAT
authby=secret
pfs=no
auto=add
keyingtries=3
dpddelay=40
dpdtimeout=130
dpdaction=clear
leftnexthop=%defaultroute
rightnexthop=%defaultroute
rekey=no
ikelifetime=8h
keylife=1h
type=transport
left=172.20.14.161 (自己网卡IP地址,海外阿里云适用)
leftprotoport=17/1701
right=%any
rightprotoport=17/%any
4.设置IPSEC VPN预共享密钥,服务器配置文件/etc/ipsec.secrets
[root@BYGD-VPN /]# cat /etc/ipsec.d/ipsec.secrets
172.20.14.161 %any: PSK "1234@abcd"
5.修改服务器内核参数,服务器配置文件/etc/sysctl.conf,然后sysctl -p使得内核参数立即生效
[root@BYGD-VPN /]# cat /etc/sysctl.conf
net.ipv6.conf.all.disable_ipv6 = 1
net.ipv6.conf.default.disable_ipv6 = 1
net.ipv6.conf.lo.disable_ipv6 = 1
vm.swappiness = 0
net.ipv4.neigh.default.gc_stale_time=120
net.ipv4.conf.all.rp_filter=0
net.ipv4.conf.default.rp_filter=0
net.ipv4.conf.default.arp_announce = 2
net.ipv4.conf.all.arp_announce=2
net.ipv4.tcp_max_tw_buckets = 5000
net.ipv4.tcp_syncookies = 1
net.ipv4.tcp_max_syn_backlog = 1024
net.ipv4.tcp_synack_retries = 2
net.ipv4.conf.lo.arp_announce=2
net.ipv4.ip_forward = 1
net.ipv4.conf.default.accept_redirects = 0
net.ipv4.conf.default.send_redirects = 0
net.ipv4.conf.default.accept_source_route = 0
6.检查IPsec服务
[root@BYGD-VPN /]# ipsec setup start
[root@BYGD-VPN /]# ipsec verify
Verifying installed system and configuration files
Version check and ipsec on-path [OK]
Libreswan 3.20 (netkey) on 3.10.0-693.2.2.el7.x86_64
Checking for IPsec support in kernel [OK]
NETKEY: Testing XFRM related proc values
ICMP default/send_redirects [OK]
ICMP default/accept_redirects [OK]
XFRM larval drop [OK]
Pluto ipsec.conf syntax [OK]
Two or more interfaces found, checking IP forwarding [OK]
Checking rp_filter [ENABLED]
/proc/sys/net/ipv4/conf/eth0/rp_filter [ENABLED]
rp_filter is not fully aware of IPsec and should be disabled
Checking that pluto is running [OK]
Pluto listening for IKE on udp 500 [OK]
Pluto listening for IKE/NAT-T on udp 4500 [OK]
Pluto ipsec.secret syntax [OK]
Checking 'ip' command [OK]
Checking 'iptables' command [OK]
Checking 'prelink' command does not interfere with FIPS [OK]
Checking for obsolete ipsec.conf options [OBSOLETE KEYWORD]
Warning: ignored obsolete keyword 'nat_traversal'(貌似默认就是nat_traversal,不需要配置文件中nat_traversal=yes了)
Warning: ignored obsolete keyword 'oe'
ipsec verify: encountered 3 errors - see 'man ipsec_verify' for help
7.修改xl2tpd主配置文件
[root@BYGD-VPN /]# cat /etc/xl2tpd/xl2tpd.conf
[global]
listen-addr = 172.20.14.161(自己网卡IP地址,海外阿里云适用)
ipsec saref = yes
[lns default]
ip range = 10.255.255.2-10.255.255.254
local ip = 10.255.255.1
require chap = yes
refuse pap = yes
require authentication = yes
name = LinuxVPNserver
ppp debug = yes
pppoptfile = /etc/ppp/options.xl2tpd
length bit = yes
8.修改xl2tpd中PPP特性配置文件
[root@BYGD-VPN xl2tpd]# cat /etc/ppp/options.xl2tpd
require-mschap-v2
ipcp-accept-local
ipcp-accept-remote
ms-dns 8.8.8.8
ms-dns 1.1.1.1
noccp
auth
crtscts
idle 1800
mtu 1410
mru 1410
nodefaultroute
debug
lock
proxyarp
connect-delay 5000
9.创建用户账号和密码
[root@BYGD-VPN xl2tpd]# cat /etc/ppp/chap-secrets
# Secrets for authentication using CHAP
# client server secret IP addresses
user1 * abcd@1234 *
10.关闭防火墙
systemctl stop firewalld
systemctl disable firewalld
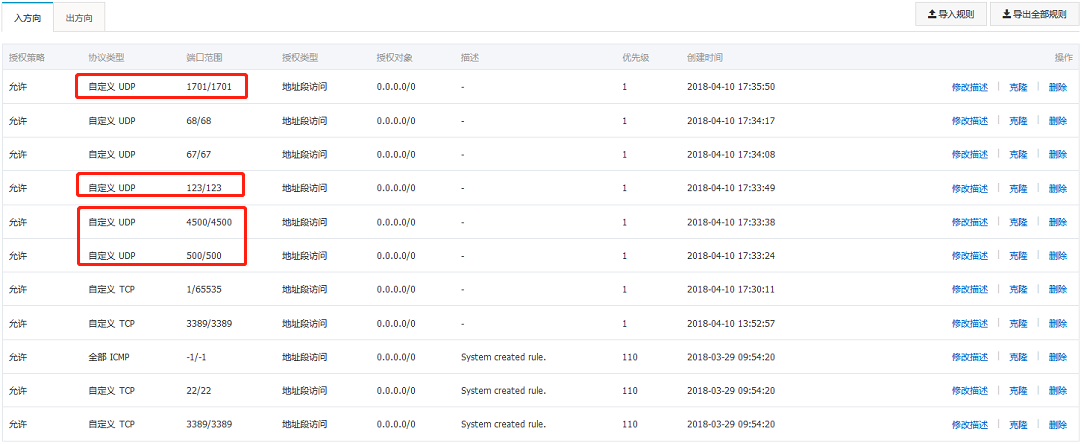
别忘了开启 Openstack安全组策略。
11.配置iptables
yum install -y iptables
yum install -y iptables-services
iptables -t nat -A POSTROUTING -s 10.255.255.0/24 -o eth0 -j MASQUERADE
[root@BYGD-VPN xl2tpd]# cat /etc/sysconfig/iptables
iptables -t nat -A POSTROUTING -s 10.255.255.0/24 -o eth0 -j MASQUERADE
systemctl start iptables
systemctl enable iptables
12.启动服务
systemctl start ipsec
systemctl start xl2tpd
systemctl enable ipsec
systemctl enable xl2tpd

 浙公网安备 33010602011771号