Silverlight弹出对话框的几种方法
在SL中经常会用到一些对话框,这里介绍几种常用的对话框及制作方法。
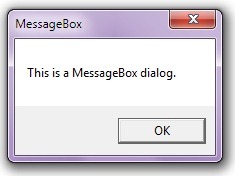
1. 利用MessageBox显示对话框
优点:简单,只要调用MessageBox.Show方法就可以显示出来。
缺点:单调,不够友好,只能用于一般的信息提示。
说明:没什么好说的。:)
1 |
MessageBox.Show("This is a MessageBox dialog.", "MessageBox", MessageBoxButton.OK); |
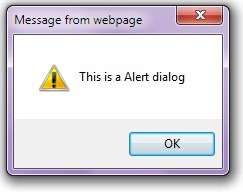
2. 利用Window.Alert或JS显示对话框
优点:和MessageBox一样,简单易用,还可以同JS进行交互,显示Confirm对话框等。
缺点:也和MessageBox一样,不够专业。 :)
说明:其实是借助JS来显示对话框,这种用法的优势,还是在于同JS的交互,如果只是显示Message,不如用MessageBox来的方便。
1 |
HtmlPage.Window.Alert("This is a Alert dialog"); |
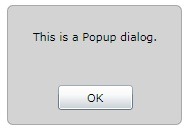
3. 利用Popup显示自制对话框
优点:自定义,可以同SL的APP结合的非常好。
缺点:稍显复杂,不利于分开维护
说明:利用Popup来显示对画框,这里使用代码的方式动态创建一个Border控件,并通过改变Popup.IsOpen来显示和隐藏对话框。
代码:
01 |
// create a Border instance for message show |
02 |
private Border CreateMessageBox(string message, RoutedEventHandler clickHandler) |
03 |
{ |
04 |
Border border = new Border(); |
05 |
border.Width = 175; |
06 |
border.Height = 120; |
07 |
border.CornerRadius = new CornerRadius(5); |
08 |
border.BorderThickness = new Thickness(1.5); |
09 |
border.BorderBrush = new SolidColorBrush(Colors.DarkGray); |
10 |
border.Background = new SolidColorBrush(Colors.LightGray); |
11 |
12 |
Grid grid = new Grid(); |
13 |
grid.RowDefinitions.Add(new RowDefinition() { Height = new GridLength(60) }); |
14 |
grid.RowDefinitions.Add(new RowDefinition() { Height = new GridLength(60) }); |
15 |
16 |
TextBlock tb = new TextBlock() |
17 |
{ |
18 |
Text = message, |
19 |
VerticalAlignment = VerticalAlignment.Center, |
20 |
HorizontalAlignment = HorizontalAlignment.Center |
21 |
}; |
22 |
Grid.SetRow(tb, 0); |
23 |
grid.Children.Add(tb); |
24 |
25 |
Button bn = new Button() |
26 |
{ |
27 |
Content = "OK", |
28 |
Width = 75, |
29 |
Height = 25, |
30 |
HorizontalAlignment = HorizontalAlignment.Center, |
31 |
VerticalAlignment = VerticalAlignment.Center |
32 |
}; |
33 |
Grid.SetRow(bn, 1); |
34 |
bn.Click += clickHandler; |
35 |
grid.Children.Add(bn); |
36 |
37 |
border.Child = grid; |
38 |
39 |
return border; |
40 |
} |
41 |
42 |
// use Popup to show a message |
43 |
Popup popup = new Popup(); |
44 |
Border border = this.CreateMessageBox("This is a Popup dialog.", (m, n) => popup.IsOpen = false); |
45 |
popup.Child = border; |
46 |
popup.IsOpen = true; |
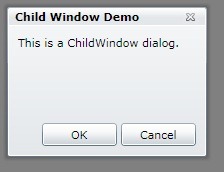
4. 使用ChildWindow作为对话框
优点:简单易用,效果很好,可以自定义,在单独的文件中利用维护。
缺点:需要设计合理的和重复利用的ChildWindow,用于减少文件的增加。
说明:推荐使用的对话框模式,无论是显示效果,还是开发过程,以及后期的维护,都是很有优势的一种模式。这里没有什么要说的,新建一个ChildWindow,增加一个TextBlock用于显示Message。这里就不把ChildWindow的代码贴出来了,大家可以下载源代码。
代码:
5. 利用控件的Visibility达到对话框的效果
这里就不贴图了,和Popup的那个图一样。
优点:支持大部分控件。
缺点:不太好用,应该算是一种Workaround。
说明:这种做法在SL2的时候很常用,在SL3后,有了ChildWindow,基本就废弃了吧。不过,如果在一个Canvas中做一个可以随意的Dialog,还是一个很不错的选择。这里使用Popup中创建的Border,并加载到Grid中。
01 |
UIElement elem = this.LayoutRoot.Children.FirstOrDefault((m) => m is Border); |
02 |
if (elem == null) |
03 |
{ |
04 |
Border border = null; |
05 |
border = this.CreateMessageBox("This is a Custom dialog.", (m, n) => |
06 |
{ |
07 |
border.Visibility = Visibility.Collapsed; // close dialog |
08 |
}); |
09 |
Grid.SetRow(border, 2); |
10 |
Grid.SetColumn(border, 0); |
11 |
Grid.SetColumnSpan(border, 3); |
12 |
this.LayoutRoot.Children.Add(border); |
13 |
elem = border; |
14 |
} |
15 |
elem.Visibility = Visibility.Visible; // show dialog |
![]() 作者:chhuic
作者:chhuic
出处:http://chhuic.cnblogs.com
本文版权归作者和博客园共有,欢迎转载,但未经作者同意必须保留此段声明,且在文章页面明显位置给出原文连接,否则保留追究法律责任的权利。


