笔记3:uni-app可拖动顶部选项卡切换导航栏scroll-view可滚动视图区域
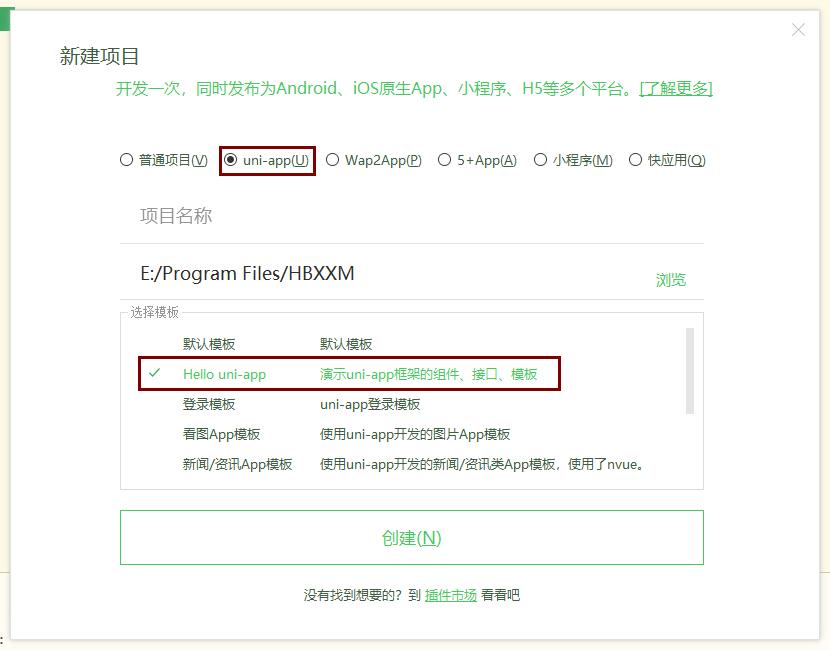
1,创建uni-app,选择hello模板,

2,找到文件/pages/template/tabbar/tabbar.nvue,查看class

3,在现项目下创建index.vue编写,也可内置模板一样
<view class="tabs">
    <scroll-view scroll-x class="scroll-h" >
    <block v-for="(tab,index) in tabBars" :key="tab.id">
    <view class="uni-tab-item" :class="{'uni-tab-item-title-active' :tabIndex==index}" @tap="tabtap(index)">
    <!--1 {{tab.name}} -->
    <!--2 <text class="uni-tab-item-title" :class="tabIndex==index ? 'uni-tab-item-title-active' : ''">{{tab.name}}</text> -->
    </view>
    </block>
    </scroll-view>
</view>
4,在data(){}写上切换数据文字
return {
    tabIndex:0,
    tabBars:[
        { name:"关注",id:"guanzhu"},
        { name:"推荐",id:"tuijian"},
        { name:"体育",id:"tiyu"},
        { name:"热点",id:"redian"},
        { name:"财经",id:"caijing"},
        { name:"娱乐",id:"yule"},
        { name:"军事",id:"junshi"},
        { name:"历史",id:"lishi"},
        { name:"本地",id:"bendi"},
    ]
}
5,在文件tabbar.nvue找到style下class的css
.tabs {
    flex: 1;
    flex-direction: column;
    overflow: hidden;
    background-color: #ffffff;
    /* #ifdef MP-ALIPAY || MP-BAIDU */
    height: 100vh;
    /* #endif */
}

.scroll-h {
    width: 750upx;
    height: 80upx;
    flex-direction: row;
    /* #ifndef APP-PLUS */
    white-space: nowrap;
    /* #endif */
    /* flex-wrap: nowrap; */
    /* border-color: #cccccc;
    border-bottom-style: solid;
    border-bottom-width: 1px; */
}

.line-h {
    height: 1upx;
    background-color: #cccccc;
}

.uni-tab-item {
    /* #ifndef APP-PLUS */
    display: inline-block;
    /* #endif */
    flex-wrap: nowrap;
    padding-left: 34upx;
    padding-right: 34upx;
}

.uni-tab-item-title {
    color: #555;
    font-size: 30upx;
    height: 80upx;
    line-height: 80upx;
    flex-wrap: nowrap;
    /* #ifndef APP-PLUS */
    white-space: nowrap;
    /* #endif */
}

.uni-tab-item-title-active {
    color: #007AFF;
}
6,点击显示当前卡片按钮导航
methods: {
    tabtap(index){
        this.tabIndex=index;
    }
},
7,效果

8,可以添加修改样式。
9,相关内置组件scroll-view属性可滚动视图区域。
笔者:Chervehong
本文以学习、研究和分享为主,欢迎转载,但必须在文章页面明显位置给出原文连接。
本文仅是作者观点,如文中有不妥或者错误的地方还望高手的你指出,以免误人子弟。
如果觉得本文对你有所帮助不如【推荐】一下!
再次感谢您耐心的读完本篇文章。
本文仅是作者观点,如文中有不妥或者错误的地方还望高手的你指出,以免误人子弟。
如果觉得本文对你有所帮助不如【推荐】一下!
再次感谢您耐心的读完本篇文章。


