第一个Spring Boot项目
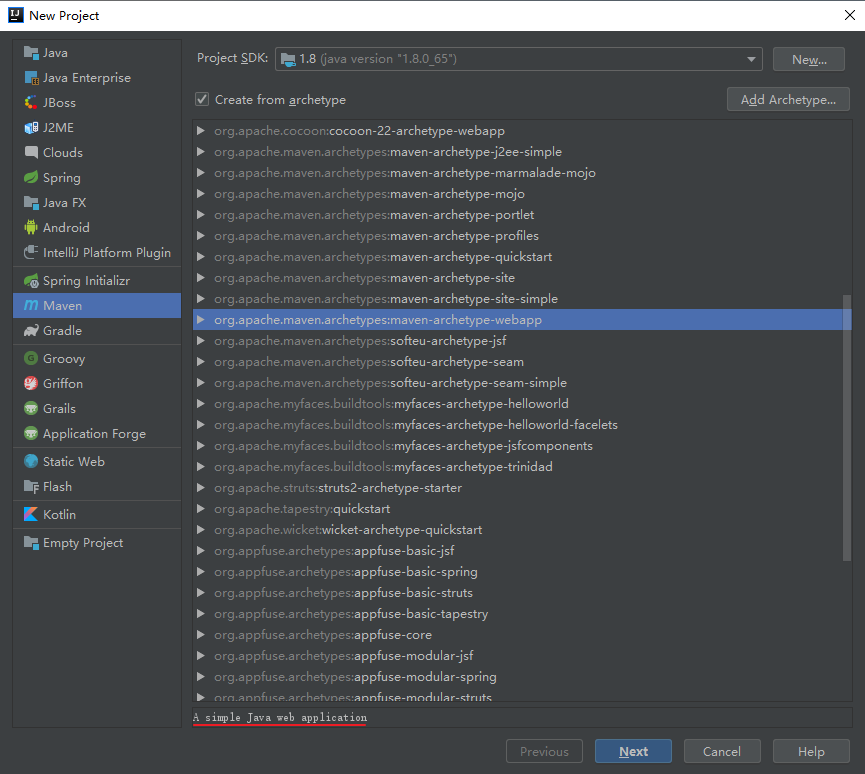
使用Maven

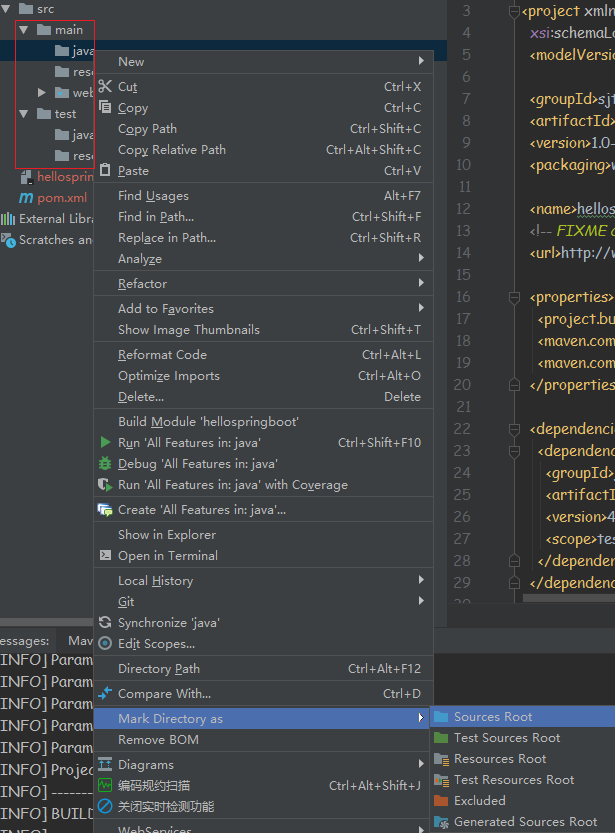
然后对项目结构进行调整——添加java和resources:

- 将
main文件夹下的java作为Sources Root - 将
main文件夹下的resources作为Resources Root - 将
test文件夹下的java作为Test Sources Root - 将
test文件夹下的resources作为Test Resources Root
项目中引入依赖
在pom.xml中:
- 继承Springboot的父项目
<!-- Inherit defaults from Spring Boot
	groupId:项目组织的唯一标识;artifactId:项目的唯一标识-->
<parent>
    <groupId>org.springframework.boot</groupId>
    <artifactId>spring-boot-starter-parent</artifactId>
    <version>2.2.5.RELEASE</version>
</parent>
- 引入Spring Boot 的web支持
<!-- Add typical dependencies for a web application -->
<dependencies>
    <dependency>
        <groupId>org.springframework.boot</groupId>
        <artifactId>spring-boot-starter-web</artifactId>
    </dependency>
</dependencies>
建包并编写入口类和控制器
Application.java:
package sjtu.chenzf;

import org.springframework.boot.SpringApplication;
import org.springframework.boot.autoconfigure.EnableAutoConfiguration;
import org.springframework.web.bind.annotation.GetMapping;
import org.springframework.web.bind.annotation.RestController;

// 通过该注解,开启自动配置
@EnableAutoConfiguration
@RestController

public class Application {
    public static void main(String[] args) {
        /*
         * SpringApplication为Spring的应用类,用来启动SpringBoot应用(部署到对应的web容器中)
         * 参数1:传入入口类的类对象;参数2为main函数的参数
         */
        SpringApplication.run(Application.class, args);
    }

    @GetMapping("/helloSpringBoot")
    public String hello(){
        // 控制台显示
        System.out.println("Hello SpringBoot");
        // 网页页面显示
        return "hello springboot";
    }
}
在浏览器中输入http://localhost:8080/helloSpringBoot,页面显示hello springboot,控制台显示Hello SpringBoot。
将入口类与控制器解耦合
Application.java:
package sjtu.chenzf;

import org.springframework.boot.SpringApplication;
import org.springframework.boot.autoconfigure.EnableAutoConfiguration;
import org.springframework.web.bind.annotation.GetMapping;
import org.springframework.web.bind.annotation.RestController;

// 通过该注解,开启自动配置
@EnableAutoConfiguration

public class Application {
    public static void main(String[] args) {
        /*
         * SpringApplication为Spring的应用类,用来启动SpringBoot应用(部署到对应的web容器中)
         * 参数1:传入入口类的类对象;参数2为main函数的参数
         */
        SpringApplication.run(Application.class, args);
    }
}
controller/HelloController.java:
package sjtu.chenzf.controller;

import org.springframework.web.bind.annotation.GetMapping;
import org.springframework.web.bind.annotation.RequestMapping;
import org.springframework.web.bind.annotation.RestController;

@RestController
// 为避免路径冲突,再添加一级命名空间
@RequestMapping("/chenzf")
public class HelloController {
    // 方法的访问路径
    @GetMapping("/helloSpringBoot")
    public String hello() {
        System.out.println("Hello Spring Boot !");
        return "hello springboot";
    }
}
此时,需通过在浏览器中输入http://localhost:8080/chenzf/hello来进行访问,但访问时出现了问题,无法访问控制器!
添加ComponentScan
在main/java/sjtu/chenzf/Application.java中,@EnableAutoConfiguration仅能完成开启自动配置——初始化Spring和Spring MVC环境等作用,无法扫描到controller包中HelloController.java的注解,而解耦前,这些注解都是在一个文件中,所以能够正常工作。
在Application.java中添加@ComponentScan(第8行)来扫描当前入口类所在包及其子包中相关注解:
package sjtu.chenzf;

import org.springframework.boot.SpringApplication;
import org.springframework.boot.autoconfigure.EnableAutoConfiguration;
import org.springframework.context.annotation.ComponentScan;

// 通过该注解,开启自动配置
@EnableAutoConfiguration
// 用来扫描相关注解,扫描范围为当前入口类所在包及其子包
@ComponentScan

public class Application {
    public static void main(String[] args) {
        /*
         * SpringApplication为Spring的应用类,用来启动SpringBoot应用(部署到对应的web容器中)
         * 参数1:传入入口类的类对象;参数2为main函数的参数
         */
        SpringApplication.run(Application.class, args);
    }
}
标准开发方式 @SpringBootApplication
We generally recommend that you
locate your main application class in a root package above other classes. The@SpringBootApplicationannotation is often placed on your main class, and it implicitly defines a base “search package” for certain items. For example, if you are writing a JPA application, the package of the@SpringBootApplicationannotated class is used to search for@Entityitems. Using a root package also allows component scan to apply only on your project.
package sjtu.chenzf;

import org.springframework.boot.SpringApplication;
import org.springframework.boot.autoconfigure.SpringBootApplication;

// 组合注解:组合了@EnableAutoConfiguration和@ComponentScan
@SpringBootApplication

public class Application {
    public static void main(String[] args) {
        SpringApplication.run(Application.class, args);
    }
}
Tomcat端口占用
***************************
APPLICATION FAILED TO START
***************************

Description:

Web server failed to start. Port 8080 was already in use.

Action:

Identify and stop the process that's listening on port 8080 or configure this application to listen on another port.
在main/resources文件下添加application.yml。然后在application.yml中修改端口号(注意数值8989前的空格):
server:
  port: 8989
还可以通过application.yml指定当前应用的名称:
#  数值前要有空格
server:
  port: 8989  # 用来指定内嵌服务器端口号
  servlet:
    context-path: /HelloSpringBoot  # 用来指定当前应用在部署到内嵌容器中的项目名称
此时,需通过在浏览器中输入http://localhost:8989/HelloSpringBoot/chenzf/hello来进行访问。
也可以使用application.properties配置文件:
# 用来指定内嵌服务器端口号
server.port=8989

# 用来指定当前应用在部署到内嵌容器中的项目名称
server.servlet.context-path=/HelloSpringBoot

