Python逆向爬虫之selenimu动态渲染页面爬虫,非常详细
Python逆向爬虫之selenimu动态渲染页面爬虫,非常详细
Selenium 是最广泛使用的开源 Web UI(用户界面)自动化测试套件之一。Selenium 支持的语言包括C#,Java,Perl,PHP,Python 和 Ruby。目前,Selenium Web 驱动程序最受 Python 和 C#欢迎。 Selenium 测试脚本可以使用任何支持的编程语言进行编码,并且可以直接在大多数现代 Web 浏览器中运行。在爬虫领域 selenium 同样是一把利器,能够解决大部分的网页的反爬问题。
一、安装 selenium
pip install selenium
安装完 selenium 之后,并不能立即使用,我们还需要下载各种浏览器的驱动才可以。
注意:部分浏览器驱动需要通过其他渠道下载才能下载。如果没有其他渠道下载的朋友,可以加微信:Alvin0918,博主帮您下载
1.1 Chrome 浏览器驱动安装
在 Chrome 浏览器地址栏输入:chrome://settings/help

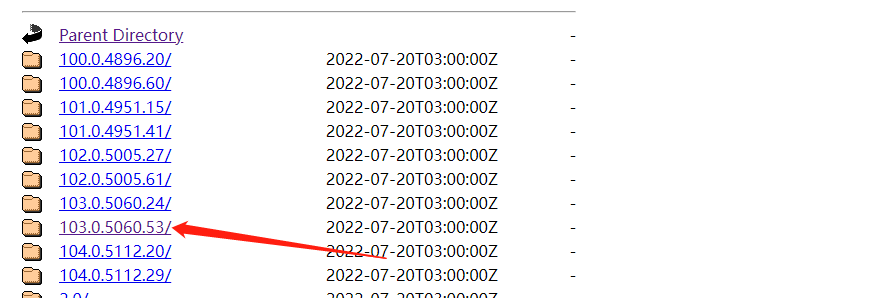
下载离当前浏览器版本的最相近的版本。
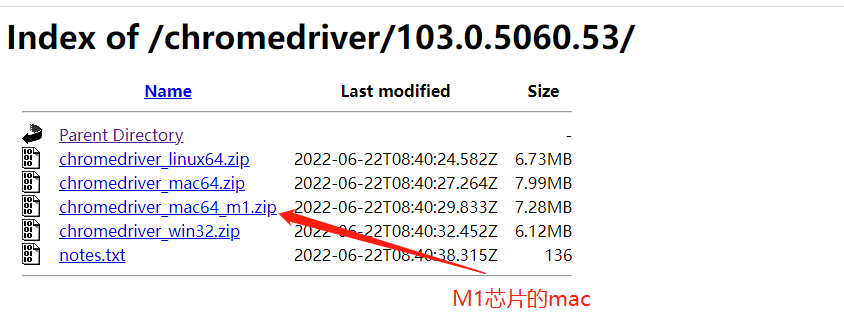
根据不同的电脑类型下载驱动。
下载完成之后,解压到任何一个路径中,然后添加环境变量即可。
1.2 测试浏览器驱动
# -*- coding: utf-8 -*-
from selenium.webdriver import Chrome

web = Chrome(executable_path="./chromedriver.exe")

web.get(url="https://www.baidu.com/")
如果打开了新的浏览器,就表示安装成功。
二、定位
前面我们已经了解到 selenium 是用来操作浏览器的,所以这一小节我们主要用来了解 selenium 是如何操作 Chrome 浏览器。
2.1 id 定位
根据标签的 ID 属性来定位需要操作的内容。
标签的 id 具有唯一性,就像人的身份证,假设有个 a 标签如下。
<a id="baidu" href="https://www.baidu.com"></a>
我们可以通过 id 定位到它,由于 id 的唯一性,我们可以不用管其他的标签的内容。
from selenium.webdriver.common.by import By

web.find_element(By.ID, "baidu")
2.2 name 定位
name 指定标签的名称,在页面中可以不唯一。假设有个 meta 标签如下
<meta name="description" content="CSDN是全球知名中文IT技术交流平台,创建于1999年,包含原创博客、精品问答、职业培训、技术论坛、资源下载等产品服务,提供原创、优质、完整内容的专业IT技术开发社区.">
我们可以使用 find_element 定位到 meta 标签。
# -*- coding: utf-8 -*-
from selenium.webdriver import Chrome
from selenium.webdriver.common.by import By

web = Chrome(executable_path="./chromedriver.exe")

web.get(url="https://blog.csdn.net/")

web.find_element(By.NAME, "description")
2.3 class 定位
class 指定标签的类名,在页面中可以不唯一。
<div class=" active-blog"></div>
我们可以使用 By.CLASS_NAME 定位到 div 标签。
# -*- coding: utf-8 -*-
from selenium.webdriver import Chrome
from selenium.webdriver.common.by import By

web = Chrome(executable_path="./chromedriver.exe")

web.get(url="https://blog.csdn.net/")

web.find_element(By.CLASS_NAME, "active-blog")
2.4 标签定位
每个 tag 往往用来定义一类功能,所以通过 tag 来识别某个元素的成功率很低,每个页面一般都用很多相同的 tag 。
<div></div>
我们可以使用 By.TAG_NAME 定位到 div 标签。
# -*- coding: utf-8 -*-
from selenium.webdriver import Chrome
from selenium.webdriver.common.by import By

web = Chrome(executable_path="./chromedriver.exe")

web.get(url="https://blog.csdn.net/")

web.find_element(By.TAG_NAME, "active-blog")
2.5 xpath 定位
xpath 是一种在 XML 文档中定位元素的语言,它拥有多种定位方式。
# -*- coding: utf-8 -*-
from selenium.webdriver import Chrome
from selenium.webdriver.common.by import By

web = Chrome(executable_path="./chromedriver.exe")

web.get(url="https://blog.csdn.net/")

web.find_element(By.XPATH, '//*[@id="floor-blog-index_747"]/div/div[1]/div[1]/div[1]/div/a/span')
2.6 css 定位
CSS 使用选择器来为页面元素绑定属性,它可以较为灵活的选择控件的任意属性,一般定位速度比 xpath 要快,但使用起来略有难度。
# -*- coding: utf-8 -*-
from selenium.webdriver import Chrome
from selenium.webdriver.common.by import By

web = Chrome(executable_path="./chromedriver.exe")

web.get(url="https://blog.csdn.net/")

web.find_element(By.CSS_SELECTOR, '.blog-text')
2.7 文本定位
link 专门用来定位文本链接,假如要定位下面这一标签。
# -*- coding: utf-8 -*-
from selenium.webdriver import Chrome
from selenium.webdriver.common.by import By
web = Chrome(executable_path="./chromedriver.exe")
web.get(url="https://blog.csdn.net/qq_33261700/article/details/119549172")
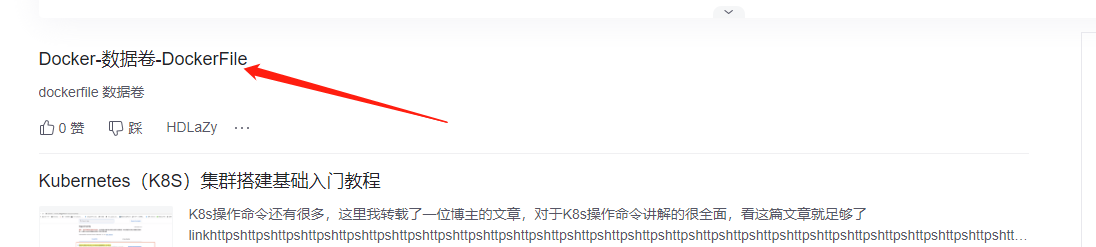
web.find_element(By.LINK_TEXT, 'K8S系列第九篇(持久化存储,emptyDir、hostPath、PV/PVC)')
2.8 模糊定位
partial_link 翻译过来就是“部分链接”,对于有些文本很长,这时候就可以只指定部分文本即可定位,同样使用刚才的例子。
# -*- coding: utf-8 -*-
from selenium.webdriver import Chrome
from selenium.webdriver.common.by import By

web = Chrome(executable_path="./chromedriver.exe")

web.get(url="https://blog.csdn.net/qq_33261700/article/details/119549172")

web.find_element(By.PARTIAL_LINK_TEXT, 'K8S系列第九篇')
三、浏览器控制
控制浏览器的大小及其操作。
3.1 设置浏览器窗口大小
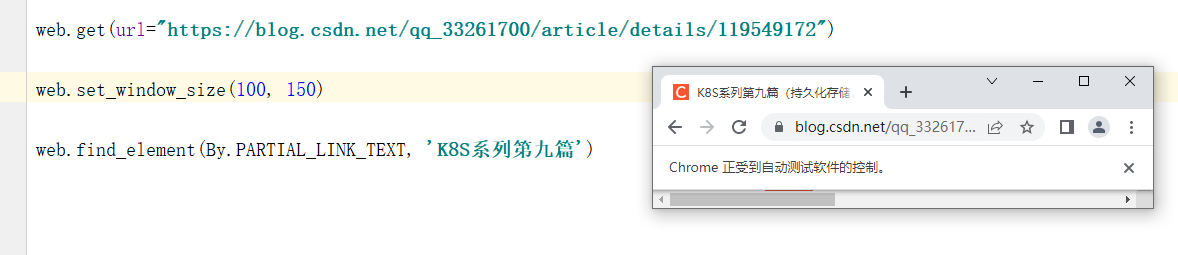
webdriver 提供 set_window_size() 方法来修改浏览器窗口的大小。
# -*- coding: utf-8 -*-
from selenium.webdriver import Chrome
from selenium.webdriver.common.by import By

web = Chrome(executable_path="./chromedriver.exe")

web.get(url="https://blog.csdn.net/qq_33261700/article/details/119549172")

web.set_window_size(100, 150)

web.find_element(By.PARTIAL_LINK_TEXT, 'K8S系列第九篇')
3.2 浏览器全屏
webdriver 提供 maximize_window()
方法来设置浏览器窗口全屏。
web.maximize_window()
3.3 浏览器前进&后退
webdriver 提供 back 和 forward 方法来实现页面的后退与前进。
# -*- coding: utf-8 -*-
from selenium.webdriver import Chrome
import time

web = Chrome(executable_path="chromedriver.exe")

web.get("https://blog.csdn.net/")
time.sleep(2)

web.get("https://blog.csdn.net/qq_33261700")
time.sleep(2)

web.back()
time.sleep(2)

web.forward()
3.4 浏览器刷新
在一些特殊情况下我们可能需要刷新页面来获取最新的页面数据,这时我们可以使用 refresh() 来刷新当前页面。
# -*- coding: utf-8 -*-
from selenium.webdriver import Chrome
import time

web = Chrome(executable_path="chromedriver.exe")

web.get(url="https://blog.csdn.net/qq_33261700?type=blog")
time.sleep(2)

web.refresh()
3.5 浏览器窗口切换
在很多时候我们都需要用到窗口切换,比如:当我们点击注册按钮时,它一般会打开一个新的标签页,但实际上代码并没有切换到最新页面中,这时你如果要定位注册页面的标签就会发现定位不到,这时就需要将实际窗口切换到最新打开的那个窗口。我们先获取当前各个窗口的句柄,这些信息的保存顺序是按照时间来的,最新打开的窗口放在数组的末尾,这时我们就可以定位到最新打开的那个窗口了。
# -*- coding: utf-8 -*-
from selenium.webdriver import Chrome
from selenium.webdriver.common.by import By
import time

web = Chrome(executable_path="chromedriver.exe")

web.get(url="https://blog.csdn.net/qq_33261700?type=blog")

web.maximize_window()

web.find_element(By.XPATH, '//*[@id="userSkin"]/div[2]/div/div[2]/div[1]/div[2]/div/article[1]/a').click()

windows = web.window_handles
web.switch_to.window(windows[0])
3.6 输入内容
在浏览器中使用 send_keys() 输入搜索内容。
# -*- coding: utf-8 -*-
from selenium.webdriver import Chrome
from selenium.webdriver.common.by import By
import time

web = Chrome(executable_path="chromedriver.exe")

web.get(url="https://blog.csdn.net/qq_33261700?type=blog")

time.sleep(1)

keys = web.find_element(By.XPATH, '//*[@id="toolbar-search-input"]')

time.sleep(1)

keys.send_keys('selenimu')

time.sleep(1)

web.find_element(By.XPATH, '//*[@id="toolbar-search-button"]').click()
3.7 还有其他操作
| 方法 | 描述 |
|---|---|
clear() |
清除文本内容 |
is_displayed() |
判断该元素是否可见 |
get_attribute() |
获取标签属性值 |
size |
返回元素的尺寸 |
text |
返回元素文本 |
四、鼠标控制
在webdriver 中,鼠标操作都封装在ActionChains类中,常见方法如下:
| 方法 | 描述 |
|---|---|
click() |
单击左键 |
context_click() |
单击右键 |
double_click() |
双击 |
drag_and_drop() |
拖动 |
move_to_element() |
鼠标悬停 |
perform() |
执行所有ActionChains中存储的动作 |
# -*- coding: utf-8 -*-
from selenium.webdriver import Chrome
from selenium.webdriver.common.by import By
from selenium.webdriver.common.action_chains import ActionChains
import time

web = Chrome(executable_path="chromedriver.exe")

web.get(url="https://www.zhipin.com/shanghai/")

time.sleep(1)

keys = web.find_element(By.XPATH, '//*[@id="main"]/div/div[1]/div/div[1]/dl[1]')

time.sleep(1)

move = ActionChains(web).move_to_element(keys).perform()

五、键盘操作
webdriver 中 Keys 类几乎提供了键盘上的所有按键方法,我们可以使用 send_keys + Keys 实现输出键盘上的组合按键如 “Ctrl + C”、“Ctrl + V” 等。
# -*- coding: utf-8 -*-
from selenium.webdriver import Chrome
from selenium.webdriver.common.by import By
from selenium.webdriver.common.action_chains import ActionChains
from selenium.webdriver.common.keys import Keys
import time

web = Chrome(executable_path="chromedriver.exe")

web.get(url="https://www.zhipin.com/shanghai/")

# Ctrl + c
web.find_element(By.XPATH, '').send_keys(Keys.CONTROL, "c")
# Ctrl + v
web.find_element(By.XPATH, '').send_keys(Keys.CONTROL, "v")
# 回车
web.find_element(By.XPATH, '').send_keys(Keys.ENTER)
# F1
web.find_element(By.XPATH, '').send_keys(Keys.F1)
# 空格
web.find_element(By.XPATH, '').send_keys(Keys.SPACE)
# tab
web.find_element(By.XPATH, '').send_keys(Keys.TAB)
# ESC键
web.find_element(By.XPATH, '').send_keys(Keys.ESCAPE)
# ALT
web.find_element(By.XPATH, '').send_keys(Keys.ALT)
# SHIFT
web.find_element(By.XPATH, '').send_keys(Keys.SHIFT)
# 向下
web.find_element(By.XPATH, '').send_keys(Keys.ARROW_DOWN)
# 向左
web.find_element(By.XPATH, '').send_keys(Keys.ARROW_LEFT)
# 向右
web.find_element(By.XPATH, '').send_keys(Keys.ARROW_RIGHT)
# 向上
web.find_element(By.XPATH, '').send_keys(Keys.ARROW_UP)
六、设置元素等待
很多页面都使用 ajax 技术,页面的元素不是同时被加载出来的,为了防止定位这些尚在加载的元素报错,可以设置元素等来增加脚本的稳定性。webdriver 中的等待分为 显式等待 和 隐式等待。
6.1 显式等待
设置一个超时时间,每个一段时间就去检测一次该元素是否存在,如果存在则执行后续内容,如果超过最大时间(超时时间)则抛出超时异常(TimeoutException)。显示等待需要使用 WebDriverWait,同时配合 until 或 not until 。下面详细讲解一下。
- driver:浏览器驱动
- timeout:超时时间,单位秒
- poll_frequency:每次检测的间隔时间,默认为0.5秒
- ignored_exceptions:指定忽略的异常,如果在调用 until 或 until_not 的过程中抛出指定忽略的异常,则不中断代码,默认忽略的只有 NoSuchElementException 。
- method:指定预期条件的判断方法,在等待期间,每隔一段时间调用该方法,判断元素是否存在,直到元素出现。until_not 正好相反,当元素消失或指定条件不成立,则继续执行后续代码
- message: 如果超时,抛出 TimeoutException ,并显示 message 中的内容
# -*- coding: utf-8 -*-
from selenium.webdriver import Chrome
from selenium.webdriver.common.by import By
from selenium.webdriver.common.action_chains import ActionChains
from selenium.webdriver.common.keys import Keys
from selenium.webdriver.support.ui import WebDriverWait
from selenium.webdriver.support import expected_conditions
import time

web = Chrome(executable_path="chromedriver.exe")

el = WebDriverWait(web, 5, 0.5).until(
    expected_conditions.presence_of_element_located((By.ID, 'kw')),
    message="超时了。。。"
)

6.2 隐士等待
隐式等待也是指定一个超时时间,如果超出这个时间指定元素还没有被加载出来,就会抛出 NoSuchElementException 异常。
除了抛出的异常不同外,还有一点,隐式等待是全局性的,即运行过程中,如果元素可以定位到,它不会影响代码运行,但如果定位不到,则它会以轮询的方式不断地访问元素直到元素被找到,若超过指定时间,则抛出异常。
# -*- coding: utf-8 -*-
from selenium.webdriver import Chrome
from selenium.webdriver.common.by import By
from selenium.webdriver.common.action_chains import ActionChains
from selenium.webdriver.common.keys import Keys
from selenium.webdriver.support.ui import WebDriverWait
from selenium.webdriver.support import expected_conditions
import time

web = Chrome(executable_path="chromedriver.exe")

web.get(url="https://blog.csdn.net/qq_33261700?type=blog")

web.implicitly_wait(5)

start = time.time()

try:
    web.find_element(By.ID, 'kw')
except Exception as e:
    print(e)
    print(time.time() - start)
七、find_elements 和 find_element
在 selenium 之前的版本中,定位元素是有 8 种方式,而 selenium 4.0 以后的版本中变成了find_elements 和 find_element 两种。
其中 find_elements 和 find_element 之间的区别也非常的简单,find_elements 是定位多个元素的而 find_elemen 是只能定位一个元素。
# -*- coding: utf-8 -*-
from selenium.webdriver import Chrome
from selenium.webdriver.common.by import By
from selenium.webdriver.common.action_chains import ActionChains
from selenium.webdriver.common.keys import Keys
from selenium.webdriver.support.ui import WebDriverWait
from selenium.webdriver.support import expected_conditions
import time

web = Chrome(executable_path="chromedriver.exe")

web.get(url="https://blog.csdn.net/qq_33261700?type=blog")

for item in web.find_elements(By.XPATH, '//*[@id="userSkin"]/div[2]/div/div[2]/div[1]/div[2]/div/article'):
    print(item.find_element(By.XPATH, "./a/div[1]/h4").text)
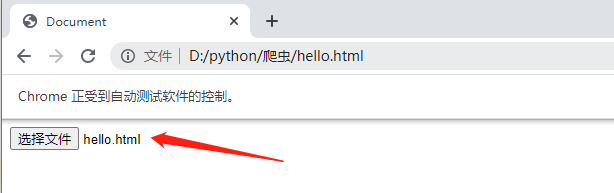
八、上传 & 下载文件
常见的 web 页面的上传,一般使用 input 标签或是插件(JavaScript、Ajax),对于 input 标签的上传,可以直接使用 send_keys(路径) 来进行上传。
8.1 上传文件
<!doctype html>
<html lang="en">
<head>
    <meta charset="UTF-8">
    <meta name="viewport"
          content="width=device-width, user-scalable=no, initial-scale=1.0, maximum-scale=1.0, minimum-scale=1.0">
    <meta http-equiv="X-UA-Compatible" content="ie=edge">
    <title>Document</title>
</head>
<body>
	<input type="file">
</body>
</html>
下面通过 xpath 定位 input 标签,然后使用 send_keys(str(file_path) 上传文件。
# -*- coding: utf-8 -*-
from selenium.webdriver import Chrome
from selenium.webdriver.common.by import By
from selenium.webdriver.common.action_chains import ActionChains
from selenium.webdriver.common.keys import Keys
from selenium.webdriver.support.ui import WebDriverWait
from selenium.webdriver.support import expected_conditions
import time

web = Chrome(executable_path="chromedriver.exe")

web.get(url="file:///D:/python/爬虫/hello.html")

web.find_element(By.NAME, 'upload').send_keys(str('D:/python/爬虫/hello.html'))
8.2 下载文件
# -*- coding: utf-8 -*-
from selenium.webdriver import Chrome, ChromeOptions
from selenium.webdriver.common.by import By
from selenium.webdriver.common.action_chains import ActionChains
from selenium.webdriver.common.keys import Keys
from selenium.webdriver.support.ui import WebDriverWait
from selenium.webdriver.support import expected_conditions
import time, os
current_directory = os.path.dirname(os.path.abspath(__file__))

prefs = {
    'profile.default_content_settings.popups': 0,
    'download.default_directory': str(current_directory)
}

option = ChromeOptions()
option.add_experimental_option('prefs', prefs)

web = Chrome(executable_path="chromedriver.exe", options=option)

web.get(url="https://image.baidu.com/search/index?ct=201326592&tn=baiduimage&word=%E9%A3%8E%E6%99%AF&pn=3&spn=0&ie=utf-8&oe=utf-8&cl=2&lm=-1&fr=&se=&sme=&cs=2984023968%2C2695166758&os=1902941552%2C2392086484&objurl=https%3A%2F%2Fgimg2.baidu.com%2Fimage_search%2Fsrc%3Dhttp%3A%2F%2Fimg.jj20.com%2Fup%2Fallimg%2F1115%2F092621094155%2F210926094155-8-1200.jpg%26refer%3Dhttp%3A%2F%2Fimg.jj20.com%26app%3D2002%26size%3Df9999%2C10000%26q%3Da80%26n%3D0%26g%3D0n%26fmt%3Dauto%3Fsec%3D1660909844%26t%3D18a8b8c697e65c79c5dd86ccaf3b506e&di=7108135681917976577&tt=1&is=0%2C0&adpicid=0&gsm=1e&dyTabStr=MCwzLDYsMSw0LDUsNywyLDgsOQ%3D%3D")

web.find_element(By.XPATH, '//*[@id="mediacy-toolbar"]/span[1]').click()

web.switch_to.window(web.window_handles[-1])
web.find_element(By.TAG_NAME, 'html').send_keys('thisisunsafe')
九、cookies
cookies 是识别用户登录与否的关键,爬虫中常常使用 selenium + requests 实现 cookie持久化,即先用 selenium 模拟登陆获取 cookie ,再通过 requests 携带 cookie 进行请求。
webdriver 提供 cookies 的几种操作:读取、添加删除。
- get_cookies:以字典的形式返回当前会话中可见的 cookie 信息。
- get_cookie(name):返回 cookie 字典中 key == name 的 cookie 信息。
- add_cookie(cookie_dict):将 cookie 添加到当前会话中。
- delete_cookie(name):删除指定名称的单个 cookie。
- delete_all_cookies():删除会话范围内的所有 cookie。
# -*- coding: utf-8 -*-
from selenium.webdriver import Chrome, ChromeOptions
from selenium.webdriver.common.by import By
from selenium.webdriver.common.action_chains import ActionChains
from selenium.webdriver.common.keys import Keys
from selenium.webdriver.support.ui import WebDriverWait
from selenium.webdriver.support import expected_conditions
import time, os
current_directory = os.path.dirname(os.path.abspath(__file__))

web = Chrome(executable_path="chromedriver.exe")
web.get("https://www.baidu.com")

print(web.get_cookies())
print(web.get_cookie('domain'))
十、使用 JS
在使用 selenimu 的时候,难免需要操作 JS,下面我们实操一下 selenimu 调用 JS。
# -*- coding: utf-8 -*-
from selenium.webdriver import Chrome, ChromeOptions
from selenium.webdriver.common.by import By
from selenium.webdriver.common.action_chains import ActionChains
from selenium.webdriver.common.keys import Keys
from selenium.webdriver.support.ui import WebDriverWait
from selenium.webdriver.support import expected_conditions
import time, os
current_directory = os.path.dirname(os.path.abspath(__file__))

web = Chrome(executable_path="chromedriver.exe")
web.get("https://www.baidu.com")

web.execute_script('alert("Hello World!")')
十一、隐藏浏览器指纹
selenium 对于部分网站来说十分强大,但它也不是万能的,实际上,selenium 启动的浏览器,有几十个特征可以被网站检测到,轻松的识别出你是爬虫。
不相信?接着往下看,首先你手动打开浏览器输入https://bot.sannysoft.com/,在网络无异常的情况下,显示应该如下:
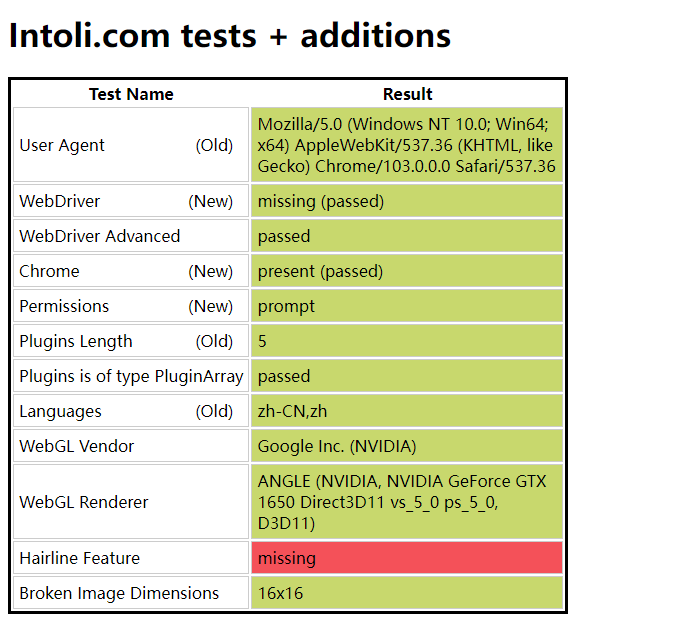
同样的,我们使用 selenium 打开该网站。
# -*- coding: utf-8 -*-
from selenium.webdriver import Chrome

web = Chrome(executable_path="chromedriver.exe")
web.get("https://bot.sannysoft.com/")

我们可以看到的是,如果我们爬取的网站真的想阻止也是非常简单的。那么是不是说 selenium 就不能使用呢?并不是这样的。如果我们想隐藏的足够好,就需要 stealth.min.js 这个文件。
11.1 生成 stealth.min.js
生成 stealth.min.js 首先需要安装 nodejs。
npx extract-stealth-evasions
11.2 测试
# -*- coding: utf-8 -*-
from selenium.webdriver import Chrome

web = Chrome(executable_path="chromedriver.exe")

with open('stealth.min.js', 'r') as f:
    js = f.read()

web.execute_cdp_cmd("Page.addScriptToEvaluateOnNewDocument", {
    "source": js
})

web.get("https://bot.sannysoft.com/")
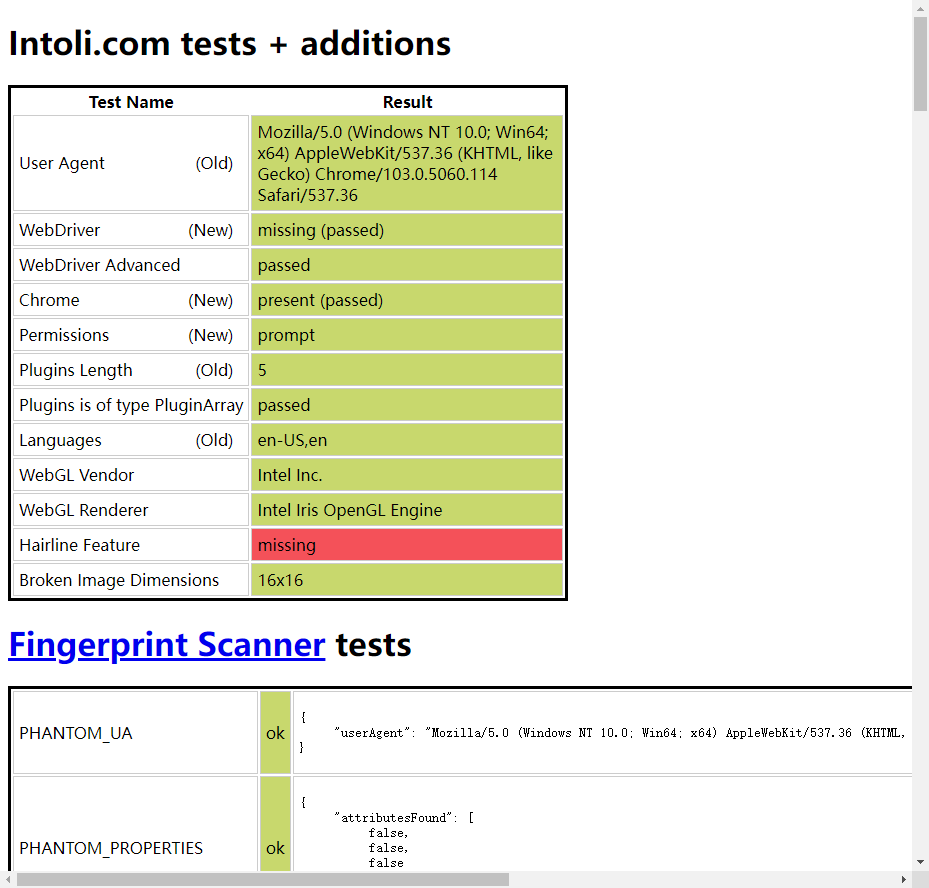
通过 stealth.min.js 的隐藏,可以看到这次使用无头浏览器特征基本都以隐藏,已经十分接近人工打开浏览器了。
十二、selenium 模拟登录
# -*- coding: utf-8 -*-
from selenium.webdriver import Chrome
from selenium.webdriver.common.by import By
from selenium.webdriver.support.ui import WebDriverWait
from selenium.webdriver.support import expected_conditions
import time, ddddocr
from PIL import Image

def runLogin():

    """
    开始登录
    :return:
    """
    url = "https://weibo.com/login.php"

    web = Chrome(executable_path="chromedriver.exe")

    with open('stealth.min.js', 'r') as f:
        js = f.read()

    web.execute_cdp_cmd("Page.addScriptToEvaluateOnNewDocument", {
        "source": js
    })

    web.get(url=url)

    web.maximize_window()

    element = WebDriverWait(web, 10, 0.5).until(
        expected_conditions.presence_of_element_located((By.XPATH, '//*[@id="loginname"]')),
        message="超时了。。。"
    )

    web.find_element(By.XPATH, '//*[@id="loginname"]').send_keys('用户名')
    web.find_element(By.XPATH, '//*[@id="pl_login_form"]/div/div[3]/div[2]/div/input').send_keys('密码')

    code_img_name = downloadCodeImg(web)

    code = IdentifyPictures(code_img_name)

    # 输入识别出来的验证码
    web.find_element(By.XPATH, '//*[@id="pl_login_form"]/div/div[3]/div[3]/div/input').send_keys(code)

    # 开始登录
    web.find_element(By.XPATH, '//*[@id="pl_login_form"]/div/div[3]/div[6]/a').click()

def IdentifyPictures(code_img_name):

    """
    识别验证码
    :param code_img_name:
    :return:
    """
    det = ddddocr.DdddOcr(old=True)

    with open(code_img_name, 'rb') as f:
        img = f.read()

    res = det.classification(img)

    return res

def downloadCodeImg(web):

    """
    保存图形验证码
    :param web:
    :return:
    """

    element = WebDriverWait(web, 10, 0.5).until(
        expected_conditions.presence_of_element_located((By.XPATH, '//*[@id="pl_login_form"]/div/div[3]/div[3]/a/img')),
        message="超时了。。。"
    )

    time.sleep(1)

    # 对当前页面进行截图保存
    web.save_screenshot('page.png')
    # 定位验证码图片的位置
    code_img_ele = web.find_element(By.XPATH, '//*[@id="pl_login_form"]/div/div[3]/div[3]/a/img')
    # 获取验证码左上角的坐标x,y
    location = code_img_ele.location
    # 获取验证码图片对应的长和宽
    size = code_img_ele.size

    # 左上角和右下角的坐标
    rangle = (
        int(location['x']),
        int(location['y']),
        int((location['x'] + size['width'])),
        int((location['y'] + size['height']))
    )

    i = Image.open('./page.png')
    code_img_name = './code_img.png'

    # crop根据rangle元组内的坐标进行裁剪
    frame = i.crop(rangle)
    frame.save(code_img_name)

    return code_img_name

def main():

    runLogin()

if __name__ == '__main__':

    main()
# -*- coding: utf-8 -*-
# Author:小阳爱技术
import time

from selenium.webdriver import Chrome
from selenium.webdriver.common.by import By
from selenium.webdriver.chrome.options import Options
from selenium.webdriver.common.action_chains import ActionChains
import requests
import base64
from PIL import Image


class HandleCode:
    """
    B站自动登录
    """
    CODE_IMG_PATH = "./code.png"
    BIG_IMG = "./all.png"

    def __init__(self):
        self.img_label = None
        self.code_coordinate = {}
        self.web = self.create_chrome()

    def create_chrome(self):
        """
        创建浏览器对象
        :return:
        """
        # 初始化一个浏览器参数对象
        options = Options()
        options.add_experimental_option("excludeSwitches", ["enable-automation"])
        # 去掉了webdriver痕迹
        options.add_argument("--disable-blink-features=AutomationControlled")
        # 指定浏览器分辨率
        options.add_argument('window-size=1920x1080')

        with open("./stealth.min.js", 'r') as f:
            js = f.read()

        # 创建一个浏览器对象
        web = Chrome(executable_path="./chromedriver.exe", options=options)

        # 设置一个伪装
        web.execute_cdp_cmd("Page.addScriptToEvaluateOnNewDocument", {
            "source": js
        })

        # 隐式等待浏览器渲染完成,sleep是强制等待
        web.implicitly_wait(10)

        # 浏览器内容缩放 67%
        # web.execute_script("document.body.style.zoom='0.35'")

        # 浏览器窗口最大化
        web.maximize_window()

        return web

    def open_chrome_bilibili(self):

        """
        打开 哔哩哔哩 登录页面
        :return:
        """

        self.web.get("https://passport.bilibili.com/login")

    def get_username_password(self):
        """
        获取用户名密码
        :return:
        """
        return {
            "username": "15517127859",
            "password": "Chen18790070830!"
        }

    def send_username_password(self):
        """
        输入用户名密码
        :return:
        """
        username_and_password = self.get_username_password()

        self.web.find_element(By.ID, 'login-username').send_keys(username_and_password['username'])
        self.web.find_element(By.ID, 'login-passwd').send_keys(username_and_password['password'])

    def login(self):
        """
        点击登录
        :return:
        """

        self.web.find_element(By.XPATH, '//*[@id="geetest-wrap"]/div/div[5]/a[1]').click()

    def get_img_base64(self, url):
        """
        获取 base64 图片
        :param url:
        :return:
        """
        with open(url, 'rb') as f:
            base64_data = base64.b64encode(f.read())

        return base64_data

    def identification_verification_code(self, typeid=27) -> dict:
        """
        快识别
        :param typeid:
        :return:
        """

        username_password = {
            "username": "15517127859",
            "password": "15517127859"
        }

        with open(self.CODE_IMG_PATH, 'rb') as f:
            base64_data = base64.b64encode(f.read())
            b64 = base64_data.decode()

        data = {
            "username": username_password['username'],
            "password": username_password['password'],
            "typeid": typeid,
            "image": b64
        }

        resp = requests.post("https://api.ttshitu.com/predict", json=data)

        if resp.status_code == 200:
            return resp.json()
        else:
            return {'success': True, 'code': '0', 'message': 'success'}

    def save_screenshot(self):
        """
        保存图片
        :return:
        """
        time.sleep(5)

        # 截取当前整个页面
        self.web.save_screenshot(self.BIG_IMG)

    def get_coordinates(self):
        """
        获取验证码坐标对象
        :return:
        """
        self.img_label = self.web.find_element(By.CSS_SELECTOR,
                                               'body > div.geetest_panel.geetest_wind > div.geetest_panel_box.geetest_no_logo.geetest_panelshowclick > div.geetest_panel_next > div > div')

    def get_section(self):
        """
        计算验证码的左右上下横切面坐标
        :return:
        """
        left = self.img_label.location['x']
        top = self.img_label.location['y']
        right = self.img_label.location['x'] + self.img_label.size['width']
        down = self.img_label.location['y'] + self.img_label.size['height']

        self.code_coordinate = {
            "left": left,
            "top": top,
            "right": right,
            "down": down,
            "width": self.img_label.size['width'],
            "height": self.img_label.size['height']
        }

        print(self.code_coordinate)

        # 根据坐标切割图片
        im = Image.open(self.BIG_IMG)
        im = im.crop((left, top, right, down))
        im.save(self.CODE_IMG_PATH)

    def disassemble_coordinate(self, coordinate):
        """
        拆解坐标,并点击
        :param coordinate: 111,222|333,444
        :return:
        """
        result_list = coordinate.split('|')
        for result in result_list:
            x = result.split(',')[0]
            y = result.split(',')[1]
            print(x, y)
            self.click_code(x, y)
            time.sleep(2)

        self.confirm_code()

    def click_code(self, x, y):
        """
        根据坐标点击
        :param x:
        :param y:
        :return:
        """
        action = ActionChains(self.web)
        action.move_to_element_with_offset(
            self.img_label,
            int(x) - 130, int(y) - 162
        ).click().perform()

    def confirm_code(self):
        """
        确认登录
        :return:
        """
        self.web.find_element(By.XPATH, '//a[@class="geetest_commit"]').click()


if __name__ == '__main__':
    # 初始化
    code = HandleCode()
    # 打开B站
    code.open_chrome_bilibili()
    # 用户名和密码
    code.send_username_password()
    # 点击登录按钮
    code.login()
    # 保存整个页面
    code.save_screenshot()
    # 获取验证码 Element 对象
    code.get_coordinates()
    # 切割验证码
    code.get_section()
    # 超级鹰验证码识别
    identification_img = code.identification_verification_code()
    # 判断验证码识别结果
    if int(identification_img['code']) == 0:
        # 根据坐标去点击
        code.disassemble_coordinate(identification_img['data']['result'])
        # 再次点击登录按钮进行登录,但是登录验证需要验证码验证结果,所以需要有所延时
        time.sleep(2)
        # code.login()
    else:
        print(identification_img['err_str'])

 浙公网安备 33010602011771号