2020.1.26笔记——springdatajpa
使用jpa的步骤:
1. 导入maven坐标
<spring.version>4.2.4.RELEASE</spring.version>
<hibernate.version>5.0.7.Final</hibernate.version>
<slf4j.version>1.6.6</slf4j.version>
<log4j.version>1.2.12</log4j.version>
<c3p0.version>0.9.1.2</c3p0.version>
<mysql.version>5.1.6</mysql.version>
2. 配置springdatajpa的xml文件,就是配置数据库,当项目运行的时候可以正常使用jpa
<jpa:repositories base-package="cn.itcast.dao"
transaction-manager-ref="transactionManager"
entity-manager-factory-ref="entityManagerFactory"></jpa:repositories>
<tx:advice id="txAdvice" transaction-manager="transactionManager">
tx:attributes
<tx:method name="save" propagation="REQUIRED"/>
<tx:method name="insert" propagation="REQUIRED"/>
<tx:method name="update" propagation="REQUIRED"/>
<tx:method name="delete" propagation="REQUIRED"/>
<tx:method name="get" read-only="true"/>
<tx:method name="find" read-only="true"/>
<tx:method name="*" propagation="REQUIRED"/>
</tx:attributes>
</tx:advice>
aop:config
<aop:pointcut id="pointcut" expression="execution(* cn.itcast.service..(..))" />
<aop:advisor advice-ref="txAdvice" pointcut-ref="pointcut" />
</aop:config>
<context:component-scan base-package="cn.itcast"></context:component-scan>
以上的文档内都有具体的内容解释,故不再赘述;
案例:
-
创建客户实体类:
package cn.itcast.entity;
import javax.persistence.*;
/**
* @Created by Intellij IDEA.
* @author: 陈亚萌
* @Date: 2020/1/24
* 实体类和表的映射关系
* @Entity声明实体列
* @Table
* 类中和表中字段的映射关系
* @Id
* @GeneratedValue
* @Column
*/
@Entity
@Table(name = "cst_customer")
public class Customer {
@Id
@GeneratedValue(strategy = GenerationType.IDENTITY)
@Column(name = "cust_id")
private Long custId;
@Column(name = "cust_name")
private String custName;
@Column(name = "cust_source")
private String custSource;
@Column(name = "cust_level")
private String custLevel;
@Column(name = "cust_industry")
private String custIndustry;
@Column(name = "cust_phone")
private String custPhone;
@Column(name = "cust_address")
private String custAddress;public Long getCustId() {
return custId;
}public void setCustId(Long custId) {
this.custId = custId;
}public String getCustAddress() {
return custAddress;
}public void setCustAddress(String custAddress) {
this.custAddress = custAddress;
}public String getCustIndustry() {
return custIndustry;
}public void setCustIndustry(String custIndustry) {
this.custIndustry = custIndustry;
}public String getCustLevel() {
return custLevel;
}public void setCustLevel(String custLevel) {
this.custLevel = custLevel;
}public String getCustName() {
return custName;
}public void setCustName(String custName) {
this.custName = custName;
}public String getCustPhone() {
return custPhone;
}public void setCustPhone(String custPhone) {
this.custPhone = custPhone;
}public String getCustSource() {
return custSource;
}public void setCustSource(String custSource) {
this.custSource = custSource;
}@Override
public String toString() {
return "Customer{" +
"custId=" + custId +
", custAddress='" + custAddress + ''' +
", custIndustry='" + custIndustry + ''' +
", custLevel='" + custLevel + ''' +
", custName='" + custName + ''' +
", custPhone='" + custPhone + ''' +
", custSource='" + custSource + ''' +
'}';
}
}
一般来说,注解@Column(name = "cust_id")一般不用加,他会自动根据你的名字来路由表结构的。如果不想写getset方法可以使用lombok中的@Data注解,省去写toString方法和setget方法的时间
2. 创建接口类CustomerDao,必须继承JpaRepository<Customer,Long>, JpaSpecificationExecutor
*1. JpaRepository<操作的实体类类型,实体类中主键属性的类型>
*2. JpaSpecificationExecutor<操作的实体类型>
3. 根据测试类进行测试增删改查:
####一、jpa自己封装的方法:
测试类的写法,一般在创建Maven项目后,会有test包,然后根据你需要测试的方法来写包,包结构必须一一对应:
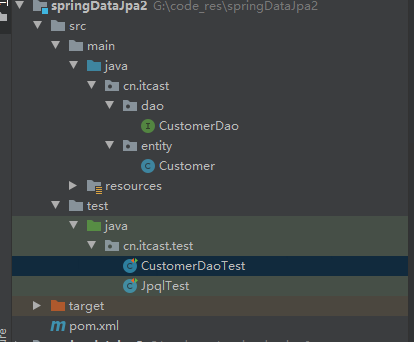
另外,在测试类的上面需要加上注释:
//声明spring提供的单元测试
@RunWith(SpringJUnit4ClassRunner.class)
//指定spring容器的配置信息
@ContextConfiguration(locations = "classpath:applicationContext.xml")
1. 测试查找,根据id查找:
@Test
/**
* 根据id查询
*/
public void testFindOne(){
final Customer one = customerDao.findOne(2L);
System.out.println(one);
}
test注解必须加上,如果不加会报错。这种是根据jpa自动封装的方法进行查找出来的结果。
2. 测试保存或者更新
/**
* 保存或者更新
* 根据传递的对象是否有存在主键id,如果没有主键id,则保存
* 如果传递的对象存在主键的属性id,则更新数据
/
@Test
public void saveOne(){
Customer customer=new Customer();
customer.setCustName("chenyameng111");
customer.setCustLevel("vip");
customer.setCustIndustry("jiaoyu");
final Customer save = customerDao.save(customer);
System.out.println(save);
}
@Test
/*
* 更新按照id
*/
public void updateOne(){
Customer customer=new Customer();
customer.setCustId(3L);
customer.setCustName("陈亚萌111");
customerDao.save(customer);
}
保存和更新有区别,因为主键设置为自增,所以保存的时候不需要传递id,但是如果你要更新数据的时候,需要进行传递id
3. 删除略
4. 查找所有:
/**
* 查询所有
*/
@Test
public void findAll(){
final List
for (Customer customer : all) {
System.out.println(customer);
}
}
查找所有也是使用封装好的方法
5. 查询总数
@Test
public void testCount(){
//查询客户数量
final long count = customerDao.count();
System.out.println(count);
}
6. 判断该条数据是否存在,一般为主键来判断
/**
* 判断id是否存在
* 可以查询id为4
* 的用户,如果值为空则不存在
*
* 2. 判断数据库中id为4的数量,为0则不存在 若》0
*/
@Test
public void testExists(){
final boolean exists = customerDao.exists(4l);
System.out.println(exists);
}
7. findOne getOne的区别
/**
* 根据id从数据库中查询
* @Transactional:保证getOne正常运行,事务处理
* findOne: em.find();立即加载
* getOne: em.getReference():延迟加载 返回是客户的动态代理对象,什么时候用什么时候查询
*/
@Test
@Transactional
public void testGetOne(){
final Customer one = customerDao.getOne(4L);
System.out.println(one);
}
二、jpql方法<如果想自定义sql语句>:
jpql的存在主要就是为了是jpa更加灵活,比如可以完成模糊查询,按照指定位置更新数据,查询所有等
-
根据姓名查找
@Test
/**
* 根据id查询
*/
public void testFindJpql(){
final Customer one = customerDao.findJpq("chenyameng");
System.out.println(one);
}
在CustomerDao中的定义为:/**
* 根据客户名称查询客户
* 使用jpql的形式
* jpql:from Customer where custName = ?
* 配置jpql语句:
* @Query
*/
@Query(value = "from Customer where custName = ?")
public Customer findJpq(String custName); -
根据id和用户名查找
@Test
public void testFindCustNameAndId(){
final Customer chenyameng = customerDao.findCustNameAndId("chenyameng", 2L);
System.out.println(chenyameng);
}
在CustomerDao中的定义:/**
* 根据客户名称和客户id查询
* jpql:from Customer where custName=? and custId=?
* 对于多个占位符参数:
* 赋值的时候,默认的情况下,占位符的位置需要和方法参数中的位置保持一致
* 对于指定占位符参数的位置:
* ? 索引的方式指定此占位的取值来源
*/
@Query(value = "from Customer where custName=? and custId=?")
public Customer findCustNameAndId(String custName,Long custId); -
更新
-
/**
* 测试jpql的更新
* springdatajpa使用jpql完成更新或者删除操作
* 1. 需要手动添加事务的支持
* 2. 默认执行结束后,回滚事务
* @Rollback(value = false)不会滚
*/
@Test
@Transactional
@Rollback(value = false)
public void testUpdataCustomer(){
customerDao.updateCustomer(4L,"111222");
}
CustomerDao:/**
* 使用jpql完成更新操作
* 案例: 根据id更新,客户的名称
* 更新4号客户的名称,将名称改为111222
* sql:update cst_customer set cust_name= ? where cust_id =?
* jpql: update Customer set custName = ? where custId=?
* @Query:代表的是进行查询
* 声明此方法是进行更新操作
* @Modifying:更新操作
*/
@Query(value = "update Customer set custName = ?2 where custId=?1")
@Modifying
public void updateCustomer(Long custId,String custName);
基本讲解都在代码里。故不再赘述 -
查找所有 使用mysql或者sql的语法进行查找的时候需要加上nativeQuery=true
/**
* 测试sql查询
*/
@Test
public void testListAll(){
final List<Object[]> sql = customerDao.findSql();
for (Object[] objects : sql) {
System.out.println(Arrays.toString(objects));
}
}
CustomerDao:/**
* 使用sql形式查询
* 查询全部的客户
* sql:select * from customer
* @Query:配置sql查询
* value:sql语句
* nativeQuery表示是否使用本地查询 true sql false:jpql
*/
@Query(value = "select * from cst_customer",nativeQuery = true)
public List<Object [] > findSql(); -
使用sql语句进行模糊查询:
/**
* 测试sql模糊查询
*/
@Test
public void testCondition(){
final List<Object[]> sql = customerDao.findByCondition("chenyam%");
for (Object[] objects : sql) {
System.out.println(Arrays.toString(objects));
}
}
CustomerDao:@Query(value = "select * from cst_customer where cust_name like ?1",nativeQuery = true)
List<Object [] > findByCondition(String name); -
根据jpa封装好的方法进行查询:
@Test
public void testFindByname(){
final Customer chenyameng = customerDao.findByCustName("chenyameng");
System.out.println(chenyameng);
}
@Test
public void testFindCuastNameLike(){
final Customer chenyameng = customerDao.findByCustNameLike("chenya%");
System.out.println(chenyameng);
}
@Test
public void testFindCustNameLikeAndIndustry(){
final Listcustomer = customerDao.findByCustNameLikeAndCustIndustry("陈亚萌%", "教育");
for (Customer customer1 : customer) {
System.out.println(customer1);
}
}
CustomerDao:
/**
* 方法名约定:
* findBy:查询
* 对象中的属性名称,需要首字母大写:查询的条件
* CustName:
* * 默认情况下使用的方式查询
* 模糊匹配查询:
* 1. findBy+属性名称(根据属性名称完成匹配的查询)
* 2. findBy+属性名称+“查询方式”(Like|isnull)
* findByCustNameLike 可以进行模糊查询
* 3. 多条件查询
* findBy+属性名+“查询方式” + “多条件的连接符And | Or(select * from c where sss)”+属性名+ “查询方式”
* findByCustName:根据客户名称查询
* 在springdatajpa的运行阶段:会根据方法名称进行解析,findBy from xxx
* 属性名称 where 。。。
*/
Customer findByCustName(String custName);
Customer findByCustNameLike(String name);
/**
* 使用客户名模糊匹配和客户所属行业精准匹配的查询
*
*/
List
待总结:
- 项目内容的全部整理。
- jpa最后一部分,分页等内容的总结。
 posted on

 浙公网安备 33010602011771号