@Android View的加载流程
什么是Activity?
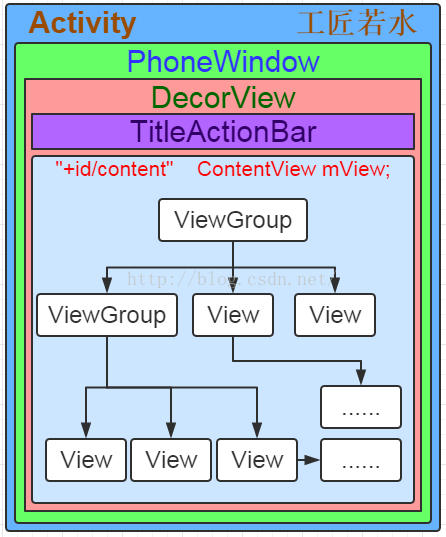
Activity是 用户操作的可视化界面;它为用户提供了一个放置视图和交互操作的窗口。采用setContentView的方法提供。因此,可以理解Activity、Window、View三者关系为。Activity提供Window ,View被添加到Window中。
以刷墙举例:
Activity可以理解为房间,Window就是房间内的墙面, 我们在墙面上可以刷各种不同的图案,这些图案就是View。
Activity View的加载流程
1、Activity在被创建之初,调用了attach方法,这个时候,为Activity创建了一个PhoneWindow, 并且为PhoneWindow设置了事件交互的回掉。
2、紧接着Activity的onCreate()方法被回掉。这里也就到了我们经常复写方法,我们在OnCreate()之中,调用setContentView(id)。
3、在setContentView(), PhoneWindow 创建了一个顶级视图 DecorView (FrameLayout)的子类。
4、紧接着,DecorView会依据一些feature(类似NO_ACTICON_BAR)来,添加一个layout。这个Layout中包含了Title、content。其中content也是FrameLayout,也就是我们在setContentView(id),将视图添加的父容器。
所以我们必须要在setContentView之前设置实现全屏
getWindow().setFlags(WindowManager.LayoutParams.FLAG_FULLSCREEN, WindowManager.LayoutParams.FLAG_FULLSCREEN);
实现无标题栏(但有系统自带的任务栏):
requestWindowFeature(Window.FEATURE_NO_TITLE);
之前一直不明白为什么android的view层次是这么个布局,现在终于有所了解了。。其实上图还有点问题,其实在DecorWindow中还有一个id为statusBarBackgroud和一个id为navigationBarBackground的View,分别表示手机的顶部的状态栏和手机底部的导航栏。。
Activity中加载布局,都是通过在onCreate中调用setContentView方法开始:
    @Override
    protected void onCreate(Bundle savedInstanceState) {
        // TODO Auto-generated method stub
        super.onCreate(savedInstanceState);
        setContentView(R.layout.main_layout);
        ButterKnife.bind(this);
    }
Activity中有setContentView重载方法,一个是layoutid,一个直接传入view
    public void setContentView(@LayoutRes int layoutResID) {
        getWindow().setContentView(layoutResID);
        initWindowDecorActionBar();
    }
    public void setContentView(View view) {
        getWindow().setContentView(view);
        initWindowDecorActionBar();
    }
实际上调用的都是PhoneWindow的setContentView方法。initWindowDecorActionBar一看就知道是初始化actionbar的
    @Override
    public void setContentView(int layoutResID) {
        // Note: FEATURE_CONTENT_TRANSITIONS may be set in the process of installing the window
        // decor, when theme attributes and the like are crystalized. Do not check the feature
        // before this happens.
        if (mContentParent == null) {
            installDecor();//如果mContentParent为空调用installDecor,初始化
        } else if (!hasFeature(FEATURE_CONTENT_TRANSITIONS)) {
            mContentParent.removeAllViews();
        }

        if (hasFeature(FEATURE_CONTENT_TRANSITIONS)) {
            final Scene newScene = Scene.getSceneForLayout(mContentParent, layoutResID,
                    getContext());
            transitionTo(newScene);
        } else {
            //可以看到mContentParent这个view作为layoutResID的parent,所以layoutResID根width/height参数有效
            mLayoutInflater.inflate(layoutResID, mContentParent);
        }
        mContentParent.requestApplyInsets();
        final Callback cb = getCallback();
        if (cb != null && !isDestroyed()) {
            cb.onContentChanged();
        }
    }

    @Override
    public void setContentView(View view) {
        setContentView(view, new ViewGroup.LayoutParams(MATCH_PARENT, MATCH_PARENT));//所以始终是MATCH_PARENT,所以该view的width/height无效
    }

    @Override
    public void setContentView(View view, ViewGroup.LayoutParams params) {
        // Note: FEATURE_CONTENT_TRANSITIONS may be set in the process of installing the window
        // decor, when theme attributes and the like are crystalized. Do not check the feature
        // before this happens.
        if (mContentParent == null) {
            installDecor();
        } else if (!hasFeature(FEATURE_CONTENT_TRANSITIONS)) {
            mContentParent.removeAllViews();
        }

        if (hasFeature(FEATURE_CONTENT_TRANSITIONS)) {
            view.setLayoutParams(params);
            final Scene newScene = new Scene(mContentParent, view);
            transitionTo(newScene);
        } else {
            mContentParent.addView(view, params);//把这个view加入到mContentParent中了,同时layoutparam为MATCH_PARENT
        }
        mContentParent.requestApplyInsets();
        final Callback cb = getCallback();
        if (cb != null && !isDestroyed()) {
            cb.onContentChanged();
        }
    }
setContentView(View view) 所以view设置的layout_width/layout_height无效,始终是MATCH_PARENT
setContentView(int layoutResID) 因为是通过inflate(id,mParent) 所以设置的layout_width/layout_height有效。。。
inflate方法的解析,可以查看Android LayoutInflater原理分析
既然mContentParent是在installDecor方法中初始化的,那么
      private void installDecor() {
        if (mDecor == null) {
            mDecor = generateDecor();//初始化mDecor这个View
            mDecor.setDescendantFocusability(ViewGroup.FOCUS_AFTER_DESCENDANTS);
            mDecor.setIsRootNamespace(true);
            if (!mInvalidatePanelMenuPosted && mInvalidatePanelMenuFeatures != 0) {
                mDecor.postOnAnimation(mInvalidatePanelMenuRunnable);
            }
        }
        if (mContentParent == null) {
            mContentParent = generateLayout(mDecor);//通过mDecor对象初始化mContentParent
            .....
        }
    .....
    }
可以看到通过generateDecor方法生成了DecorView,这个DecorView其实也是所有应用窗口的根View
private final class DecorView extends FrameLayout implements RootViewSurfaceTaker然后在generateLayout方法中初始化了mContentParent对象
    protected ViewGroup generateLayout(DecorView decor) {
        // Apply data from current theme.
        TypedArray a = getWindowStyle();
        .........

        if (a.getBoolean(R.styleable.Window_windowNoTitle, false)) { //获取theme中的设置,如果是NoTitle
            requestFeature(FEATURE_NO_TITLE);//调用该方法,表示无标题
        } else if (a.getBoolean(R.styleable.Window_windowActionBar, false)) { //获取theme中的设置,如果是ActionBar
            // Don't allow an action bar if there is no title.
            requestFeature(FEATURE_ACTION_BAR);//调用该方法,表示actionbar
        }
    .........

        int layoutResource;
        int features = getLocalFeatures();//记得上文中的requestFeature,然后就可以通过getLocalFeatures方法获取了。。其实在activity中可以调用requestFeature
        // System.out.println("Features: 0x" + Integer.toHexString(features));
        if ((features & (1 << FEATURE_SWIPE_TO_DISMISS)) != 0) {
            layoutResource = R.layout.screen_swipe_dismiss;
        }
    ..........
      else if ((features & (1 << FEATURE_NO_TITLE)) == 0) {
            // If no other features and not embedded, only need a title.
            // If the window is floating, we need a dialog layout
            if (mIsFloating) {
                TypedValue res = new TypedValue();
                getContext().getTheme().resolveAttribute(
                        R.attr.dialogTitleDecorLayout, res, true);
                layoutResource = res.resourceId;
            } else if ((features & (1 << FEATURE_ACTION_BAR)) != 0) {
                layoutResource = a.getResourceId(
                        R.styleable.Window_windowActionBarFullscreenDecorLayout,
                        R.layout.screen_action_bar);
            } else {
                layoutResource = R.layout.screen_title;
            }
            // System.out.println("Title!");
        } else if ((features & (1 << FEATURE_ACTION_MODE_OVERLAY)) != 0) {
            layoutResource = R.layout.screen_simple_overlay_action_mode;
        } else {
            // Embedded, so no decoration is needed.
            layoutResource = R.layout.screen_simple;
            // System.out.println("Simple!");
        }
    ............

        View in = mLayoutInflater.inflate(layoutResource, null);
        decor.addView(in, new ViewGroup.LayoutParams(MATCH_PARENT, MATCH_PARENT));//把上述得到的layoutResource添加到decor中
        mContentRoot = (ViewGroup) in;

        ViewGroup contentParent = (ViewGroup)findViewById(ID_ANDROID_CONTENT);//获取id=content的view作为contenparent
    ............
    }
可以看见上面方法主要作用就是根据窗口的风格修饰类型为该窗口选择不同的窗口根布局文件。mDecor做为根视图将该窗口根布局添加进去,然后获取id为content的FrameLayout返回给mContentParent对象。所以installDecor方法实质就是产生mDecor和mContentParent对象。
另一方面如果要设置窗口风格,必须放在setContentView的前面
requestWindowFeature(Window.FEATURE_NO_TITLE);//getLocalFeatures方法中被获取
setContentView(R.layout.test_layout);
当窗口风格是NoTitle,同时没有actionbar的时候,那么窗口根布局就是screen_title.xml.xml
<LinearLayout xmlns:android="http://schemas.android.com/apk/res/android"
    android:orientation="vertical"
    android:fitsSystemWindows="true">
    <!-- Popout bar for action modes -->
    <ViewStub android:id="@+id/action_mode_bar_stub"
              android:inflatedId="@+id/action_mode_bar"
              android:layout="@layout/action_mode_bar"
              android:layout_width="match_parent"
              android:layout_height="wrap_content"
              android:theme="?attr/actionBarTheme" />
    <FrameLayout
        android:layout_width="match_parent"
        android:layout_height="?android:attr/windowTitleSize"
        style="?android:attr/windowTitleBackgroundStyle">
        <TextView android:id="@android:id/title"
            style="?android:attr/windowTitleStyle"
            android:background="@null"
            android:fadingEdge="horizontal"
            android:gravity="center_vertical"
            android:layout_width="match_parent"
            android:layout_height="match_parent" />
    </FrameLayout>
    <FrameLayout android:id="@android:id/content"
        android:layout_width="match_parent"
        android:layout_height="0dip"
        android:layout_weight="1"
        android:foregroundGravity="fill_horizontal|top"
        android:foreground="?android:attr/windowContentOverlay" />
</LinearLayout>
@android:id/content 这个其实就是mContentParent,同时还有@+id/action_mode_bar_stub的ViewStub,都被添加到了DecorView中去了
为了验证这个猜测,打开Android\android-sdk\tools\hierarchyviewer工具验证
在我的代码中,既没有设置title也没有设置actionbar
<LinearLayout xmlns:android="http://schemas.android.com/apk/res/android"
              android:layout_width="match_parent"
              android:layout_height="match_parent"
              android:gravity="center"
              android:orientation="vertical">

    <Button
        android:id="@+id/test"
        android:text="Test"
        android:layout_width="wrap_content"
        android:layout_height="wrap_content"/>
    <Button
        android:id="@+id/startAnim"
        android:layout_marginTop="100dp"
        android:background="@android:color/holo_red_dark"
        android:layout_width="wrap_content"
        android:layout_height="wrap_content"
        android:text="start"/>

</LinearLayout>
    <style name="AppTheme.NoActionBar">
        <item name="windowActionBar">false</item>
        <item name="windowNoTitle">true</item>
    </style>
所以最后整个view视图层次如下图
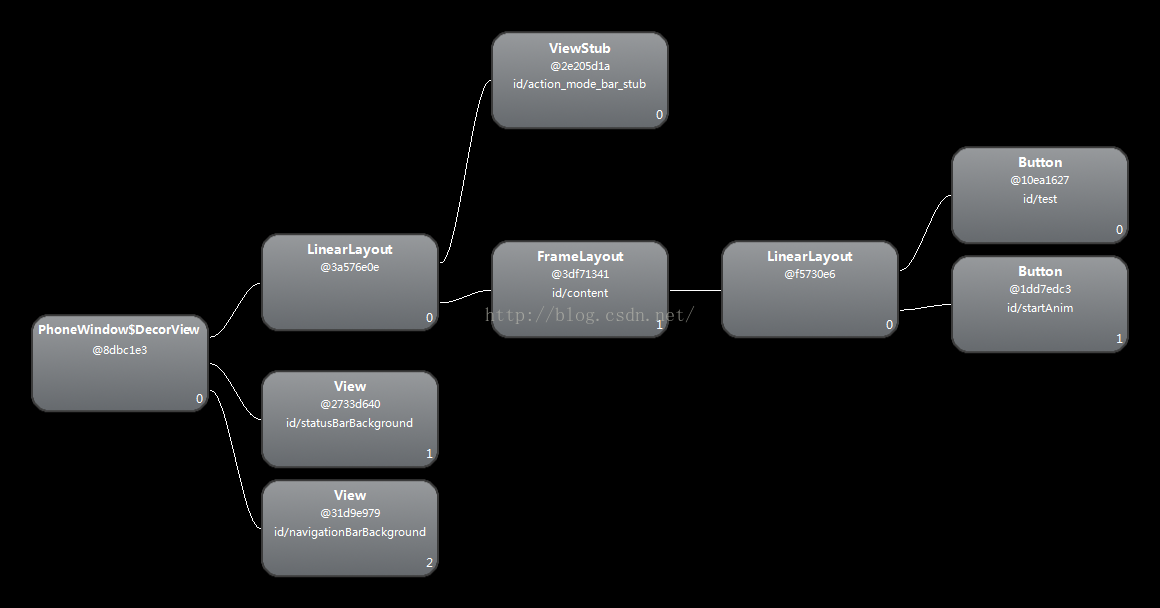
DecorView果然作为根View,其下有三个子view,id为statusBarBackgroud和id为navigationBarBackground的View,分别表示手机的顶部的状态栏和手机底部的导航栏。然后是一个LinearLayout,很明显这个就是上面提到的screen_title.xml.xml中的根LinearLayout。然后包括一个@+id/action_mode_bar_stub的ViewStub,一个@android:id/content的FrameLayout,,,然后因为在setContentView中,下面两种方式都把这个FrameLayout作为了main_activity.xml的根视图。。
mLayoutInflater.inflate(layoutResID, mContentParent);
mContentParent.addView(view, params);
最后inflate内部其实还是调用addview,然后一直如果该view是viewgroup,那么viewgroup又会把其中所有的子view都add进去,所以最后view就形成了一个视图层次。
inflate原理可以参考 Android LayoutInflater原理分析
那最后知道了所有的view的根viewgroup就是上面的decorview,那么这个decorview又是在哪里被添加的呢?
handler机制我们知道了启动Activity其实都会启动activityThread的main方法,这个方法里面会创建主线程的looper。
启动Activity调用完ActivityThread的main方法之后,接着调用ActivityThread类performLaunchActivity来创建要启动的Activity组件,
在创建Activity组件的过程中,还会为该Activity组件创建窗口对象和视图对象;接着Activity组件创建完成之后,通过调用ActivityThread类的handleResumeActivity将它激活。
(在onCreate中调用了setContentView,所以把除了decorView之外的所有的view都已经添加进去了。)handleResumeActivity中把decorView添加进去了
handleResumeActivity方法中调用了r.activity.makeVisible();
    final void handleResumeActivity(IBinder token,
            boolean clearHide, boolean isForward, boolean reallyResume) {
        // If we are getting ready to gc after going to the background, well
        // we are back active so skip it.
        ......
        // TODO Push resumeArgs into the activity for consideration
        ActivityClientRecord r = performResumeActivity(token, clearHide);

        if (r != null) {
            ......
            // If the window hasn't yet been added to the window manager,
            // and this guy didn't finish itself or start another activity,
            // then go ahead and add the window.
            ......
            // If the window has already been added, but during resume
            // we started another activity, then don't yet make the
            // window visible.
            ......
            // The window is now visible if it has been added, we are not
            // simply finishing, and we are not starting another activity.
            if (!r.activity.mFinished && willBeVisible
                    && r.activity.mDecor != null && !r.hideForNow) {
                ......
                if (r.activity.mVisibleFromClient) {
                    r.activity.makeVisible();
                }
            }
            ......
        } else {
            // If an exception was thrown when trying to resume, then
            // just end this activity.
            ......
        }
    }
Activity中makeVisible方法,把这个DecorView添加到wm中。。
    void makeVisible() {
        if (!mWindowAdded) {
            ViewManager wm = getWindowManager();
            wm.addView(mDecor, getWindow().getAttributes());
            mWindowAdded = true;
        }
        mDecor.setVisibility(View.VISIBLE);
    }
另一方面,wm.addView实际上调用的是WindowManagerGlobal中addView方法,此时创建了ViewRootImpl对象。。ViewRootImpl有木有很熟悉,在绘制View过程中,就是从ViewRootImpl的performTraversals方法开始的,然后依次经过测量,布局,绘制过程。。invalidate其实最后也是调用了ViewRootImpl的performTraversals方法
    public void addView(View view, ViewGroup.LayoutParams params, Display display, Window parentWindow) {
        ............
        ViewRootImpl root;
        View panelParentView = null;

        ............
        root = new ViewRootImpl(view.getContext(), display);
        view.setLayoutParams(wparams);
        mViews.add(view);
        mRoots.add(root);
        mParams.add(wparams);
    }
总结一下:
1.创建一个DecorView的对象mDecor,该mDecor对象将作为整个应用窗口的根视图。
2.依据Feature等style theme创建不同的窗口修饰布局文件,并且通过findViewById获取Activity布局文件该存放的地方(窗口修饰布局文件中id为content的FrameLayout)。
3.将Activity的布局文件添加至id为content的FrameLayout内。

 浙公网安备 33010602011771号