
微信小程序自定义导航栏
十年河东,十年河西,莫欺少年穷
学无止境,精益求精

鄙人最初Net程序猿一枚,因被逼,自学了物联网及网络编程,又被逼,逐又自学了VUE及React,后又被逼,做起了小程序开发
人呐,都是被逼出来的
为什么要自定义navigationBar?
原生导航栏的限制
- 除了胶囊按钮以外,原生导航栏只会出现返回按钮和当用户打开的小程序最底层页面是非首页时,默认展示的“返回首页”按钮 。
- 原生导航栏的标题文字的颜色只有黑白。
- 布局无法改变,不能做定制。
navigationBar是什么?
- 微信小程序一般来说有两个bar,一个导航栏,一个tabbar(小程序下方一排切换按钮),实现下方自定义tabbar的方法一般来说较为简单,现在着重叙述上方自定义导航栏的实现。
小程序布局
- 谈到导航栏与自定义导航栏,就需要解释一下微信小程序的布局了。在小程序开发中使用wx.getSystemInfo() 方法可以获取到系统信息。

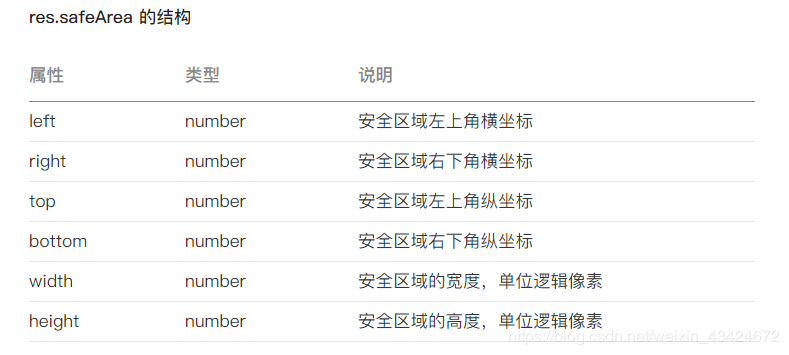
- 部分获取到的信息如上图(截取自微信小程序开发者文档),对我们理解布局有用的信息是以上跟宽度高度相关的属性,如当前设备的屏幕高宽,可用高宽,以及saveArea。
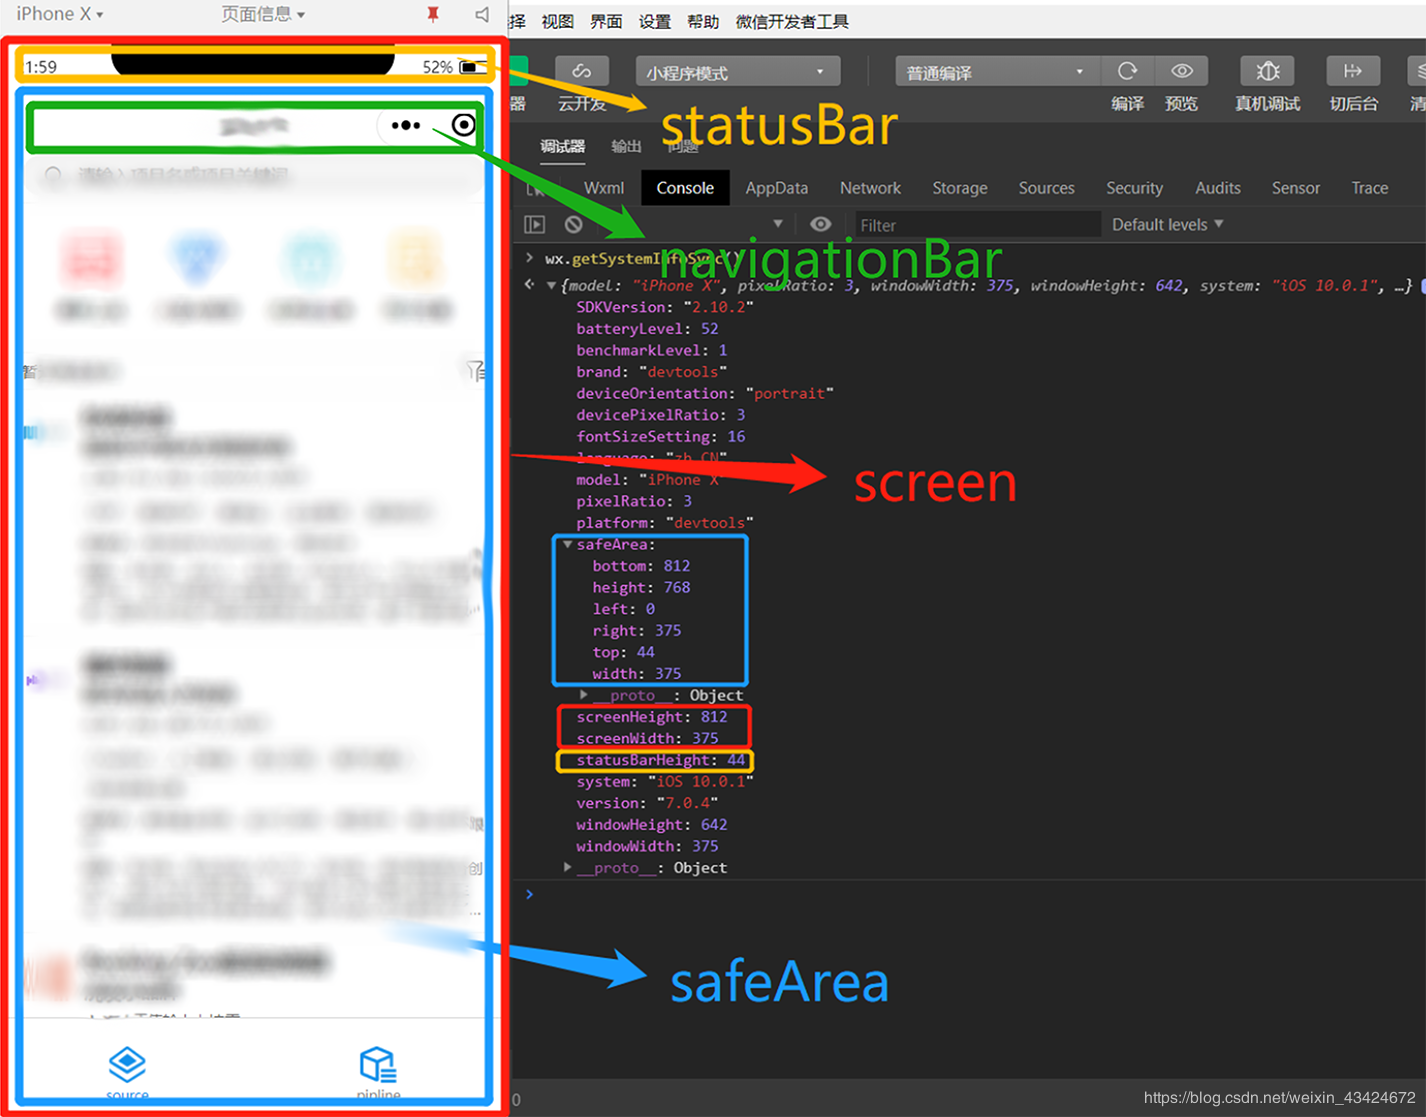
- 上图展示我们从systemInfo获取到的数据的实际表现,以苹果X的刘海屏为例(所有安卓刘海屏原理类似):最外层的红色框即屏幕大小,蓝色框即安全区域字面意思也就是开发者所能操纵的页面区域,上面的黄色框即手机的状态栏,绿色区域即我们要自定义的navigationBar。
- 可见,导航栏紧贴safeArea的上部,如果使用原生导航栏,导航栏下方即是真正意义的可操控范围。
- 实际上我们自定义的导航栏也是在这个safeArea内与胶囊对齐最为和谐。很关键的原因就是微信将右上角的胶囊按钮作为了内置组件,只有黑白两种颜色,即我们无法改变它的大小位置透明度等等,所以为了配合胶囊按钮,一般自定义的导航栏位置也与上图位置一致。
自定义navigationBar怎么做?
去掉原生导航栏。
- 将需要自定义navigationBar页面的page.json的navigationBarTitleText去掉。
- 加上"navigationStyle":"custom",这样原生的导航栏就已经消失,甚至后退键也不会出现需要自定义。
- 另外,早在2016年微信已经开始适配沉浸式状态栏,目前几乎所有的机型里微信都是沉浸式状态栏,也就是说去掉原生导航栏的同时,整个屏幕已经成为可编程区域。
计算navigationBarHeight。
- 原生的胶囊按钮当然存在,那么下一步就需要你去定位出自定义的导航栏高度以及位置。
- 对于不同的机型,对于不同的系统,状态栏以及胶囊按钮的位置都不确定,所以需要用到一定的计算,从而面对任何机型都可以从容判定。
- 使用wx.getSystemInfo()获取到statusBarHeight,这样就确定了导航栏最基本的距离屏幕上方的据里。
- 使用wx.getMenuButtonBoundingClientRect()获取到小程序的胶囊信息(注意这个api存在各种问题,在不同端表现不一致,后面会叙述这个api调用失败的处理情况),如下图,以下坐标信息以屏幕左上角为原点。

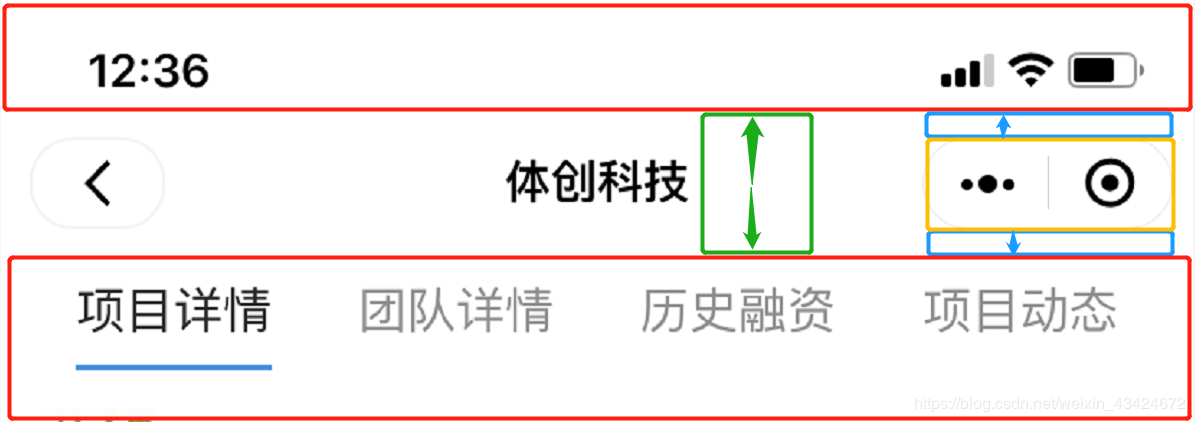
- 以下图为例,上面的红色框是statusBar,高度已知;下面的红色框是正文内容,夹在中间的就是求解之一navigationBarHeight;而黄色的是原生胶囊按钮也是在垂直居中位置,高度为胶囊按钮基于左上角的坐标信息已知,不难得出,navigationBarHeight = 蓝色框高度 × 2 + 胶囊按钮.height。(蓝色框高度 = 胶囊按钮.top - statusBarHeight)
-
最后的计算公式为:navigationBarHeight = (胶囊按钮.top - statusBarHeight) × 2 + 胶囊按钮.height。navigationBar 距屏幕上方的距离即为navigationBarHeight。
-
这种计算方法在各种机型以及安卓ios都适用。
-
针对"wx.getMenuButtonBoundingClientRect()"获取错误或者获取数据为0的极少数情况,只能够去模拟,对于android,一般navigationBarHeight为48px,而对于ios一般为40px,所有机型的胶囊按钮高度是32px笔者也是通过网上很多的文章和自测得出的,这种误差一般可以忽略。当然最理想的就是微信可以hold住所有机型,呵呵。最后提醒一下仅以真机为准,开发者工具的bug就更多不说了。
代码实现
- 获取本机信息,笔者一般写在App的onLaunch中。
App.JS ,鄙人将获取到的相关信息存放在了全局数据中 【APPJS中判断了是否是分享进来的场景值,如果是分享进来的,则不显示返回按钮】
场景值可参考:https://developers.weixin.qq.com/miniprogram/dev/reference/scene-list.html


import {
  request
} from "./Request/Request";
App({
  globalData: {
    statusBarHeight: 0, //状态栏高度
    menuButtonHeight: 0, //胶囊按钮高度
    navigationBarHeight: 0, //计算得出的导航栏高度
    navigationBarAndStatusBarHeight: 0, //导航栏和状态栏高度之和
    platform: "", //手机型号 android 或 IOS
    isShare:false //是否由分享而来
  },
  request: request,
  /**
   * 当小程序初始化完成时,会触发 onLaunch(全局只触发一次)
   */
  onLaunch: function (options) {
    let that = this;
     // 判断是否由分享进入小程序  从分享进入小程序时 返回上一级按钮不应该存在
     if (options.scene == 1007 || options.scene == 1008) {
      tthathis.globalData.isShare = true;
    } else {
      that.globalData.isShare = false;
    };

    const {
      statusBarHeight,
      platform
    } = wx.getSystemInfoSync();//获取系统信息

    const {
      top,
      height
    } = wx.getMenuButtonBoundingClientRect();

    console.log(wx.getSystemInfoSync())
    that.globalData.platform=platform;
    //状态栏高度
    that.globalData.statusBarHeight = statusBarHeight;
    // 胶囊按钮高度 一般是32px 如果获取不到就使用32px
    that.globalData.menuButtonHeight = height ? height : 32;
    // 判断胶囊按钮信息是否成功获取
    if (top && top !== 0 && height && height !== 0) {
      // 导航栏高度
      that.globalData.navigationBarHeight = (top - statusBarHeight) * 2 + height
    } else {
      //个别手机获取不到 根据机型进行赋值
      that.globalData.navigationBarHeight = platform === 'android' ? 48 : 40
    }
    //用于绝对定位 占用空间
    that.globalData.navigationBarAndStatusBarHeight= that.globalData.navigationBarHeight+that.globalData.statusBarHeight;
  },
  /**
   * 当小程序启动,或从后台进入前台显示,会触发 onShow
   */
  onShow: function (options) {

  },

  /**
   * 当小程序从前台进入后台,会触发 onHide
   */
  onHide: function () {

  },

  /**
   * 当小程序发生脚本错误,或者 api 调用失败时,会触发 onError 并带上错误信息
   */
  onError: function (msg) {

  }
})
App.Json 中 window 配置 【切莫将背景色设置为黑色,否则时间,电量等信息显示不出来】
  "window":{
    "navigationBarBackgroundColor": "#FFF",
    "navigationBarTitleText": "陈大六的小程序",
    "navigationBarTextStyle":"black",
    "enablePullDownRefresh":true,
    "backgroundTextStyle":"dark",
    "onReachBottomDistance":100
  },
在组件Components中创建 navigationBar 文件夹及 navigationBar 组件
navigationBar.js
var app = getApp();
Component({
  /**
   * 组件的属性列表
   */
  properties: {
    title: { //导航栏标题
      type: String,
      value: "wecaht"
    },
    navigationtype: { //跳转方式
      type: String,
      value: "navigateTo"
    },
    navigationurl: { //URL
      type: String,
      value: "/pages/index/index"
    }
  },

  /**
   * 组件的初始数据
   */
  data: {
    //是否是分享页面 由分享而来 不展示返回按钮
    isShare: app.globalData.isShare,
    // 状态栏高度
    statusBarHeight: app.globalData.statusBarHeight + 'px',
    // 导航栏高度
    navigationBarHeight: app.globalData.navigationBarHeight + 'px',
    // 胶囊按钮高度
    menuButtonHeight: app.globalData.menuButtonHeight + 'px',
    // 导航栏和状态栏高度
    navigationBarAndStatusBarHeight: app.globalData.navigationBarAndStatusBarHeight + 'px'
  },

  /**
   * 组件的方法列表
   */
  methods: {
    GoBack(e) {
      let that=this;
      let url=e.currentTarget.dataset.navigationurl;
      //console.log(e)
      if (e.currentTarget.dataset.navigationtype == "navigateTo") {
        wx.navigateTo({
          url: url,
        })
      }
      if (e.currentTarget.dataset.navigationtype== "navigateBack") {
        wx.navigateBack({
          url: url,
        })
      }
    }
  }
})
.navigationBar.wxml 【分享进来的页面,不显示返回按钮】

代码如下:
<!--navigationBar.wxml-->
<view class="navigation-container" style="{{'height: ' + navigationBarAndStatusBarHeight}}">
    <!--空白来占位状态栏-->
    <view  style="{{'height: ' + statusBarHeight}}"></view>
    <!--自定义导航栏-->
    <view class="navigation-bar" style="{{'height:' + navigationBarHeight}}">
        <view bindtap="GoBack" data-navigationtype="{{navigationtype}}" data-navigationurl="{{navigationurl}}" class="navigation-buttons" style="{{'height:' + menuButtonHeight}}">
            <image wx:if="{{!isShare}}" class="nav-img" src='/pages/images/reback.png' mode="widthFix"/>
        </view>
        <view class="navigation-title" style="{{'line-height:' + navigationBarHeight}}">{{title}}</view>
    </view>
</view>
 <!--空白占位,填充定位造成的空间飘逸-->
<view style="{{'height: ' + navigationBarAndStatusBarHeight}}"></view>
.navigationBar.wxml 样式如下:
/* navigationBar.wxss */
.navigation-container {
  position: fixed;
  width: 100%;
  z-index: 9999999;
  top: 0;
  left: 0;
  background-color: #ffffff;
}

.navigation-bar {
  position: relative;
  display: flex;
  flex-direction: row;
  align-items: center;
}

.navigation-buttons {
  display: flex;
  align-items: center;
  margin-left: 10px;
  box-sizing: border-box;
  background-color: transparent;
  width: 68rpx;
}

.statusbarClas {
  background: transparent;
  color:black;
}

.nav-img {
  width: 16rpx;
}

.navigation-title {
  position: absolute;
  left: 104px;
  right: 104px;
  text-align: center;
  font-size: 30rpx;
  color: #000000;
  overflow: hidden;
  text-overflow: ellipsis;
  white-space: nowrap;
  font-family: 楷体;
}
外部页面引用该组件如下,
.Json文件,引入组件
{
  "usingComponents": {
    "navigationBar":"../Components/navigationBar/navigationBar"
  },
  "navigationStyle":"custom"
}
注意添加属性:"navigationStyle":"custom" 代表我们要自定义组件
.wxss文件,样式如下:
/* packageA/component/successlv.wxss */

.table{
  width: 100%;
  /* width: calc(100% - 52rpx); */
  /* height: calc(100vh - 450rpx); */
  height: 540rpx;
  box-sizing: border-box;
  /* padding: 0 26rpx; */
  /* margin-left: 26rpx; */
  background-color: #fff;
}


.dxBox{
  height: 128rpx;
  width: 100%;
  margin-top: 24rpx;
  display: flex;
  justify-content: space-between;
  align-items: center;
  background-color: #fff;
  font-size: 28rpx;
  color: #303133;
  font-weight: 600;
  font-family: PingFangSC;
  padding: 0 40rpx 0 40rpx;
  box-sizing: border-box;
}
.wxml代码如下:
<navigationBar title="自定义导航栏" navigationtype="navigateTo" navigationurl="/pages/echarts/echarts"></navigationBar>
<view class="dxBox">
  <view>{{title}}</view>
  <view style="color:#727273">今日:2358次</view>
</view>
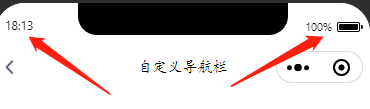
最终效果如下:
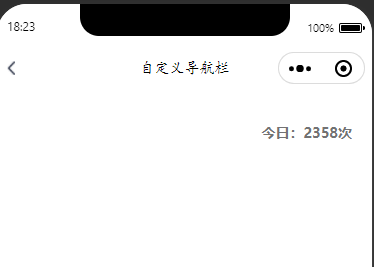
自定义组件中需要父页面传值 Title 、navigationtype 、 navigationurl 三个属性,用来展示导航标题、 跳转方式、跳转地址。
以上便是鄙人封装的自定义导航栏
参考博客:
https://www.cnblogs.com/lst619247/p/13255097.html
https://www.jianshu.com/p/7393c800ba09
@天才卧龙的博客

 浙公网安备 33010602011771号