
Linux CentOS7 系统下安装及卸载Docker 及 配置阿里云镜像加速 及 Docker C/S架构
十年河东,十年河西,莫欺少年穷
学无止境,精益求精
1、查看Linux操作系统
切换目录到etc
sudo cd /etc/
查看系统配置
cat os-release
我的配置如下:
NAME="CentOS Linux"
VERSION="7 (Core)"
ID="centos"
ID_LIKE="rhel fedora"
VERSION_ID="7"
PRETTY_NAME="CentOS Linux 7 (Core)"
ANSI_COLOR="0;31"
CPE_NAME="cpe:/o:centos:centos:7"
HOME_URL="https://www.centos.org/"
BUG_REPORT_URL="https://bugs.centos.org/"

CENTOS_MANTISBT_PROJECT="CentOS-7"
CENTOS_MANTISBT_PROJECT_VERSION="7"
REDHAT_SUPPORT_PRODUCT="centos"
REDHAT_SUPPORT_PRODUCT_VERSION="7"
由上可知,我的系统为CentOS 7
3、安装之前写清除之前安装的Docker
sudo yum remove docker \
                  docker-client \
                  docker-client-latest \
                  docker-common \
                  docker-latest \
                  docker-latest-logrotate \
                  docker-logrotate \
                  docker-engine
4、安装yum-utils包(提供yum-config-manager 实用程序)
sudo yum install -y yum-utils
5、配置镜像地址【官方文档提供的镜像地址为国外服务器地址,非常慢,这里使用阿里云镜像地址】
sudo yum-config-manager --add-repo http://mirrors.aliyun.com/docker-ce/linux/centos/docker-ce.repo
6、重新建立缓存区【使配置的镜像地址生效】
yum makecache fast
7、安装docker 【安装过程中会有提问,输入 y 继续下一步】
sudo yum install docker-ce docker-ce-cli containerd.io
8、开启docker 【类似于windows服务】
sudo systemctl start docker
9、检查docker 是否安装成功
docker -v
如果输出以下内容,则证明安装成功
Docker version 20.10.14, build a224086
卸载 Docker 引擎
-
卸载 Docker 引擎、CLI 和 Containerd 软件包:
sudo yum remove docker-ce docker-ce-cli containerd.io
2.移除安装文件及相关容器
 sudo rm -rf /var/lib/docker
 sudo rm -rf /var/lib/containerd
参考文档:https://docs.docker.com/engine/install/centos/
我的全部脚本


[root@localhost etc]# cat os-release
NAME="CentOS Linux"
VERSION="7 (Core)"
ID="centos"
ID_LIKE="rhel fedora"
VERSION_ID="7"
PRETTY_NAME="CentOS Linux 7 (Core)"
ANSI_COLOR="0;31"
CPE_NAME="cpe:/o:centos:centos:7"
HOME_URL="https://www.centos.org/"
BUG_REPORT_URL="https://bugs.centos.org/"

CENTOS_MANTISBT_PROJECT="CentOS-7"
CENTOS_MANTISBT_PROJECT_VERSION="7"
REDHAT_SUPPORT_PRODUCT="centos"
REDHAT_SUPPORT_PRODUCT_VERSION="7"

[root@localhost etc]# clear

[root@localhost etc]# sudo yum remove docker \
>                   docker-client \
>                   docker-client-latest \
>                   docker-common \
>                   docker-latest \
>                   docker-latest-logrotate \
>                   docker-logrotate \
>                   docker-engine
已加载插件:fastestmirror, langpacks
参数 docker 没有匹配
参数 docker-client 没有匹配
参数 docker-client-latest 没有匹配
参数 docker-common 没有匹配
参数 docker-latest 没有匹配
参数 docker-latest-logrotate 没有匹配
参数 docker-logrotate 没有匹配
参数 docker-engine 没有匹配
不删除任何软件包
[root@localhost etc]# sudo yum install -y yum-utils
已加载插件:fastestmirror, langpacks
Loading mirror speeds from cached hostfile
 * base: mirrors.cn99.com
 * extras: mirrors.cn99.com
 * updates: mirrors.cn99.com
base                                          | 3.6 kB     00:00
extras                                        | 2.9 kB     00:00
updates                                       | 2.9 kB     00:00
(1/4): base/7/x86_64/group_gz                   | 153 kB   00:00
(2/4): extras/7/x86_64/primary_db               | 246 kB   00:00
(3/4): base/7/x86_64/primary_db                 | 6.1 MB   00:03
(4/4): updates/7/x86_64/primary_db              |  14 MB   00:07
软件包 yum-utils-1.1.31-54.el7_8.noarch 已安装并且是最新版本
无须任何处理
[root@localhost etc]# yum-config-manager --add-repo http://mirrors.aliyun.com/docker-ce/linux/centos/docker-ce.repo
已加载插件:fastestmirror, langpacks
adding repo from: http://mirrors.aliyun.com/docker-ce/linux/centos/docker-ce.repo
grabbing file http://mirrors.aliyun.com/docker-ce/linux/centos/docker-ce.repo to /etc/yum.repos.d/docker-ce.repo
repo saved to /etc/yum.repos.d/docker-ce.repo
[root@localhost etc]# yum makecache fast
已加载插件:fastestmirror, langpacks
Loading mirror speeds from cached hostfile
 * base: mirrors.ustc.edu.cn
 * extras: mirrors.ustc.edu.cn
 * updates: mirrors.ustc.edu.cn
base                                          | 3.6 kB     00:00
docker-ce-stable                              | 3.5 kB     00:00
extras                                        | 2.9 kB     00:00
updates                                       | 2.9 kB     00:00
(1/2): docker-ce-stable/7/x86_64/updateinfo     |   55 B   00:00
(2/2): docker-ce-stable/7/x86_64/primary_db     |  75 kB   00:00
元数据缓存已建立
[root@localhost etc]# sudo yum install docker-ce docker-ce-cli containerd.io
已加载插件:fastestmirror, langpacks
Loading mirror speeds from cached hostfile
 * base: mirrors.ustc.edu.cn
 * extras: mirrors.ustc.edu.cn
 * updates: mirrors.ustc.edu.cn
正在解决依赖关系
--> 正在检查事务
---> 软件包 containerd.io.x86_64.0.1.5.11-3.1.el7 将被 安装
--> 正在处理依赖关系 container-selinux >= 2:2.74,它被软件包 containerd.io-1.5.11-3.1.el7.x86_64 需要
---> 软件包 docker-ce.x86_64.3.20.10.14-3.el7 将被 安装
--> 正在处理依赖关系 docker-ce-rootless-extras,它被软件包 3:docker-ce-20.10.14-3.el7.x86_64 需要
---> 软件包 docker-ce-cli.x86_64.1.20.10.14-3.el7 将被 安装
--> 正在处理依赖关系 docker-scan-plugin(x86-64),它被软件包 1:docker-ce-cli-20.10.14-3.el7.x86_64 需要
--> 正在检查事务
---> 软件包 container-selinux.noarch.2.2.119.2-1.911c772.el7_8 将被 安装
---> 软件包 docker-ce-rootless-extras.x86_64.0.20.10.14-3.el7 将被 安装
--> 正在处理依赖关系 fuse-overlayfs >= 0.7,它被软件包 docker-ce-rootless-extras-20.10.14-3.el7.x86_64 需要
--> 正在处理依赖关系 slirp4netns >= 0.4,它被软件包 docker-ce-rootless-extras-20.10.14-3.el7.x86_64 需要
---> 软件包 docker-scan-plugin.x86_64.0.0.17.0-3.el7 将被 安装
--> 正在检查事务
---> 软件包 fuse-overlayfs.x86_64.0.0.7.2-6.el7_8 将被 安装
--> 正在处理依赖关系 libfuse3.so.3(FUSE_3.2)(64bit),它被软件包 fuse-overlayfs-0.7.2-6.el7_8.x86_64 需要
--> 正在处理依赖关系 libfuse3.so.3(FUSE_3.0)(64bit),它被软件包 fuse-overlayfs-0.7.2-6.el7_8.x86_64 需要
--> 正在处理依赖关系 libfuse3.so.3()(64bit),它被软件包 fuse-overlayfs-0.7.2-6.el7_8.x86_64 需要
---> 软件包 slirp4netns.x86_64.0.0.4.3-4.el7_8 将被 安装
--> 正在检查事务
---> 软件包 fuse3-libs.x86_64.0.3.6.1-4.el7 将被 安装
--> 解决依赖关系完成

依赖关系解决

=====================================================================
 Package             架构   版本              源                大小
=====================================================================
正在安装:
 containerd.io       x86_64 1.5.11-3.1.el7    docker-ce-stable  29 M
 docker-ce           x86_64 3:20.10.14-3.el7  docker-ce-stable  22 M
 docker-ce-cli       x86_64 1:20.10.14-3.el7  docker-ce-stable  30 M
为依赖而安装:
 container-selinux   noarch 2:2.119.2-1.911c772.el7_8
                                              extras            40 k
 docker-ce-rootless-extras
                     x86_64 20.10.14-3.el7    docker-ce-stable 8.1 M
 docker-scan-plugin  x86_64 0.17.0-3.el7      docker-ce-stable 3.7 M
 fuse-overlayfs      x86_64 0.7.2-6.el7_8     extras            54 k
 fuse3-libs          x86_64 3.6.1-4.el7       extras            82 k
 slirp4netns         x86_64 0.4.3-4.el7_8     extras            81 k

事务概要
=====================================================================
安装  3 软件包 (+6 依赖软件包)

总下载量:94 M
安装大小:378 M
Is this ok [y/d/N]: y
Downloading packages:
警告:/var/cache/yum/x86_64/7/extras/packages/container-selinux-2.119.2-1.911c772.el7_8.noarch.rpm: 头V3 RSA/SHA256 Signature, 密钥 ID f4a80eb5: NOKEY
container-selinux-2.119.2-1.911c772.el7_8.noarch.rpm 的公钥尚未安装
(1/9): container-selinux-2.119.2-1.911c772.el7_ |  40 kB   00:00
警告:/var/cache/yum/x86_64/7/docker-ce-stable/packages/docker-ce-20.10.14-3.el7.x86_64.rpm: 头V4 RSA/SHA512 Signature, 密钥 ID 621e9f35: NOKEY
docker-ce-20.10.14-3.el7.x86_64.rpm 的公钥尚未安装
(2/9): docker-ce-20.10.14-3.el7.x86_64.rpm      |  22 MB   00:20
(3/9): containerd.io-1.5.11-3.1.el7.x86_64.rpm  |  29 MB   00:22
(4/9): docker-ce-rootless-extras-20.10.14-3.el7 | 8.1 MB   00:08
(5/9): fuse-overlayfs-0.7.2-6.el7_8.x86_64.rpm  |  54 kB   00:00
(6/9): slirp4netns-0.4.3-4.el7_8.x86_64.rpm     |  81 kB   00:00
(7/9): fuse3-libs-3.6.1-4.el7.x86_64.rpm        |  82 kB   00:00
(8/9): docker-scan-plugin-0.17.0-3.el7.x86_64.r | 3.7 MB   00:03
(9/9): docker-ce-cli-20.10.14-3.el7.x86_64.rpm  |  30 MB   00:22
---------------------------------------------------------------------
总计                                    2.2 MB/s |  94 MB  00:42
从 https://mirrors.aliyun.com/docker-ce/linux/centos/gpg 检索密钥
导入 GPG key 0x621E9F35:
 用户ID     : "Docker Release (CE rpm) <docker@docker.com>"
 指纹       : 060a 61c5 1b55 8a7f 742b 77aa c52f eb6b 621e 9f35
 来自       : https://mirrors.aliyun.com/docker-ce/linux/centos/gpg
是否继续?[y/N]:y
从 file:///etc/pki/rpm-gpg/RPM-GPG-KEY-CentOS-7 检索密钥
导入 GPG key 0xF4A80EB5:
 用户ID     : "CentOS-7 Key (CentOS 7 Official Signing Key) <security@centos.org>"
 指纹       : 6341 ab27 53d7 8a78 a7c2 7bb1 24c6 a8a7 f4a8 0eb5
 软件包     : centos-release-7-9.2009.0.el7.centos.x86_64 (@anaconda)
 来自       : /etc/pki/rpm-gpg/RPM-GPG-KEY-CentOS-7
是否继续?[y/N]:y
Running transaction check
Running transaction test
Transaction test succeeded
Running transaction
  正在安装    : docker-scan-plugin-0.17.0-3.el7.x86_64           1/9
  正在安装    : 1:docker-ce-cli-20.10.14-3.el7.x86_64            2/9
  正在安装    : 2:container-selinux-2.119.2-1.911c772.el7_8.no   3/9
  正在安装    : containerd.io-1.5.11-3.1.el7.x86_64              4/9
  正在安装    : slirp4netns-0.4.3-4.el7_8.x86_64                 5/9
  正在安装    : fuse3-libs-3.6.1-4.el7.x86_64                    6/9
  正在安装    : fuse-overlayfs-0.7.2-6.el7_8.x86_64              7/9
  正在安装    : docker-ce-rootless-extras-20.10.14-3.el7.x86_6   8/9
  正在安装    : 3:docker-ce-20.10.14-3.el7.x86_64                9/9
  验证中      : 3:docker-ce-20.10.14-3.el7.x86_64                1/9
  验证中      : containerd.io-1.5.11-3.1.el7.x86_64              2/9
  验证中      : fuse3-libs-3.6.1-4.el7.x86_64                    3/9
  验证中      : fuse-overlayfs-0.7.2-6.el7_8.x86_64              4/9
  验证中      : docker-ce-rootless-extras-20.10.14-3.el7.x86_6   5/9
  验证中      : slirp4netns-0.4.3-4.el7_8.x86_64                 6/9
  验证中      : 2:container-selinux-2.119.2-1.911c772.el7_8.no   7/9
  验证中      : 1:docker-ce-cli-20.10.14-3.el7.x86_64            8/9
  验证中      : docker-scan-plugin-0.17.0-3.el7.x86_64           9/9

已安装:
  containerd.io.x86_64 0:1.5.11-3.1.el7
  docker-ce.x86_64 3:20.10.14-3.el7
  docker-ce-cli.x86_64 1:20.10.14-3.el7

作为依赖被安装:
  container-selinux.noarch 2:2.119.2-1.911c772.el7_8
  docker-ce-rootless-extras.x86_64 0:20.10.14-3.el7
  docker-scan-plugin.x86_64 0:0.17.0-3.el7
  fuse-overlayfs.x86_64 0:0.7.2-6.el7_8
  fuse3-libs.x86_64 0:3.6.1-4.el7
  slirp4netns.x86_64 0:0.4.3-4.el7_8

完毕!
[root@localhost etc]# start docker
bash: start: 未找到命令...
[root@localhost etc]# sudo systemctl start docker
[root@localhost etc]# sudo docker run hello-world
Unable to find image 'hello-world:latest' locally
latest: Pulling from library/hello-world
2db29710123e: Pull complete
Digest: sha256:bfea6278a0a267fad2634554f4f0c6f31981eea41c553fdf5a83e95a41d40c38
Status: Downloaded newer image for hello-world:latest

Hello from Docker!
This message shows that your installation appears to be working correctly.

To generate this message, Docker took the following steps:
 1. The Docker client contacted the Docker daemon.
 2. The Docker daemon pulled the "hello-world" image from the Docker Hub.
    (amd64)
 3. The Docker daemon created a new container from that image which runs the
    executable that produces the output you are currently reading.
 4. The Docker daemon streamed that output to the Docker client, which sent it
    to your terminal.

To try something more ambitious, you can run an Ubuntu container with:
 $ docker run -it ubuntu bash

Share images, automate workflows, and more with a free Docker ID:
 https://hub.docker.com/

For more examples and ideas, visit:
 https://docs.docker.com/get-started/

[root@localhost etc]# docker -v
Docker version 20.10.14, build a224086
[root@localhost etc]#
配置阿里云镜像加速
访问 https://help.aliyun.com/document_detail/60750.html

点击进入控制台
前往开通

设置密码
确定,进来后,点击镜像加速器

就冒出来配置方法,很简单的,就是拿到加速地址,然后去搞个json文件即可。

vim /etc/docker/daemon.json

# 添加如下内容,具体地址自己申请咯
{
  "registry-mirrors": ["https://****.mirror.aliyuncs.com"]
}

# 重启服务
systemctl daemon-reload
systemctl restart docker
这个时候查看docker信息
[root@localhost admin]# docker info
Containers: 5
 Running: 0
 Paused: 0
 Stopped: 5
Images: 5
Server Version: 1.13.1
Storage Driver: overlay2
 Backing Filesystem: xfs
 Supports d_type: true
 Native Overlay Diff: true
Logging Driver: journald
Cgroup Driver: systemd
Plugins:
 Volume: local
 Network: bridge host macvlan null overlay
Swarm: inactive
Runtimes: docker-runc runc
Default Runtime: docker-runc
Init Binary: /usr/libexec/docker/docker-init-current
containerd version:  (expected: aa8187dbd3b7ad67d8e5e3a15115d3eef43a7ed1)
runc version: 5eda6f6fd0c2884c2c8e78a6e7119e8d0ecedb77 (expected: 9df8b306d01f59d3a8029be411de015b7304dd8f)
init version: fec3683b971d9c3ef73f284f176672c44b448662 (expected: 949e6facb77383876aeff8a6944dde66b3089574)
Security Options:
 seccomp
  WARNING: You're not using the default seccomp profile
  Profile: /etc/docker/seccomp.json
 selinux
Kernel Version: 3.10.0-862.9.1.el7.x86_64
Operating System: CentOS Linux 7 (Core)
OSType: linux
Architecture: x86_64
Number of Docker Hooks: 3
CPUs: 1
Total Memory: 974.6 MiB
Name: localhost.localdomain
ID: RKLD:HVRZ:AAX6:O36J:264Q:QAF6:EHO6:2VCI:AA3M:445E:266Y:KCKU
Docker Root Dir: /var/lib/docker
Debug Mode (client): false
Debug Mode (server): false
Registry: https://index.docker.io/v1/
Experimental: false
Insecure Registries:
 127.0.0.0/8
Registry Mirrors:
 https://****.mirror.aliyuncs.com
Live Restore Enabled: false
Registries: docker.io (secure)
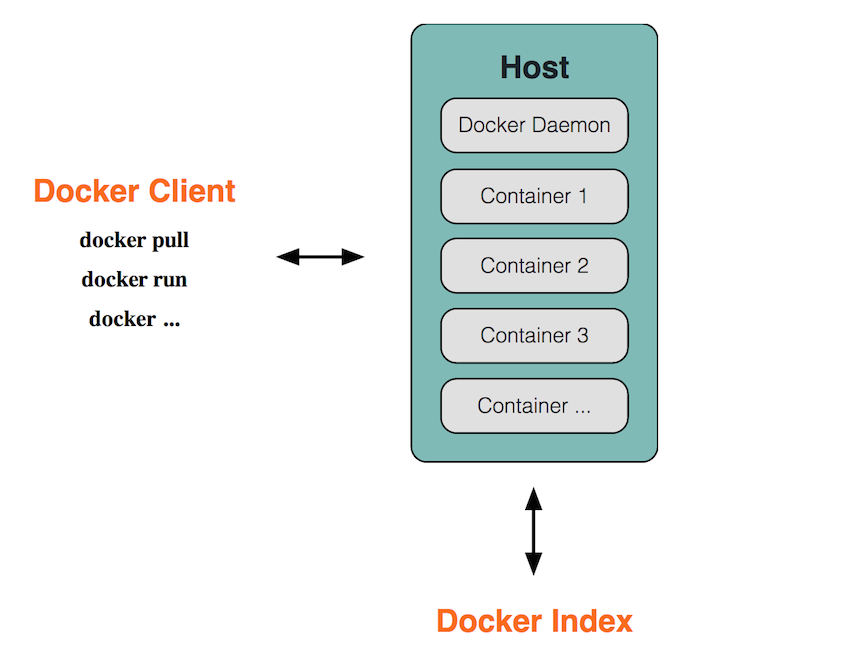
Docker C/S架构
简介
Docker是一个开源的应用容器引擎,基于GO语言。
Docker可以让开发者打包他们的应用以及依赖包到一个轻量级、可移植的容器中,然后发布到任何流行的Linux机器上,也可以实现虚拟化。
容器是完全使用沙箱机制,相互之间不会有任何接口(类似iPhone的app),更重要的是容器性能开销极低。
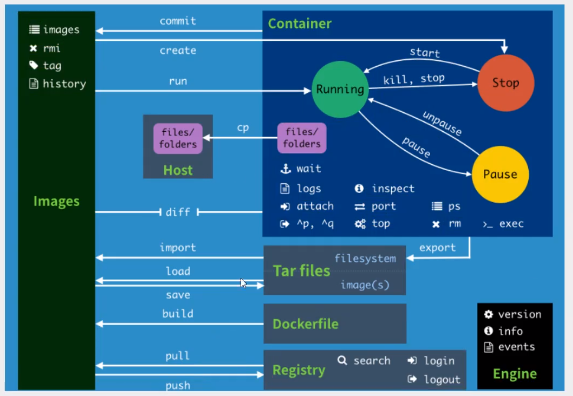
整体架构图#
概念#
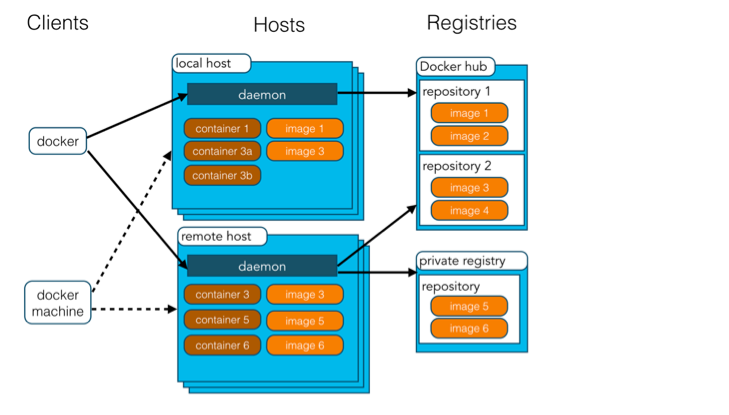
Docker是CS架构,主要有两个概念:
-
docekr daemon:运行在宿主机上,docker守护经常,用户通过docker client (输入docker命令)与docekr daemon交互
-
docker client: docker 命令行工具,是用户使用docker的主要方式,docker client 与docker daemon通信并将结果返回给用户,docker client 也可以通过socket 或者 RESTful api访问远程的docker daemon
使用docker的三个主要概念:
- docker image: 镜像只是读的,镜像中包含有需要运行的文件。镜像用来创建container 容器,一个镜像可以运行多个容器container,镜像只有读取的权限,不能修改。镜像还可以通过Dockerfile脚本创建,也可以下载远程仓库中的镜像
- docker container:容器是docker运行组件,启动一个镜像就是一个容器,容器是一个隔离的环境,多个容器之间是不会相互影响的,保证容器中的程序月在一个相对安全的环境中
- docekr hub/registry:共享和管理docker 镜像,用户可用上传下载远程仓库中的镜像,官方仓库地址
简单来说:镜像就是相当于打包好的版本,镜像启动之后运行在容器中,仓库就是存放镜像的地方
命令执行过程#

- Docker的守护进程运行在宿主机上,也就是我们常说的“C/S架构”的Server(服务)端,守护进程会在启动后,一直在后台运行,负责实现Docker的各种功能
- 用户通过client客户端输入docker命令通过命令行接口将用户输入的命令传递给docker daemon守护进程
- 守护进程将命令执行的结果返回给客户端,返显示在命令行接口中
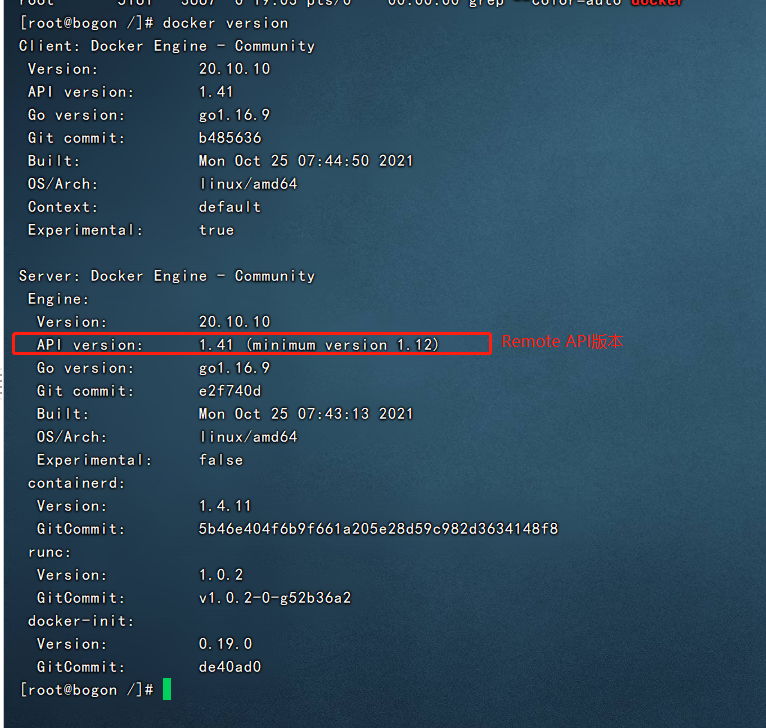
Remote API#
除了使用客户端的命令行接口,docker也提供了Remote API接口调用的方式,与docker的守护进程通信的方式。
Remote API 和常见的网络平台提供的api接口相似,是RESful 风格的api接口。这就意味着我们可以直接通过编程的方式调用docker API接口,与docker环境集成。
Docker的Remote在某些复杂的情况下,也支持以下方式进行交互:
- STDIN:标准输入
- STDOUT:标准输出
- STDERR: 标准错误输出
通过Remote API的形式,来实现Docker的C/S架构的模式图:

用户可以与自定义的程序(JAVA、C++等)进行交互,而这些程序通过调用Remote API与Docker的守护进行进行协作。
客户端与守护进程的通信方式#
Docker的客户端与守护进程,实际上是通过Socket进行连接的。
Docker提供了三种进行Socket连接的模式:
- Unix的端口模式【Docker默认的客户端与守护进程的连接方式】
unix:///var/run/docker.sock
- TCP协议的host:port模式
tcp://host:port
- fd的Socket模式
fd://socketfd
完整的Docker的C/S模式的运行方式图:

演示#
- 启动docker 并查看守护进程
# 启动docker 环境
[root@bogon /]# systemctl start docker
# 根据管道,搜索关键词docker,查看docker守护进程
[root@bogon /]# ps -ef |grep docker
root       1534      1  0 18:57 ?        00:00:01 /usr/bin/dockerd -H fd:// --containerd=/run/containerd/containerd.sock
root       5161   3667  0 19:03 pts/0    00:00:00 grep --color=auto docker

- 查看docker version详情
docker version
- 修改配置文件使用Remote API 来实现socket连接
# 1. 修改配置文件  /lib/systemd/system/docker.service文件
vim /lib/systemd/system/docker.service
# 注释掉图中第第二行,并在其上方添加一行(默认端口为2375)
ExecStart=/usr/bin/dockerd -H unix:///var/run/docker.sock -H tcp://0.0.0.0:2375
# ExecStart=/usr/bin/dockerd -H fd:// --containerd=/run/containerd/containerd.sock

# 2. 重启服务
systemctl daemon-reload
service docker restart

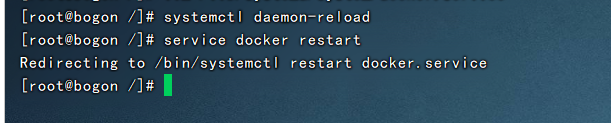
- 测试访问接口
curl localhost:2375/images/json
#查看宿主机的所有镜像json格式

[
    {
        "VirtualSize": 141468644,
        "Size": 141468644,
        "SharedSize": -1,
        "RepoTags": [
            "nginx:latest"
        ],
        "RepoDigests": [
            "nginx@sha256:fd63aac07effae8efcc4677b6197783b11a674b6664ba86e76884b1af3ffe345"
        ],
        "ParentId": "",
        "Labels": {
            "maintainer": "NGINX Docker Maintainers <docker-maint@nginx.com>"
        },
        "Id": "sha256:e9ce56a96f8e0e9f75051f258a595d1257bd6bb91913b79455ea77e67e686c5c",
        "Created": 1637086817,
        "Containers": -1
    },
    {
        "VirtualSize": 133277153,
        "Size": 133277153,
        "SharedSize": -1,
        "RepoTags": null,
        "RepoDigests": [
            "nginx@sha256:644a70516a26004c97d0d85c7fe1d0c3a67ea8ab7ddf4aff193d9f301670cf36"
        ],
        "ParentId": "",
        "Labels": {
            "maintainer": "NGINX Docker Maintainers <docker-maint@nginx.com>"
        },
        "Id": "sha256:87a94228f133e2da99cb16d653cd1373c5b4e8689956386c1c12b60a20421a02",
        "Created": 1634004220,
        "Containers": -1
    },
    {
        "VirtualSize": 440930756,
        "Size": 440930756,
        "SharedSize": -1,
        "RepoTags": [
            "jenkins/jenkins:lts"
        ],
        "RepoDigests": [
            "jenkins/jenkins@sha256:4b17ea5e222f5fbfcf8d77ac497c6f597ebe5141c39e210dac6c5815485e20a4"
        ],
        "ParentId": "",
        "Labels": {
            "org.opencontainers.image.version": "2.303.2",
            "org.opencontainers.image.vendor": "Jenkins project",
            "org.opencontainers.image.url": "https://www.jenkins.io/",
            "org.opencontainers.image.title": "Official Jenkins Docker image",
            "org.opencontainers.image.source": "https://github.com/jenkinsci/docker",
            "org.opencontainers.image.licenses": "MIT",
            "org.opencontainers.image.description": "The Jenkins Continuous Integration and Delivery server"
        },
        "Id": "sha256:e4ebf98bd6ca32c9bbc21810ce1b953dfba5308bbfa9651a3f1573a5a0aff2aa",
        "Created": 1633538013,
        "Containers": -1
    }
]
注意:使用原有命令接口需要,修改原来配置
设置docker 自启动【随着linux系统的启动同步启动】
1、在 /lib/systemd/system 目录添加 docker.service 文件
#进入自启文件目录
cd /lib/systemd/system
2、编辑nginx.service
#编辑自启文件
vi docker.service
3、添加一下内容, Restart=always [如果有这段,就不用添加]
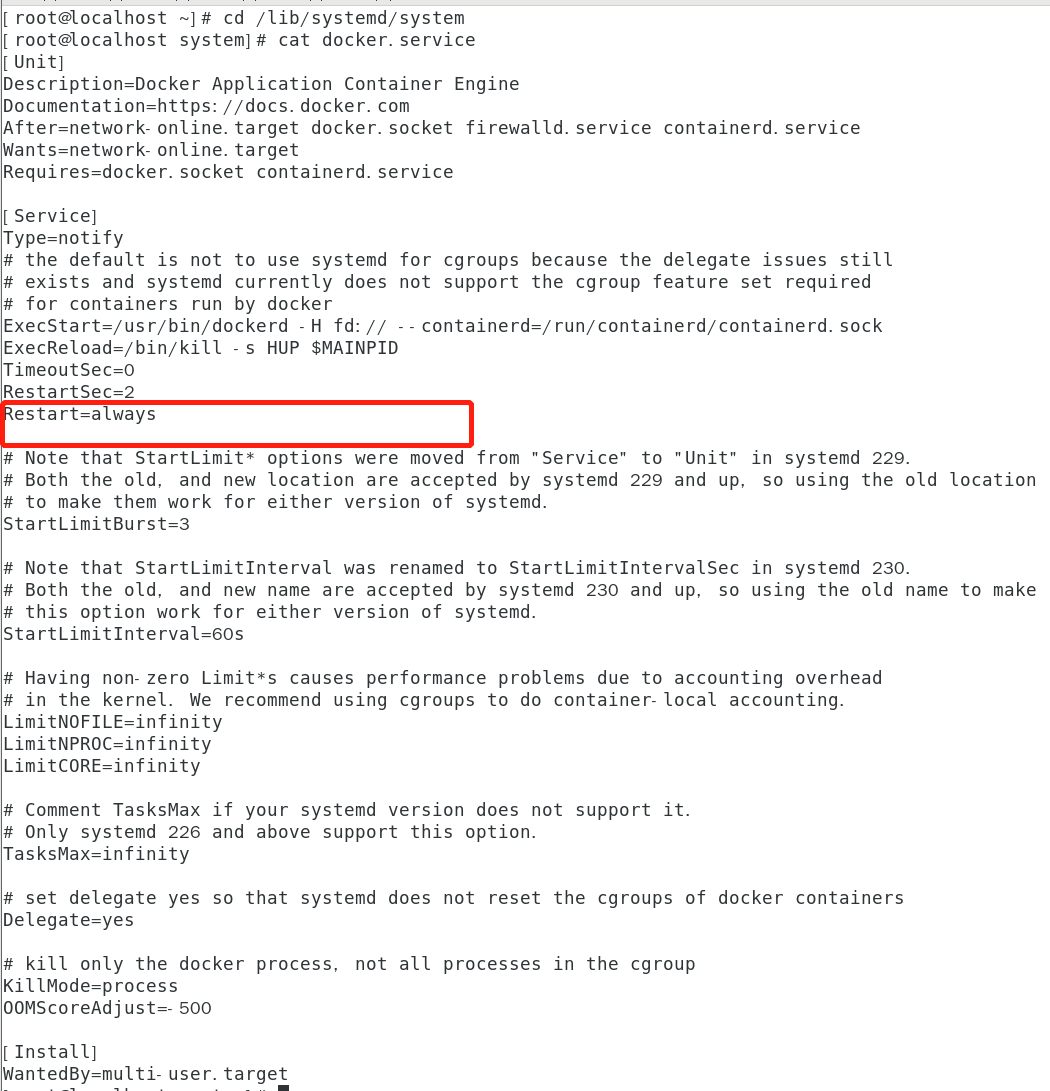
3、设置自动启动
systemctl enable docker.service
这样系统重启后,就不用在输入:systemctl start docker 了
4、其它命令
# 启动 nginx
systemctl start docker
# 停止
systemctl stop docker
# 加载配置文件
systemctl reload docker
@天才卧龙的博客

 浙公网安备 33010602011771号