反射反射程序猿的快乐,使用反射实现NetCore3.1依赖注入
十年河东,十年河西,莫欺少年穷
学无止境,精益求精
开局一张图,内容全靠编
如下图:
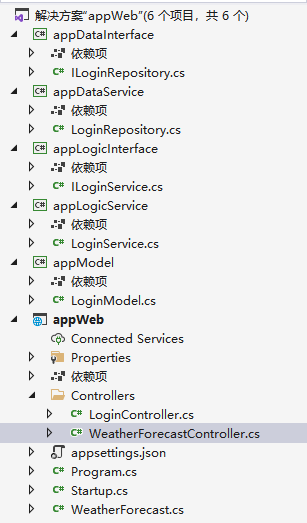
上图是我简单构造的一个NetCore的分层项目,解释如下:
appModel:实体层
appDataInterface:数据访问接口层
appDataService:数据访问接口层的实现层
appLogicInterface:业务逻辑接口层
appLogicService:业务逻辑层的实现层
appWeb:webApi站点
很简单的一个基础的项目构造就这样悄无声息的构建出来了,层次之间的引用,我就不多赘述了。哈哈
然后,我们搞一个接口,如下:
appDataInterface 的 ILoginRepository
using appModel;
using System;
using System.Collections.Generic;
using System.Text;

namespace appDataInterface
{
    public interface ILoginRepository
    {
        LoginModel UserLogin(string userAccount, string userPassword);
    }
}
appLogicInterface 的 ILoginService
using appModel;
using System;
using System.Collections.Generic;
using System.Text;

namespace appLogicInterface
{
    public interface ILoginService
    {
        LoginModel UserLogin(string userAccount, string userPassword);
    }
}
再然后,我们搞下接口的实现,如下:
appDataService 的 LoginRepository
using appDataInterface;
using appModel;
using System;

namespace appDataService
{
    public class LoginRepository: ILoginRepository
    {
        public LoginModel UserLogin(string userAccount, string userPassword)
        {
            return new LoginModel()
            {
                userName = "陈大六",
                userRole = "超级管理员"
            };
        }
    }
}
appLogicService 的 LoginService
using appDataInterface;
using appLogicInterface;
using appModel;
using System;

namespace appLogicService
{
    public class LoginService: ILoginService
    {
        private readonly ILoginRepository repository;
        public LoginService(ILoginRepository repository)
        {
            this.repository = repository;
        }
        /// <summary>
        /// 用户登录接口
        /// </summary>
        /// <param name="userAccount"></param>
        /// <param name="userPassword"></param>
        /// <returns></returns>
        public LoginModel UserLogin(string userAccount, string userPassword)
        {
            return repository.UserLogin(userAccount, userPassword);
        }
    }
}
注意:业务逻辑层需要依赖注入数据访问层,因此她的构造方法为:
        private readonly ILoginRepository repository;
        public LoginService(ILoginRepository repository)
        {
            this.repository = repository;
        }
最后,我们来写个简单的控制器,如下:


using appLogicInterface;
using Microsoft.AspNetCore.Http;
using Microsoft.AspNetCore.Mvc;
using System;
using System.Collections.Generic;
using System.Linq;
using System.Threading.Tasks;

namespace appWeb.Controllers
{
    [Route("api/Login")]
    [ApiController]
    public class LoginController : ControllerBase
    {
        private readonly ILoginService service;
        public LoginController(ILoginService service)
        {
            this.service = service;
        }

        [HttpGet("UserLogin")]
        public IActionResult UserLogin(string userName,string userPassword)
        {
            return Ok(service.UserLogin(userName, userPassword));
        }
    }
}
截止到这儿,我们还差一步、、、那就是在StartUp.cs中注入接口及实现类,如下:
        public void ConfigureServices(IServiceCollection services)
        {
            services.AddControllers();
            services.AddScoped<ILoginRepository, LoginRepository>();
            services.AddScoped<ILoginService, LoginService>();
        }
项目构造完成后,我们来看看返回结果:

那么,问题来了,如果我们的项目足够大,接口及实现类足够多,我们就需要在StartUp.cs中写很多很多依赖注入,这样给人一种臃肿的感觉。
有没有什么好的方法来避免写很多的依赖注入呢?
答案是肯定的,反射反射,程序猿的快乐,通过反射我们来解决此问题。
1、在该项目中增加一个项目,命名为:appInit
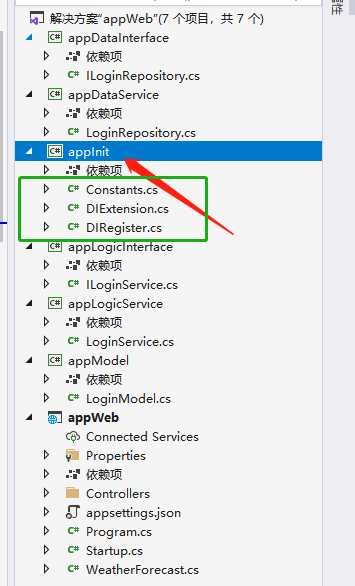
多余的话,我也不想多说,直接上代码吧,代码有一定的注释:
Constants.cs
using System;
using System.Collections.Generic;
using System.Text;

namespace app.Init
{
    public class Constants
    {
        /// <summary>
        /// 业务逻辑层DLL文件:appLogicService.dll
        /// </summary>
        public const string ServiceDllFullName = "appLogicService.dll";
        /// <summary>
        /// 业务逻辑层实现类的命名后缀,也就是说,我们在接口层定义一个接口为:IABCService 那么,它的实现类就必须为:ABCService
        /// </summary>
        public const string ServiceSuffix = "Service";
        /// <summary>
        /// 数据访问层DLL文件:appDataService.dll
        /// </summary>
        public const string RepositoryDllFullName = "appDataService.dll";
        /// <summary>
        /// 业务逻辑层实现类的命名后缀,也就是说,我们在接口层定义一个接口为:IBugRepository 那么,它的实现类就必须为:BugRepository
        /// </summary>
        public const string RepositorySuffix = "Repository";

    }
}
DIExtension.cs
using Microsoft.Extensions.DependencyInjection;
using System;
using System.Linq;
using System.Reflection;

namespace app
{
    /// <summary>
    /// 反射注入
    /// </summary>
    public static class DIExtension
    {
        //public static void RegisterAssemblyEndsWith(this IServiceCollection services, Assembly assembly, params string[] endsWith)
        //{
        //    string @namespace = typeof(DIExtension).Namespace;
        //    foreach (var type in assembly.GetTypes())
        //    {
        //        if ((!type.IsInterface) && (!type.IsAbstract) && CheckEndsWith(type.FullName, endsWith))
        //        {
        //            var typeInterface = type.GetInterfaces().Where(p => p.FullName.StartsWith(@namespace)).FirstOrDefault(i => CheckEndsWith(i.FullName, endsWith));
        //            if (typeInterface != null)
        //            {
        //                services.AddScoped(typeInterface, type);
        //            }
        //            else
        //            {
        //                services.AddScoped(type, type);
        //            }
        //        }
        //    }
        //}

        public static void RegisterAssemblyEndsWith(this IServiceCollection services, Assembly assembly, params string[] endsWith)
        {
            ///app
            string @namespace = typeof(DIExtension).Namespace;//用于只查找app开头的命名空间
            foreach (var type in assembly.GetTypes())
            {
                if ((!type.IsInterface) && (!type.IsAbstract) && CheckEndsWith(type.FullName, endsWith))
                {
                    ///找到对应的接口,验证接口命名规则 例如 AService 对应的接口应为:IAService 且 命名空间的开头带有"app"|||用于只查找app开头的命名空间
                    var typeInterfaces = type.GetInterfaces().Where(p => p.FullName.StartsWith(@namespace) && CheckEndsWith(p.FullName, endsWith)).ToList();
                    if (typeInterfaces?.Count > 0)
                    {
                        foreach (var typeInterface in typeInterfaces)
                        {
                            services.AddScoped(typeInterface, type);
                        }
                    }
                    else
                    {
                        services.AddScoped(type, type);
                    }
                }
            }
        }
        /// <summary>
        /// 命名规则检测
        /// </summary>
        /// <param name="source"></param>
        /// <param name="endsWith"></param>
        /// <returns></returns>
        private static bool CheckEndsWith(string source, string[] endsWith)
            => endsWith.Any(p => source.EndsWith(p, StringComparison.OrdinalIgnoreCase));
    }
}
DIRegister.cs
using Microsoft.AspNetCore.Builder;
using Microsoft.AspNetCore.Http;
using Microsoft.Extensions.DependencyInjection;
using System;
using System.Collections.Generic;
using System.IO;
using System.Reflection;
using System.Text;

namespace app.Init
{
    public static class DIRegister
    {
        /// <summary>
        ///此处 this 是将RegisterDI方法标记为IServiceCollection 的 扩展方法
        /// </summary>
        /// <param name="services"></param>
        public static void RegisterDI(this IServiceCollection services)
        {
            ///D:\525gitProject\netcore\WuAnManager\WuAnChangeApi\bin\Debug\netcoreapp3.1
            var rootPath = Path.GetDirectoryName(typeof(DIExtension).Assembly.Location);
            var rootDir = new DirectoryInfo(rootPath);
            ///D:\525gitProject\netcore\WuAnManager\WuAnChangeApi\bin\Debug\netcoreapp3.1
            var basePath = rootDir.FullName;
            RegisterDll(services, basePath, Constants.ServiceDllFullName, Constants.ServiceSuffix);
            RegisterDll(services, basePath, Constants.RepositoryDllFullName, Constants.RepositorySuffix);
        }

        /// <summary>
        /// 依赖注入
        /// </summary>
        /// <param name="services"></param>
        /// <param name="basePath"></param>
        /// <param name="dllName"></param>
        /// <param name="endsWith"></param>
        private static void RegisterDll(IServiceCollection services, string basePath, string dllName, params string[] endsWith)
        {
            ///D:\525gitProject\netcore\WuAnManager\WuAnChangeApi\bin\Debug\netcoreapp3.1\WuAnService.dll
            string assemblyPath = Path.Combine(basePath, dllName);
            var assembly = Assembly.LoadFrom(assemblyPath);
            services.RegisterAssemblyEndsWith(assembly, endsWith);
        }

        /// <summary>
        /// 用于查看注入的接口及实现类  此处的This表明DIListPage方法为IApplicationBuilder的一个扩展方法
        /// </summary>
        /// <param name="app"></param>
        /// <param name="_services"></param>
        public static void DIListPage(this IApplicationBuilder app, IServiceCollection _services)
        {
            app.Map($"/api/allservices", builder => builder.Run(async context =>
            {
                var sb = new StringBuilder();
                sb.Append("<h1>All Services</h1>");
                sb.Append("<table><thead>");
                sb.Append("<tr><th>Type</th><th>Lifetime</th><th>Instance</th></tr>");
                sb.Append("</thead><tbody>");
                foreach (var svc in _services)
                {
                    sb.Append("<tr>");
                    sb.Append($"<td>{svc.ServiceType.FullName}</td>");
                    sb.Append($"<td>{svc.Lifetime}</td>");
                    sb.Append($"<td>{svc.ImplementationType?.FullName}</td>");
                    sb.Append("</tr>");
                }
                sb.Append("</tbody></table>");
                await context.Response.WriteAsync(sb.ToString());
            }));
        }
    }
}
最后,我们修改Startup.cs 如下:
using app.Init;
using appDataInterface;
using appDataService;
using appLogicInterface;
using appLogicService;
using Microsoft.AspNetCore.Builder;
using Microsoft.AspNetCore.Hosting;
using Microsoft.AspNetCore.HttpsPolicy;
using Microsoft.AspNetCore.Mvc;
using Microsoft.Extensions.Configuration;
using Microsoft.Extensions.DependencyInjection;
using Microsoft.Extensions.Hosting;
using Microsoft.Extensions.Logging;
using System;
using System.Collections.Generic;
using System.Linq;
using System.Threading.Tasks;

namespace appWeb
{
    public class Startup
    {
        public Startup(IConfiguration configuration)
        {
            Configuration = configuration;
        }

        public IConfiguration Configuration { get; }
        private IServiceCollection _services;
        // This method gets called by the runtime. Use this method to add services to the container.
        public void ConfigureServices(IServiceCollection services)
        {
            services.AddControllers();
            //services.AddScoped<ILoginRepository, LoginRepository>();
            //services.AddScoped<ILoginService, LoginService>();

            this._services = services;
            services.RegisterDI();
        }

        // This method gets called by the runtime. Use this method to configure the HTTP request pipeline.
        public void Configure(IApplicationBuilder app, IWebHostEnvironment env)
        {
            if (env.IsDevelopment())
            {
                app.UseDeveloperExceptionPage();
            }

            app.UseHttpsRedirection();

            app.UseRouting();

            app.UseAuthorization();

            app.UseEndpoints(endpoints =>
            {
                endpoints.MapControllers();
            });

            app.DIListPage(_services);
        }
    }
}
startup修改的地方如下:
private IServiceCollection _services;
注释掉:
//services.AddScoped<ILoginRepository, LoginRepository>();
//services.AddScoped<ILoginService, LoginService>();
增加【需要引用appinit项目】
  this._services = services;
  services.RegisterDI();
增加【用于查看注入的接口及实现类】
app.DIListPage(_services);
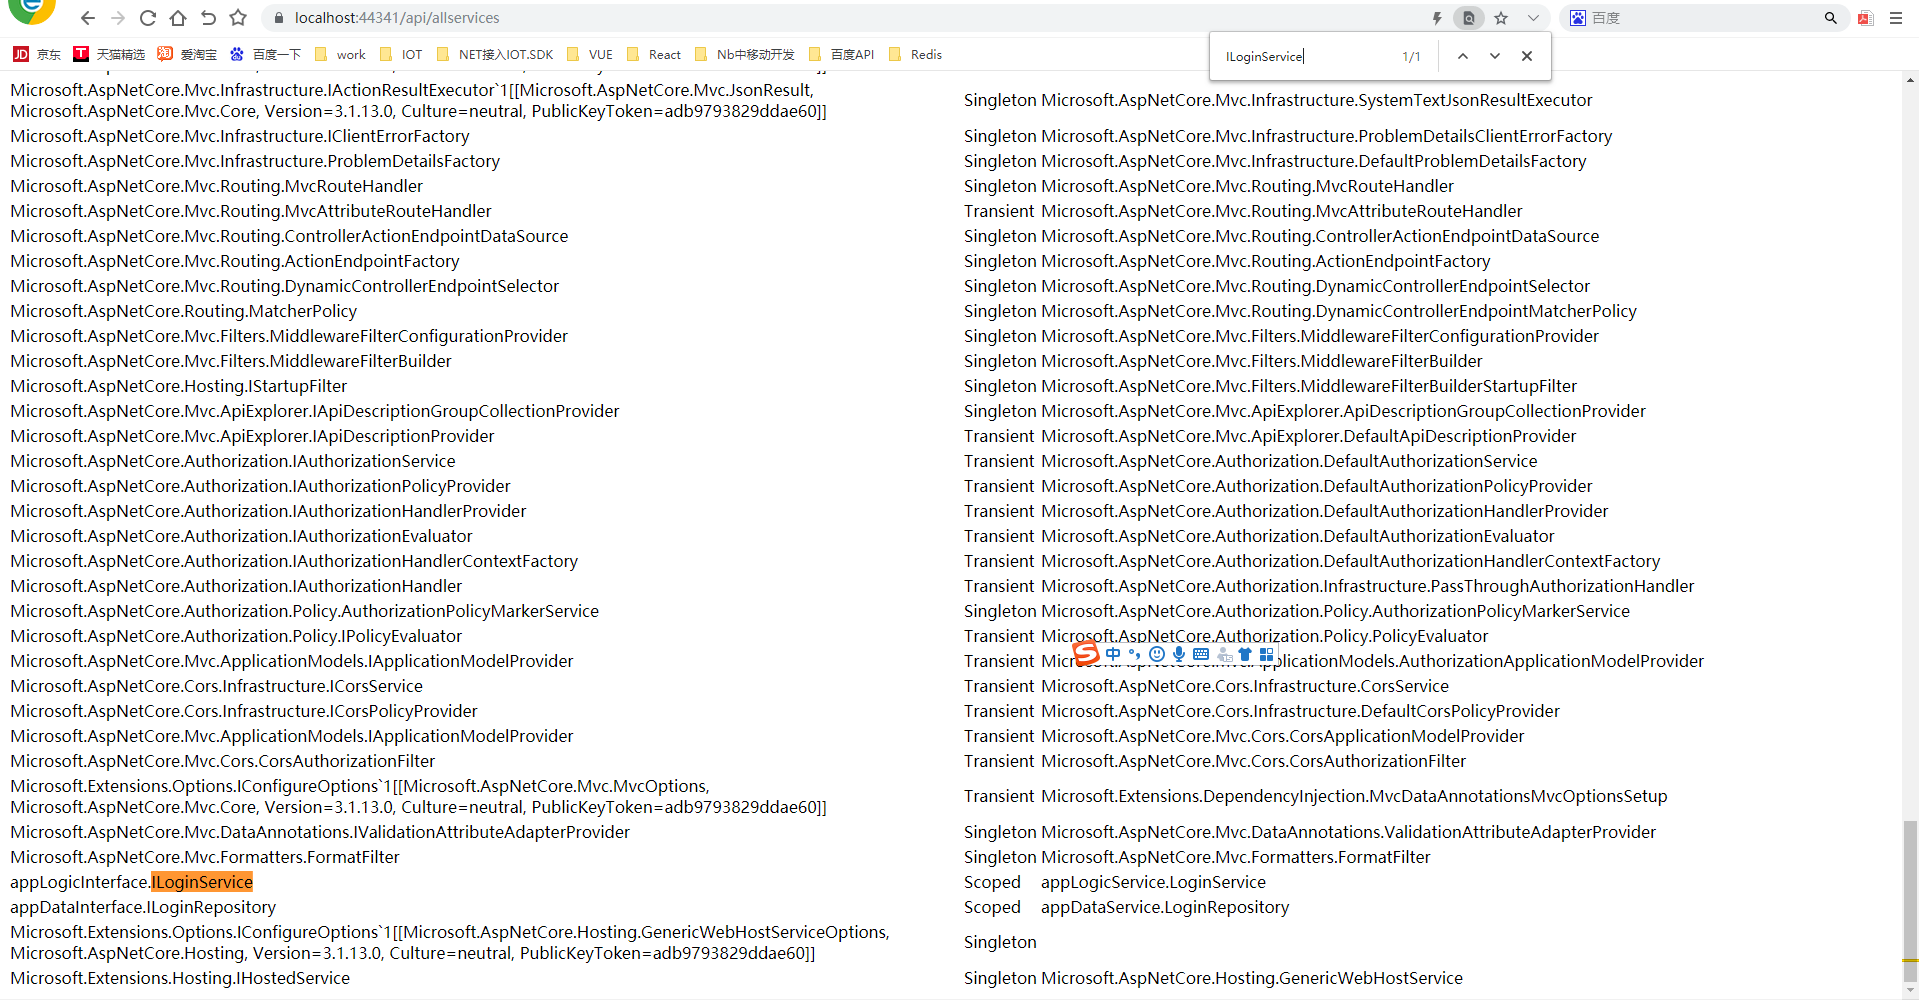
这样,整个无需逐个写依赖映射的小工程就构造完成了,运行下,看看效果
1、先查看注入的接口及实现类,路由参考DIRegister.cs类中的DIListPage方法
再看看我们写的登录方法:

哈哈,就这样就可以了。
@天才卧龙的博客

 浙公网安备 33010602011771号