
netCore3.1项目搭建过程记录-省的每次都傻乎乎的不知道应该先干啥
十年河东,十年河西,莫欺少年穷
学无止境,精益求精
我搭建项目的习惯,一般先搭建项目整体的层次划分,首先贴出我搭建项目的各个层次划分:
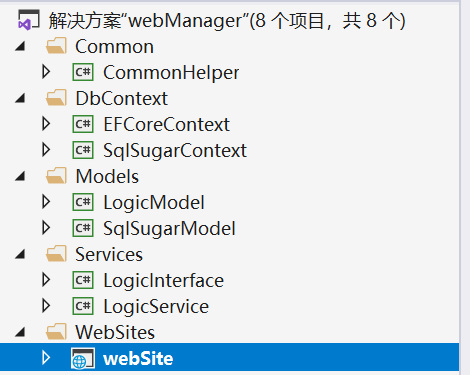
项目分为8层,数据库层采用EfCore 结合 sqlSugar的方式,从上到下依次为:公共类层、EfCore上下文层、SqlSugar上下文层,业务实体层、sqlSugar实体层【由工具生成】、接口层、服务层、web站点【webApi属于这一层】,各层次之间的引用,我就不累述了。
清晰了项目的各层次,下面我们逐步完善这个裸体项目
1、搭建你的数据库上下文层
1.1、搭建EfCore上下文
1、打开程序包管理控制台,选中EFCoreContext层,并依次执行如下控制命令
 Install-Package Microsoft.EntityFrameworkCore
 Install-Package Microsoft.EntityFrameworkCore.SqlServer
 Install-Package Microsoft.EntityFrameworkCore.Tools
 Install-Package Microsoft.VisualStudio.Web.CodeGeneration.Design -Version 3.1.4
2、选中启动项目webSite ,并依次执行上述控制命令
 Install-Package Microsoft.EntityFrameworkCore
 Install-Package Microsoft.EntityFrameworkCore.SqlServer
 Install-Package Microsoft.EntityFrameworkCore.Tools
 Install-Package Microsoft.VisualStudio.Web.CodeGeneration.Design -Version 3.1.4
如下图:

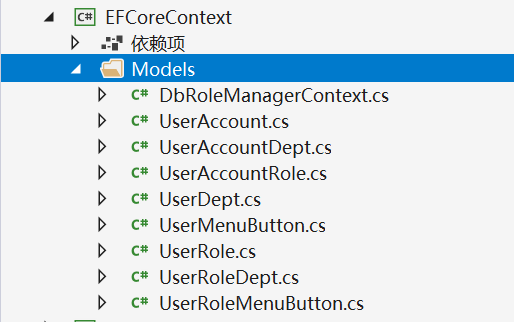
3、以上两步骤执行完毕后,在程序包管理控制台中继续切换到EFCoreContext层,并执行如下指令生成数据库上下文【注意,连接字符串要改成你自己的】

4、执行成功后,生成的上下文如下:
我的数据库脚本请参考:通用权限管理【数据库】设计方案
最后在启动类中注册SqlServer服务,如下:
        public void ConfigureServices(IServiceCollection services)
        {
            services.AddControllers();

            #region 注册SQLSERVER
            services.AddDbContext<DbRoleManagerContext>(options =>
                 options.UseSqlServer(Configuration.GetConnectionString("WuAnDBContext")));
            #endregion
这样的话,EFCore的上下文就生成了,因为netCore对原生SQL的支持不是特别好,因此,我的项目中引入了sqlSugar作为支持。下面我们来搭建sqlSugar的上下文。
1.2、搭建sqlSugar上下文及sqlsugar实体
没有玩过SqlSugar的小虎斑可以参考这篇博客:SqlSugar+SqlServer+NetCore3.1 入门案例
SqlSugar的工具【可通过项目/工具生成】大家可参考:http://www.codeisbug.com/Doc/8/1123 或者 直接去CSDN 上下载相关工具/项目:https://download.csdn.net/download/wolongbb/12997789
1、在项目SqlSugarContext、SqlSugarModel 中,通过NuGet安装sqlSugar引用 和 SqlSugar的依赖项Newtonsoft.Json V 12.0.3 及 System.Data.SqlClient V 4.8.2 版本

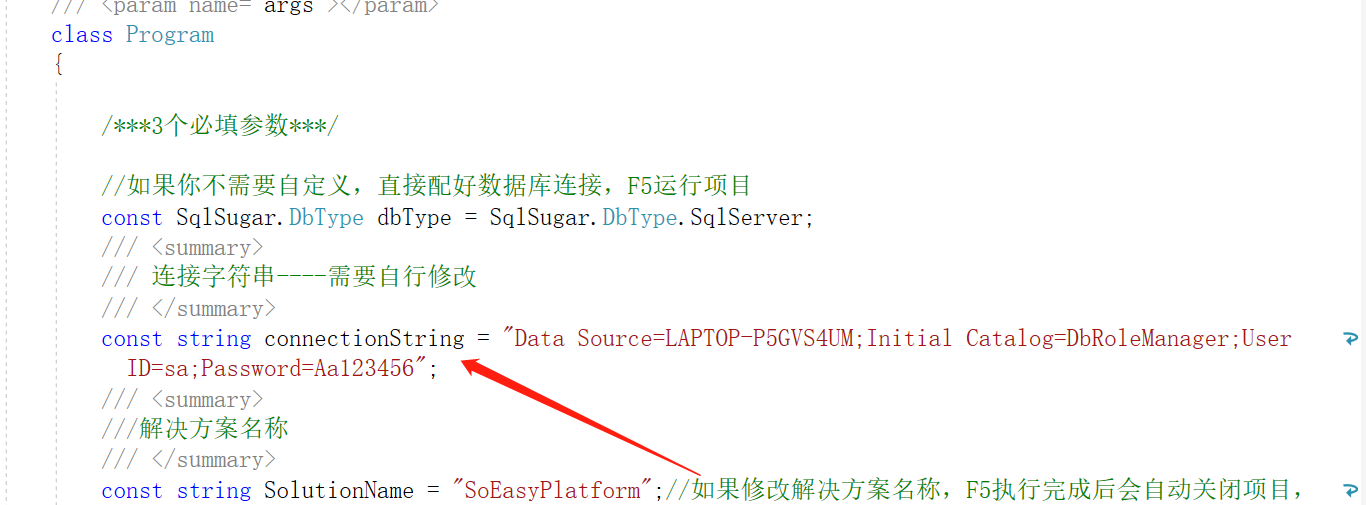
2、通过下载的项目,生成sqlSugar上下文及sqlsugar实体
注意:在下载的项目SoEasyPlatform-master中需要自行修改连接字符串及命名空间。
我的sqlsugar上下文如下:


using SqlSugarModel.Enties;
using SqlSugar;
using System;
using System.Collections.Generic;
using System.Linq;
using System.Linq.Expressions;

namespace SugarContext
{
    public class SugarDbContext
    {
        /// 获取连接字符串
        private static string Connection = "Data Source=LAPTOP-P5GVS4UM;Initial Catalog=DbRoleManager;User ID=sa;Password=Aa123456";

        public SugarDbContext()
        {
            Db = new SqlSugarClient(new ConnectionConfig()
            {
                ConnectionString = Connection,
                DbType = DbType.SqlServer,
                InitKeyType = InitKeyType.Attribute,//从特性读取主键和自增列信息
                IsAutoCloseConnection = true,//开启自动释放模式和EF原理一样我就不多解释了

            });
            //调式代码 用来打印SQL
            Db.Aop.OnLogExecuting = (sql, pars) =>
            {
                Console.WriteLine(sql + "\r\n" +
                    Db.Utilities.SerializeObject(pars.ToDictionary(it => it.ParameterName, it => it.Value)));
                Console.WriteLine();
            };

        }
        //注意:不能写成静态的
        public SqlSugarClient Db;//用来处理事务多表查询和复杂的操作
    }
    public class SugarDbContext<T> where T : class, new()
    {
        public SugarDbContext()
        {
            Db = new SqlSugarClient(new ConnectionConfig()
            {
                ConnectionString = "Data Source=LAPTOP-P5GVS4UM;Initial Catalog=DbRoleManager;User ID=sa;Password=Aa123456",
                DbType = DbType.SqlServer,
                InitKeyType = InitKeyType.Attribute,//从特性读取主键和自增列信息
                IsAutoCloseConnection = true,//开启自动释放模式和EF原理一样我就不多解释了

            });
            //调式代码 用来打印SQL
            Db.Aop.OnLogExecuting = (sql, pars) =>
            {
                Console.WriteLine(sql + "\r\n" +
                    Db.Utilities.SerializeObject(pars.ToDictionary(it => it.ParameterName, it => it.Value)));
                Console.WriteLine();
            };

        }
        //注意:不能写成静态的
        public SqlSugarClient Db;//用来处理事务多表查询和复杂的操作
        public SimpleClient<T> CurrentDb { get { return new SimpleClient<T>(Db); } }//用来操作当前表的数据

        public SimpleClient<User_Dept> User_DeptDb { get { return new SimpleClient<User_Dept>(Db); } }//用来处理User_Dept表的常用操作
        public SimpleClient<User_MenuButton> User_MenuButtonDb { get { return new SimpleClient<User_MenuButton>(Db); } }//用来处理User_MenuButton表的常用操作
        public SimpleClient<User_Role> User_RoleDb { get { return new SimpleClient<User_Role>(Db); } }//用来处理User_Role表的常用操作
        public SimpleClient<User_Role_Dept> User_Role_DeptDb { get { return new SimpleClient<User_Role_Dept>(Db); } }//用来处理User_Role_Dept表的常用操作
        public SimpleClient<User_Role_MenuButton> User_Role_MenuButtonDb { get { return new SimpleClient<User_Role_MenuButton>(Db); } }//用来处理User_Role_MenuButton表的常用操作
        public SimpleClient<User_Account> User_AccountDb { get { return new SimpleClient<User_Account>(Db); } }//用来处理User_Account表的常用操作
        public SimpleClient<User_Account_Dept> User_Account_DeptDb { get { return new SimpleClient<User_Account_Dept>(Db); } }//用来处理User_Account_Dept表的常用操作
        public SimpleClient<User_Account_Role> User_Account_RoleDb { get { return new SimpleClient<User_Account_Role>(Db); } }//用来处理User_Account_Role表的常用操作


        /// <summary>
        /// 获取所有
        /// </summary>
        /// <returns></returns>
        public virtual List<T> GetList()
        {
            return CurrentDb.GetList();
        }

        /// <summary>
        /// 根据表达式查询
        /// </summary>
        /// <returns></returns>
        public virtual List<T> GetList(Expression<Func<T, bool>> whereExpression)
        {
            return CurrentDb.GetList(whereExpression);
        }


        /// <summary>
        /// 根据表达式查询分页
        /// </summary>
        /// <returns></returns>
        public virtual List<T> GetPageList(Expression<Func<T, bool>> whereExpression, PageModel pageModel)
        {
            return CurrentDb.GetPageList(whereExpression, pageModel);
        }

        /// <summary>
        /// 根据表达式查询分页并排序
        /// </summary>
        /// <param name="whereExpression">it</param>
        /// <param name="pageModel"></param>
        /// <param name="orderByExpression">it=>it.id或者it=>new{it.id,it.name}</param>
        /// <param name="orderByType">OrderByType.Desc</param>
        /// <returns></returns>
        public virtual List<T> GetPageList(Expression<Func<T, bool>> whereExpression, PageModel pageModel, Expression<Func<T, object>> orderByExpression = null, OrderByType orderByType = OrderByType.Asc)
        {
            return CurrentDb.GetPageList(whereExpression, pageModel, orderByExpression, orderByType);
        }


        /// <summary>
        /// 根据主键查询
        /// </summary>
        /// <returns></returns>
        public virtual T GetById(dynamic id)
        {
            return CurrentDb.GetById(id);
        }

        /// <summary>
        /// 根据主键删除
        /// </summary>
        /// <param name="id"></param>
        /// <returns></returns>
        public virtual bool Delete(dynamic id)
        {
            return CurrentDb.Delete(id);
        }


        /// <summary>
        /// 根据实体删除
        /// </summary>
        /// <param name="id"></param>
        /// <returns></returns>
        public virtual bool Delete(T data)
        {
            return CurrentDb.Delete(data);
        }

        /// <summary>
        /// 根据主键删除
        /// </summary>
        /// <param name="id"></param>
        /// <returns></returns>
        public virtual bool Delete(dynamic[] ids)
        {
            return CurrentDb.AsDeleteable().In(ids).ExecuteCommand() > 0;
        }

        /// <summary>
        /// 根据表达式删除
        /// </summary>
        /// <param name="id"></param>
        /// <returns></returns>
        public virtual bool Delete(Expression<Func<T, bool>> whereExpression)
        {
            return CurrentDb.Delete(whereExpression);
        }


        /// <summary>
        /// 根据实体更新,实体需要有主键
        /// </summary>
        /// <param name="id"></param>
        /// <returns></returns>
        public virtual bool Update(T obj)
        {
            return CurrentDb.Update(obj);
        }

        /// <summary>
        ///批量更新
        /// </summary>
        /// <param name="id"></param>
        /// <returns></returns>
        public virtual bool Update(List<T> objs)
        {
            return CurrentDb.UpdateRange(objs);
        }

        /// <summary>
        /// 插入
        /// </summary>
        /// <param name="id"></param>
        /// <returns></returns>
        public virtual bool Insert(T obj)
        {
            return CurrentDb.Insert(obj);
        }


        /// <summary>
        /// 批量
        /// </summary>
        /// <param name="id"></param>
        /// <returns></returns>
        public virtual bool Insert(List<T> objs)
        {
            return CurrentDb.InsertRange(objs);
        }


        //自已扩展更多方法
    }
}
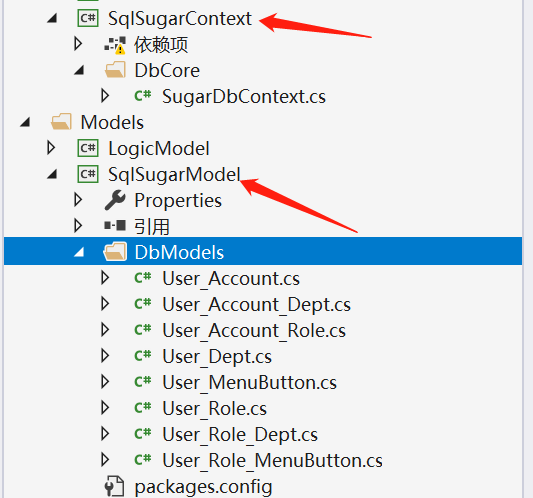
这样的话,sqlSugar上下文层及sqlsugar实体层就搭建完毕了,结果如下:
综上所述,数据库部分的搭建就完成了,有EFCore和sqlSugar,我们就可以玩转数据库的操作了。
2、搭建你的webSite层【Swagger,log4Net,Json web Token,异常捕获中间件,Api路由等等】
2.1、搭建你的swagger并结合Jwt验证,使你的Api更安全并易于管理及测试,更详细内容可参考:NetCore3.1 如何添加带有JWT Token 验证的Swagger
1、打开程序包管理控制台,执行如下指令,安装swagger相关引用
Install-Package Swashbuckle.AspNetCore -Version 5.0.0
2、安装Swashbuckle.AspNetCore.Filters包 版本5.12
Install-Package Swashbuckle.AspNetCore.Filters -Version 5.1.2
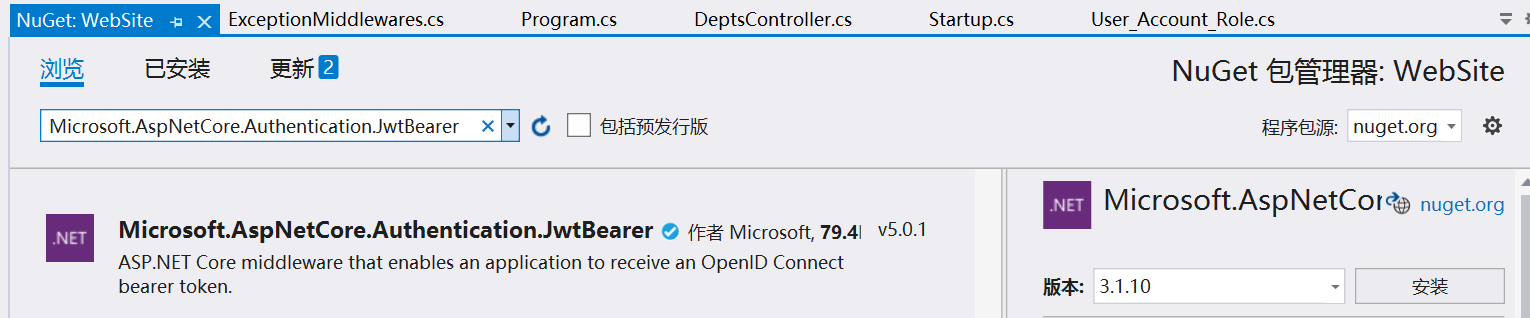
3、Nuget安装JwtBearer引用v 3.1.10版本
4、修改StartUp类如下:
using System;
using System.Collections.Generic;
using System.IO;
using System.Linq;
using System.Text;
using System.Threading.Tasks;
using EFCoreContext.Models;
using log4net;
using log4net.Config;
using log4net.Repository;
using LogicModel;
using Microsoft.AspNetCore.Authentication.JwtBearer;
using Microsoft.AspNetCore.Builder;
using Microsoft.AspNetCore.Hosting;
using Microsoft.AspNetCore.HttpsPolicy;
using Microsoft.AspNetCore.Mvc;
using Microsoft.EntityFrameworkCore;
using Microsoft.Extensions.Configuration;
using Microsoft.Extensions.DependencyInjection;
using Microsoft.Extensions.Hosting;
using Microsoft.Extensions.Logging;
using Microsoft.IdentityModel.Tokens;
using Microsoft.OpenApi.Models;
using Swashbuckle.AspNetCore.Filters;
using WebSite.Middlewares;

namespace WebSite
{
    public class Startup
    {
        public static ILoggerRepository repository { get; set; }
        public Startup(IConfiguration configuration)
        {
            Configuration = configuration;
            // 指定配置文件
            repository = LogManager.CreateRepository("NETCoreRepository");
            XmlConfigurator.Configure(repository, new FileInfo("Log4Net.config"));
        }


        public IConfiguration Configuration { get; }

        // This method gets called by the runtime. Use this method to add services to the container.
        public void ConfigureServices(IServiceCollection services)
        {
            services.AddControllers();

            #region 注册SQLSERVER
            services.AddDbContext<DbRoleManagerContext>(options =>
                 options.UseSqlServer(Configuration.GetConnectionString("WuAnDBContext")));
            #endregion

            #region JWT
            services.AddAuthentication(x =>
            {
                x.DefaultAuthenticateScheme = JwtBearerDefaults.AuthenticationScheme;
                x.DefaultChallengeScheme = JwtBearerDefaults.AuthenticationScheme;
            }).AddJwtBearer(x =>
            {
                x.RequireHttpsMetadata = false;
                x.SaveToken = true;
                x.TokenValidationParameters = new TokenValidationParameters
                {
                    ValidateIssuerSigningKey = true,
                    IssuerSigningKey = new SymmetricSecurityKey(Encoding.ASCII.GetBytes(TokenManagementModel.Secret)),
                    ValidIssuer = TokenManagementModel.Issuer,
                    ValidAudience = TokenManagementModel.Audience,
                    ValidateIssuer = false,
                    ValidateAudience = false
                };
            });
            #endregion

            #region 注册Swagger服务
            // 注册Swagger服务
            services.AddSwaggerGen(c =>
            {
                // 添加文档信息
                c.SwaggerDoc("v1", new OpenApiInfo { Title = "权限管理相关接口", Version = "V1" });
                //c.SwaggerDoc("demo", new OpenApiInfo { Title = "示例接口", Version = "demo" });
                c.DocInclusionPredicate((docName, apiDesc) => apiDesc.GroupName == docName.ToUpper());
                var basePath = Path.GetDirectoryName(typeof(Program).Assembly.Location);//获取应用程序所在目录(绝对,不受工作目录影响,建议采用此方法获取路径)
                var xmlPath = Path.Combine(basePath, "WebSite.xml");
                c.IncludeXmlComments(xmlPath);
                #region Jwt
                //开启权限小锁
                c.OperationFilter<AddResponseHeadersFilter>();
                c.OperationFilter<AppendAuthorizeToSummaryOperationFilter>();

                //在header中添加token,传递到后台
                c.OperationFilter<SecurityRequirementsOperationFilter>();
                c.AddSecurityDefinition("oauth2", new OpenApiSecurityScheme
                {
                    Description = "JWT授权(数据将在请求头中进行传递)直接在下面框中输入Bearer {token}(注意两者之间是一个空格) \"",
                    Name = "Authorization",//jwt默认的参数名称
                    In = ParameterLocation.Header,//jwt默认存放Authorization信息的位置(请求头中)
                    Type = SecuritySchemeType.ApiKey
                });


                #endregion
            });
            #endregion
        }

        // This method gets called by the runtime. Use this method to configure the HTTP request pipeline.
        public void Configure(IApplicationBuilder app, IWebHostEnvironment env)
        {
            if (env.IsDevelopment())
            {
                app.UseDeveloperExceptionPage();
            }
            //允许跨域
            app.UseCors(builder => builder.AllowAnyOrigin().AllowAnyHeader().AllowAnyMethod());

            #region 启用Swagger中间件
            // 启用Swagger中间件
            app.UseSwagger(c => c.RouteTemplate = "swagger/{documentName}/swagger.json");
            // 配置SwaggerUI
            app.UseSwaggerUI(c =>
            {
                c.SwaggerEndpoint($"/swagger/v1/swagger.json", "V1");
            });
            #endregion

            //注册异常中间件
            app.UseMiddleware<ExceptionMiddlewares>();

            app.UseAuthentication();

            app.UseHttpsRedirection();

            app.UseRouting();

            app.UseAuthorization();

            app.UseEndpoints(endpoints =>
            {
                endpoints.MapControllers();
            });
        }
    }
}
Jwt密钥类:
    /// <summary>
    /// POCO类,用来存储签发或者验证jwt时用到的信息
    /// </summary>
    public class TokenManagementModel
    {
        public static string Secret = "987654321987654321";//私钥

        public static string Issuer = "webapi.cn";

        public static string Audience = "WebApi";

        public static int AccessExpiration = 180;//过期时间

        public static int RefreshExpiration = 180;//刷新时间
    }
4、由于这块内容在 NetCore3.1 如何添加带有JWT Token 验证的Swagger 中讲解比较详细,就不一步步演示了。
2.2、搭建你的Log4Net日志并结合异常处理中间件,使你的系统轻而易举的处理系统错误及异常,这块内容可参考:NetCore 异常处理过滤器、中间件 、并整合Log4Net
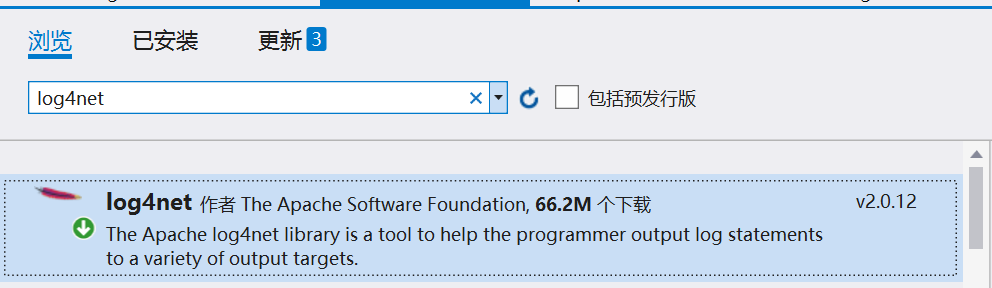
1、首选通过Nuget引用Log4Net,如下:
然后在sutartUp的构造函数中注册Log4Net
        public static ILoggerRepository repository { get; set; }
        public Startup(IConfiguration configuration)
        {
            Configuration = configuration;
            // 指定配置文件
            repository = LogManager.CreateRepository("NETCoreRepository");
            XmlConfigurator.Configure(repository, new FileInfo("Log4Net.config"));
        }
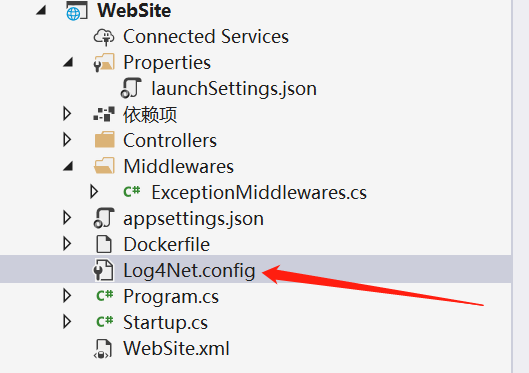
2、添加Log4Net日志的XML配置文件Log4Net.config
<?xml version="1.0" encoding="utf-8" ?> <configuration> <!-- This section contains the log4net configuration settings --> <log4net> <appender name="ConsoleAppender" type="log4net.Appender.ConsoleAppender"> <layout type="log4net.Layout.PatternLayout" value="%date [%thread] %-5level %logger - %message%newline" /> </appender> <appender name="RollingLogFileAppender" type="log4net.Appender.RollingFileAppender"> <file value="Log\\LogInfo\\" /> <appendToFile value="true" /> <rollingStyle value="Composite" /> <staticLogFileName value="false" /> <datePattern value="yyyyMMdd'.log'" /> <maxSizeRollBackups value="10" /> <maximumFileSize value="5MB" /> <layout type="log4net.Layout.PatternLayout"> <conversionPattern value="%n异常时间:%d [%t] %n异常级别:%-5p 
异 常 类:%c [%x] %n%m %n" /> </layout> </appender> <!-- Setup the root category, add the appenders and set the default level --> <root> <level value="ALL" /> <appender-ref ref="ConsoleAppender" /> <appender-ref ref="FileAppender" /> <appender-ref ref="RollingLogFileAppender" /> </root> </log4net> </configuration>
截止到这儿,Log4Net就成功引入到项目中了。
3、在项目中添加异常处理中间件:ExceptionMiddlewares,结合Log4Net进行异常日志记录
using log4net;
using Microsoft.AspNetCore.Hosting;
using Microsoft.AspNetCore.Http;
using Microsoft.Extensions.Logging;
using Newtonsoft.Json;
using System;
using System.Collections.Generic;
using System.Linq;
using System.Threading.Tasks;

namespace WebSite.Middlewares
{
    public class ExceptionMiddlewares
    {
        private ILog log;
        private readonly RequestDelegate next;
        private IHostingEnvironment environment;
        public ExceptionMiddlewares(RequestDelegate next, IHostingEnvironment environment, ILogger<ExceptionMiddlewares> logger)
        {
            this.log = LogManager.GetLogger(Startup.repository.Name, typeof(ExceptionMiddlewares));
            this.next = next;
            this.environment = environment;
        }

        public async Task Invoke(HttpContext context)
        {
            try
            {
                await next.Invoke(context);
                var features = context.Features;
            }
            catch (Exception e)
            {
                await HandleException(context, e);
            }
        }

        private async Task HandleException(HttpContext context, Exception e)
        {
            context.Response.StatusCode = 500;
            context.Response.ContentType = "text/json;charset=utf-8;";
            string error = "";

            if (environment.IsDevelopment())
            {
                var json = new { message = e.Message + "【" + e.StackTrace + "】" };
                log.Error(json);
                error = JsonConvert.SerializeObject(json);
            }
            else
            {
                var json = new { message = e.Message + "【" + e.StackTrace + "】" };
                log.Error(json);
                error = JsonConvert.SerializeObject(json);
                error = "抱歉,出错了";
            }


            await context.Response.WriteAsync(error);
        }
    }
}
4、在startup类中注册异常中间件
            //注册异常中间件
            app.UseMiddleware<ExceptionMiddlewares>();
5、这块内容已详细实现,可参考:NetCore 异常处理过滤器、中间件 、并整合Log4Net ,这儿不再重复累述。
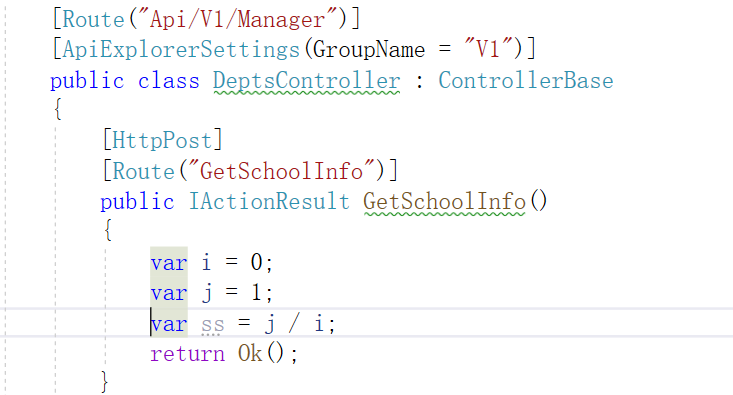
做个测试,写个被除数为0 的程序,看看中间件能否捕获异常,Log4Net能否记录下异常信息
Log4Net记录的日志如下:

3、继续完善你搭建的项目【添加选项模式,封装分页类,统一返回值BaseResponse,MongoDB/Redis/MQ/缓存/Jwt生成、验证,等等】
写到这儿,项目的基本搭建就完成了,关于:添加选项模式,封装分页类,统一返回值BaseResponse,MongoDB/Redis/MQ/缓存/Jwt生成、验证等等,有兴趣的可以搜索我的博客,基本都有实现。
可参考:
NetCore读取配置文件,简单实现。
NetCore3.1 使用 mongoDb 存储日志,提升查询效率
消息队列 RocketMQ 并发量十万级
Redis 的基础数据类型
高并发时,使用Redis应注意的问题 及 Redis缓存帮助类
EFcoe中如果通过日志记录Linq转化的SQL语句
EFCore 封装分页功能
ASP.NET Core 中的响应缓存 / ResponseCache
实时web应用方案——SignalR(.net core) 理论篇
NetCore 配置文件---直接读取及选项模式读取
NetCore 基于identity的登录验证授权机制
深入理解 NetCore 中的依赖注入的好处 及 、Singleton、Scoped、Transient 三种对象的差异
asp.net core 系列 5 项目实战之:NetCore 的 async 和 await(参考自:Microsoft教程)
SqlSugar 用法大全
总结:
一个优秀的程序猿,不仅仅要会用框架,也应该会自己搭建一个框架,想成为架构师,这只是开始。
@天才卧龙的博客
