SpringBoot的使用
1. Spring Boot概述
目标:了解Spring Boot是什么,有什么作用
小结:
Spring Boot是一个便捷搭建 基于spring工程的脚手架;作用是帮助开发人员快速搭建大型的spring 项目。简化工程的配置,依赖管理;实现开发人员把时间都集中在业务开发上。
2. Spring Boot入门
目标:能够使用Spring Boot搭建项目
分析:
需求:可以在浏览器中访问http://localhost:8080/hello输出一串字符
实现步骤:
- 创建工程;
- 添加依赖(启动器依赖,spring-boot-starter-web);
- 创建启动类;
- 创建处理器Controller;
- 测试
小结:
Spring Boot工程可以通过添加启动器依赖和创建启动引导类实现快速创建web工程。
spring-boot-starter-web默认的应用服务器端口是8080
3. Java代码方式配置
目标:可以使用@Value获取配置文件配置项并结合@Bean注册组件到Spring
分析:
需求:使用Java代码配置数据库连接池,并可以在处理器中注入并使用
步骤:
- 添加依赖;
- 创建数据库;
- 创建数据库连接参数的配置文件jdbc.properties;
- 创建配置类;
- 改造处理器类注入数据源并使用
小结:
package com.itheima.config;

import com.alibaba.druid.pool.DruidDataSource;
import org.springframework.beans.factory.annotation.Value;
import org.springframework.context.annotation.Bean;
import org.springframework.context.annotation.Configuration;
import org.springframework.context.annotation.PropertySource;

import javax.sql.DataSource;

@Configuration
@PropertySource("classpath:jdbc.properties")
public class JdbcConfig {

    @Value("${jdbc.url}")
    String url;
    @Value("${jdbc.driverClassName}")
    String driverClassName;
    @Value("${jdbc.username}")
    String username;
    @Value("${jdbc.password}")
    String password;

    @Bean
    public DataSource dataSource(){
        DruidDataSource dataSource = new DruidDataSource();
        dataSource.setDriverClassName(driverClassName);
        dataSource.setUrl(url);
        dataSource.setUsername(username);
        dataSource.setPassword(password);
        return dataSource;
    }

}
4. Spring Boot属性注入方式
目标:能够使用@ConfigurationProperties实现Spring Boot配置文件配置项读取和应用
分析:
需求:将配置文件中的配置项读取到一个对象中;
实现:可以使用Spring Boot提供的注解@ConfigurationProperties,该注解可以将Spring Boot的配置文件(默认必须为application.properties或application.yml)中的配置项读取到一个对象中。
实现步骤:
- 创建配置项类JdbcProperties类,在该类名上面添加@ConfigurationProperties;
- 将jdbc.properties修改名称为application.properties;
- 将JdbcProperties对象注入到JdbcConfig;
- 测试
小结:
- 使用@ConfigurationProperties编写配置项类将配置文件中的配置项设置到对象中
@ConfigurationProperties(prefix = "jdbc")
public class JdbcProperties {

    private String url;
    private String driverClassName;
    private String username;
    private String password;

    public String getUrl() {
        return url;
    }

    public void setUrl(String url) {
        this.url = url;
    }

    public String getDriverClassName() {
        return driverClassName;
    }

    public void setDriverClassName(String driverClassName) {
        this.driverClassName = driverClassName;
    }

    public String getUsername() {
        return username;
    }

    public void setUsername(String username) {
        this.username = username;
    }

    public String getPassword() {
        return password;
    }

    public void setPassword(String password) {
        this.password = password;
    }
}
- 使用@ConfigurationProperties在方法上面使用
    @Bean
    @ConfigurationProperties(prefix = "jdbc")
    public DataSource dataSource() {
        return new DruidDataSource();
    }
5. 多个yml文件配置
目标:可以将多个yml文件在application.yml文件中配置激活
分析:
yaml与properties配置文件除了展示形式不相同以外,其它功能和作用都是一样的;在项目中原路的读取方式不需要改变。
1)yml配置文件的特征:
- 树状层级结构展示配置项;
- 配置项之间如果有关系的话需要分行空两格;
- 配置项如果有值的话,那么需要在
:之后空一格再写配置项值;
将application.properties配置文件修改为application.yml的话:
jdbc:
  driverClassName: com.mysql.jdbc.Driver
  url: jdbc:mysql://127.0.0.1:3306/heima
  username: root
  password: root

key:
  abc: cba
  def:
    - g
    - h
    - j
2)多个yml配置文件;在spring boot中是被允许的。这些配置文件的名称必须为application-***.yml,并且这些配置文件必须要在application.yml配置文件中激活之后才可以使用。
3)如果properties和yml配置文件同时存在在spring boot项目中;那么这两类配置文件都有效。在两个配置文件中如果存在同名的配置项的话会以properties文件的为主。
小结:
在多个配置文件时,需要将这些文件在application.yml文件中进行激活:
#激活配置文件;需要指定其它的配置文件名称
spring:
  profiles:
    active: abc,def
6. 自动配置原理
目标:了解Spring Boot项目的配置加载流程
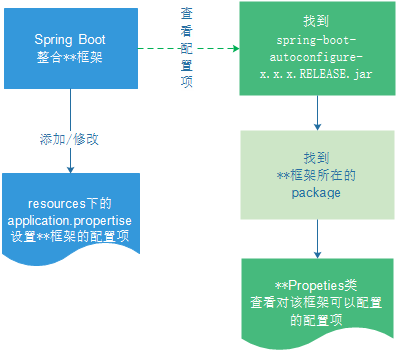
小结:
- 在
META-INF\spring.fatories文件中定义了很多自动配置类;可以根据在pom.xml文件中添加的 启动器依赖自动配置组件 - 通过如下流程可以去修改application配置文件,改变自动配置的组件默认参数

7. lombok应用
目标:使用lombok的注解实现pojo类的简化
分析:
使用Spring Boot整合SSM工程;需要使用到数据库数据。
-
将数据库表数据导入到数据库中(springboot_test);
-
编写数据库表对应的实体类;一般情况下需要编写get/set/toString等这些方法会耗时并且会让实体类看起来比较臃肿。可以使用lombok插件对实体类进行简化。
lombok是一个插件工具类包;提供了一些注解@Data、@Getter等这些注解去简化实体类中的构造方法、get/set等方法的编写。
- 在IDEA中安装lombok插件;
- 添加lombok对应的依赖到项目pom.xml文件;
- 改造实体类使用lombok注解
小结:
在Bean上使用:
@Data :自动提供getter和setter、hashCode、equals、toString等方法
@Getter:自动提供getter方法
@Setter:自动提供setter方法
@Slf4j:自动在bean中提供log变量,其实用的是slf4j的日志功能。
8. Spring Boot整合-SpringMVC端口和静态资源
目标:可以修改tomcat的端口和访问项目中的静态资源
分析:
-
修改tomcat端口
查询**Properties,设置配置项(前缀+类变量名)到application配置文件中
-
访问项目中的静态资源
静态资源放置的位置;放置静态资源并访问这些资源
小结:
- 修改项目tomcat端口:
#tomcat端口
server:
  port: 80
-
在spring boot项目中静态资源可以放置在如下目录:

9.Spring Boot整合-SpringMVC拦截器
目标:可以在Spring Boot项目中配置自定义SpringMVC拦截器
分析:
- 编写拦截器(实现HandlerInterceptor);
- 编写配置类实现 WebMvcConfigurer,在该类中添加各种组件;
- 测试
小结:
可以在spring boot项目中通过配置类添加各种组件;如果要添加拦截器的话:
package com.itheima.config;

import com.itheima.interceptor.MyInterceptor;
import org.springframework.context.annotation.Bean;
import org.springframework.context.annotation.Configuration;
import org.springframework.web.servlet.config.annotation.InterceptorRegistry;
import org.springframework.web.servlet.config.annotation.WebMvcConfigurer;

@Configuration
public class MvcConfig implements WebMvcConfigurer {

    //注册拦截器
    @Bean
    public MyInterceptor myInterceptor(){
        return new MyInterceptor();
    }

    //添加拦截器到spring mvc拦截器链
    @Override
    public void addInterceptors(InterceptorRegistry registry) {
        registry.addInterceptor(myInterceptor()).addPathPatterns("/*");
    }
}
10. Spring Boot整合-事务和连接池
目标:配置Spring Boot自带默认的hikari数据库连接池和使用@Transactional注解进行事务配置
分析:
-
事务配置
- 添加事务相关的启动器依赖,mysql相关依赖;
- 编写业务类UserService使用事务注解@Transactional
-
数据库连接池hikari配置
只需要在application配置文件中指定数据库相关参数
小结:
- 事务配置;只需要添加jdbc启动器依赖
- 数据库连接池使用默认的hikari,在配置文件中配置如下:
spring:
  datasource:
    driver-class-name: com.mysql.jdbc.Driver
    url: jdbc:mysql://127.0.0.1:3306/springboot_test
    username: root
    password: root
11. Spring Boot整合-Mybatis
目标:配置Mybatis在Spring Boot工程中的整合包,设置mybatis的实体类别名,输出执行sql语句配置项
分析:
- 添加启动器依赖;
- 配置Mybatis:实体类别名包,日志,映射文件等;
- 配置MapperScan
小结:
-
添加mybatis官方对于spring boot的一个启动器
<!--mybatis --> <dependency> <groupId>org.mybatis.spring.boot</groupId> <artifactId>mybatis-spring-boot-starter</artifactId> <version>2.0.1</version> </dependency> -
配置mybatis
mybatis: # 实体类别名包路径 type-aliases-package: com.itheima.pojo # 映射文件路径 # mapper-locations: classpath:mappers/*.xml configuration: log-impl: org.apache.ibatis.logging.stdout.StdOutImpl -
设置启动器类中的mapper扫描

12. Spring Boot整合-通用Mapper
目标:配置通用Mapper组件到Spring Boot项目中并使用Mapper
分析:
通用Mapper:可以实现自动拼接sql语句;所有的mapper都不需要编写任何方法也就是不用编写sql语句。可以提高开发效率。
- 添加启动器依赖;
- 改造UserMapper继承Mapper
; - 修改启动引导类Application中的Mapper扫描注解;
- 修改User实体类添加jpa注解;
- 改造UserService实现业务功能;
小结:
在启动引导类上面的mapper扫描注解 一定要修改为 通用mapper的扫描注解
13. Spring Boot整合测试
目标:可以访问处理器对应路径将数据库中的数据根据id查询
分析:
- 改造HelloController,注入UserService利用其方法实现查询;
- 启动项目进行测试 http://localhost/user/用户id --> http://localhost/user/8
小结:
修改了HelloController:
    @Autowired
    private UserService userService;

    /**
     * 根据用户id查询用户
     * @param id 用户id
     * @return 用户
     */
    @GetMapping("/user/{id}")
    public User queryById(@PathVariable Long id){
        return userService.queryById(id);
    }
14. Spring Boot整合-Junit
目标:在Spring Boot项目中使用Junit进行单元测试UserService的方法
分析:
- 添加启动器依赖spring-boot-starter-test;
- 编写测试类
小结:
@RunWith(SpringRunner.class)
@SpringBootTest
public class UserServiceTest {

    @Autowired
    private UserService userService;

    @Test
    public void queryById() {
        User user = userService.queryById(8L);
        System.out.println("user = " + user);
    }

    @Test
    public void saveUser() {
        User user = new User();
        user.setUserName("test2");
        user.setName("test2");
        user.setAge(13);
        user.setPassword("123456");
        user.setSex(1);
        user.setCreated(new Date());
        userService.saveUser(user);
    }
}
在Spring Boot项目中如果编写测试类则必须要在类上面添加@SpringBootTest
15. Spring Boot整合-redis
目标:在Spring Boot项目中使用Junit测试RedisTemplate的使用
分析:
- 添加启动器依赖;spring-boot-starter-data-redis
- 配置application.yml中修改redis的连接参数;(redis需要启动)
- 编写测试类应用RedisTemplate操作redis中的5种数据类型(string/hash/list/set/sorted set)
小结:
@RunWith(SpringRunner.class)
@SpringBootTest
public class RedisTest {

    @Autowired
    private RedisTemplate redisTemplate;

    @Test
    public void test(){
        //string 字符串
        //redisTemplate.opsForValue().set("str", "heima");
        redisTemplate.boundValueOps("str").set("heima");
        System.out.println("str = " + redisTemplate.opsForValue().get("str"));

        //hash 散列
        redisTemplate.boundHashOps("h_key").put("name", "heima");
        redisTemplate.boundHashOps("h_key").put("age", 13);
        //获取所有域
        Set set = redisTemplate.boundHashOps("h_key").keys();
        System.out.println(" hash散列的所有域:" + set);
        //获取所有值
        List list = redisTemplate.boundHashOps("h_key").values();
        System.out.println(" hash散列的所有域的值:" + list);

        //list 列表
        redisTemplate.boundListOps("l_key").leftPush("c");
        redisTemplate.boundListOps("l_key").leftPush("b");
        redisTemplate.boundListOps("l_key").leftPush("a");
        //获取全部元素
        list = redisTemplate.boundListOps("l_key").range(0, -1);
        System.out.println(" list列表中的所有元素:" + list);

        // set 集合
        redisTemplate.boundSetOps("s_key").add("a", "b", "c");
        set = redisTemplate.boundSetOps("s_key").members();
        System.out.println(" set集合中的所有元素:" + set);

        // sorted set 有序集合
        redisTemplate.boundZSetOps("z_key").add("a", 30);
        redisTemplate.boundZSetOps("z_key").add("b", 20);
        redisTemplate.boundZSetOps("z_key").add("c", 10);
        set = redisTemplate.boundZSetOps("z_key").range(0, -1);
        System.out.println(" zset有序集合中的所有元素:" + set);
    }
}
16. Spring Boot项目部署
目标:将Spring Boot项目使用maven指令打成jar包并运行测试
分析:
- 需要添加打包组件将项目中的资源、配置、依赖包打到一个jar包中;可以使用maven的
package; - 部署:java -jar 包名
小结:
-
添加打包组件
<build> <plugins> <!-- 打jar包时如果不配置该插件,打出来的jar包没有清单文件 --> <plugin> <groupId>org.springframework.boot</groupId> <artifactId>spring-boot-maven-plugin</artifactId> <version>2.2.6.RELEASE</version> </plugin> </plugins> </build> -
部署运行
java -jar 包名


