

Security——helloworld
个人认为,在框架中,最难的就是Spring与鉴权框架。大部分框架,即便不知道原理,知道如何使用,也能完成日常的开发。
而鉴权框架和Spring不同,他们并没有限定如何去使用,更多的,需要程序员自己的想法。
如果你有非常多的想法,那这篇文章能帮到你,快速构建起一个可运行的HelloWorld,之后就可以尝试自己添砖加瓦了。
已经对常用的代码做了注释说明。
Helloworld
直接上代码
Maven依赖

<?xml version="1.0" encoding="UTF-8"?>
<project xmlns="http://maven.apache.org/POM/4.0.0" xmlns:xsi="http://www.w3.org/2001/XMLSchema-instance"
         xsi:schemaLocation="http://maven.apache.org/POM/4.0.0 https://maven.apache.org/xsd/maven-4.0.0.xsd">
    <modelVersion>4.0.0</modelVersion>
    <parent>
        <groupId>org.springframework.boot</groupId>
        <artifactId>spring-boot-starter-parent</artifactId>
        <version>2.1.13.RELEASE</version>
        <relativePath/> <!-- lookup parent from repository -->
    </parent>
    <groupId>cn.seaboot</groupId>
    <artifactId>security</artifactId>
    <version>0.0.1-SNAPSHOT</version>
    <name>security</name>
    <description>Demo project for Spring Boot</description>

    <properties>
        <java.version>1.8</java.version>
        <spring-cloud.version>Greenwich.SR5</spring-cloud.version>
    </properties>

    <dependencies>
        <!--<dependency>-->
            <!--<groupId>org.springframework.cloud</groupId>-->
            <!--<artifactId>spring-cloud-starter-oauth2</artifactId>-->
        <!--</dependency>-->
        <dependency>
            <groupId>org.springframework.cloud</groupId>
            <artifactId>spring-cloud-starter-security</artifactId>
        </dependency>

        <dependency>
            <groupId>org.springframework.boot</groupId>
            <artifactId>spring-boot-starter-web</artifactId>
        </dependency>
        <dependency>
            <groupId>org.springframework.boot</groupId>
            <artifactId>spring-boot-starter-test</artifactId>
            <scope>test</scope>
        </dependency>
    </dependencies>

    <dependencyManagement>
        <dependencies>
            <dependency>
                <groupId>org.springframework.cloud</groupId>
                <artifactId>spring-cloud-dependencies</artifactId>
                <version>${spring-cloud.version}</version>
                <type>pom</type>
                <scope>import</scope>
            </dependency>
        </dependencies>
    </dependencyManagement>

    <build>
        <plugins>
            <plugin>
                <groupId>org.springframework.boot</groupId>
                <artifactId>spring-boot-maven-plugin</artifactId>
            </plugin>
        </plugins>
    </build>

</project>
Controller
一个测试用的接口,主要测试如何获取当前登录用户的信息,这是业务中经常用到的代码,也就是SecurityContextHolder的使用,类似于Shiro框架中的ShiroUtils。
package cn.seaboot.security.ctrl;

import org.springframework.security.core.context.SecurityContextHolder;
import org.springframework.web.bind.annotation.GetMapping;
import org.springframework.web.bind.annotation.RestController;

/**
 * @author Mr.css
 * @date 2020-05-06 15:06
 */
@RestController
public class HelloController {

  @GetMapping("/hello")
  public String hello() {
    //获取登录的账号
    Object principal = SecurityContextHolder.getContext().getAuthentication().getPrincipal();
    System.out.println(principal.getClass());
    System.out.println(principal);
    return "hello";
  }
}
SecurityConfig
主要测试登录和鉴权两个功能,下面直接在代码中添加了几个用户和权限配置
package cn.seaboot.security.config;

import org.springframework.context.annotation.Bean;
import org.springframework.context.annotation.Configuration;
import org.springframework.security.config.annotation.authentication.builders.AuthenticationManagerBuilder;
import org.springframework.security.config.annotation.web.builders.HttpSecurity;
import org.springframework.security.config.annotation.web.builders.WebSecurity;
import org.springframework.security.config.annotation.web.configuration.WebSecurityConfigurerAdapter;
import org.springframework.security.crypto.bcrypt.BCryptPasswordEncoder;
import org.springframework.security.crypto.password.PasswordEncoder;

/**
 * @author Mr.css
 * @date 2020-05-07 23:38
 */
@Configuration
public class SecurityConfig extends WebSecurityConfigurerAdapter {
  /**
   * 下面这两行配置表示在内存中配置了两个用户,分别是javaboy和lisi,密码都是123,并且赋予了admin权限
   * @param auth AuthenticationManagerBuilder
   */
  @Override
  protected void configure(AuthenticationManagerBuilder auth) throws Exception {
    auth.inMemoryAuthentication()
        .withUser("javaboy")
        .roles("admin")
        .password("$2a$10$Wuts2iHTzQBmeRVKJ21oFuTsvOJ5ffsqpD3DRzNupKwn5Gy54LEpC")
        .and()
        .withUser("lisi")
        .roles("user")
        .password("$2a$10$gDCkllHpktQfHgwYWKW2T.JCgkUZcTZTLfDBhlJvTLO/BDSMeA2YS");
  }

  /**
   * 加密算法
   */
  @Bean
  PasswordEncoder passwordEncoder() {
    return new BCryptPasswordEncoder();
  }

  /**
   * URL角色权限配置,下列代码的意思是:访问路径hello,需要有admin角色
   *
   * @param http HttpSecurity
   */
  @Override
  protected void configure(HttpSecurity http) throws Exception {
    http
        .authorizeRequests()
        .antMatchers("/hello/**").hasRole("admin")
        .antMatchers("/hello").hasRole("admin")
        .anyRequest().authenticated()
        .and()
        .formLogin().and()
        .httpBasic();
  }

  /**
   * 白名单配置:直接过滤掉该地址,配置完这些地址不走 Spring Security 过滤器链
   */
  @Override
  public void configure(WebSecurity web){
    web.ignoring().antMatchers("/vercode");
  }

  /**
   * 测试加密算法
   * @param args
   */
  public static void main(String[] args) {
    System.out.println(new BCryptPasswordEncoder().encode("123"));;
    System.out.println(new BCryptPasswordEncoder().matches("123", "$2a$10$gDCkllHpktQfHgwYWKW2T.JCgkUZcTZTLfDBhlJvTLO/BDSMeA2YS"));;
  }
}
URL权限配置的其它可选项:
在configure函数中,已经展示了如何给Url配置权限,更多的配置如下:
antMatchers(url).hasRole()
antMatchers(url).access()
hasRole([role]) 当前用户是否拥有指定角色。
hasAnyRole([role1,role2]) 多个角色是一个以逗号进行分隔的字符串。如果当前用户拥有指定角色中的任意一个则返回true。
hasAuthority([auth]) 等同于hasRole
hasAnyAuthority([auth1,auth2]) 等同于hasAnyRole
Principle 代表当前用户的principle对象
authentication 直接从SecurityContext获取的当前Authentication对象
permitAll 总是返回true,表示允许所有的
denyAll 总是返回false,表示拒绝所有的
isAnonymous() 当前用户是否是一个匿名用户
isRememberMe() 表示当前用户是否是通过Remember-Me自动登录的
isAuthenticated() 表示当前用户是否已经登录认证成功了。
isFullyAuthenticated() 如果当前用户既不是一个匿名用户,同时又不是通过Remember-Me自动登录的,则返回true。
页面测试
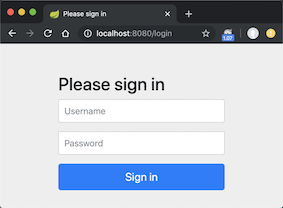
这样简单的配置,就完成了第一个demo,访问Hello地址,就会自动跳转登录页面(Spring Security内置),用前面配置的账号和密码即可登录。
代码进阶
完成上面的Demo之后,肯定会有非常多的疑问
问题一
思考问题:我们的用户肯定是配置在数据库里的,而且,登录页面也必定是用自己的,我们该怎么使用我们自己的登录界面?
答:通过formLogin()可以配置我们自己的登录页面,表单提交路径,以及首页地址。
配置如下:
 http
        .formLogin()
        .loginPage("/login.html")
        .failureUrl("/login.html?error=1")
        .defaultSuccessUrl("/index.html")
        .loginProcessingUrl("/user/login")
        .permitAll()
        .and()
登录的接口如下,需要在这个接口中,查询用户的详细信息,包括:账号、密码、权限(详细的代码在后面给出):
package org.springframework.security.core.userdetails;

public interface UserDetailsService {
  UserDetails loadUserByUsername(String var1) throws UsernameNotFoundException;
}
问题二:
思考问题:UserDetailsService只有1个参数 (userName),那么问题就来了,假设我们有2个参数怎么办?比如:验证码。
答:原理非常简单,就是在登录拦截之前,再加一个优先级更高的校验码拦截。
http.addFilterBefore(new xxxxxxFilter(), xxxxxxxFilter.class)
调整代码
根据上述问题,对代码进行调整
package cn.seaboot.security.config;

import org.springframework.context.annotation.Bean;
import org.springframework.context.annotation.Configuration;
import org.springframework.security.config.annotation.authentication.builders.AuthenticationManagerBuilder;
import org.springframework.security.config.annotation.web.builders.HttpSecurity;
import org.springframework.security.config.annotation.web.builders.WebSecurity;
import org.springframework.security.config.annotation.web.configuration.WebSecurityConfigurerAdapter;
import org.springframework.security.crypto.bcrypt.BCryptPasswordEncoder;
import org.springframework.security.crypto.password.PasswordEncoder;
import org.springframework.security.web.authentication.UsernamePasswordAuthenticationFilter;
import org.springframework.security.web.authentication.rememberme.JdbcTokenRepositoryImpl;
import org.springframework.security.web.authentication.rememberme.PersistentTokenRepository;

import javax.annotation.Resource;
import javax.sql.DataSource;

/**
 * @author Mr.css
 * @date 2020-05-07 23:38
 */
@Configuration
public class SecurityConfig extends WebSecurityConfigurerAdapter {
  /**
   * @param auth AuthenticationManagerBuilder
   */
  @Override
  protected void configure(AuthenticationManagerBuilder auth) throws Exception {
    // 设置自定义登录处理逻辑:userDetailsService
    auth.userDetailsService(new CustomUserDetailsService())
        .passwordEncoder(passwordEncoder());
  }

  /**
   * 加密算法
   */
  @Bean
  PasswordEncoder passwordEncoder() {
    return new BCryptPasswordEncoder();
  }

  /**
   * URL角色权限配置,访问路径hello,需要有admin角色(这里权限还是固定的,希望配在数据库的话,需要自己实现)
   *
   * @param http HttpSecurity
   */
  @Override
  protected void configure(HttpSecurity http) throws Exception {
    http
        .addFilterBefore(new BeforeLoginAuthenticationFilter("/user/login", "/login.html"), UsernamePasswordAuthenticationFilter.class)
        .authorizeRequests()
        .antMatchers("/hello/**").hasRole("admin")
        .antMatchers("/hello").hasRole("admin")
        .anyRequest().authenticated()
        .and()
        .formLogin()
        .loginPage("/login.html")
        .failureUrl("/login.html?error=1")
        .defaultSuccessUrl("/index.html")
        .loginProcessingUrl("/user/login")
        .permitAll()
        .and()
        .httpBasic();


    //session管理
    //session失效后跳转到登录页面
    http.sessionManagement().invalidSessionUrl("/toLogin");

    //单用户登录,如果有一个登录了,同一个用户在其他地方登录将前一个剔除下线
    //http.sessionManagement().maximumSessions(1).expiredSessionStrategy(expiredSessionStrategy());

    //单用户登录,如果有一个登录了,同一个用户在其他地方不能登录
    http.sessionManagement().maximumSessions(1).maxSessionsPreventsLogin(true);

    //CSRF是一种网站攻击手段,为了防止攻击,默认的登录页面有一个用于安全验证的token,如果使用模版引擎,可以使用表达式获取,因为我们直接使用html,因此先禁用
    //    <input name="_csrf" type="hidden" value="d2ef6916-316b-4889-895c-07a2ca3759fc">
    //    <input  type = “hidden”  name = “${_csrf.parameterName}”  value = “${_csrf.token}” />
    http.csrf().disable();
  }

  /**
   * 白名单配置:直接过滤掉该地址,因为默认的投票规则,只要满足1个条件,即可通过认证,因此白名单内部的url都会被直接通过,这里就不展开投票规则的说明了
   */
  @Override
  public void configure(WebSecurity web) {
    web.ignoring().antMatchers("/vercode");
  }
}
模拟用户登录
要在这里查询用户的详细信息,包括权限列表等等,下面的代码直接添加了几个模拟用户。
package cn.seaboot.security.config;

import org.springframework.security.core.GrantedAuthority;
import org.springframework.security.core.authority.SimpleGrantedAuthority;
import org.springframework.security.core.userdetails.User;
import org.springframework.security.core.userdetails.UserDetails;
import org.springframework.security.core.userdetails.UserDetailsService;
import org.springframework.security.core.userdetails.UsernameNotFoundException;

import java.util.ArrayList;
import java.util.List;

/**
 *
 * @author Mr.css
 * @date 2020-05-08 0:02
 */
public class CustomUserDetailsService implements UserDetailsService {

  @Override
  public UserDetails loadUserByUsername(String userName) throws UsernameNotFoundException {
    // TODO: 查询账户
    // 这里并没有真正去查询数据库,而是允许任意账号登录,密码都是123,并且都是admin角色;
    // GrantedAuthority直译是授予权限,与config中配置的hasRole有歧义,Security角色和权限的区分非常模糊,后面我发了文章专门分析,实际上角色就是权限,不要受函数名影响。
    List<GrantedAuthority> grantedAuthorities = new ArrayList<>();
    GrantedAuthority grantedAuthority = new SimpleGrantedAuthority("ROLE_admin");
    grantedAuthorities.add(grantedAuthority);
    return new org.springframework.security.core.userdetails.User(userName,"$2a$10$gDCkllHpktQfHgwYWKW2T.JCgkUZcTZTLfDBhlJvTLO/BDSMeA2YS", grantedAuthorities);
  }
}
模拟验证码校验
模拟校验码功能,登录页面除了需要提供用户名/密码,还需一些别的参数。
import org.springframework.security.authentication.InsufficientAuthenticationException;
import org.springframework.security.core.Authentication;
import org.springframework.security.core.AuthenticationException;
import org.springframework.security.web.authentication.AbstractAuthenticationProcessingFilter;
import org.springframework.security.web.authentication.SimpleUrlAuthenticationFailureHandler;
import javax.servlet.*;
import javax.servlet.http.HttpServletRequest;
import javax.servlet.http.HttpServletResponse;
import java.io.IOException;

/**
 * @author Mr.css
 * @date 2020-05-10 1:14
 */
public class BeforeLoginAuthenticationFilter extends AbstractAuthenticationProcessingFilter {
  private String servletPath;

  public BeforeLoginAuthenticationFilter(String servletPath, String failureUrl) {
    super(servletPath);
    this.servletPath = servletPath;
    setAuthenticationFailureHandler(new SimpleUrlAuthenticationFailureHandler(failureUrl));
  }

  @Override
  public Authentication attemptAuthentication(HttpServletRequest httpServletRequest, HttpServletResponse httpServletResponse) throws AuthenticationException, IOException, ServletException {
    return null;
  }

  /**
   * 这里模拟客户端的验证码,只要验证码是test,即可通过校验
   */
  @Override
  public void doFilter(ServletRequest request, ServletResponse response, FilterChain chain) throws IOException, ServletException {
    HttpServletRequest req = (HttpServletRequest) request;
    if(servletPath.equals(req.getServletPath()) && "POST".equalsIgnoreCase(req.getMethod())){
        if (!"test".equals(req.getParameter("token"))) {
        unsuccessfulAuthentication(req, (HttpServletResponse) response, new InsufficientAuthenticationException("输入的验证码不正确"));
        return;
      }
    }
    chain.doFilter(request, response);
  }
}
登录页面
<!DOCTYPE html>
<html lang="en">
<head>
  <meta charset="UTF-8">
  <title>Title</title>
</head>
<body>
自定义表单验证:
<form action="/user/login" method="post">
  <br/>
  用户名:
  <input type="text" name="username" placeholder="name"><br/>
  密码:
  <input type="password" name="password" placeholder="password"><br/>
  <input type="text" name="token" value="test"><br/>
  <input name="submit" type="submit" value="提交">
</form>
</body>
</html>
一些其它配置:
//单用户登录,如果有一个登录了,同一个用户在其他地方登录将前一个剔除下线
//http.sessionManagement().maximumSessions(1).expiredSessionStrategy(expiredSessionStrategy());
//单用户登录,如果有一个登录了,同一个用户在其他地方不能登录
http.sessionManagement().maximumSessions(1).maxSessionsPreventsLogin(true);
默认的登录过滤器:
UsernamePasswordAuthenticationFilter


【推荐】国内首个AI IDE,深度理解中文开发场景,立即下载体验Trae
【推荐】编程新体验,更懂你的AI,立即体验豆包MarsCode编程助手
【推荐】抖音旗下AI助手豆包,你的智能百科全书,全免费不限次数
【推荐】轻量又高性能的 SSH 工具 IShell:AI 加持,快人一步
· 开发者必知的日志记录最佳实践
· SQL Server 2025 AI相关能力初探
· Linux系列:如何用 C#调用 C方法造成内存泄露
· AI与.NET技术实操系列(二):开始使用ML.NET
· 记一次.NET内存居高不下排查解决与启示
· 开源Multi-agent AI智能体框架aevatar.ai,欢迎大家贡献代码
· Manus重磅发布:全球首款通用AI代理技术深度解析与实战指南
· 被坑几百块钱后,我竟然真的恢复了删除的微信聊天记录!
· 没有Manus邀请码?试试免邀请码的MGX或者开源的OpenManus吧
· 园子的第一款AI主题卫衣上架——"HELLO! HOW CAN I ASSIST YOU TODAY