一、ApplicationMaster与RM、NM的交互过程:
具体运行任务时,会由ApplicationMaster和ResourceManager和NamenodeManger打交道。
ApplicationMaster与RM交互:
1、向RM注册,RM返回注册响应。
2、通过AllocateRequest申请资源,随后通过申请空资源来发送心跳。
3、等所有container运行完毕后,通知RM结束。
ApplicationMaster与NM交互:
1、向NM申请资源,启动任务。
2、查询container的运行状态。
3、程序运行完成后,结束container。
二、代码分析:
下面的applicationMaster实现了向namenode申请container运行程序的功能,所要运行的程序是linux命令,打印一样hello world,然后休息100s:echo 'hello world'; sleep 100s
第一部分,ApplicationMaster与RM交互:
与RM交互由AMRMClientAsync类型的对象完成,在得到一个AMRMClientAsync实例前,我们需要实现接口AMRMClient.CallbakHandler。
AMRMClient.CallbackHandler接口中必须要实现的方法有6个,重要的是下面两个:
- onContaienrsCompleted:该方法的传入参数是List<ContainerStatus> completedContainers。当收到通知有一些container已经运行结束时,我们可以检查它们的退出状态(如ContaienrExitStatus.ABORTED),来判断是否结束整个任务。
- onContainersAllocated:该方法传入参数是List<Container> allocatedContainers。收到通知新分配了container时,我们就可以在这些container中准备运行上面的hello world命令啦。
启动一个amClient:
1 AMRMClientAsync.CallbackHandler allocListener = new RMCallbackHandler();
2 amRMClient = AMRMClientAsync.createAMRMClientAsync(1000, allocListener);
3 amRMClient.init(conf);
4 amRMClient.start();
根据设定的container数量构造ContainerRequest对象进行申请。
1 for (int i = 0; i < numTotalContainersToRequest; ++i) {
2      Priority pri = Priority.newInstance(requestPriority);
3      Resource capability = Resource.newInstance(containerMem, containerVCores);
4      ContainerRequest request = new ContainerRequest(capability, null, null, pri);
5      amRMClient.addContainerRequest(request);
6  }
CallbackHandler中的具体实现。onContainersCompleted中主要是监控container数量。onContainersAllocated中进行container被分配下来后的动作,在这里我们启动contaienr。
另起线程来让nmClient启动容器:
 1  public void onContainersAllocated(List<Container> allocatedContainers) {
 2         numAllocatedContainers.addAndGet(allocatedContainers.size());
 3         for (Container allocatedContainer : allocatedContainers) {
 4               LaunchContainerRunnable runnableLaunchContainer = new LaunchContainerRunnable(allocatedContainer, containerListener);
 5               Thread launchThread = new Thread(runnableLaunchContainer);
 6               // launch and start the container on a separate thread to keep
 7               // the main thread unblocked
 8               // as all containers may not be allocated at one go.
 9               launchThreads.add(launchThread);
10               launchThread.start();
11         }
12  }
线程launchThread中具体动作。像Client端提交container一样,同样需要设置ContaienrLauncherContext(localResources、commands、environment),之后交给NM的CallbackHandler处理。
1 ContainerLaunchContext ctx = ContainerLaunchContext.newInstance(localResources, environment, commands, null, null, null);
2 /*交由nmClient处理*/
3 containerListener.addContainer(container.getId(), container);
4 nmClient.startContainerAsync(container, ctx);
所有container成功结束后,ApplicationMaster向RM注销注册。
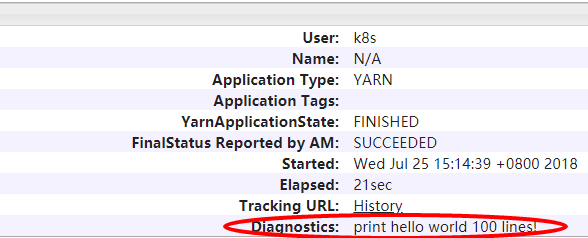
 1 FinalApplicationStatus appStatus;
 2 String appMessage = "print hello world 100 lines";
 3 boolean success = true;
 4 if(numFailedContainers.get() == 0 && numCompletedContainers.get() == numTotalContainers) {
 5        appStatus = FinalApplicationStatus.SUCCEEDED;
 6 }else {
 7        appStatus = FinalApplicationStatus.FAILED;
 8 }
 9 amRMClient.unregisterApplicationMaster(appStatus, appMessage, null);
10 amRMClient.stop();
11 return true;
上面的appMessage字符串,会显示在yarn web中的这一块
第二部分,ApplictionMaster与NM交互:
与NM交互由NMClientAsync类型的对象完成。与跟RM交互类似,在得到一个NMClientAsync实例前,我们需要实现接口NMClientAsync.CallbackHandler。
NMClientAsync.CallbackHandler中同样有必须要实现的6个方法,对不同的应用有不同的具体实现方式。
在这个helloworld版本中,NMClientAsync.CallbackHandler持有一个ConcurrentHashMap<ContainerId, Container> containers ,主要用于监控每个container的运行状况,然后改变container计数。例如下面的onStartContainerError,把启动失败的container删除。
1 @Override
2 public void onStartContainerError(ContainerId containerId, Throwable t) {
3        containers.remove(containerId);
4        applicationMaster.numCompletedContainers.incrementAndGet();
5        applicationMaster.numFailedContainers.incrementAndGet();
}
启动nmClient:
1 NMCallbackHandler containerListener = new NMCallbackHandler(this);
2 nmClient = new NMClientAsyncImpl(containerListener);
3 nmClient.init(conf);
4 nmClient.start();
查询container运行状态:
1 public void onContainerStarted(ContainerId containerId, Map<String, ByteBuffer> allServiceResponse) {
2        Container container = containers.get(containerId);
3            if (container != null) {
4               applicationMaster.nmClient.getContainerStatusAsync(containerId, container.getNodeId());
5        }
6  }
所有container结束后停止nmClient:
1 while(!done && (numCompletedContainers.get() != numTotalContainers)) {
2       Thread.sleep(200);
3 }
4 nmClient.stop();
这个过程走下来,基本能熟悉调用yarn的流程和其中用到的接口。不过hadoop提供的接口很多种,在实现的时候可以自由选择。
有用链接hadoop 2.7.2 API :https://hadoop.apache.org/docs/r2.7.2/api/index.html
完整代码github地址:https://github.com/chenqy930/testYarn
