
reactnative ignite App + wordpress後台CMS 詳細案例
1.0 入門篇
WordPress-Plugin-Boilerplate-Tutorial 更为简洁的架构方案
React Native Elements开发环境 & 生成项目 & 虚拟机调试 & 本地生成APK档 & 虚拟机运行APK档
2.0 Ignite框架
Ignite是reactnative里最最齊全的軍火庫。
https://github.com/infinitered/ignite
3.0 ReactNative庫
以下是常用的RN庫。一部份已在Ignite框架,但仍需自行安裝另一些常用庫。
已在Ignite框架:
| Library | Category | Description |
| React Navigation | Navigation | 必需先讀doc。 |
| MobX-State-Tree | State Management | 必需先讀doc。 |
| MobX-React-Lite | React Integration | / |
| apisauce | REST client | 采用Wordpress做後台。所以用哪個api庫不重要。 |
自行安裝:
| Library | Category | Description |
| react-native-sqlite-storage | Persistence | / |
| moment | FormatDatetime | / |
| react-native-vector-icons | Icon Framework | 常見icon集合 |
|
@react-navigation/material-top-tabs react-native-tab-view react-native-pager-view |
UI Framework | React Navigation Toptabs庫 |
|
@rneui/base @rneui/themed |
UI Framework | / |
|
react-native-chart-kit react-native-svg |
UI Chart Framework | / |
4.0 Quick Start & Build App
4.1 創建項目
npx ignite-cli@latest new {PROJECT_NAME} --yes
4.2 更改icon image
{PROJECT_NAME}\ignite\templates\app-icon

npx ignite-cli generate app-icon android
Build App icon。
4.3 更改啟動splash
{PROJECT_NAME}\ignite\templates\splash-screen

npx ignite-cli generate splash-screen FF0000
build splash。
4.4 更改android app名稱
{PROJECT_NAME}\android\app\src\main\res\values\strings.xml
<resources>
    <string name="app_name">Smoke507</string>
</resources>
app_name就是android app名稱
4.5 Build App
adb devices -l
npm bundle:android
cd android && gradlew assembleDebug && adb install %PROJECT_ROOT%\android\app\build\outputs\apk\debug\app-debug.apk
1行: 檢查devices。2行: compile。3行: Build APK。
5.0 Ignite框架
5.1 Ignite結構
在{PROJECT_NAME}\app下的Ignite結構。
| PATH | Description | Files |
| components | Ignite自帶的漂亮組件 | |
| config | 項目設置 |
config.base.ts,通用 config.dev.ts,開發環境 config.prod.ts,生產環境 |
| i18n | 國際化 | |
| models | MobX-State-Tree的Store | |
| navigators | React Navigation的狀態流 | |
| screens | APP視圖 | |
| services |
網絡層 數據持久化層 |
|
| theme | Ignite自帶的主題 | |
| utils | 工具庫 |
5.2 Navigators
npx ignite-cli generate navigator CounterNavigator
用Generators自動生成。組件在{PROJECT_NAME}\ignite\app\navigators。
{PROJECT_NAME}\ignite\app\navigators\AppNavigator.tsx
import { CounterTopTabsNavigator, CounterTopTabsNavigatorParamList } from "./CounterTopTabsNavigator"

export type AppStackParamList = {
  CounterNavigator: NavigatorScreenParams<CounterTabParamList>
}

const AppStack = observer(function AppStack() {
  const {
    authenticationStore: { isAuthenticated },
  } = useStores()

  return (
    <Stack.Navigator
      initialRouteName='CounterNavigator'
    >
      <Stack.Screen name="CounterNavigator" component={CounterNavigator} />
    </Stack.Navigator>
  )
})
在AppNavigator主組件,載入剛剛自己的CounterNavigator。
5.3 Screen 視圖
npx ignite-cli generate screen CounterHome
用Generators自動生成。組件在{PROJECT_NAME}\ignite\app\screens。
{PROJECT_NAME}\ignite\app\navigators\CounterHomeScreen.tsx
import React, { FC } from "react"
import { observer } from "mobx-react-lite"
import { ViewStyle } from "react-native"
import { NativeStackScreenProps } from "@react-navigation/native-stack"
import { AppStackScreenProps } from "app/navigators"
import { Screen, Text } from "app/components"
// import { useNavigation } from "@react-navigation/native"
// import { useStores } from "app/models"

interface CounterHomeScreenProps extends NativeStackScreenProps<AppStackScreenProps<"CounterHome">> {}

export const CounterHomeScreen: FC<CounterHomeScreenProps> = observer(function CounterHomeScreen() {
  // Pull in one of our MST stores
  // const { someStore, anotherStore } = useStores()

  // Pull in navigation via hook
  // const navigation = useNavigation()
  return (
    <Screen style={$root} preset="scroll">
      <Text text="counterHome" />
    </Screen>
  )
})

const $root: ViewStyle = {
  flex: 1,
}
Screen模版。所有數據都必需由Store映射渣染。
5.3.1 把新視圖 載入 Navigators
{PROJECT_NAME}\ignite\app\navigators\CounterNavigator.tsx
import { CounterHomeScreen } from "../screens"

export type CounterTabParamList = {
  CounterHome: undefined,
}

const Tab = createBottomTabNavigator<CounterTabParamList>()
export const CounterNavigator = () => {
  const { bottom } = useSafeAreaInsets()

  return (
    <Tab.Navigator
      screenOptions={{
        headerShown: false,
        tabBarHideOnKeyboard: true,
      }}
    >
      <Tab.Screen
        name="CounterHomeScreen"
        component={CounterHomeScreen}
        options={{
          tabBarLabel: translate("CounterNavigator.CounterHomeTab"),
          tabBarIcon: ({ focused }) => (
            <Icon name={focused ? "home" : "home-outline"} type="ionicon" color={focused && colors.tint} size={30} />
          ),
          unmountOnBlur: false,
        }}
      />

    </Tab.Navigator>
  )
}
在Tab.Screen綁定CounterHomeScreen。注意,只有BottomTabNavigator才有unmountOnBlur強制轉頁刷新。
5.4 MobX-State-Tree
由於經常切換視圖,因此要保持數據的有效性,必需用MST做數據Store中心化。
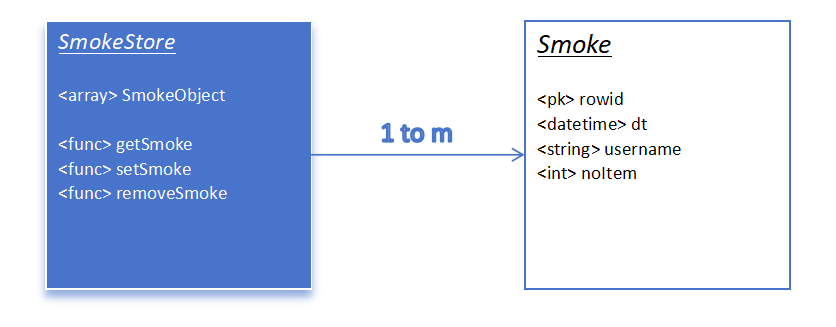
SMT用了Factory模式。經由SmokeStore去生產和和管理DataObject。
因此,任何DataObject必需包括: Store & Self。
npx ignite-cli generate Counter
創建Somke。
import { Instance, SnapshotIn, SnapshotOut, types } from "mobx-state-tree"
import { withSetPropAction } from "./helpers/withSetPropAction"

/**
 * Model description here for TypeScript hints.
 */
export const CounterModel = types
  .model("Counter")
  .props({})
  .actions(withSetPropAction)
  .views((self) => ({})) // eslint-disable-line @typescript-eslint/no-unused-vars
  .actions((self) => ({})) // eslint-disable-line @typescript-eslint/no-unused-vars

export interface Counter extends Instance<typeof CounterModel> {}
export interface CounterSnapshotOut extends SnapshotOut<typeof CounterModel> {}
export interface CounterSnapshotIn extends SnapshotIn<typeof CounterModel> {}
export const createCounterDefaultModel = () => types.optional(CounterModel, {})
Somke模板。
| Function | Description |
| model | 實体名稱 |
| props | 屬性鍵 |
| views | 返回屬性 |
| actions | 修改屬性 |
5.4.1 加載Smoke
{PROJECT_ROOT}\app\models\index.ts
export * from "./Counter"
加載Smoke到index.ts
{PROJECT_ROOT}\app\models\RootStore.ts
import { Instance, SnapshotOut, types } from "mobx-state-tree"

import { CounterModel } from "./Counter"

/**
 * A RootStore model.
 */
export const RootStoreModel = types.model("RootStore").props({
  counter: types.optional(CounterModel, {} as any),
})

/**
 * The RootStore instance.
 */
export interface RootStore extends Instance<typeof RootStoreModel> {}
/**
 * The data of a RootStore.
 */
export interface RootStoreSnapshot extends SnapshotOut<typeof RootStoreModel> {}
1. import SmokeModel,2. 加載SmokeModel到RootStoreModel。
5.4.2 創建SmokeStore
{PROJECT_ROOT}\app\models\CounterStore.ts
npx ignite-cli generate CounterStore
創建SomkeStore。
5.4.3 SmokeStore模版
import { Instance, SnapshotIn, SnapshotOut, flow, types } from "mobx-state-tree"
import { Counter, CounterModel } from "./Counter"
import { withSetPropAction } from "./helpers/withSetPropAction"
/**
 * Model description here for TypeScript hints.
 */
export const CounterStoreModel = types
  .model("CounterStore")
  .props({
    counters: types.array(CounterModel),
  })
  .actions(withSetPropAction)
  .views((store) => ({
    get items() {
      return store.counters
    },
  })) // eslint-disable-line @typescript-eslint/no-unused-vars
  .actions((store) => ({
    async fetchCounters() {

    },

    addCounter: flow(function * (counter: Counter) {

    }),

    removeCounter: flow(function * (counter: Counter) {

    }),
  })) // eslint-disable-line @typescript-eslint/no-unused-vars

export interface CounterStore extends Instance<typeof CounterStoreModel> {}
export interface CounterStoreSnapshotOut extends SnapshotOut<typeof CounterStoreModel> {}
export interface CounterStoreSnapshotIn extends SnapshotIn<typeof CounterStoreModel> {}
export const createCounterStoreDefaultModel = () => types.optional(CounterStoreModel, {})
SmokeStore模版
1. import之前創建的SmokeModel
2. 創建 <array - CounterModel> counters
3. 所有actions操作,必而flow。
addCounter: flow(function * (counter: Counter) {
  var response = yield api.addCounter(counter)
  if (response.data.status == 'success') {
    counter.setRowid(response.data.post_id)
    store.counters.push(counter)
  }
  return response
}),
用flow yield 取代 async await。 詳細可參考: https://mobx-state-tree.js.org/concepts/async-actions
5.4.4 加載SmokeStore
{PROJECT_ROOT}\app\models\index.ts
{PROJECT_ROOT}\app\models\RootStore.ts
在index.ts & RootStore.ts 加載 SmokeStore。
6.0 API Service
{PROJECT_ROOT}\app\services\api\api.ts
網絡層。
7.0 Screen 使用 MST Store
{PROJETC_ROOT}\app\screens\CounterHomeScreen.tsx
import { useStores } from "app/models"

interface CounterHomeScreenProps extends NativeStackScreenProps<AppStackScreenProps<"CounterHome">> {}

export const CounterHomeScreen: FC<CounterHomeScreenProps> = observer(function CounterHomeScreen(_props) {
  const { counterStore } = useStores()
  useEffect(() => {
    ;(async function load() {
      counterStore.fetchCounters()
    })()
  }, [counterStore])

  return (
    <Screen preset="scroll" safeAreaEdges={["top"]}>
      {{ counterStore.items() }}
    </Screen>
  )
})
1. useStores() 載入 counterStore
2. useEffect是React生命周期。用await call counterStore.fetchCounters()。
3. react會自動渣染 counterStore.items()。
7.1 Screen Listitem優化
https://reactnative.dev/docs/flatlist
這種List控件,應用優化版的Flatlist。自帶 動態渣染 效果。
8.0 Ignite總彙
1.0 Create ingite project
1.1 Change app_icon, app_name, app_splash
1.2 Build APK
2.0 Create Bottom Navigators
3.0 Create Screen
3.1 Import Screen to Navigators
4.0 MST
4.1 Create Smoke & SmokeStore
4.2 Import SmokeStore to Screen
5.0 Use MST on Screen
Quick start Ignite!
9.0 Wordpress Plugin
https://wppb.me/
創建wordpress plugin。
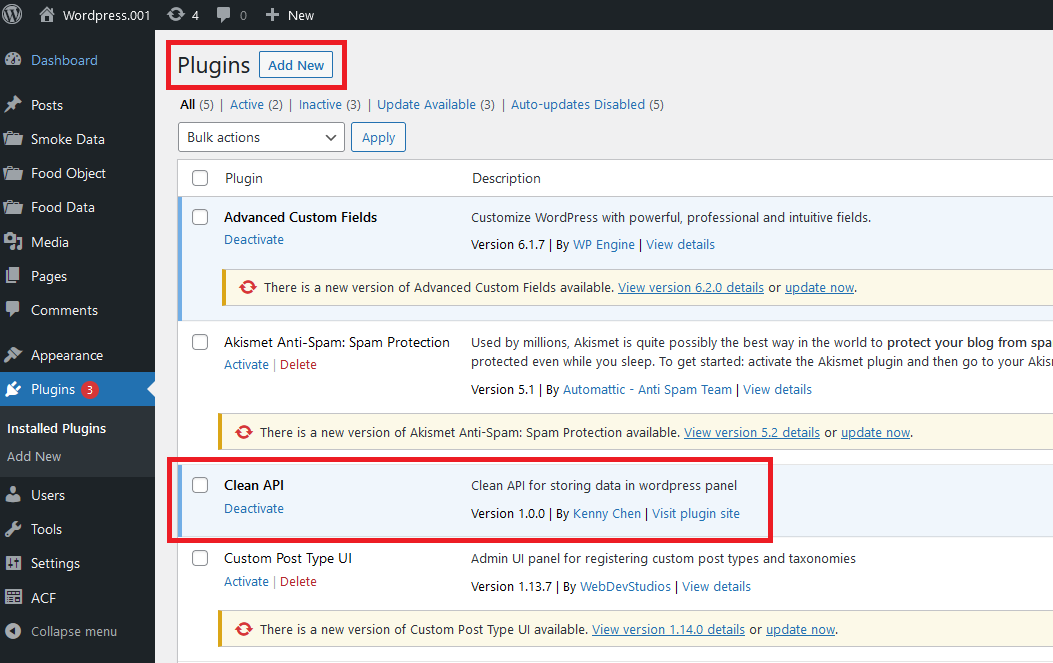
CleanAPI就是自己創建的Plugin。用來生產優雅的後端API。
Plugin根目錄: {PROJECT_ROOT}\wp-content\plugins\clean-api\
9.1 WP-CPT 後台CMS
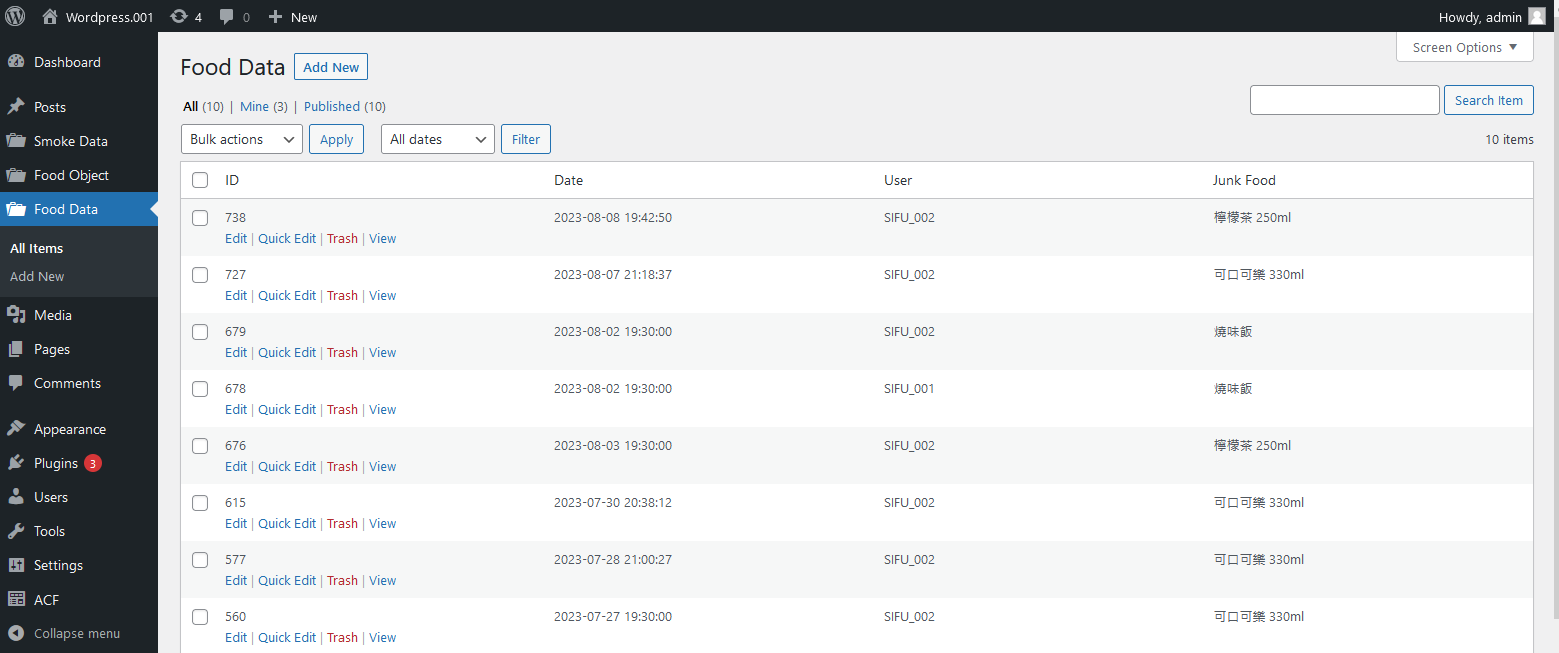
https://generatewp.com/post-type/
用generatewp生成CPT源碼。這個是用來生成Wordpress CMS視圖。
{PRODUCT_ROOT}\wp-content\plugins\clean-api\public\classes\junkFoodDataCPT.php
<?php

new junkFoodDataCPT();

class junkFoodDataCPT {

  function __construct() {
    $this->post_type = 'junk_food_data';
    $this->post_name = 'Food Data';
    add_action( 'init', [$this, "custom_post_type_{$this->post_type}"] );
    add_filter( "manage_{$this->post_type}_posts_columns", [$this, "set_{$this->post_type}_columns"] );
    add_action( "manage_{$this->post_type}_posts_custom_column" , [$this, "set_{$this->post_type}_custom_column"], 10, 2 );
    add_action( 'admin_init', [$this, "set_{$this->post_type}_meta_boxes"], 2);
    add_action( 'edit_form_after_title', [$this, "set_{$this->post_type}_header"], 2);
  }

  public function custom_post_type_junk_food_data() {

    $labels = array(
      'name'                  => _x( $this->post_name, 'Post Type General Name', $this->post_type ),
      'singular_name'         => _x( $this->post_name, 'Post Type Singular Name', $this->post_type ),
      'menu_name'             => __( $this->post_name, $this->post_type ),
      'name_admin_bar'        => __( $this->post_name, $this->post_type ),
      'archives'              => __( 'Item Archives', $this->post_type ),
      'attributes'            => __( 'Item Attributes', $this->post_type ),
      'parent_item_colon'     => __( 'Parent Item:', $this->post_type ),
      'all_items'             => __( 'All Items', $this->post_type ),
      'add_new_item'          => __( 'Add New Item', $this->post_type ),
      'add_new'               => __( 'Add New', $this->post_type ),
      'new_item'              => __( 'New Item', $this->post_type ),
      'edit_item'             => __( 'Edit Item', $this->post_type ),
      'update_item'           => __( 'Update Item', $this->post_type ),
      'view_item'             => __( 'View Item', $this->post_type ),
      'view_items'            => __( 'View Items', $this->post_type ),
      'search_items'          => __( 'Search Item', $this->post_type ),
      'not_found'             => __( 'Not found', $this->post_type ),
      'not_found_in_trash'    => __( 'Not found in Trash', $this->post_type ),
      'featured_image'        => __( 'Featured Image', $this->post_type ),
      'set_featured_image'    => __( 'Set featured image', $this->post_type ),
      'remove_featured_image' => __( 'Remove featured image', $this->post_type ),
      'use_featured_image'    => __( 'Use as featured image', $this->post_type ),
      'insert_into_item'      => __( 'Insert into item', $this->post_type ),
      'uploaded_to_this_item' => __( 'Uploaded to this item', $this->post_type ),
      'items_list'            => __( 'Items list', $this->post_type ),
      'items_list_navigation' => __( 'Items list navigation', $this->post_type ),
      'filter_items_list'     => __( 'Filter items list', $this->post_type ),
    );
    $args = array(
      'label'                 => __( $this->post_name, $this->post_type ),
      'description'           => __( $this->post_name, $this->post_type ),
      'labels'                => $labels,
      'hierarchical'          => false,
      'public'                => true,
      'show_ui'               => true,
      'show_in_menu'          => true,
      'menu_icon'             => 'dashicons-portfolio',
      'menu_position'         => 5,
      'show_in_admin_bar'     => false,
      'show_in_nav_menus'     => true,
      'can_export'            => true,
      'has_archive'           => true,
      'exclude_from_search'   => false,
      'publicly_queryable'    => true,
      'capability_type'       => 'page',
      'show_in_rest'          => true,
    );
    register_post_type( $this->post_type, $args );
  }

  public function set_junk_food_data_columns($columns) {

  }

  public function set_junk_food_data_custom_column($column_id, $post_id) {

  }

  public function set_junk_food_data_meta_boxes() {

  }

  public function set_junk_food_data_header() {

  }
}
CPT必需是Class Object。
{PROJECT_ROOT}\wp-content\plugins\clean-api\public\class-clean-api-public.php
public function __construct( $plugin_name, $version ) {

  $this->plugin_name = $plugin_name;
  $this->version = $version;

  require_once("classes/junkFoodDataCPT.php");
}
把剛剛創建的junkFoodDataCPT.php,加載到class-clean-api-public.php。
9.1.1 WP-CPT Edit Page
https://www.advancedcustomfields.com/
像BI軟件(現在流行叫低代瑪)那樣,可自行創建輸入頁面。
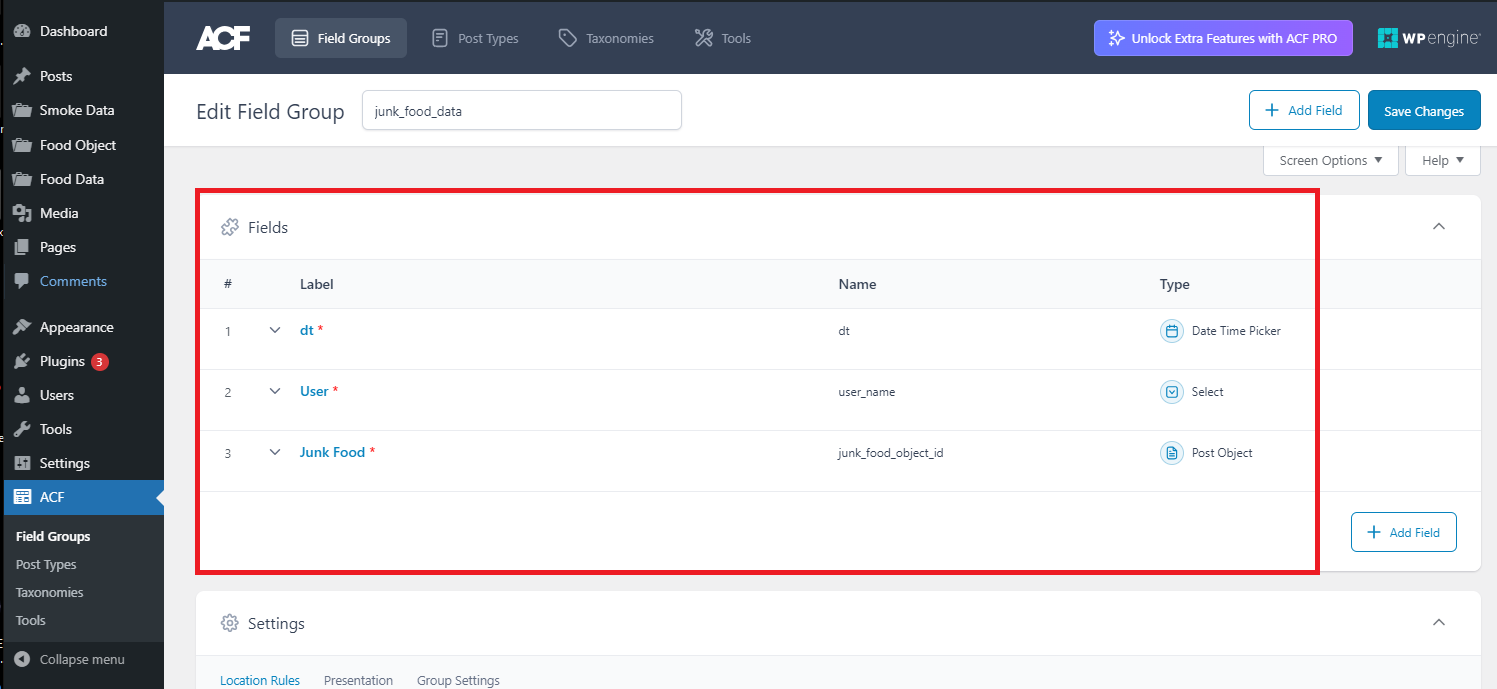
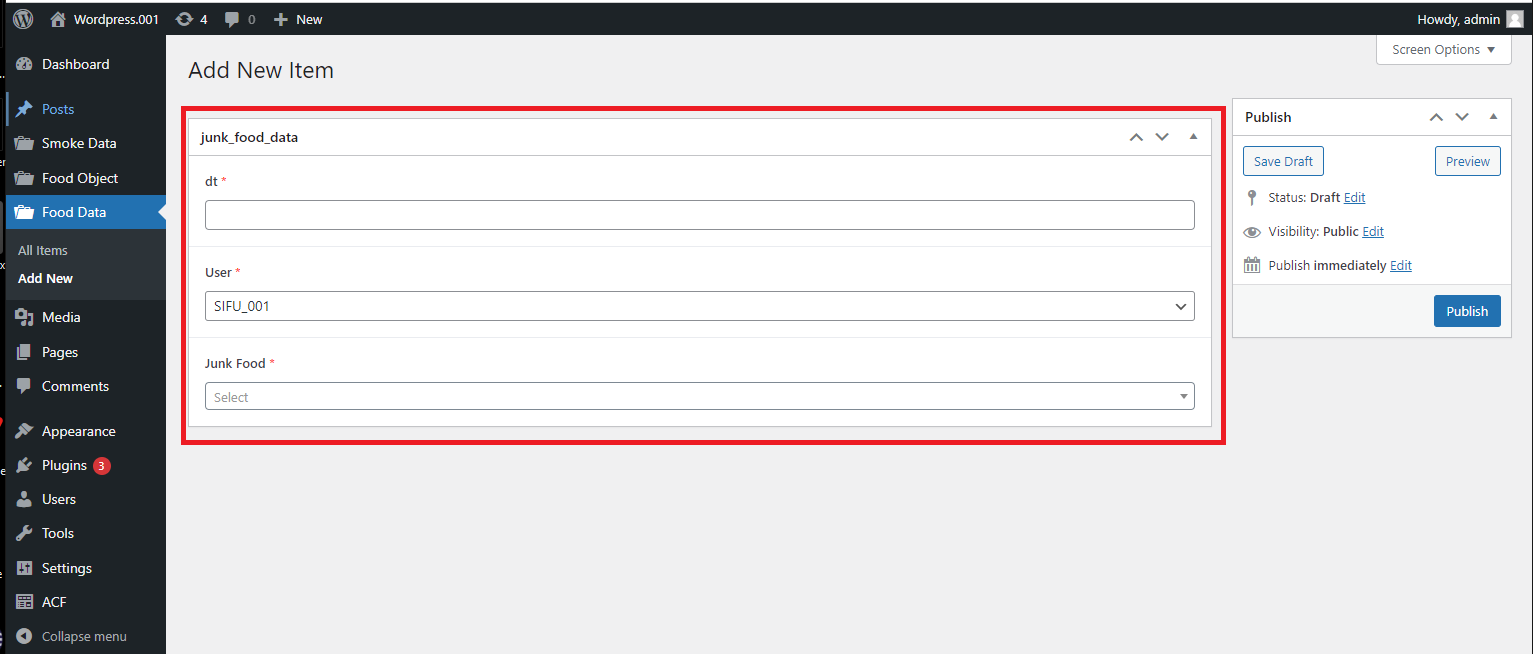
數據對象需是wordpress postType。
用戶資料需是user group。
9.2 API Service
{PROHECT_ROOT}\wp-content\plugins\clean-api\public\classes\apiV1.php
add_action( 'rest_api_init', function () {
  register_rest_route( $this->plugin_name.'/v1', '/get-smoke/all', array(
    'methods' => 'POST',
    'callback' => 'get_smoke_all',
  ));
});

add_action( 'rest_api_init', function () {
  register_rest_route( $this->plugin_name.'/v1', '/save-smoke', array(
    'methods' => 'POST',
    'callback' => 'save_smoke',
    'args' => array(
      'dt' => array('required' => true),
      'user' => array('required' => true),
      'area' => array('required' => true),
      'noItem' => array('required' => true),
    ),
  ));
});

function get_smoke_all($data) {
  $posts = get_posts(
    array(
      'post_status' => 'publish',
      'numberposts' => -1,
      'post_type'   => 'smoke_data',
      'meta_key'    => 'dt',
      'orderby'     => 'meta_value',
      'order'       => 'DESC',
    )
  );
  $posts2 = array();
  foreach ($posts as $k1 => $v1) {
    $post = array('rowid' => $v1->ID);
    foreach (array('dt', 'user', 'area', 'noItem') as $v2) {
      $post[$v2] = get_post_meta($v1->ID, $v2, true);
      if ($v2 == 'noItem') {
        $post[$v2] = (int)$post[$v2];
      }
    }
    $posts2[] = $post;
  }

  if ($posts2) {
    return wp_send_json(array('status' => 'success', 'data' => $posts2), 200);
  }
  else {
    return wp_send_json(array('status' => 'fail', 'error' => $posts2), 200);
  }
}

function save_smoke($data) {
  $post = array(
    'post_status' => 'publish',
    'post_type' => 'smoke_data',
    'meta_input' => array(
      'dt' => $data['dt'],
      'user' => $data['user'],
      'area' => $data['area'],
      'noItem' => $data['noItem'],
    ),
  );
  $res = wp_insert_post($post);

  if ($res) {
    return wp_send_json(array('status' => 'success', 'post_id' => $res), 200);
  }
  else {
    return wp_send_json(array('status' => 'fail', 'error' => $res), 200);
  }
}
1. register_rest_route可用前置器,設置需required哪些args。
2. 所有dataobject都是用WP Post type來存取。
{PROJECT_ROOT}\wp-content\plugins\clean-api\public\class-clean-api-public.php
public function __construct( $plugin_name, $version ) {

  $this->plugin_name = $plugin_name;
  $this->version = $version;

  require_once("classes/apiV1.php");
  require_once("classes/junkFoodDataCPT.php");
}
把剛剛創建的apiV1.php,加載到class-clean-api-public.php。
9.3 Wordpress User Management
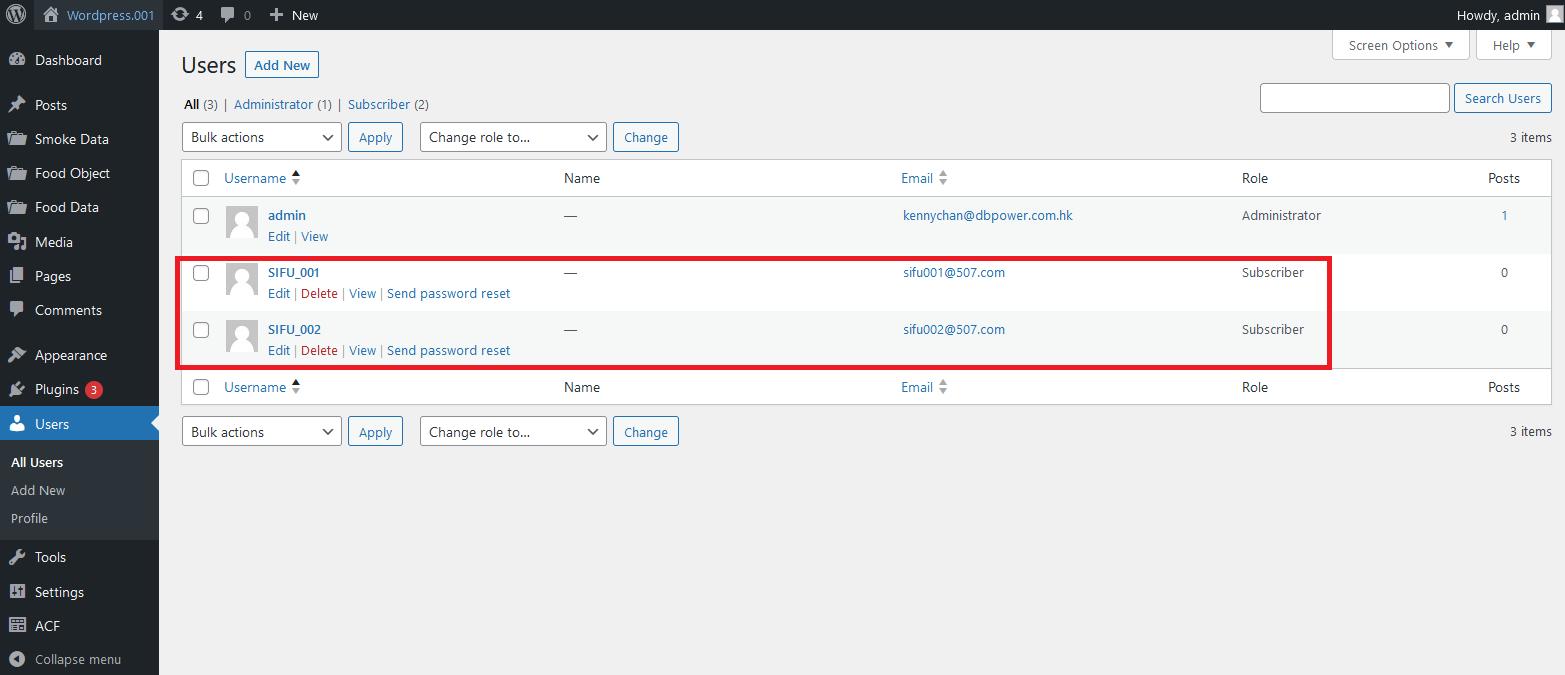
用Wordpress自帶的user group來管理用戶。

 浙公网安备 33010602011771号