springboot整合Swagger2
SpringBoot集成Swagger
新建一个springboot web项目
导入依赖
<!-- https://mvnrepository.com/artifact/io.springfox/springfox-swagger-ui -->
<dependency>
    <groupId>io.springfox</groupId>
    <artifactId>springfox-swagger-ui</artifactId>
    <version>2.9.2</version>
</dependency>

<!-- https://mvnrepository.com/artifact/io.springfox/springfox-swagger2 -->
<dependency>
    <groupId>io.springfox</groupId>
    <artifactId>springfox-swagger2</artifactId>
    <version>2.9.2</version>
</dependency>
编写一个hello工程
package com.cjh.springbootswagger.config;

import org.springframework.context.annotation.Configuration;
import springfox.documentation.swagger2.annotations.EnableSwagger2;

/**
 * @author
 * @site
 * @company
 * @create 2020-10-16 10:47
 */
@Configuration
@EnableSwagger2 //开启swagger
public class SwaggerConfig {
}
配置Swagger Docket
package com.cjh.springbootswagger.config;

import org.springframework.context.annotation.Bean;
import org.springframework.context.annotation.Configuration;
import springfox.documentation.service.ApiInfo;
import springfox.documentation.service.Contact;
import springfox.documentation.spi.DocumentationType;
import springfox.documentation.spring.web.plugins.Docket;
import springfox.documentation.swagger2.annotations.EnableSwagger2;

import java.util.ArrayList;

/**
 * @author
 * @site
 * @company
 * @create 2020-10-16 10:47
 */
@Configuration
@EnableSwagger2 //开启swagger
public class SwaggerConfig {


    @Bean  //配置swagger的docket实列
    public Docket docket(){
        return new Docket(DocumentationType.SWAGGER_2)
                .apiInfo(apiInfo());
    }


    private ApiInfo apiInfo(){
        //作者信息
        Contact contact = new Contact("作者","url","邮箱");
        return new ApiInfo(
                "SpringBoot集成Swagger", //标题
                "SpringBoot集成Swagger", //描述
                "1.0",//版本
                "http://localhost:8080/swagger-ui.html",
                contact,
                "Apache 2.0",
                "http://www.apache.org/licenses/LICENSE-2.0",
                new ArrayList());
    }
}
Docket.select
是否开启swagger(在测试和生产环境开启)
package com.cjh.springbootswagger.config;

import org.springframework.context.annotation.Bean;
import org.springframework.context.annotation.Configuration;
import org.springframework.context.annotation.Profile;
import org.springframework.core.env.Environment;
import org.springframework.core.env.Profiles;
import springfox.documentation.builders.RequestHandlerSelectors;
import springfox.documentation.service.ApiInfo;
import springfox.documentation.service.Contact;
import springfox.documentation.spi.DocumentationType;
import springfox.documentation.spring.web.plugins.Docket;
import springfox.documentation.swagger2.annotations.EnableSwagger2;

import java.util.ArrayList;
import java.util.Properties;

/**
 * @author
 * @site
 * @company
 * @create 2020-10-16 10:47
 */
@Configuration
@EnableSwagger2 //开启swagger
public class SwaggerConfig {


    @Bean  //配置swagger的docket实列
    public Docket docket(Environment environment) {
        //设置要显示的swagger环境
        Profiles profile = Profiles.of("dev", "test");
        //获取项目的环境
        boolean b = environment.acceptsProfiles(profile);

        return new Docket(DocumentationType.SWAGGER_2)
                .apiInfo(apiInfo())
                .enable(b)//enable是否启动swagger 。
                .select()
                //RequestHandlerSelectors配置要扫描接口的方式
                /*basePackage 指定扫描的包*/
                //。paths过滤什么路径
                .apis(RequestHandlerSelectors.basePackage("com.cjh.springbootswagger.controller"))
                .build();
    }


    private ApiInfo apiInfo() {
        //作者信息
        Contact contact = new Contact("作者", "url", "邮箱");
        return new ApiInfo(
                "SpringBoot集成Swagger", //标题
                "SpringBoot集成Swagger", //描述
                "1.0",//版本
                "http://localhost:8080/swagger-ui.html",
                contact,
                "Apache 2.0",
                "http://www.apache.org/licenses/LICENSE-2.0",
                new ArrayList());
    }
}
配置API分组
.groupName("hello")
配置多个分组
    @Bean
    public Docket docket1(){
        return new Docket(DocumentationType.SWAGGER_2).groupName("A");
    }
    @Bean
    public Docket docket2(){
        return new Docket(DocumentationType.SWAGGER_2).groupName("B");
    }
    @Bean
    public Docket docket3(){
        return new Docket(DocumentationType.SWAGGER_2).groupName("C");
    }
实体类
package com.cjh.springbootswagger.Mode;

import io.swagger.annotations.ApiModel;
import io.swagger.annotations.ApiModelProperty;
import lombok.Data;

/**
 * @author
 * @site
 * @company
 * @create 2020-10-16 11:48
 */
@ApiModel("用户")
@Data
public class User {

    @ApiModelProperty("姓名")
    private String name;
    @ApiModelProperty(value = "年龄")
    private int age;
    @ApiModelProperty(value = "性别")
    private String sex;
}
conroller
package com.cjh.springbootswagger.controller;

import com.cjh.springbootswagger.Mode.User;
import io.swagger.annotations.Api;
import io.swagger.annotations.ApiOperation;
import io.swagger.annotations.ApiParam;
import org.springframework.web.bind.annotation.*;

/**
 * @author
 * @site
 * @company
 * @create 2020-10-16 10:44
 */
@Api(tags = "hello请求层")
@RestController
public class HelloController {

    @PostMapping("/hello")
    public String hello(){
        return "hello";
    }

    @GetMapping("/user")
    public User user(){
        return new User();
    }

    @ApiOperation("user接口")
    @GetMapping("/hellouser")
    public User helloUser(@ApiParam("用户") User user){
        return user;
    }


    @ApiOperation("姓名")
    @PostMapping("/hello02/{name}")
    public String  hello02(@ApiParam("用户") @PathVariable("name") String  name){
        return name;
    }

}
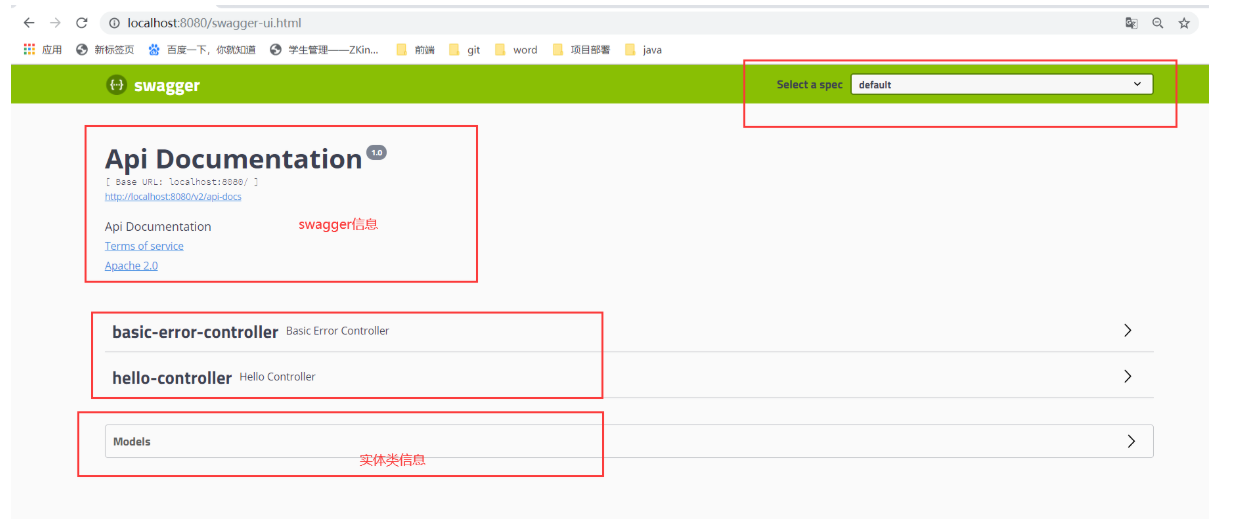
浏览器访问:
总结:
我们可以通过swagger给一些比价难以理解的接口和属性添加注释。
接口文档实时更新
可以在线测试
注意:在正式环境中关闭swagger!!出于安全考虑 ,节省运行内存。


