
开机启动流程
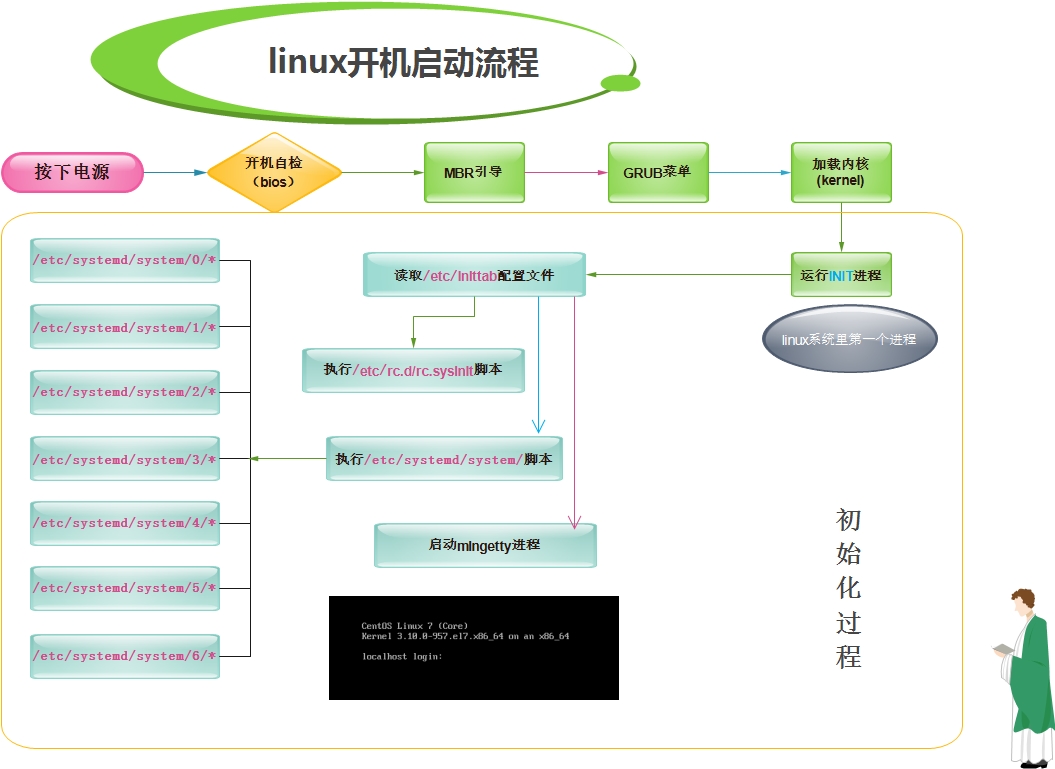
开机启动流程
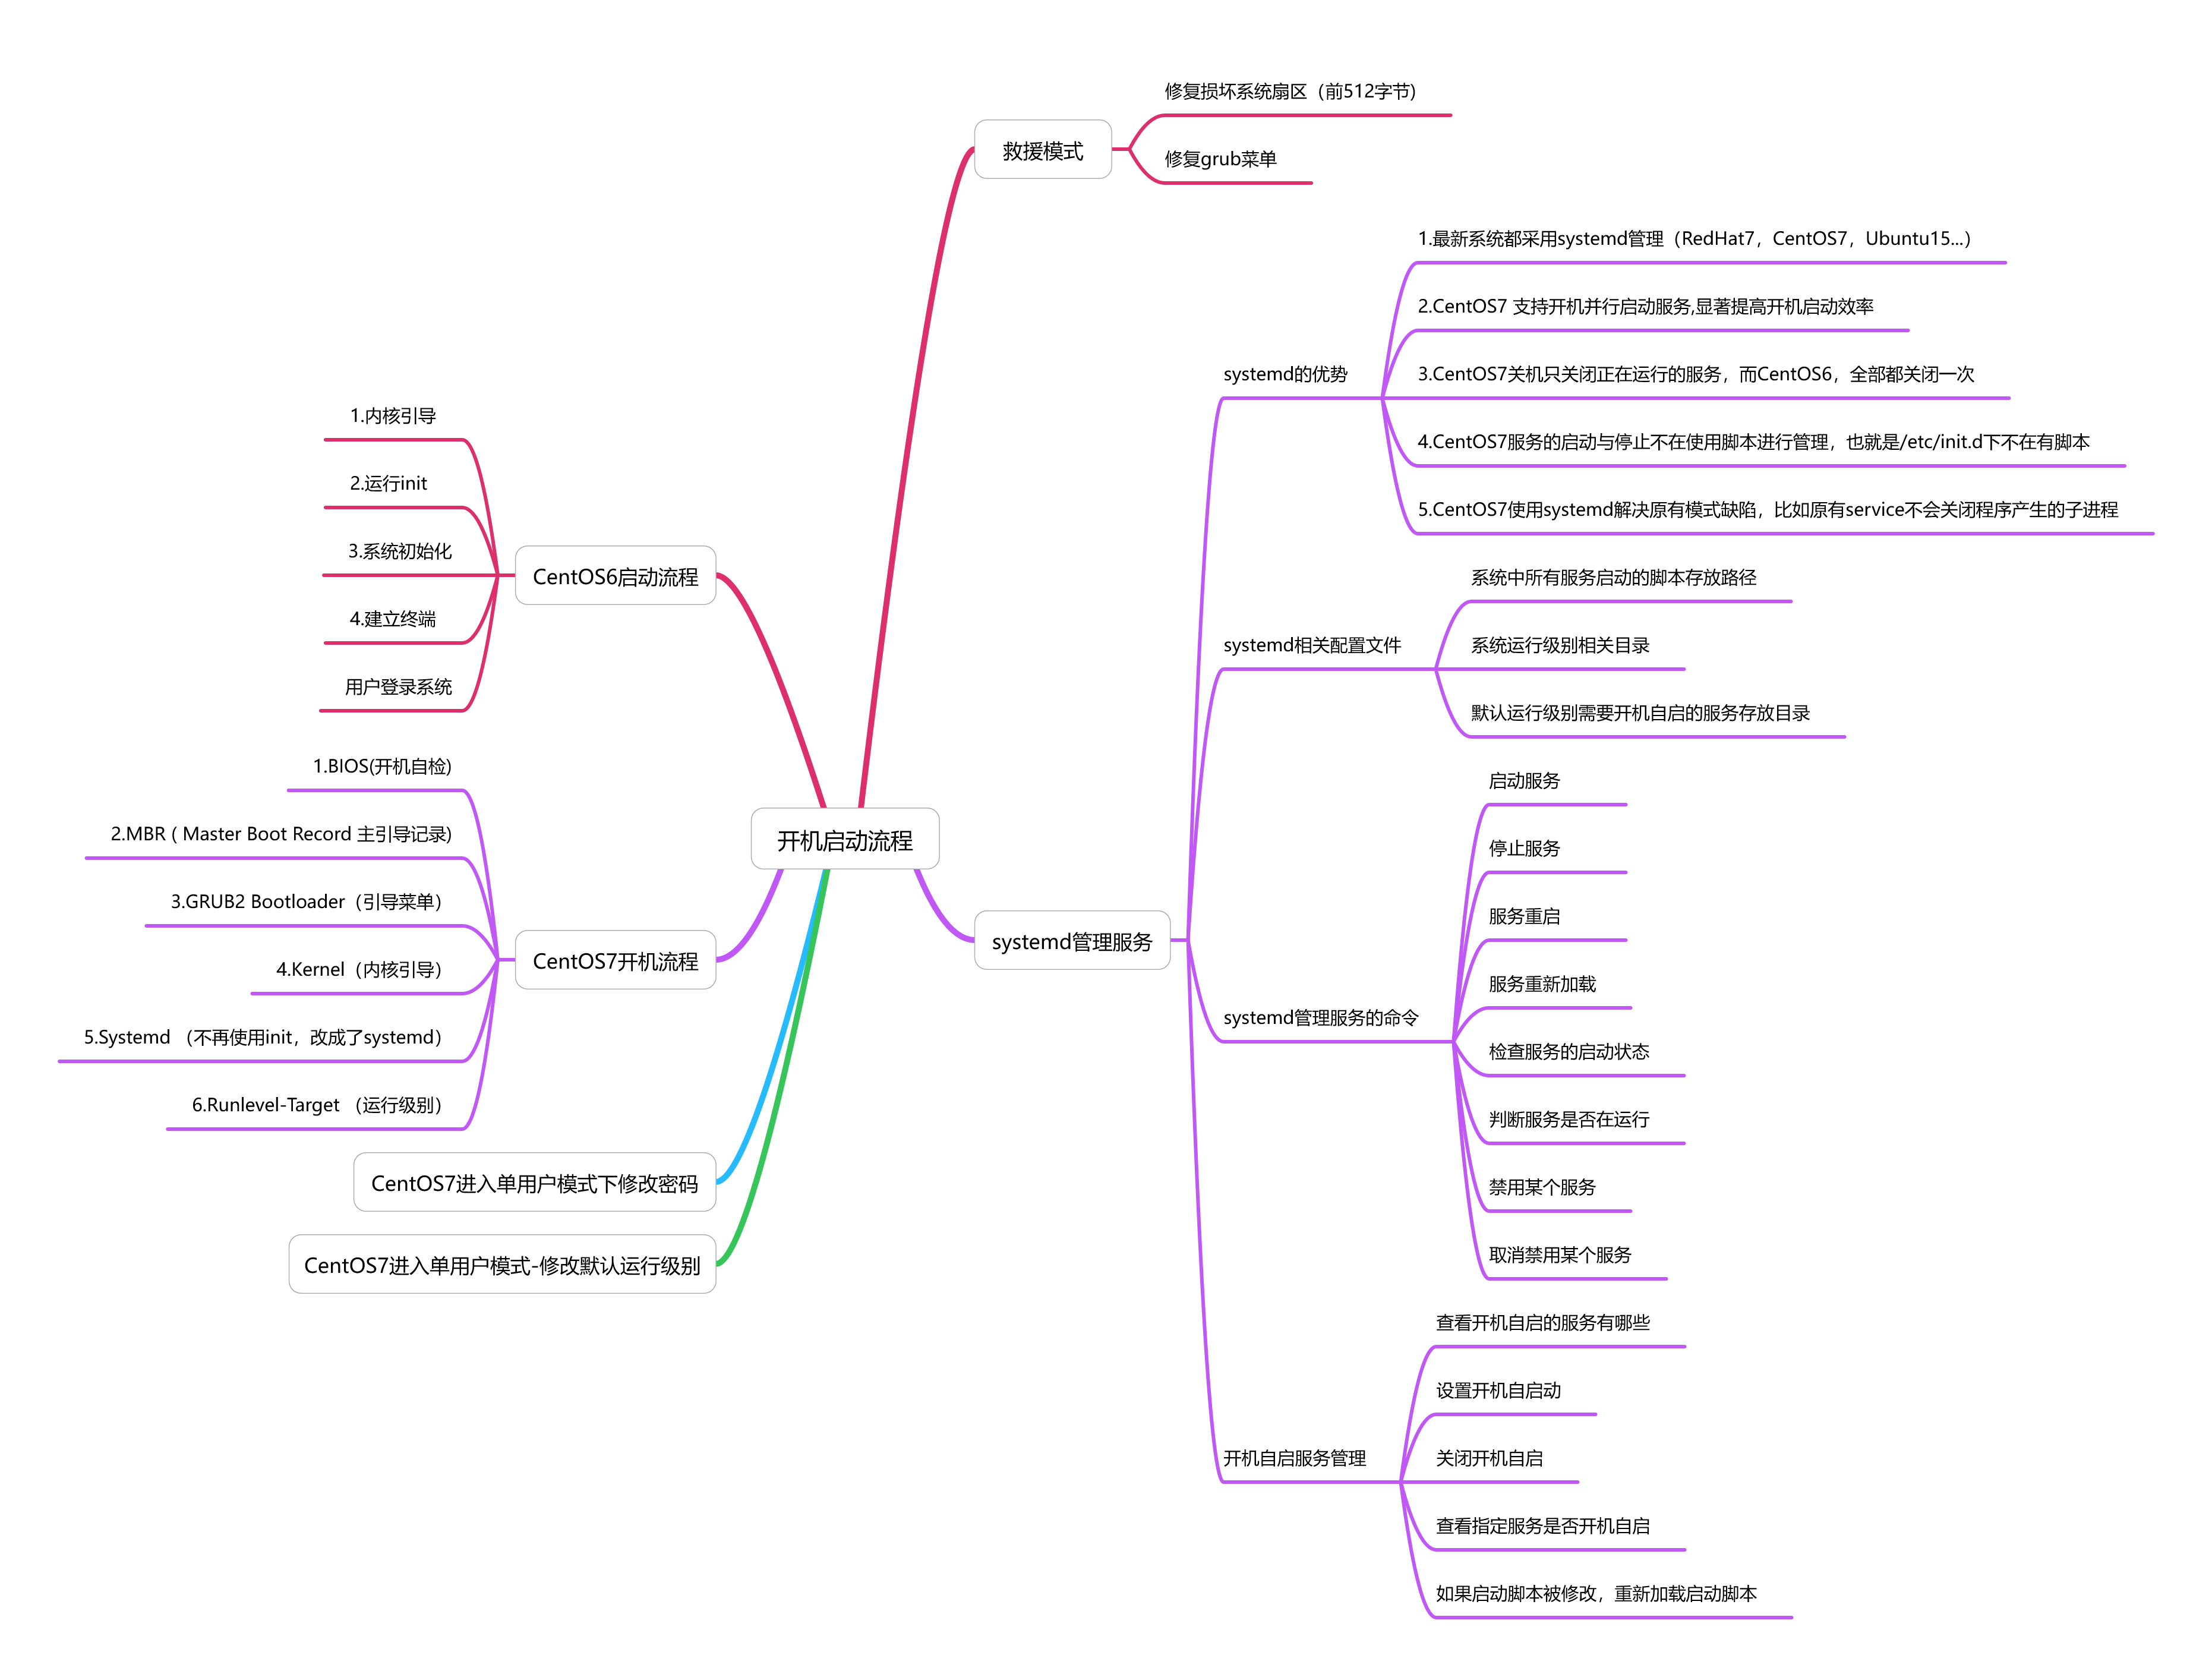
CentOS6启动流程
-
1.内核引导
- BIOS加电自检,检测主板上的硬件设备,根据BIOS设置启动系统
- 读取/boot分区下,所有内核文件
-
2.运行init
- init
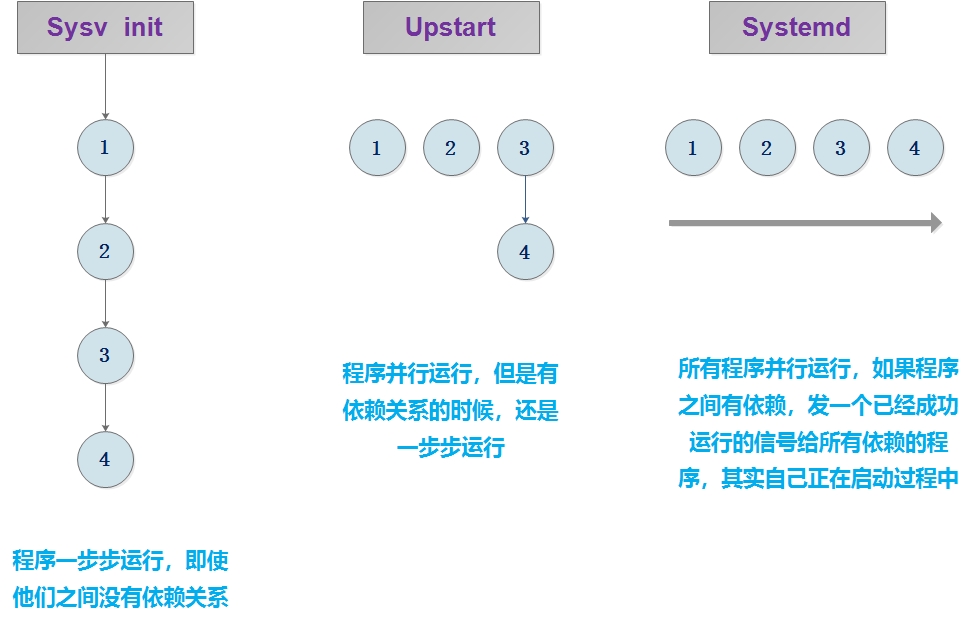
- sysV:CentOS5之前使用的pid为1的进程
- Upstart:CentOS6使用的init进程
- Systemd:CentOS7
- 加载init,涉及到Linux系统中7个运行级别
# 查看Linux系统当前的运行级别 ##centos6: runlevel [root@localhost~]# runlevel N 3 ##(N 3) N:表示上一次系统运行的级别 3:表示系统当前运行的级别 ### 例: init 加 数字 表示切换系统运行级别 [root@localhost~]# init 5 [root@localhost~]# runlevel 3 5 [root@localhost~]# init 3 [root@localhost~]# runlevel 5 3 ##centos7: [root@localhost~]# systemctl get-default multi-user.target 0:关机运行级别 1:单用户运行级别 2:多用户运行级别,没有文件系统 3:多用户运行级别,有文件系统(命令行模式) 4:CentOS6和7 保留,未使用 5:多用户,图形化运行级别 6:重启运行级别-
运行init,会读取 /etc/inittab配置文件
[root@localhost~]# cat /etc/inittab # inittab is no longer used when using systemd. # # ADDING CONFIGURATION HERE WILL HAVE NO EFFECT ON YOUR SYSTEM. # # Ctrl-Alt-Delete is handled by /usr/lib/systemd/system/ctrl-alt-del.target # # systemd uses 'targets' instead of runlevels. By default, there are two main targets: # # multi-user.target: analogous to runlevel 3 # graphical.target: analogous to runlevel 5 # # To view current default target, run: # systemctl get-default # # To set a default target, run: # systemctl set-default TARGET.target-
读取配置文件中的默认运行级别(以默认的第三级别为例)
-
centos6:
id:3:initdefault:
-
centos7:
multi-user.target
-
-
-
启动init进程
- init
-
3.系统初始化
-
根据运行级别中设置了开机自启动服务来启动对应服务
-
centos6
chkconfig --list
[root@localhost~]# chkconfig --list Note: This output shows SysV services only and does not include native systemd services. SysV configuration data might be overridden by native systemd configuration. If you want to list systemd services use 'systemctl list-unit-files'. To see services enabled on particular target use 'systemctl list-dependencies [target]'. netconsole 0:off 1:off 2:off 3:off 4:off 5:off 6:off network 0:off 1:off 2:on 3:on 4:on 5:on 6:off-
centos7
systemctl list-unit-files
ll /etc/systemd/system/multi-user.target.wants/
[root@localhost~]# systemctl list-unit-files [root@localhost~]# ll /etc/systemd/system/multi-user.target.wants/ -
-
-
4.建立终端
-
5.用户登录系统
CentOS7开机流程
-
1.BIOS(开机自检)
- BIOS加电自检,检测主板上的硬件设备,根据BIOS设置启动系统
- 读取/boot分区下,所有内核文件
-
2.MBR ( Master Boot Record 主引导记录)
- 主引导记录发在Linux引导硬盘的第一个扇区中,此信息通过bios 预加载到ROM(只读内存)中
-
3.GRUB2 Bootloader(引导菜单)
- 加载grub2菜单,选择要进入的系统
-
4.Kernel(内核引导)
- 读取/boot目录下所有内核文件
-
5.Systemd (不再使用init,改成了systemd)
-
7个运行级别
runlevel0.target -> poweroff.target
runlevel1.target -> rescue.target
runlevel2.target -> multi-user.target
runlevel3.target -> multi-user.target
runlevel4.target -> multi-user.target
runlevel5.target -> graphical.target
runlevel6.target -> reboot.target
-
-
6.Runlevel-Target (运行级别)
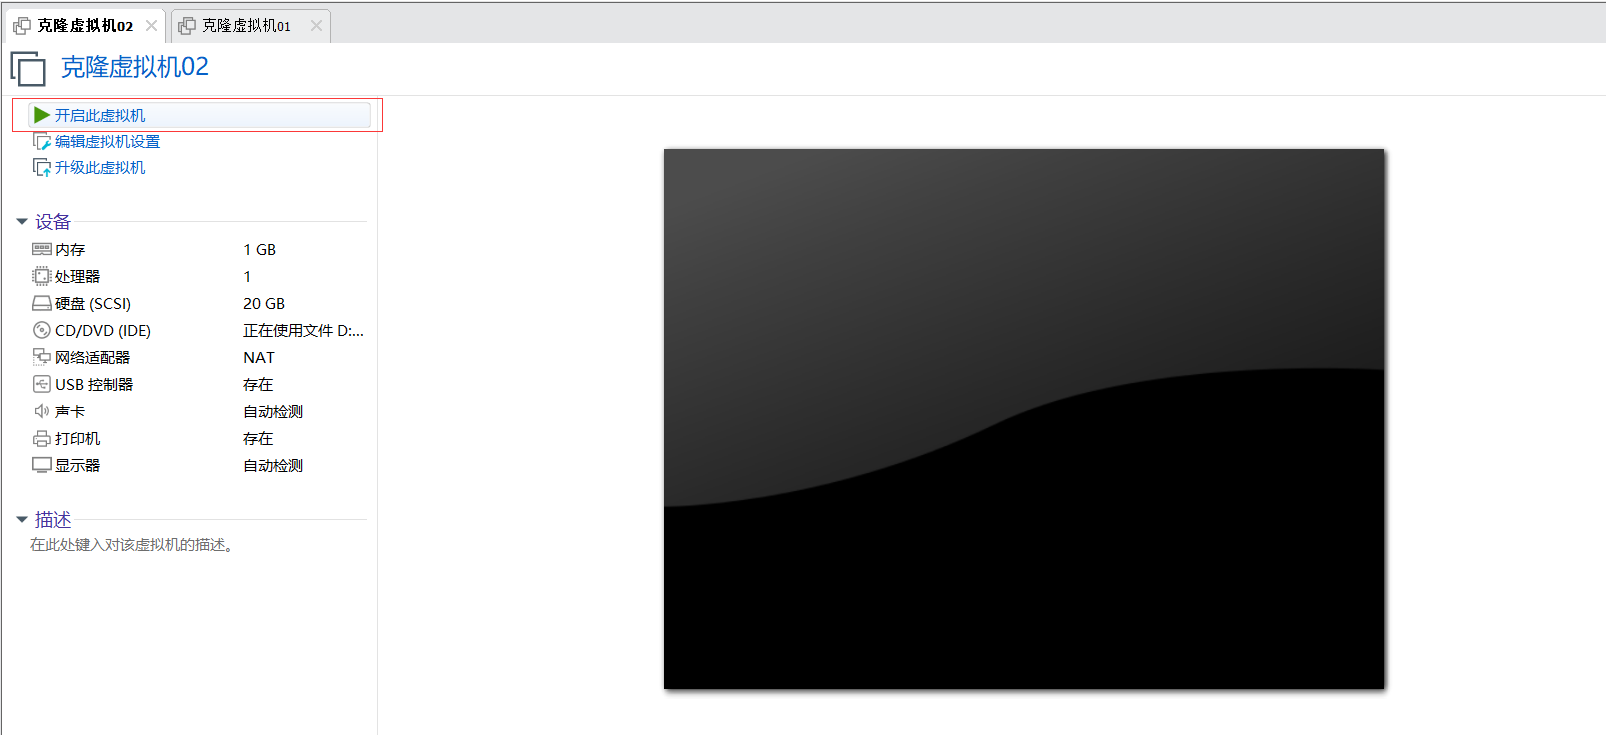
CentOS7进入单用户模式-忘记root密码
- 关机
# 关机的四种方式:
halt
poweroff
shutdown -h now
init 0
- 开机
-
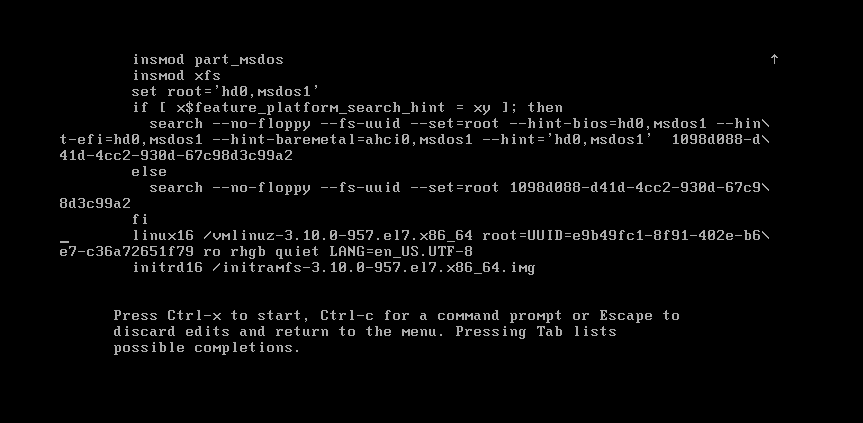
3.按e进入gurb2菜单,编辑内核参数
关闭selinux
修改内核参数
selinux
vim /etc/sysconfig/selinux
selinux=enforcing ==> selinux=disabled
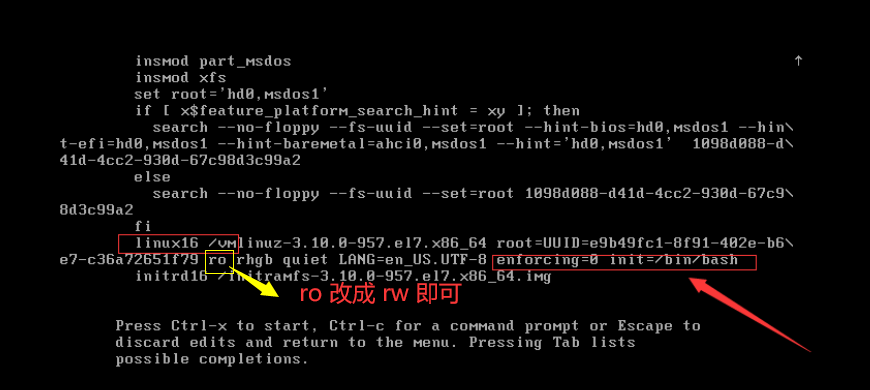
在linux16所在这行的行末,写入:
enforcing=0 init=/bin/bash
按Ctrl + x 启动系统
如下图:

- 4.修改密码
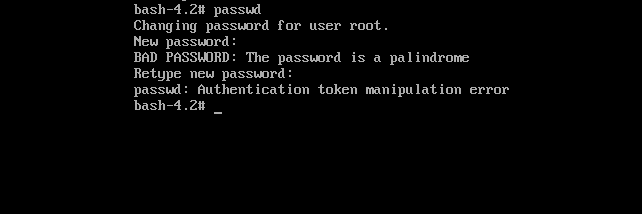
# 报错无法直接修改密码,因为当前/目录是只读状态,没有写入权限

# 所以需要重新挂载/目录

## 方法:

# 重新挂载/
mount -o rw,remount /

## 修改密码
passwd root
echo 111 |passwd --stdin root

## 重新加载init
exec /sbin/init
不需要重新挂载/的方法:
# gurb2菜单中
# 将Linux16行中的ro 改成 rw 即可:
CentOS7进入单用户模式-修改默认运行级别
-
1.关机
-
2.进入grub2菜单
-
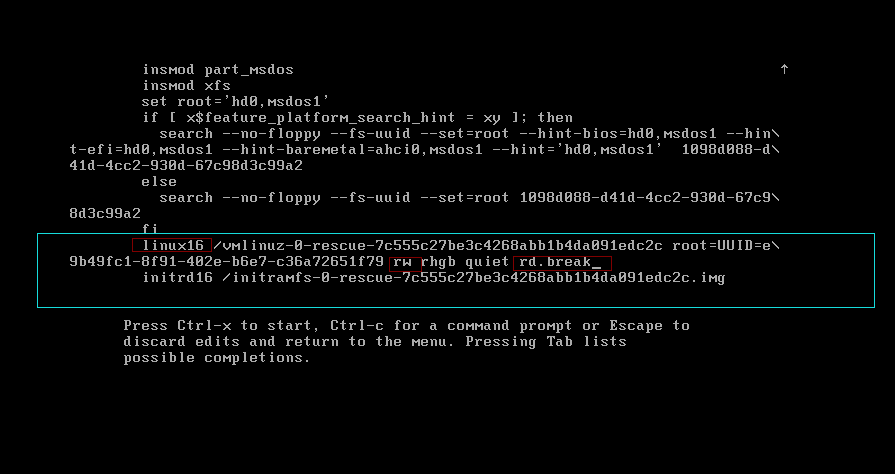
3.按e编辑grub2菜单的内核参数
# Linux16所在这行中 ro改成rw

## 行末写:rd.break

### ctrl + x 启动
如下图:
启动后如下图:(此时没有root权限)
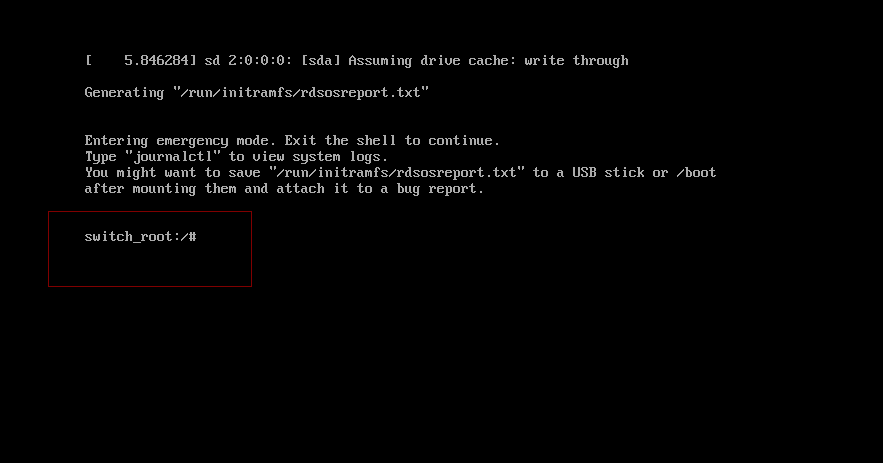
接下来需要获取root权限,重新挂载sysroot目录
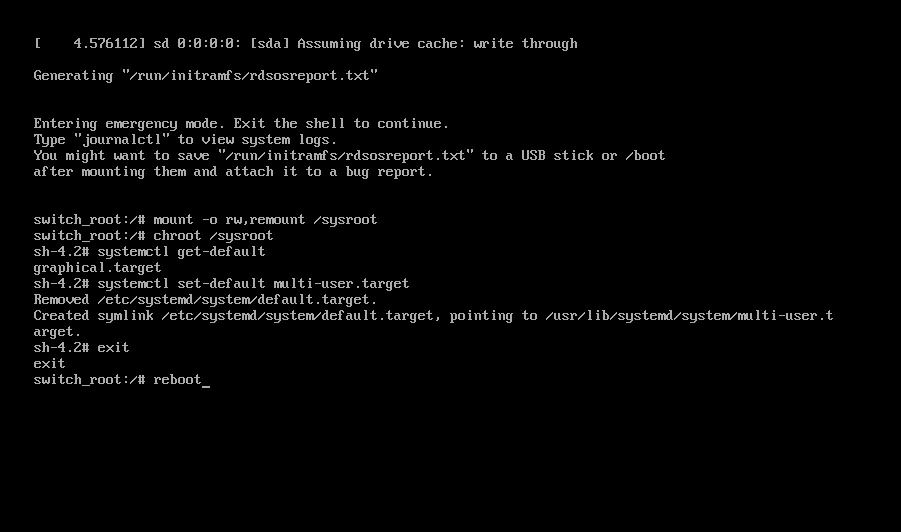
# 1.重新挂载root权限目录
mount -o rw,remount /sysroot

# 2.获取root权限
chroot /sysroot

# 3.修改默认运行级别
systemctl set-default multi-user.target

# 4.退出
exit

# 5.重启
reboot
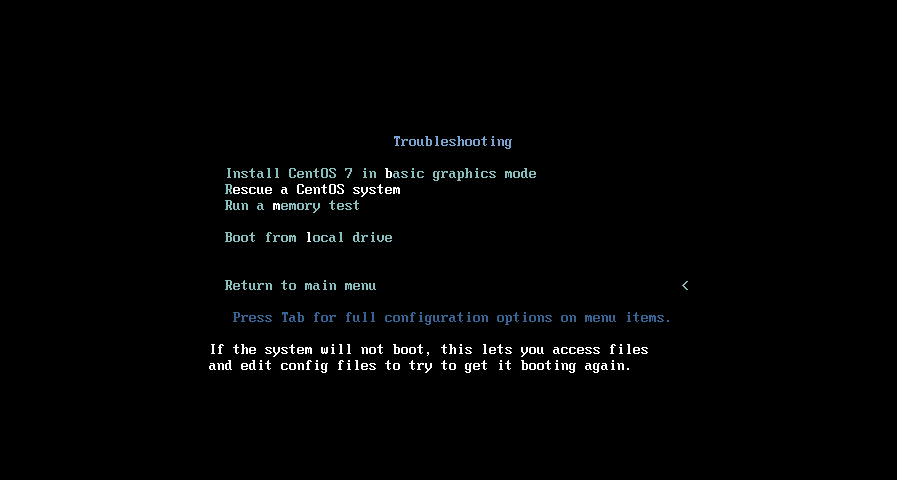
救援模式
-
需要有系统盘,才可以进入救援模式
-
1.关机
# 关机的四种方式 init 0 halt poweroff shutdown -h now -
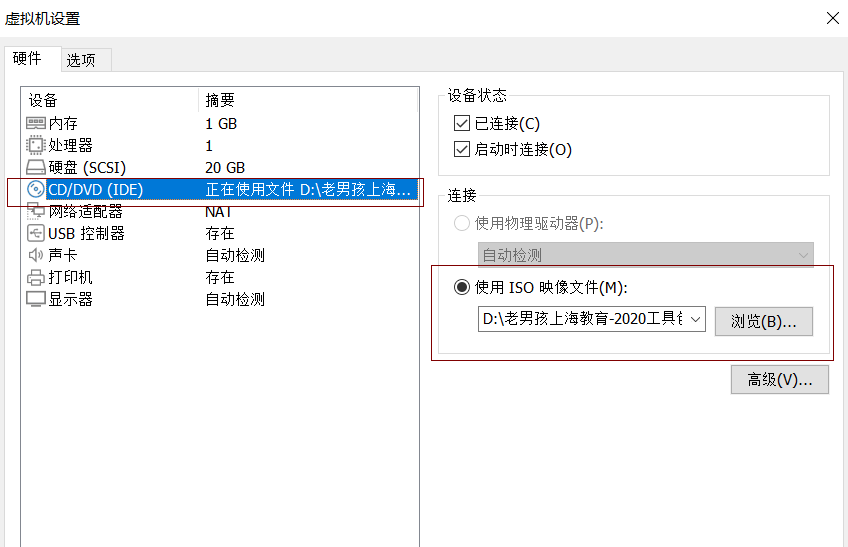
2.将系统盘放入光驱中
-
3.进入BIOS
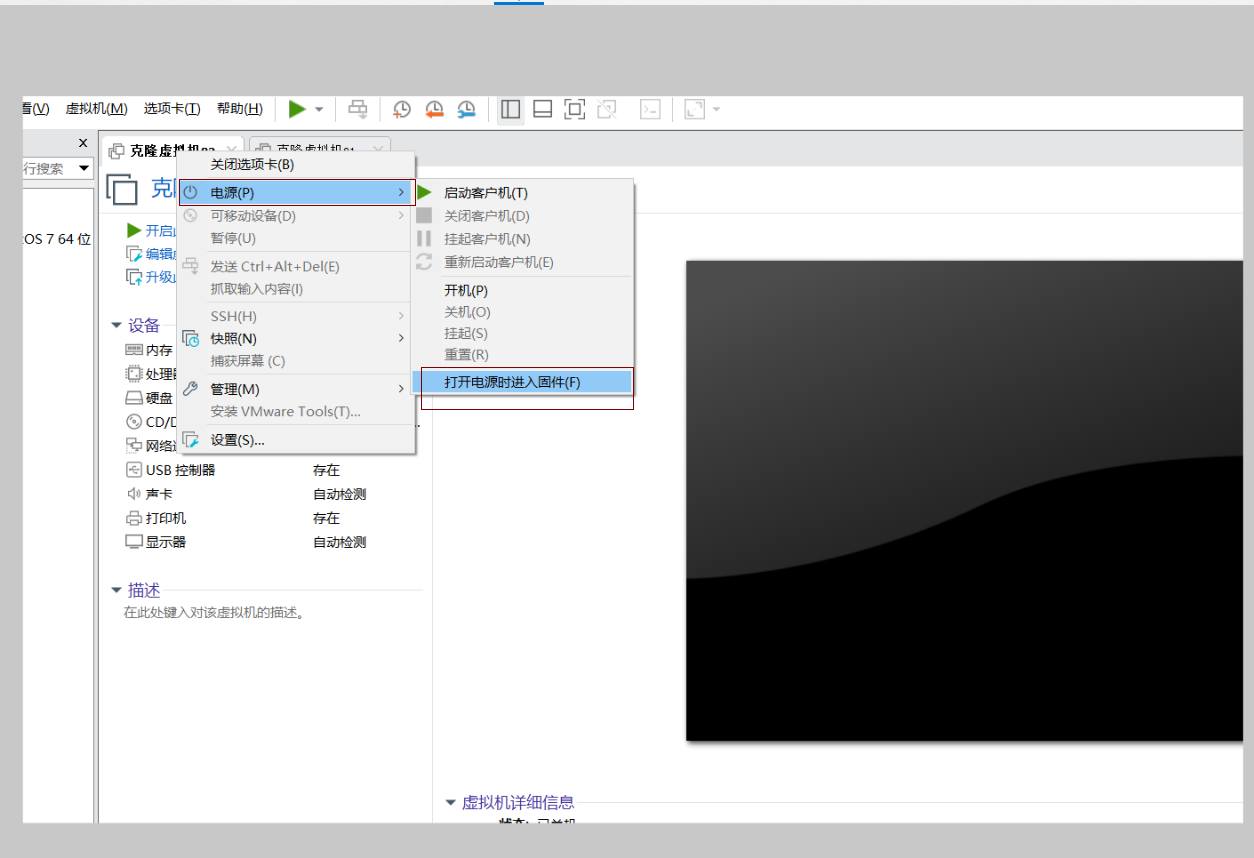
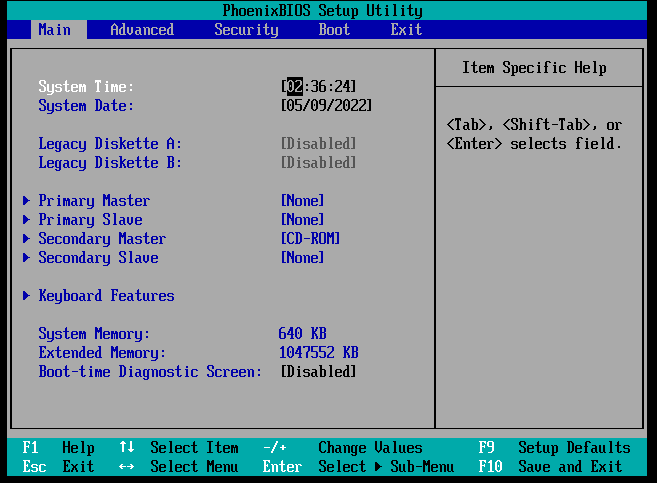
-
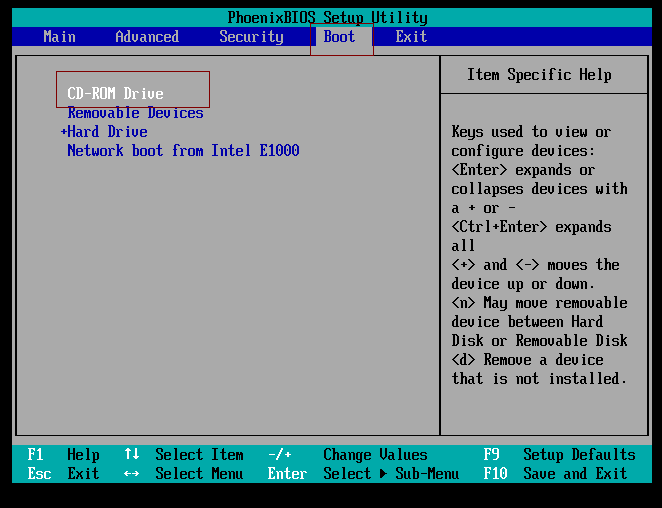
4.选择boot
-
按+号,把CD-ROM启动顺序排到第一个
-
按f10保存并退出 ->选择yes
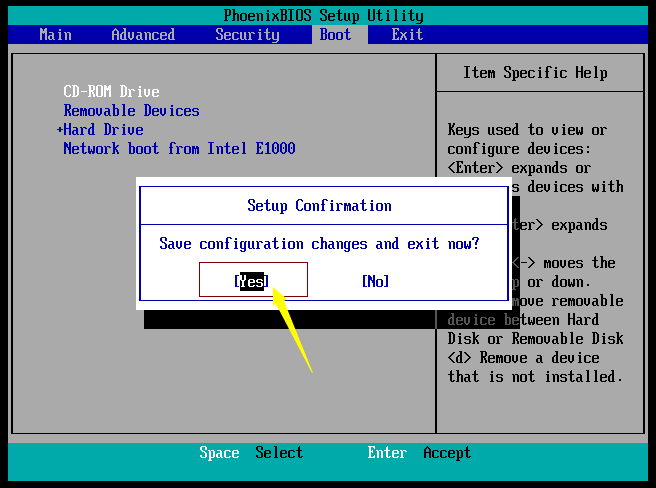
-
进入安装系统的界面
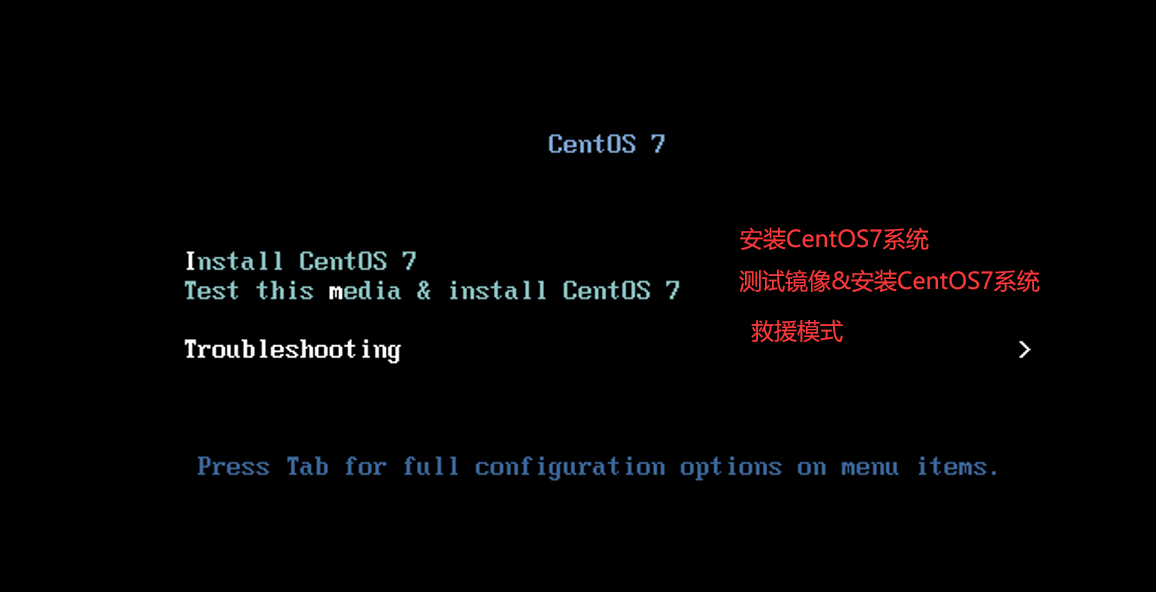
-
进入救援模式
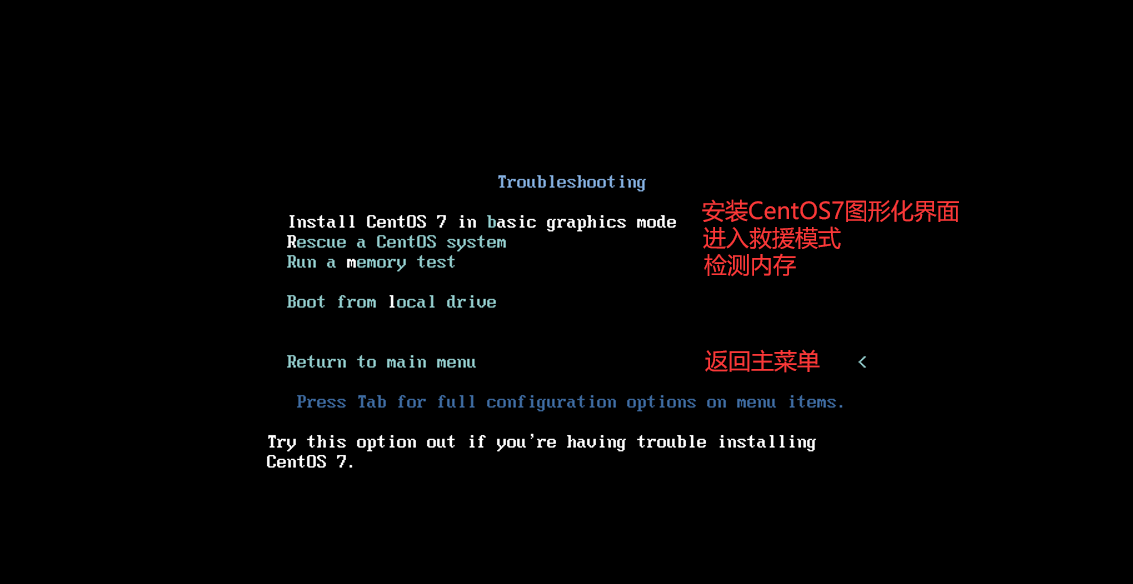
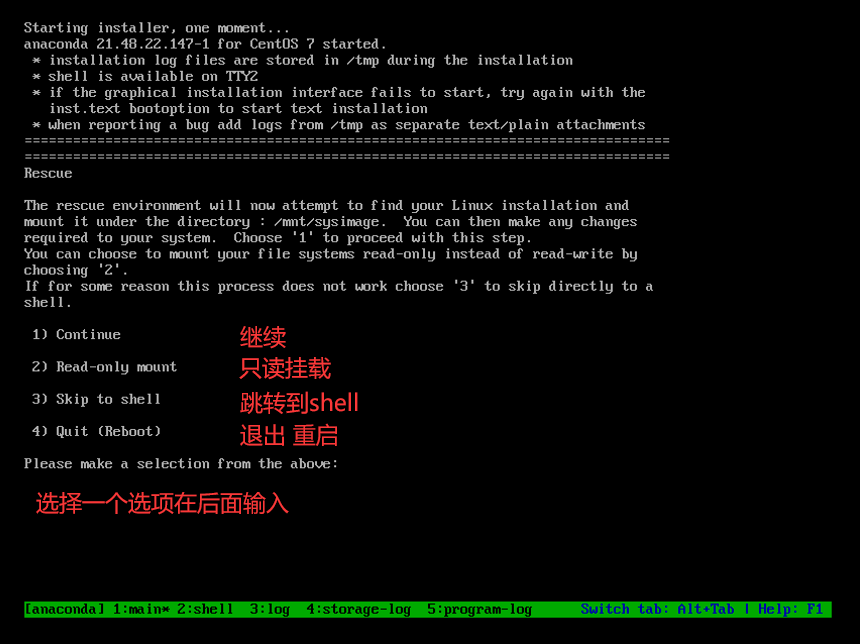
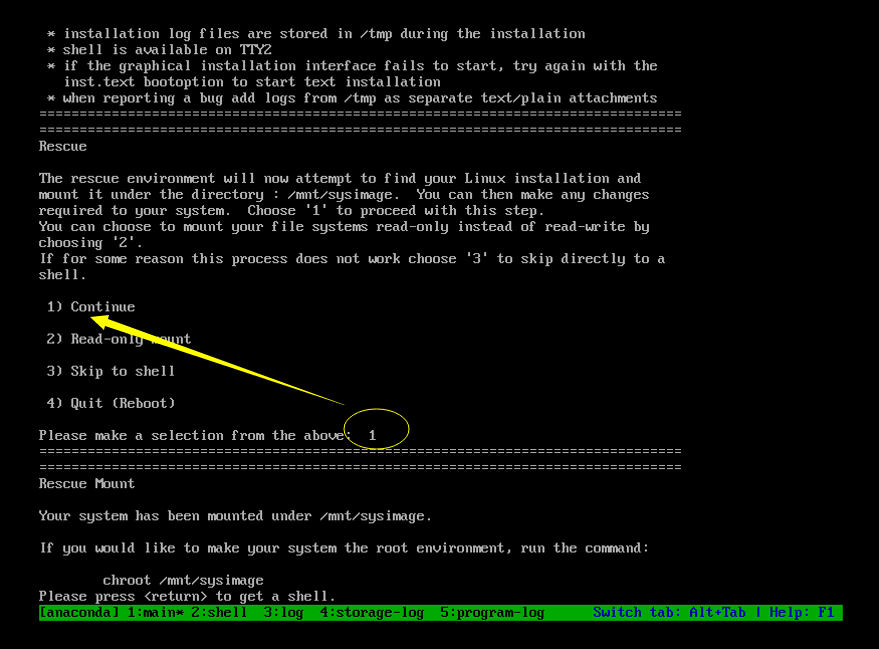
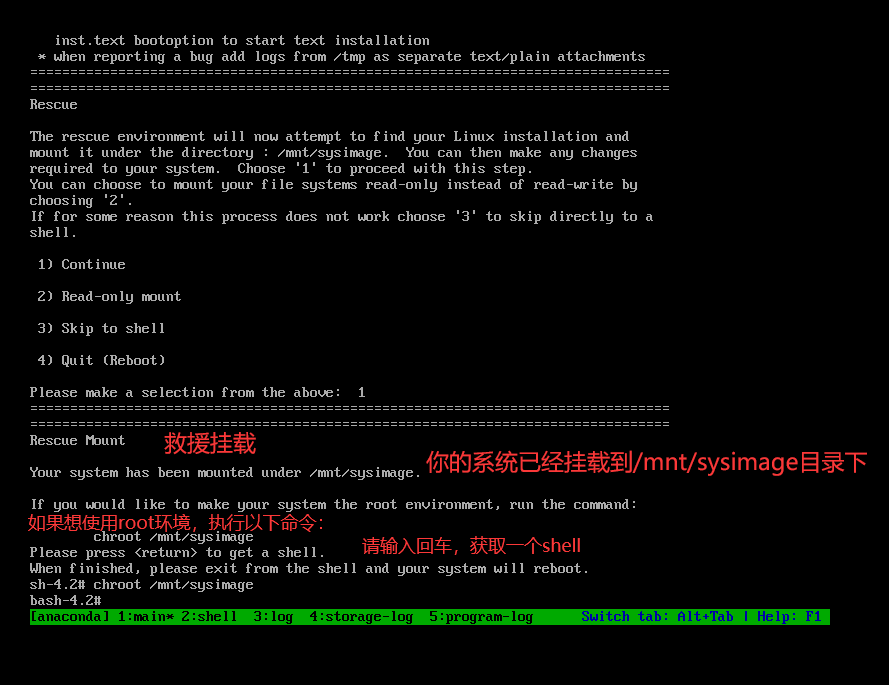
# 1.先输入回车 # 2.获取root的环境(root权限) chroot /mnt/sysimage -
案例1-修复损坏系统扇区(前512字节)
-
先进入系统破坏扇区
# 破坏硬盘的前446个字节,模拟MBR引导损坏,会发现重启无法启动系统
dd </dev/zero >/dev/sda bs=1 count=446

[root@localhost ~]# dd </dev/zero >/dev/sda bs=1 count=446
-
重启扇区被破坏已无法进入系统
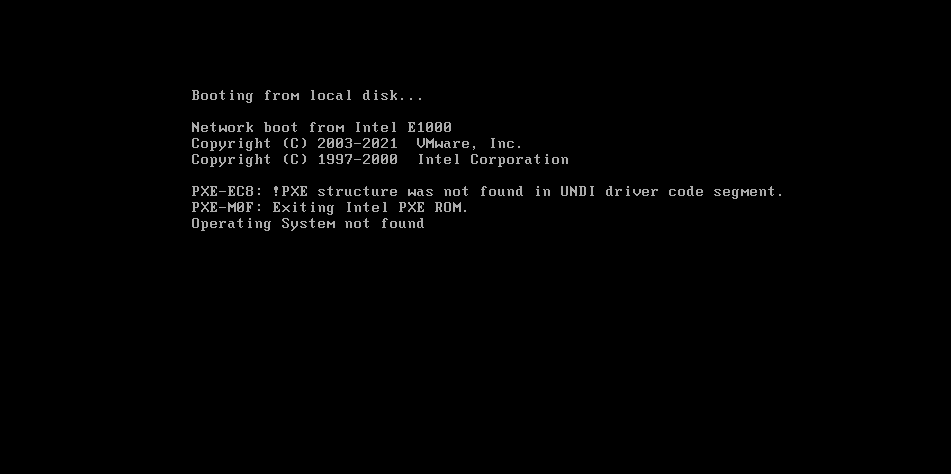
-
扇区损坏,需要进入救援模式修复扇区
进入救援模式后
# 获取root的环境(root权限)
chroot /mnt/sysimage

# 修复扇区
grub2-install /dev/sda

# 退出root环境
exit

# 重启
reboot
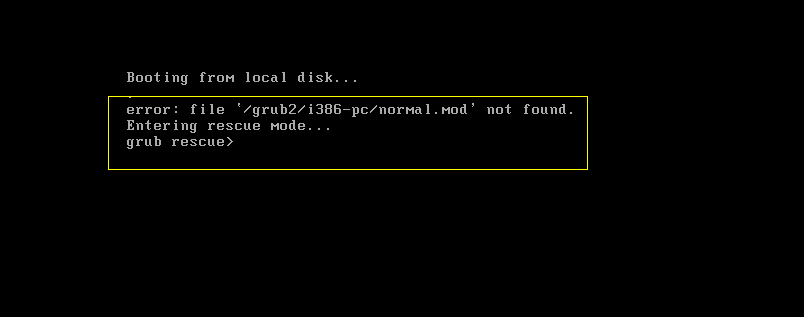
修复grub菜单
-
grub菜单损坏
rm -fr /boot/grub2 模拟grub菜单损坏
-
进行修复grub菜单
# 1.获取root的环境(root权限)
chroot /mnt/sysimage

# 2.修复扇区
grub2-install /dev/sda

# 3. 重置grub.cfg配置文件
grub2-mkconfig -o /boot/grub2/grub.cfg

# 4.退出root环境
exit

# 5.重启
reboot

# 如下图: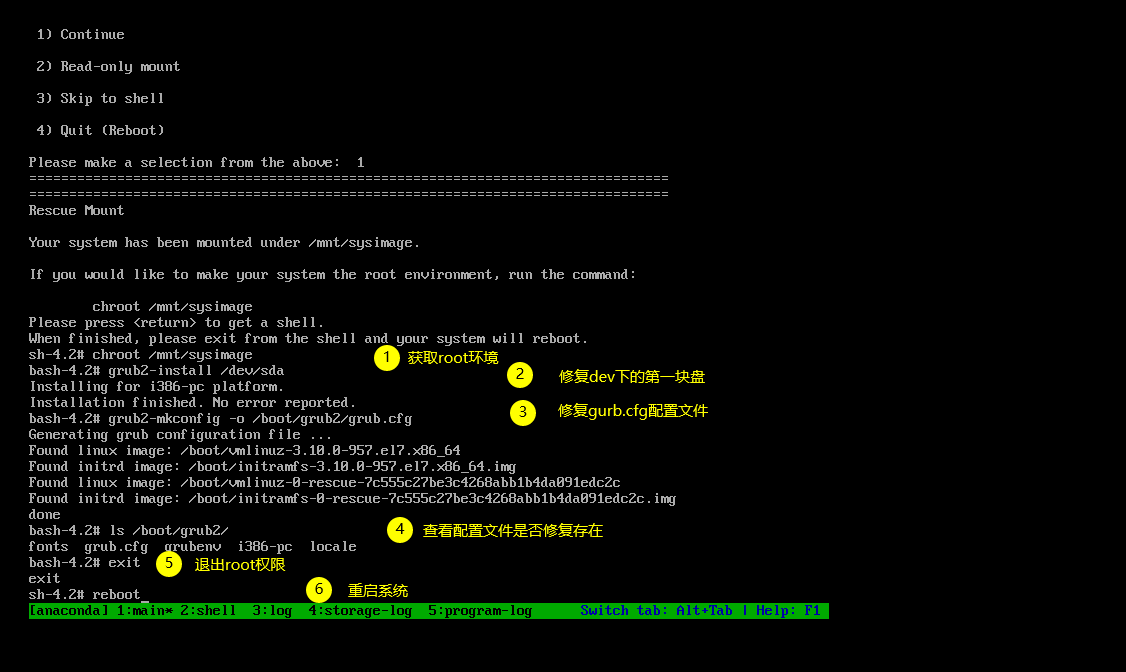
systemd管理服务
systemd的优势
- 1.最新系统都采用systemd管理(RedHat7,CentOS7,Ubuntu15...)
- 2.CentOS7 支持开机并行启动服务,显著提高开机启动效率
- 3.CentOS7关机只关闭正在运行的服务,而CentOS6,全部都关闭一次
- 4.CentOS7服务的启动与停止不在使用脚本进行管理,也就是/etc/init.d下不在有脚本
- 5.CentOS7使用systemd解决原有模式缺陷,比如原有service不会关闭程序产生的子进程
systemd相关配置文件
-
系统中所有服务启动的脚本存放路径
# CentOS 7: /usr/lib/systemd/system/ # CentOS 6: /etc/init.d/ -
系统运行级别相关目录
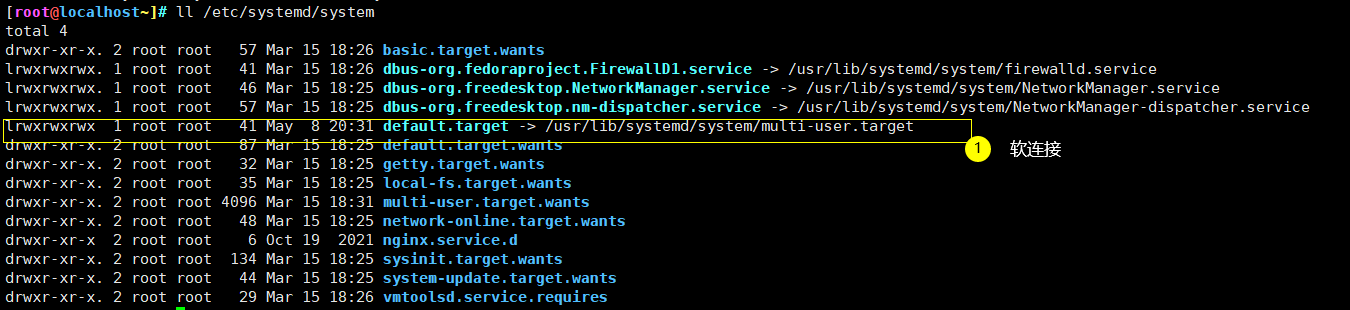
# CentOS 7: /etc/systemd/system # CentOS 6: [root@localhost~]# ll /etc/rc*.d -d lrwxrwxrwx. 1 root root 10 Mar 15 18:24 /etc/rc0.d -> rc.d/rc0.d lrwxrwxrwx. 1 root root 10 Mar 15 18:24 /etc/rc1.d -> rc.d/rc1.d lrwxrwxrwx. 1 root root 10 Mar 15 18:24 /etc/rc2.d -> rc.d/rc2.d lrwxrwxrwx. 1 root root 10 Mar 15 18:24 /etc/rc3.d -> rc.d/rc3.d lrwxrwxrwx. 1 root root 10 Mar 15 18:24 /etc/rc4.d -> rc.d/rc4.d lrwxrwxrwx. 1 root root 10 Mar 15 18:24 /etc/rc5.d -> rc.d/rc5.d lrwxrwxrwx. 1 root root 10 Mar 15 18:24 /etc/rc6.d -> rc.d/rc6.d drwxr-xr-x. 10 root root 127 Mar 15 18:25 /etc/rc.d -
默认运行级别需要开机自启的服务存放目录
# CentOS 7:当前级别所在需要开机自启的服务
[root@localhost~]# ll /etc/systemd/system/multi-user.target.wants/
total 0
lrwxrwxrwx. 1 root root 38 Mar 15 18:26 auditd.service -> /usr/lib/systemd/system/auditd.service
lrwxrwxrwx. 1 root root 37 Mar 15 18:25 crond.service -> /usr/lib/systemd/system/crond.service
lrwxrwxrwx. 1 root root 41 Mar 15 18:26 firewalld.service -> /usr/lib/systemd/system/firewalld.service
lrwxrwxrwx. 1 root root 42 Mar 15 18:26 irqbalance.service -> /usr/lib/systemd/system/irqbalance.service
lrwxrwxrwx. 1 root root 46 Mar 15 18:25 NetworkManager.service -> /usr/lib/systemd/system/NetworkManager.service
lrwxrwxrwx. 1 root root 39 Mar 15 18:26 postfix.service -> /usr/lib/systemd/system/postfix.service
lrwxrwxrwx. 1 root root 40 Mar 15 18:25 remote-fs.target -> /usr/lib/systemd/system/remote-fs.target
lrwxrwxrwx. 1 root root 46 Mar 15 18:25 rhel-configure.service -> /usr/lib/systemd/system/rhel-configure.service
lrwxrwxrwx. 1 root root 39 Mar 15 18:26 rsyslog.service -> /usr/lib/systemd/system/rsyslog.service
lrwxrwxrwx. 1 root root 36 Mar 15 18:26 sshd.service -> /usr/lib/systemd/system/sshd.service
lrwxrwxrwx. 1 root root 37 Mar 15 18:26 tuned.service -> /usr/lib/systemd/system/tuned.service
lrwxrwxrwx. 1 root root 40 Mar 15 18:26 vmtoolsd.service -> /usr/lib/systemd/system/vmtoolsd.service


# CentOS 6:
/etc/rc3.d/
K01smartd -> ../init.d/smartd
K10psacct -> ../init.d/psacct
K10saslauthd -> ../init.d/saslauthd
K15svnserve -> ../init.d/svnserve
K50netconsole -> ../init.d/netconsole
K74ntpd -> ../init.d/ntpd
K75ntpdate -> ../init.d/ntpdate
K75quota_nld -> ../init.d/quota_nld
K87restorecond -> ../init.d/restorecond
K89rdisc -> ../init.d/rdisc
K99rngd -> ../init.d/rngd
S01sysstat -> ../init.d/sysstat
S02lvm2-monitor -> ../init.d/lvm2-monitor
S08ip6tables -> ../init.d/ip6tables
S08iptables -> ../init.d/iptables
S10network -> ../init.d/network
S11auditd -> ../init.d/auditd
S12rsyslog -> ../init.d/rsyslog
S13cpuspeed -> ../init.d/cpuspeed
S13irqbalance -> ../init.d/irqbalance
S15mdmonitor -> ../init.d/mdmonitor
S20kdump -> ../init.d/kdump
S22messagebus -> ../init.d/messagebus
S25blk-availability -> ../init.d/blk-availability
S25netfs -> ../init.d/netfs
S26acpid -> ../init.d/acpid
S26haldaemon -> ../init.d/haldaemon
systemd管理服务的命令
-
1.启动服务
# CentOS 7: systemctl start 服务名 ## (推荐) service 服务名 start # CentOS 6: /etc/init.d/服务名 start service 服务名 start -
2.停止服务
# CentOS 7: systemctl stop 服务名 service 服务名 stop # CentOS 6: /etc/init.d/服务名 stop service 服务名 stop -
3.服务重启
# CentOS 7: systemctl restart 服务名 service 服务名 restart # CentOS 6: /etc/init.d/服务名 restart service 服务名 restart -
4.服务重新加载
# CentOS 7: systemctl reload 服务名 service 服务名 reload # CentOS 6: /etc/init.d/服务名 reload service 服务名 reload -
5.检查服务的启动状态
# CentOS 7: systemctl status sshd # CentOS 6: [root@localhost ~]# /etc/init.d/sshd status openssh-daemon (pid 1508) is running... -
6.判断服务是否在运行
# CentOS 7:

[root@localhost ~]# systemctl is-active sshd
active
[root@localhost ~]# systemctl stop sshd
[root@localhost ~]# systemctl is-active sshd
inactive
-
7.禁用某个服务
# CentOS 7: systemctl mask 服务名 [root@localhost ~]# systemctl mask crond Created symlink from /etc/systemd/system/crond.service to /dev/null. -
8.取消禁用某个服务
# CentOS 7:
systemctl unmask 服务名

[root@localhost~]# systemctl unmask crond
Removed symlink /etc/systemd/system/crond.service.
开机自启服务管理
-
1.查看开机自启的服务有哪些
# CentOS 7: systemctl list-unit-files [root@localhost ~]# systemctl list-unit-files # CentOS 6: chkconfig [root@localhost ~]# chkconfig -
2.设置开机自启动
# CentOS 7: systemctl enable 服务名 [root@localhost ~]# systemctl enable sshd # CentOS 6: chkconfig 服务名 on ##(默认 2 3 4 5 运行级别都自启) chkconfig 服务名 --level 3 on ##(在第三运行级别开启,其他级别都关闭) [root@localhost ~]# chkconfig sshd on [root@localhost ~]# chkconfig |grep sshd sshd 0:off 1:off 2:on 3:on 4:on 5:on 6:off [root@localhost ~]# chkconfig sshd off [root@localhost ~]# chkconfig |grep sshd sshd 0:off 1:off 2:off 3:off 4:off 5:off 6:off [root@localhost ~]# chkconfig sshd --level 3 on [root@localhost ~]# chkconfig |grep sshd sshd 0:off 1:off 2:off 3:on 4:off 5:off 6:off -
3.关闭开机自启
# CentOS 7: systemctl disable 服务名 [root@localhost ~]# systemctl disable sshd # CentOS 6: chkconfig 服务名 off [root@localhost ~]# chkconfig sshd off -
.4.查看指定服务是否开机自启
# CentOS 7: systemctl is-enabled nginx [root@localhost ~]# systemctl is-enabled nginx enabled:允许开机自启 disabled:不允许开机自启 # CentOS 6: chkconfig --list 服务名 [root@localhost ~]# chkconfig --list sshd sshd 0:off 1:off 2:off 3:on 4:off 5:off 6:off -
5.如果启动脚本被修改,重新加载启动脚本
# CentOS 7:
systemctl daemon-reload
思维导图


【推荐】国内首个AI IDE,深度理解中文开发场景,立即下载体验Trae
【推荐】编程新体验,更懂你的AI,立即体验豆包MarsCode编程助手
【推荐】抖音旗下AI助手豆包,你的智能百科全书,全免费不限次数
【推荐】轻量又高性能的 SSH 工具 IShell:AI 加持,快人一步
· winform 绘制太阳,地球,月球 运作规律
· 震惊!C++程序真的从main开始吗?99%的程序员都答错了
· 【硬核科普】Trae如何「偷看」你的代码?零基础破解AI编程运行原理
· AI与.NET技术实操系列(五):向量存储与相似性搜索在 .NET 中的实现
· 超详细:普通电脑也行Windows部署deepseek R1训练数据并当服务器共享给他人