08 Spring框架 AOP (一)
首先我们先来介绍一下AOP:
AOP(Aspect Orient Programming),面向切面编程,是面向对象编程OOP的一种补充。
面向对象编程是从静态角度考虑程序的结构,面向切面编程是从动态的角度考虑程序运行过程。
AOP底层,就是采用动态代理模式实现的。采用两种代理:JDK的动态代理,与CGLIB的动态代理。
JDK的动态代理是面向接口的,CGLIB既可以实现有接口的,又可以实现没有接口的。(对动态代理不了解的可以看看我的其关于动态代理的介绍)
面向切面编程,就是将交叉业务逻辑封装成切面,利用AOP容器的功能将切面植入到主业务逻辑中。所谓交叉业务逻辑是指:通用的,与主业务逻辑无关的代码,如安全检查,事务日志等。
Spring的AOP的几种用法:
通知:即我们的切面方法
- 前置通知
- 后置通知
- 环绕通知
-
异常通知
(一)前置通知
所谓前置通知,就是这个切面方法在我们的主业务方法之前执行。
首先我们先写一个目标接口:
//目标接口
public interface SomeServices {
    String doFirst();
    void doSecond();
}
//接口实现类,也就是主业务方法类
public class SomeServiceImp implements SomeServices{

    @Override
    public String doFirst() {
        System.out.println("print first");
        return null;
    }
    @Override
    public void doSecond() {
        System.out.println("print second");
    }
}
//切面方法,需要实现:**MethodBeforeAdvice** 接口
public class myBeforeMethodAdvice implements MethodBeforeAdvice {

    //method:业务方法
    //args:方法参数
    //target:目标类
    @Override
    public void before(Method method, Object[] arg1, Object target) throws Throwable {
            System.out.println("执行主业务前方法");
    }

}
<!--Spring主配置文件-->
    <bean id="service" class="com.test.beforeMethodAdvice.SomeServiceImp"/>

    <bean id="myAdvice" class="com.test.beforeMethodAdvice.myBeforeMethodAdvice"/>

    <bean id="ProxyService" class="org.springframework.aop.framework.ProxyFactoryBean">
        <property name="target" ref="service"/>
        <!--<property name="target" value="service"/>-->
        <property name="interceptorNames" value="myAdvice"/>
    </bean>
接着是测试方法:
public class test {

    @Test
    public void Test01() {
        String source = "com/test/beforeMethodAdvice/applicationContext.xml";
        ApplicationContext ac = new ClassPathXmlApplicationContext(source);
        SomeServices service = (SomeServices)ac.getBean("ProxyService");
        service.doFirst();
        service.doSecond();
    }
}
//控制台输出:
//执行主业务前方法
//print first
//执行主业务前方法
//print second
(二)后置通知
后置通知和前置通知雷同,只是切面方法的实现类不同,但是后置通知实现接口方法,多给用了一个returnValue参数,也就意味着我们可以获得主业务方法的返回值,我们来看看范例:
//主业务接口
public interface SomeServices {
    String doFirst();
    void doSecond();
}
//主业务方法实现类,doFirst()有返回值
package com.test.afterMethodAdvice;

public class SomeServiceImp implements SomeServices{
    @Override
    public String doFirst() {
        System.out.println("print first");
        return "abc";
    }
    @Override
    public void doSecond() {
        System.out.println("print second");
    }
}
//实现了**AfterReturningAdvice** 接口,实现这个接口的方法有一个返回值参数
public class myAfterMethodAdvice implements AfterReturningAdvice {
    //returnValue:业务方法的返回值
    //method:业务方法属性类
    //args:方法参数
    //target:目标类
    @Override
    public void afterReturning(Object returnValue, Method method, Object[] args, Object target) throws Throwable {
        System.out.println("执行业务后方法");
        //只能获取到业务方法的返回值,但是不能进行修改
        System.out.println(returnValue);
    }
<!--配置文件没什么差别-->
    <bean id="service" class="com.test.afterMethodAdvice.SomeServiceImp"/>

    <bean id="myAdvice" class="com.test.afterMethodAdvice.myAfterMethodAdvice"/>

    <bean id="ProxyService" class="org.springframework.aop.framework.ProxyFactoryBean">
        <property name="target" ref="service"/>
        <!--<property name="targetName" value="service"/>-->
        <property name="interceptorNames" value="myAdvice"/>
    </bean>
测试方法:
public class test {
    @Test
    public void Test01() {
        String source = "com/test/afterMethodAdvice/applicationContext.xml";
        ApplicationContext ac = new ClassPathXmlApplicationContext(source);
        SomeServices service = (SomeServices)ac.getBean("ProxyService");
        service.doFirst();
        service.doSecond();
    }
}
//print first
//执行业务后方法
//abc
//print second
//执行业务后方法
//null
(三)环绕通知
环绕通知就是既能实现前置通知又能实现后置通知,但是不同的是它能够对主业务方法进行修改。
//主业务接口
public interface SomeServices {
    String doFirst();
    void doSecond();
}
//主业务方法实现类
public class SomeServiceImp implements SomeServices{
    @Override
    public String doFirst() {
        System.out.println("print first");
        return "abc";
    }
    @Override
    public void doSecond() {
        System.out.println("print second");
    }
}
//环绕通知,切面方法类,需要实现**MethodInterceptor**
//并且调用参数的proceed方法,这个方法有一个返回值,也就是主业务方法的返回值,我们可以对它进行修改。
public class MyMethodInterceptor implements MethodInterceptor {

    @Override
    public Object invoke(MethodInvocation invocation) throws Throwable {

        System.out.println("环绕通知,业务方法前");
        Object result = invocation.proceed();
        System.out.println("环绕通知,业务方法后");
        if(result != null) {
            result = ((String)result).toUpperCase();
        }
        return result;
    }
}
//环绕通知的配置文件
<bean id="service" class="com.test.MethodInterceptor.SomeServiceImp"/>

    <bean id="myAdvice" class="com.test.MethodInterceptor.MyMethodInterceptor"/>

    <bean id="ProxyService" class="org.springframework.aop.framework.ProxyFactoryBean">
        <property name="target" ref="service"/>
        <property name="interceptorNames" value="myAdvice"/>
    </bean>
//测试方法:
public class test {

    @Test
    public void Test01() {
        String source = "com/test/MethodInterceptor/applicationContext.xml";
        ApplicationContext ac = new ClassPathXmlApplicationContext(source);
        SomeServices service = (SomeServices)ac.getBean("ProxyService");
        String result = service.doFirst();
        System.out.println(result);
        service.doSecond();

    }
}
//控制台输出:
//环绕通知,业务方法前
//print first
//环绕通知,业务方法后
//ABC
//环绕通知,业务方法前
//print second
//环绕通知,业务方法后
(四)异常通知:
异常通知就是当我们的主业务方法出现异常的时候,会对这个主业务方法进行加强!
例如:我们现在的主业务方法是对用户名和密码进行判断,如果用户名或者密码有误,我们就就分别抛出对应的错误,当无误的时候,程序正常执行。
//主业务接口,判断用户名,密码是否正确
public interface SomeServices {
    boolean checkedUser(String username,String password) throws UserException;
}
//实现类,实现了对用户和密码的校验
public class SomeServiceImp implements SomeServices{

    @Override
    public boolean checkedUser(String username, String password)throws UserException {

            if(!"admin".equals(username.trim())) {
                throw new UsernameException("用户名错误");
            }
            if(!"123".equals(password.trim())){
                throw new PasswordException("密码错误");
            }
        return true;
    }
}
上面两个是我们需要的主业务方法,里面我们定义了两个异常:UsernameException,PasswordException,它们都实现了父类UserException:
//UserException
public class UserException extends Exception {

    public UserException() {
        super();
    }
    public UserException(String message) {
        super(message);
    }
}
//UsernameException
public class UsernameException extends UserException {

    public UsernameException() {
        super();
    }

    public UsernameException(String message) {
        super(message);
    }
}
//PasswordException
public class PasswordException extends UserException {

    public PasswordException() {
        super();
    }

    public PasswordException(String message) {
        super(message);
    }

}
定义好上面的异常后我们就要定义我们的通知类了:
//这个异常通知需要实现ThrowsAdvice接口,接口源码上面有,我们追踪到源码会发现这个接口没有需要实现的方法,其实是由几个供我们选择,防止我们没有必要的实现全部方法

public class MyThrowsAdvice implements ThrowsAdvice {
    public void afterThrowing(Exception ex) {
        System.out.println("执行异常通知方法:" + ex.getMessage());
    }
}
配置文件没有什么变化:
<bean id="service" class="com.test.afterExceptionAdvice.SomeServiceImp"/>

    <bean id="myAdvice" class="com.test.afterExceptionAdvice.MyThrowsAdvice"/>

    <bean id="ProxyService" class="org.springframework.aop.framework.ProxyFactoryBean">
        <property name="target" ref="service"/>
        <property name="interceptorNames" value="myAdvice"/>
    </bean>
最后就是我们的测试方法:
public class test {

    @Test
    public void Test01()  {
        String source = "com/test/afterExceptionAdvice/applicationContext.xml";
        ApplicationContext ac = new ClassPathXmlApplicationContext(source);
        SomeServices service = (SomeServices)ac.getBean("ProxyService");
        //service.checkedUser("admin", "123");
        //service.checkedUser("ad", "123");
        try {
            service.checkedUser("admin", "12");
        } catch (UserException e) {
            e.printStackTrace();
        }
    }
}
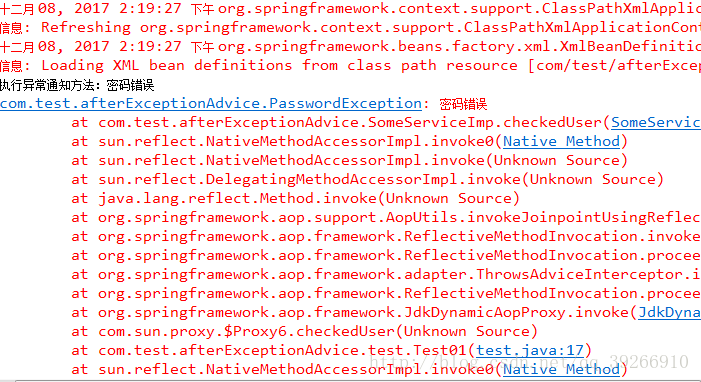
//控制台:
//**报错**
//执行异常通知方法:密码错误

本篇文章可能主要是代码的实现,原理上没有说的太多,因为前面关于动态代理的文章我也写了一篇,所以这里就没有赘述太多动态代理的知识。
版权声明:本文为博主原创文章,如需转载请表明出处。 https://blog.csdn.net/qq_39266910/article/details/78742552


