AutoMapper在asp.netcore中的使用
automapper 是.net 项目中针对模型之间转换映射的一个很好用的工具,不仅提高了开发的效率还使代码更加简洁,当然也是开源的,https://github.com/AutoMapper,这不多做介绍,详细看,官网下面是介绍它在 .net core 项目中的使用
1. 首先当然先引用 AutoMapper
- 你可以在NuGet中直接输入AutoMapper直接引用,也可以在控制台输入 Install-Package AutoMapper
2. 其次我们要引用 AutoMapper 对依赖注入的一个扩展 Extensions.Microsoft.DependencyInjection
- 由于.net core 中自带依赖注入,我们要用DI来注册我们的Mapper类
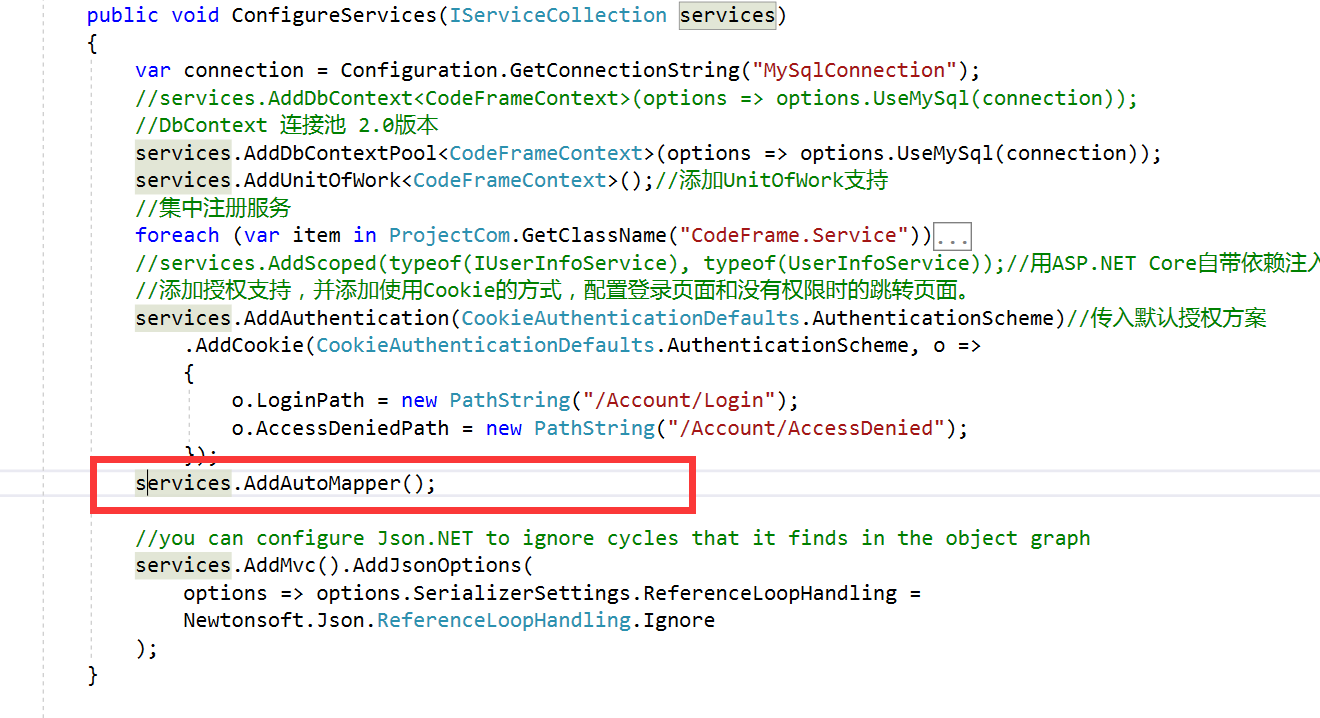
3. 在Startup 类中找到 ConfigureServices 方法 引用我们扩展中的方法

4. 在项目中创建一个映射配置类,可以项目中的任何文件夹下,扩展代码中是通过反射找出程序集中的所有映射配置
|
1
2
3
4
5
6
7
8
9
|
public class UserProfile : Profile { public UserProfile() { // Add as many of these lines as you need to map your objects CreateMap<UserInfo, UserInfoModel>(); CreateMap<UserInfoModel, UserInfo>(); } } |
5. 在 Controller中用构造函数注入 IMapper
|
1
2
3
4
5
6
7
8
9
10
|
private readonly IMapper _mapper; public UserInfoController(IUserInfoService userInfoService, IUnitOfWork unitOfWork, ILogger<UserInfoController> logger, IMapper mapper) { _unitOfWork = unitOfWork; _userInfoService = userInfoService; _logger = logger; _mapper = mapper; } |
6. 最后就可以使用mapper
|
1
2
3
4
5
6
7
8
9
10
11
12
13
14
15
16
17
|
public IActionResult AddUser(UserInfoModel model) { if (!ModelState.IsValid) { return View(model); } var user = _mapper.Map<UserInfo>(model); //映射 var repoUser = _unitOfWork.GetRepository<UserInfo>(); repoUser.Insert(user); var r = _unitOfWork.SaveChanges(); //_userInfoService.AddUserInfo(); return Json(new MgResult() { Code = r > 0 ? 0 : 1, Msg = r > 0 ? "ok" : "SaveChanges失败!" }); } |
本文永久更新地址:http://siyouku.cn/article/6859.html
asp.net core 开发框架:https://github.com/2014fighting/CodeFrame.Web.git
本文来自:http://www.cnblogs.com/fighting2014/p/7954191.html


 浙公网安备 33010602011771号