nginx入门
nginx入门
nginx简介
Nginx (engine x) 是一个 高性能 的HTTP和反向代理web服务器 [13] ,同时也提供了IMAP/POP3/SMTP服务。Nginx是由伊戈尔·赛索耶夫为俄罗斯访问量第二的Rambler.ru站点(俄文:Рамблер)开发的,公开版本1.19.6发布于2020年12月15日。 [11]
其将源代码以类BSD许可证的形式发布,因它的稳定性、丰富的功能集、简单的配置文件和低系统资源的消耗而闻名。2022年01月25日,nginx 1.21.6发布。 [12]
Nginx是一款轻量级的Web 服务器/反向代理服务器及电子邮件(IMAP/POP3)代理服务器,在BSD-like 协议下发行。其特点是占有内存少,并发能力强,事实上nginx的并发能力在同类型的网页服务器中表现较好。
正向代理和反向代理
Http代理,反向代理:作为web服务器最常用的功能之一,尤其是反向代理。
正向代理:代理客户端 vpn等

反向代理

nginx负载均衡
Nginx提供的负载均衡策略有2种:内置策略和扩展策略。内置策略为轮询,加权轮询,Ip hash。扩展策略,就天马行空,只有你想不到的没有他做不到的。
轮询

加权轮询

iphash对客户端请求的ip进行hash操作,然后根据hash结果将同一个客户端ip的请求分发给同一台服务器进行处理,可以解决session不共享的问题。使用redis存储session

动静分离,在我们的软件开发中,有些请求是需要后台处理的,有些请求是不需要经过后台处理的(如:css、html、jpg、js等等文件),这些不需要经过后台处理的文件称为静态文件。让动态网站里的动态网页根据一定规则把不变的资源和经常变的资源区分开来,动静资源做好了拆分以后,我们就可以根据静态资源的特点将其做缓存操作。提高资源响应的速度。
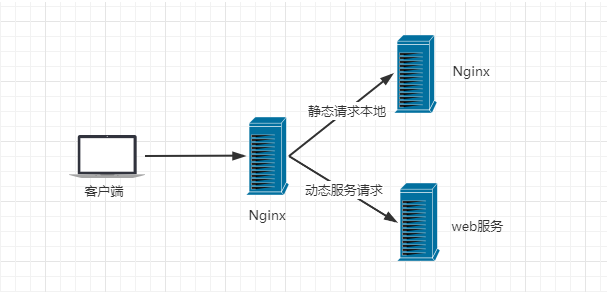
目前,通过使用Nginx大大提高了我们网站的响应速度,优化了用户体验,让网站的健壮性更上一层楼!
windows安装nginx
linux安装nginx
由于未配置linux服务器,暂未安装
nginx常用命令
cd /usr/local/nginx/sbin/
./nginx  启动
./nginx -s stop  停止
./nginx -s quit  安全退出
./nginx -s reload  重新加载配置文件
ps aux|grep nginx  查看nginx进程
启动服务器,访问默认端口号80
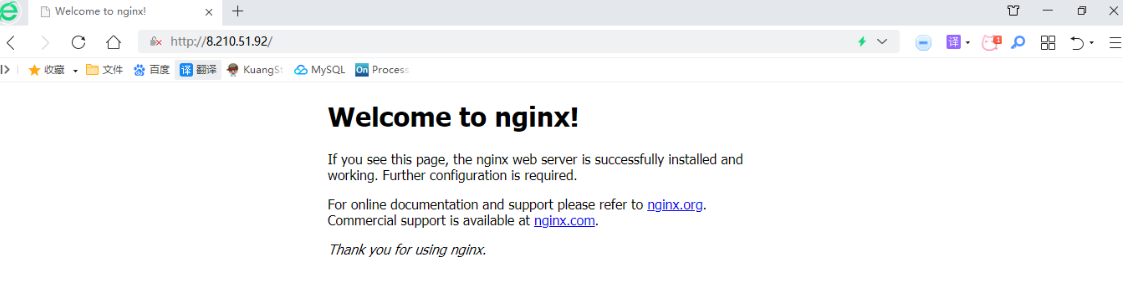
访问成功
nginx使用
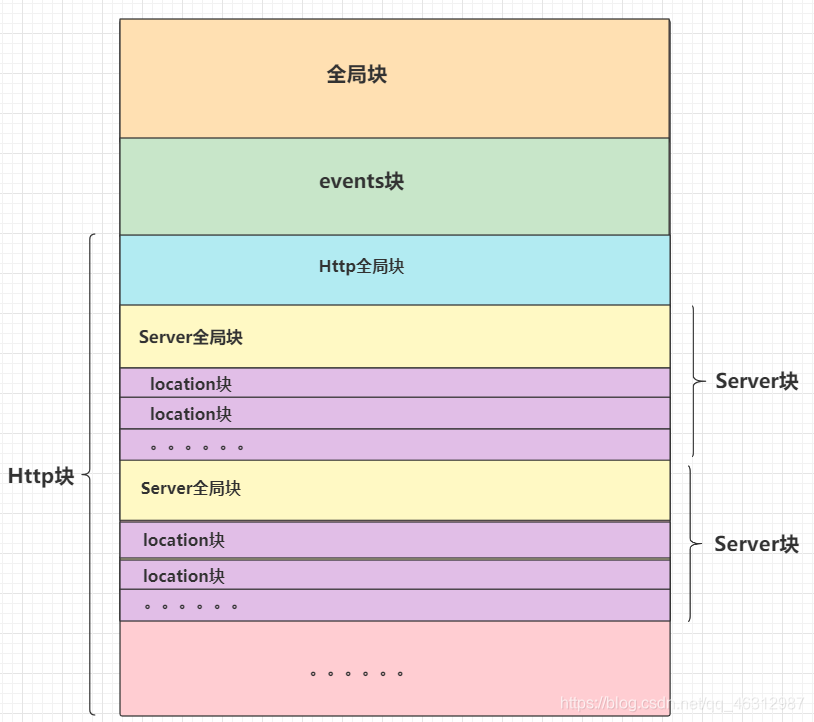
nginx.conf主要由三部分组成
- 全局块,
- events块
- http块
配置文件结构
真实配置文件概览
#全局块
#user  nobody;
worker_processes  1;

#error_log  logs/error.log;
#error_log  logs/error.log  notice;
#error_log  logs/error.log  info;

#pid        logs/nginx.pid;

#events块
events {
    worker_connections  1024;
}

#http块
http {
    include       mime.types;
    default_type  application/octet-stream;

    #log_format  main  '$remote_addr - $remote_user [$time_local] "$request" '
    #                  '$status $body_bytes_sent "$http_referer" '
    #                  '"$http_user_agent" "$http_x_forwarded_for"';

    #access_log  logs/access.log  main;

    sendfile        on;
    #tcp_nopush     on;

    #keepalive_timeout  0;
    keepalive_timeout  65;

    #gzip  on;

    #负载均衡
    upstream codeC {
        # 服务器资源
        server 127.0.0.1:8080 weight=1;
        server 127.0.0.1:8081 weight=1;
    }

	#配置server
    server {
        listen       80;
        server_name  localhost;

        #charset koi8-r;

        #access_log  logs/host.access.log  main;

        location / {
            root   html;
            index  index.html index.htm;
            # 代理配置
            proxy_pass http://codeC;
        }

        #error_page  404              /404.html;

        # redirect server error pages to the static page /50x.html
        #
        error_page   500 502 503 504  /50x.html;
        location = /50x.html {
            root   html;
        }

        # proxy the PHP scripts to Apache listening on 127.0.0.1:80
        #
        #location ~ \.php$ {
        #    proxy_pass   http://127.0.0.1;
        #}

        # pass the PHP scripts to FastCGI server listening on 127.0.0.1:9000
        #
        #location ~ \.php$ {
        #    root           html;
        #    fastcgi_pass   127.0.0.1:9000;
        #    fastcgi_index  index.php;
        #    fastcgi_param  SCRIPT_FILENAME  /scripts$fastcgi_script_name;
        #    include        fastcgi_params;
        #}

        # deny access to .htaccess files, if Apache's document root
        # concurs with nginx's one
        #
        #location ~ /\.ht {
        #    deny  all;
        #}
    }


    # another virtual host using mix of IP-, name-, and port-based configuration
    #
    #server {
    #    listen       8000;
    #    listen       somename:8080;
    #    server_name  somename  alias  another.alias;

    #    location / {
    #        root   html;
    #        index  index.html index.htm;
    #    }
    #}


    # HTTPS server
    #
    #server {
    #    listen       443 ssl;
    #    server_name  localhost;

    #    ssl_certificate      cert.pem;
    #    ssl_certificate_key  cert.key;

    #    ssl_session_cache    shared:SSL:1m;
    #    ssl_session_timeout  5m;

    #    ssl_ciphers  HIGH:!aNULL:!MD5;
    #    ssl_prefer_server_ciphers  on;

    #    location / {
    #        root   html;
    #        index  index.html index.htm;
    #    }
    #}
#可以配置多个server块
}
负载均衡简单应用
在这里简单使用一下nginx进行负载均衡
upstream关键字
#负载均衡
    upstream codeC {
        # 服务器资源  weight代表负载权重
        server 127.0.0.1:8080 weight=1;
        server 127.0.0.1:8081 weight=1;
    }
proxy_pass 设置代理配置:http://codeC
 location / {
            root   html;
            index  index.html index.htm;
            # 代理配置
            proxy_pass http://codeC;
        }
然后开启两个客户端分别指定8080 端口,8081端口开启
java -jar jar包名 --server.port=端口号

然后访问nginx listen端口80
访问成功:
小结
这只是浅显的入门,后续的继续学习需要通过书籍文档进行深入理解

 浙公网安备 33010602011771号