【Kubernetes】Service
为什么要有Service
在kubernetes中,Pod是有生命周期的,如果Pod重启它的IP很有可能会发生变化。如果我们的服务都是将Pod的IP地址写死,Pod挂掉或者重启,和刚才重启的pod相关联的其他服务将会找不到它所关联的Pod。
为了解决这个问题,在kubernetes中定义了service资源对象,Service 定义了一个服务访问的入口,客户端通过这个入口即可访问服务背后的应用集群实例,service是一组Pod的逻辑集合,这一组Pod能够被Service访问到,通常是通过Label Selector实现的。
什么是Service
service是一个固定接入层,客户端可以通过访问service的ip和端口访问到service关联的后端pod,这个service工作依赖于在kubernetes集群之上部署的一个附件,就是kubernetes的dns服务。
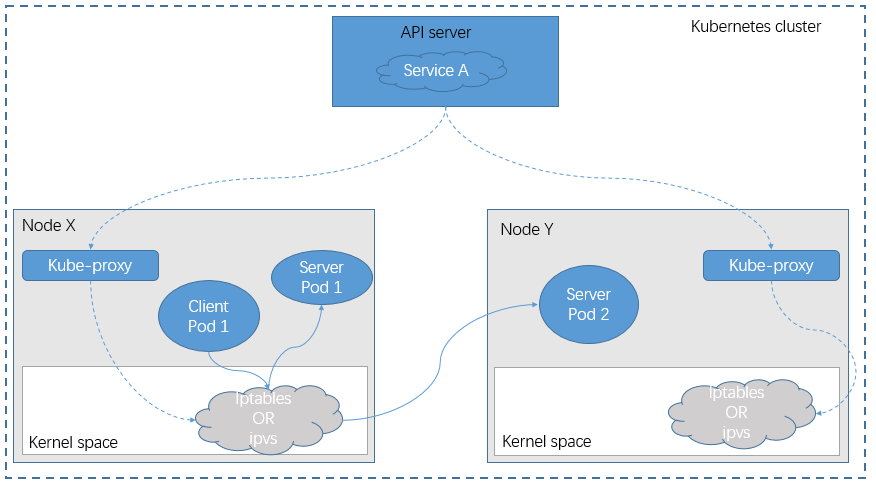
service的名称解析是依赖于dns附件的,因此在部署完k8s之后需要再部署dns附件,kubernetes要想给客户端提供网络功能,需要依赖第三方的网络插件(flannel,calico等)。每个K8s节点上都有一个组件叫做kube-proxy,kube-proxy这个组件将始终监视着apiserver中有关service资源的变动信息,需要跟master之上的apiserver交互,随时连接到apiserver上获取任何一个与service资源相关的资源变动状态。
简单来讲,service对象就是工作在节点上的一组iptables或ipvs规则,用于将到达service对象ip地址的流量调度转发至相应endpoint对象指向的ip地址和端口之上;工作于每个节点的kube-proxy组件通过apiserver持续监控着各service及其关联的pod对象,并将其创建或变动实时反映至当前工作节点上相应的iptables或ipvs规则;
其实service和pod或其他资源的关联,本质上不是直接关联,它依靠一个中间组件endpoint;endpoint主要作用就是引用后端pod或其他资源(比如k8s外部的服务也可以被endpoint引用);所谓endpoint就是ip地址+端口;
Service的类型
在k8s上service的类型有4种,第一种是clusterIP,我们在创建service资源时,如果不指定其type类型,默认就是clusterip;第二种是NodePort类型,第三种是LoadBalancer,第四种是ExternalName;不同类型的service,其功能和作用也有所不同;
ClusterIP
这种类型service不能被集群外部客户端所访问,仅能在集群节点上访问,这也是默认的ServiceType;
这种类型的service的ip地址一定是我们在初始化集群时,指定的service网络(10.96.0.0/12)中的地址
NodePort
NodePort类型的service,是建构在ClusterIP的基础上做的扩展,主要解决了集群外部客户端访问问题;通过每个Node节点上的IP和静态端口暴露k8s集群内部的服务。通过请求<NodeIP>:<NodePort>可以把请求代理到内部的pod。
NodePort类型service在创建时,它会每个节点上创建一条DNAT规则,外部客户端访问集群任意节点的指定端口,都会被DNAT到对应的service上,从而实现访问集群内部Pod;对于集群内部客户端的访问它还是通过ClusterIP进行的.
LoadBalancer
LoadBalancer这种类型的service是在NodePort的基础上做的扩展,这种类型service只能在底层是云环境的K8s上创建,如果底层是非云环境,这种类型无法实现,只能手动搭建反向代理进行对NodePort类型的service进行反代;它主要解决NodePort类型service被集群外部访问时的端口映射以及负载;
ExternalName
ExternalName这种类型service主要用来解决对应service引用集群外部的服务;如果我们需要在集群中使用集群外部的服务,我们就可以创建ExternalName类型的service,指定后端关联外部某个服务端ip地址或域名即可,它没有selector,也没有定义任何的端口和Endpoint。
# externalName字段就是需要引用的服务名或者域名
kind: Service
apiVersion: v1
metadata:
  name: my-service
  namespace: prod
spec:
  type: ExternalName
  externalName: my.database.example.com
Serivce的创建
见根据Deployment控制器创建对应的pod
$ cat deployment-demo.yaml
apiVersion: apps/v1
kind: Deployment
metadata:
  name: deployment
  namespace: default
spec:
  replicas: 3
  selector:
    matchLabels:
      demo: deployment
  template:
    metadata:
      labels:
        demo: deployment
		app: nginx
    spec:
      containers:
      - name: nginx
        image: nginx:1.16-alpine
        ports:
        - name: http
          containerPort: 80
创建ClusterIP类型的Service
# 创建 yaml文件
$ vim ClusterService.yaml
apiVersion: v1
kind: Service
metadata:
  name: nginx-clusterservice
  labels:
    app: nginx
spec:
  type: ClusterIP
  ports:
  - port: 80
    protocol: TCP
    targetPort: 80
  selector:
    app: nginx

# 发布该服务
$ kubectl apply -f ClusterSerice.yaml

# 创建成功后获取这个服务的内部IP,然后通过这个IP去访问服务
$ kubectl get service
NAME                   TYPE        CLUSTER-IP      EXTERNAL-IP   PORT(S)   AGE
kubernetes             ClusterIP   10.96.0.1       <none>        443/TCP   6d1h
nginx-clusterservice   ClusterIP   10.110.59.214   <none>        80/TCP    6s

# 通过curl工具去访问该网站,发现已经能访问到该服务
yunzhou-test4@yunzhou-test4:~/kubernetes/serivce$ curl 10.110.59.214
<!DOCTYPE html>
<html>
<head>
<title>Welcome to nginx!</title>
<style>
    body {
        width: 35em;
        margin: 0 auto;
        font-family: Tahoma, Verdana, Arial, sans-serif;
    }
</style>
</head>
<body>
<h1>Welcome to nginx!</h1>
<p>If you see this page, the nginx web server is successfully installed and
working. Further configuration is required.</p>

<p>For online documentation and support please refer to
<a href="http://nginx.org/">nginx.org</a>.<br/>
Commercial support is available at
<a href="http://nginx.com/">nginx.com</a>.</p>

<p><em>Thank you for using nginx.</em></p>
</body>
</html>
注意,在服务的yaml文件中,spec.port该字段指定的时候这个服务所暴露的接口,而sepct.targetPort字段值的是pod容器所暴露的接口,这两个概念不要搞混了。
查看该服务的详细信息
$ kubectl describe service nginx-clusterservice
Name:              nginx-clusterservice
Namespace:         default
Labels:            app=nginx
Annotations:       <none>
Selector:          app=nginx
Type:              ClusterIP
IP Family Policy:  SingleStack
IP Families:       IPv4
IP:                10.110.59.214
IPs:               10.110.59.214
Port:              <unset>  80/TCP
TargetPort:        80/TCP
Endpoints:         10.244.1.31:80,10.244.1.32:80,10.244.1.33:80
Session Affinity:  None
Events:            <none>

## 看到详细信息里面有字段名 Endpoints ,表示该服务所关联的pod容器地址

## 获取所有的endpoints信息
$ kubectl get endpoints
NAME                   ENDPOINTS                                      AGE
nginx-clusterservice   10.244.1.31:80,10.244.1.32:80,10.244.1.33:80   18m

## 查看该endpoints的详细信息
$ kubectl describe endpoints nginx-clusterservice
Name:         nginx-clusterservice
Namespace:    default
Labels:       app=nginx
Annotations:  endpoints.kubernetes.io/last-change-trigger-time: 2021-12-07T02:25:32Z
Subsets:
  Addresses:          10.244.1.31,10.244.1.32,10.244.1.33
  NotReadyAddresses:  <none>
  Ports:
    Name     Port  Protocol
    ----     ----  --------
    <unset>  80    TCP

Events:  <none>
从上面可以得知,service可以对外提供统一固定的ip地址,并将请求重定向至集群中的pod。其中“将请求重定向至集群中的pod”就是通过endpoint与selector协同工作实现。selector是用于选择pod,由selector选择出来的pod的ip地址和端口号,将会被记录在endpoint中。endpoint便记录了所有pod的ip地址和端口号。
当一个请求访问到service的ip地址时,就会从endpoint中选择出一个ip地址和端口号,然后将请求重定向至pod中。具体把请求代理到哪个pod,需要的就是kube-proxy的轮询实现的。service不会直接到pod,service是直接到endpoint资源,就是地址加端口,再由endpoint再关联到pod。
创建NodeProt类型的Service
沿用上个例子的pod,直接创建Service
yunzhou-test4@yunzhou-test4:~/kubernetes/serivce$ cat NodePortService.yaml
apiVersion: v1
kind: Service
metadata:
  name: nginx-nodeport
  labels:
    app: nginx
spec:
  type: NodePort
  ports:
  - port: 81
    protocol: TCP
    targetPort: 80
	nodePort: 32223
  selector:
    app: nginx
创建完之后查看该服务是否已经创建成功,以及查看详细信息
$ kubectl get svc
NAME                   TYPE        CLUSTER-IP      EXTERNAL-IP   PORT(S)        AGE
kubernetes             ClusterIP   10.96.0.1       <none>        443/TCP        26m
nginx-clusterservice   ClusterIP   10.110.59.214   <none>        80/TCP         43m
nginx-nodeport         NodePort    10.101.186.72   <none>        81:32223/TCP   7m21s
yunzhou-test4@yunzhou-test4:~/kubernetes/serivce$ kubectl describe svc nginx-nodeport
Name:                     nginx-nodeport
Namespace:                default
Labels:                   app=nginx
Annotations:              <none>
Selector:                 app=nginx
Type:                     NodePort
IP Family Policy:         SingleStack
IP Families:              IPv4
IP:                       10.101.186.72
IPs:                      10.101.186.72
Port:                     <unset>  81/TCP
TargetPort:               80/TCP
NodePort:                 <unset>  32223/TCP
Endpoints:                10.244.1.31:80,10.244.1.32:80,10.244.1.33:80
Session Affinity:         None
External Traffic Policy:  Cluster
Events:                   <none>
获取成功,直接通过 nodeIP:nodePort 访问由 Service 暴露出来的服务
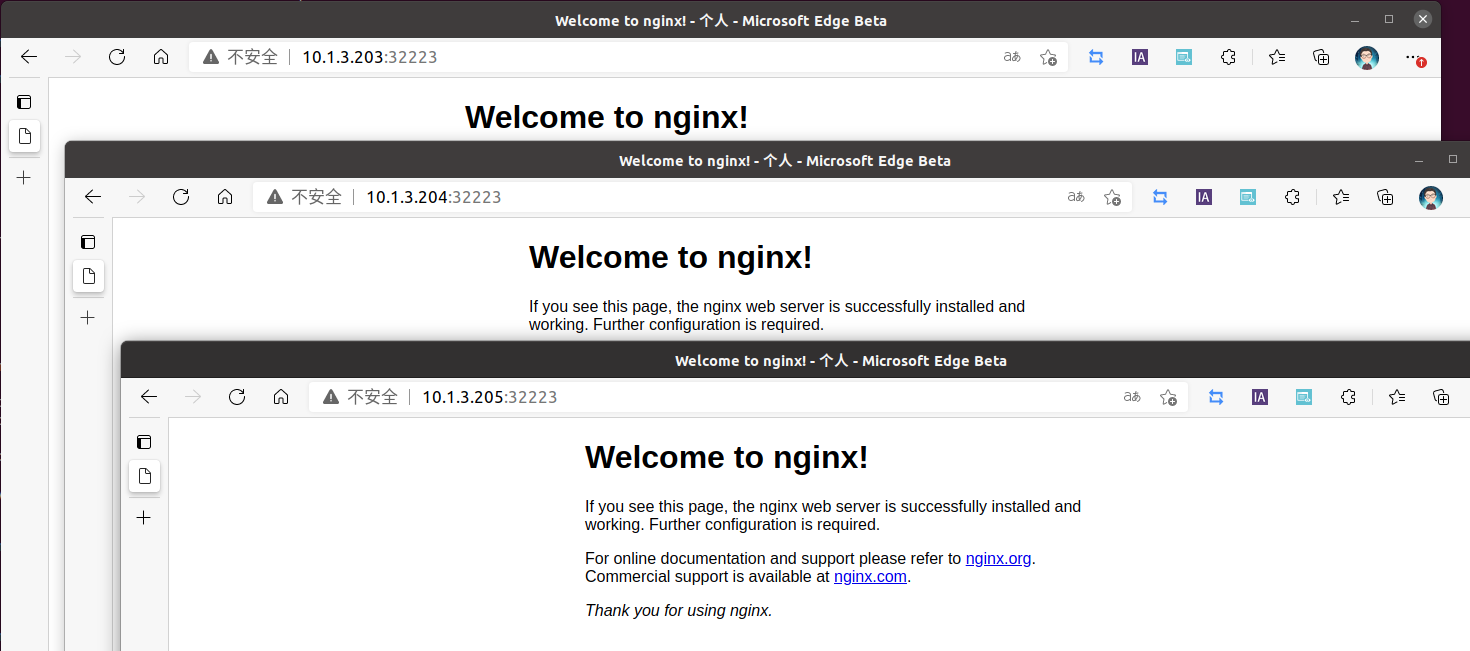
由上图可以看出,可以通过集群的任意一个节点的ip加上port访问暴露出来的服务;而且在上面定义的yaml文件中可以看出,port字段是81,那么在集群内部是不是也可以通过81去访问服务呢?
$ kubectl get svc
NAME                   TYPE        CLUSTER-IP      EXTERNAL-IP   PORT(S)        AGE
kubernetes             ClusterIP   10.96.0.1       <none>        443/TCP        30m
nginx-clusterservice   ClusterIP   10.110.59.214   <none>        80/TCP         48m
nginx-nodeport         NodePort    10.101.186.72   <none>        81:32223/TCP   11m

## 获取到这个NodePort类型的Service类型IP是 10.101.186.72
## 通过curl工具访问这个地址
yunzhou-test4@yunzhou-test4:~/kubernetes/serivce$ curl 10.101.186.72:81
<!DOCTYPE html>
<html>
<head>
<title>Welcome to nginx!</title>
<style>
    body {
        width: 35em;
        margin: 0 auto;
        font-family: Tahoma, Verdana, Arial, sans-serif;
    }
</style>
</head>
<body>
<h1>Welcome to nginx!</h1>
<p>If you see this page, the nginx web server is successfully installed and
working. Further configuration is required.</p>

<p>For online documentation and support please refer to
<a href="http://nginx.org/">nginx.org</a>.<br/>
Commercial support is available at
<a href="http://nginx.com/">nginx.com</a>.</p>

<p><em>Thank you for using nginx.</em></p>
</body>
</html>
访问成功,由此看出 NodePort 类型是基于ClusterIP类型基础之上的。
自定义endpoint实现映射外部服务
k8s需要引用k8s集群之外的服务的时候该怎么办呢?这时候可以定义一个service来引用外部的服务,这个服务的类型是ClusterIP。
在外部定义服务
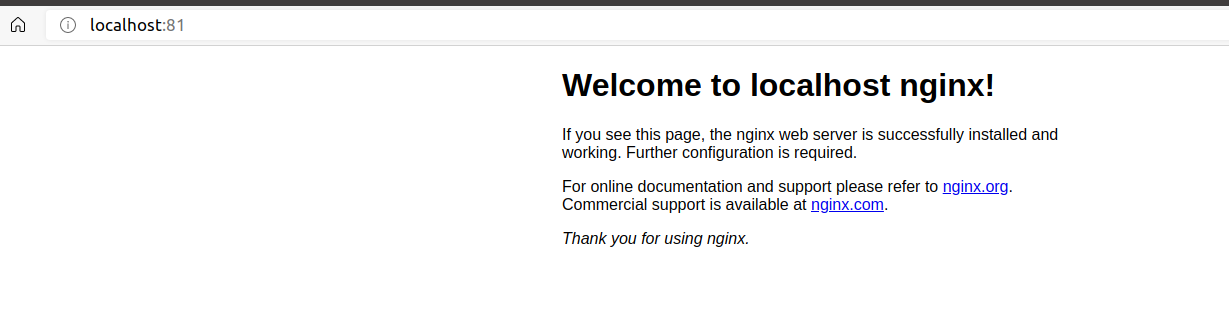
这里选择nginx,在本机起一个docker,跑nginx服务,并且将nginx的首页内容修改下,用此标明访问的是外部服务。
# 拉取nginx服务
$ docker pull nginx

# 运行容器
$ docker run -d --name nginx -p 81:80 nginx

# 进入容器,修改里面的index.html首页
$ docker exec -it nginx bash
root@683d7d28a35a: cd /usr/share/nginx/html
root@683d7d28a35a: vim index.html

# 修改里面的部分显示代码
<!DOCTYPE html>
<html>
<head>
<title>Welcome to nginx!</title>
<style>
html { color-scheme: light dark; }
body { width: 35em; margin: 0 auto;
font-family: Tahoma, Verdana, Arial, sans-serif; }
</style>
</head>
<body>

## 修改了这里的标题,原elcome to localhost nginx!
## 修改后 Welcome to localhost nginx!

<h1>Welcome to localhost nginx!</h1>
<p>If you see this page, the nginx web server is successfully installed and
working. Further configuration is required.</p>

<p>For online documentation and support please refer to
<a href="http://nginx.org/">nginx.org</a>.<br/>
Commercial support is available at
<a href="http://nginx.com/">nginx.com</a>.</p>

<p><em>Thank you for using nginx.</em></p>
</body>
</html>
访问地址,验证效果
定义k8s服务
只需要定义必要的标签以及这个服务所暴露的接口,其他无需定义。
$ cat outservice.yaml
apiVersion: v1
kind: Service
metadata:
  name: out-service
spec:
  type: ClusterIP
  ports:
  - port: 80


## 发布服务
$ kubectl apply -f outservice.yaml

## 查看服务详情
## 可以看到这里的 Endpoints 字段是none,下面就自己定义一个endpoints
$ kubectl describe svc out-service
Name:              out-service
Namespace:         default
Labels:            <none>
Annotations:       <none>
Selector:          <none>
Type:              ClusterIP
IP Family Policy:  SingleStack
IP Families:       IPv4
IP:                10.107.202.232
IPs:               10.107.202.232
Port:              <unset>  80/TCP
TargetPort:        80/TCP
Endpoints:         <none>
Session Affinity:  None
Events:            <none>


## 自定义一个endpoints,注意这里的endpoints名字要和服务名保持一致!
## subsets.addresses.ip字段填写的是外部服务的ip地址
## subsets.ports.port字段填写的是外部服务端口号
$ cat endpoint.yaml
apiVersion: v1
kind: Endpoints
metadata:
  name: out-service
subsets:
- addresses:
  - ip: 10.2.103.82
  ports:
  - port: 81

## 发布该endpoint
$ kubectl apply -f endpoints.yaml

## 可以看到该endpoints已经创建成功
$ kubectl get endpoints
NAME                   ENDPOINTS                                      AGE
kubernetes             10.1.3.205:6443                                3h35m
nginx-clusterservice   10.244.1.31:80,10.244.1.32:80,10.244.1.33:80   3h54m
nginx-nodeport         10.244.1.31:80,10.244.1.32:80,10.244.1.33:80   3h17m
out-service            10.2.103.82:81                                 8m52s


## 查看服务详细信息,看endpint是否已经存在该服务上
## 已经挂载
$ kubectl describe svc out-service
Name:              out-service
Namespace:         default
Labels:            <none>
Annotations:       <none>
Selector:          <none>
Type:              ClusterIP
IP Family Policy:  SingleStack
IP Families:       IPv4
IP:                10.107.202.232
IPs:               10.107.202.232
Port:              <unset>  80/TCP
TargetPort:        80/TCP
Endpoints:         10.2.103.82:81
Session Affinity:  None
Events:            <none>


## 使用curl验证是否访问成功,注意,这里访问的是服务的ip而不是外部服务的ip
## 访问成功!
$ curl 10.107.202.232
<!DOCTYPE html>
<html>
<head>
<title>Welcome to nginx!</title>
<style>
html { color-scheme: light dark; }
body { width: 35em; margin: 0 auto;
font-family: Tahoma, Verdana, Arial, sans-serif; }
</style>
</head>
<body>
## 访问成功!
<h1>Welcome to localhost nginx!</h1>
<p>If you see this page, the nginx web server is successfully installed and
working. Further configuration is required.</p>

<p>For online documentation and support please refer to
<a href="http://nginx.org/">nginx.org</a>.<br/>
Commercial support is available at
<a href="http://nginx.com/">nginx.com</a>.</p>

<p><em>Thank you for using nginx.</em></p>
</body>
</html>
使用Service代理需要保证 k8s节点与外部服务节点的网络是畅通的
并且endpoints的名称和代理服务的名词需要保持一致。
参考文档
本文来自博客园,作者:孟冬十九,转载请注明原文链接:https://www.cnblogs.com/chenSunshine/p/15780863.html

 浙公网安备 33010602011771号