
2.常见插件及使用
1.安装sass预处理器
步骤一:git bash here中输入:npm install -g sass
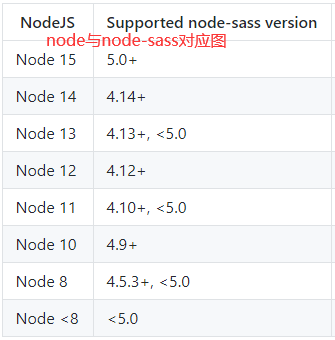
步骤二:如果报错可能是因为版本不对,可以进行如下操作:
npm uninstall --save sass-loader /* 卸载sass-loader */
npm i -D sass-loader@7.0.3       /* 安装指定版本的sass-loader */
npm uninstall --save node-sass   /* 卸载node-sass */
npm install node-sass@4.14.1     /* 安装node对应版本的node-sass */
步骤三:打开build文件夹下的webpack.base.conf.js,找到module.exports里的module,在rules里添加下面的配置:
{test: /.sass$/, loaders: ['style', 'css', 'sass']}
步骤四:样式标签更改为:
<style lang="scss"></style>
2.安装elementUI
步骤一:git bash here中输入:npm i element-ui -S
步骤二:在 main.js 中写入以下内容:
import ElementUI from 'element-ui';
import 'element-ui/lib/theme-chalk/index.css';
Vue.use(ElementUI);
3.安装vuex
步骤一:git bash here中输入:npm install vuex --save
步骤二:在src目录下新建一个store文件夹,新建一个store.js的文件,里面配置如下:
import Vue from "vue";
import Vuex from "vuex"; //引入vuex
Vue.use(Vuex); //将vuex当成一个组件来使用
export default new Vuex.Store({ //新建仓库
  // 存放数据
  state: {
    city: "北京",
    index: 0
  },
  //  异步调取
  actions: {
    change(ctx, city) {
      ctx.commit("change", city);
    }
  },
  //  更改状态
  mutations: {}
});
步骤三:在main.js中引入:
import store from './store/store' //引入
new Vue({
  store //注册(后面所有子组件都可以使用)
});
4.安装echarts
步骤一:git bash here中输入: npm install echarts --save
步骤二:在 main.js 中写入以下内容:
import * as echarts from "echarts";
Vue.prototype.$echarts = echarts;
步骤三:在组件中使用:
<template>
  <div id="main" style="width: 600px;height:400px;"></div>
</template>
<script>
export default {
  name: "HelloWorld",
  mounted(){
    this.drawLine();
  },
  methods:{
    drawLine(){
      // 初始化echarts
      let myChart=this.$echarts.init(document.getElementById('main'));
      // 绘制图表
      myChart.setOption({
        title:{text:'在vue中使用echarts'},
        tooltip:{},
        xAxis:{
          data:["衬衫","羊毛衫","裤子"]
        },
        yAxis:{},
        series:[{
          name:'销量',
          type:'bar',
          data:[5,20,40]
        }]
      })
    }
  }
};
</script>
5.安装echarts-gl
步骤一:git bash here中输入: npm install echarts-gl --save(需先安装echarts)
步骤二:如果报错,可能是因为版本太高。需先降级再安装。
npm install echarts-gl@1.1.0 --save
npm install --save echarts-gl
步骤三:在 main.js 中写入以下内容:
import * as echarts from "echarts";
import 'echarts-gl'
6.安装jquery
步骤一:git bash here中输入:npm install jquery --save
步骤二:修改配置文件:vue-loader.conf.js
//引入webpack
const webpack = require("webpack");
//添加代码配置jQuery插件
module.exports = {
  plugins: [
    new webpack.ProvidePlugin({
      $: "jquery",
      jQuery: "jquery"
    })
  ]
};
步骤三:组件中引入jquery:
<script>
  import 'jquery'; //引入jquery
  export default {
    created(){
      console.log($('#app'));
    }
  }
</script>
7.安装vue-prism-editor(代码块编辑器)
步骤一:安装vue-prism-editor。git bash here中输入:npm install vue-prism-editor
步骤二:vue-prism-editor需要依赖 prismjs,所以需要安装prismjs。git bash here中输入:npm install babel-plugin-prismjs -D
步骤三:组件中使用
// 1.使用PrismEditor 组件
<template>
  <div>
    <prism-editor class="my-editor height-300" v-model="code" aria-disabled :highlight="highlighter" line-numbers :readonly="false" :tabSize="4"></prism-editor>
  </div>
</template>

<script>
// 2.引入vue-prism-editor,显示代码块
import { PrismEditor } from "vue-prism-editor";
import "vue-prism-editor/dist/prismeditor.min.css";
import { highlight, languages } from "prismjs/components/prism-core";
import "prismjs/components/prism-clike";
import "prismjs/components/prism-javascript";
import "prismjs/themes/prism-tomorrow.css";
export default {
    // 3.注册PrismEditor 组件
    components: { PrismEditor },
    methods: {
    // 4.代码块高亮
    highlighter(code) {
      return highlight(code, languages.js);
    }
  }
};
</script>

// 5.代码块编辑器样式
<style scoped lang="scss">
.my-editor {
     background: rgba(45,45,45,0.6);
     color: #ccc;
     font-family: Fira code, Fira Mono, Consolas, Menlo, Courier, monospace;
     font-size: 14px;
     line-height: 1.5;
     padding: 5px;
}
.prism-editor__textarea:focus {
     outline: none;
}
</style>
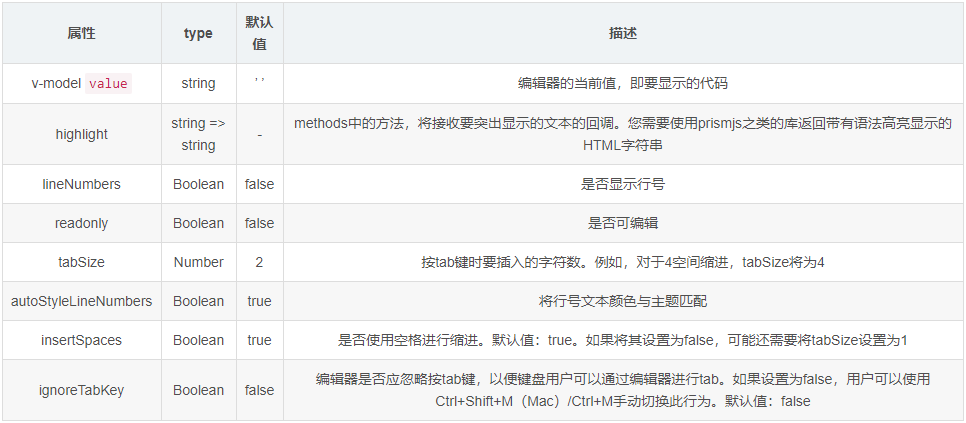
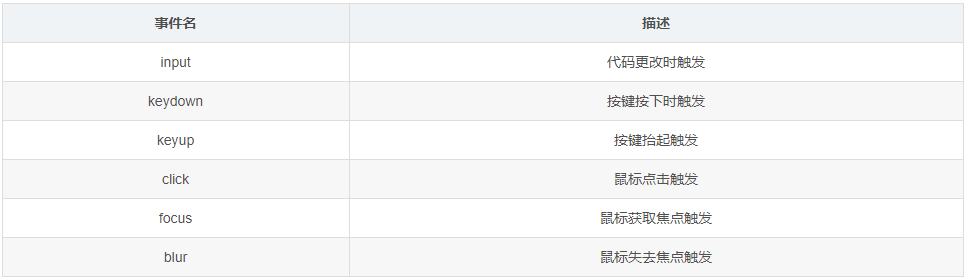
步骤四:常见属性和事件:
8.安装data-v(可视化大屏组件库)
步骤一:git bash here中输入:npm install @jiaminghi/data-view
步骤二:在 main.js 中写入以下内容:
import dataV from '@jiaminghi/data-view'
Vue.use(dataV)
9.安装js-cookie
步骤一:git bash here中输入:npm install js-cookie --save
步骤二:引用:
import Cookies from'js-cookie'
10.安装tinymce(富文本编辑器)
步骤一:git bash here中输入:npm i @tinymce/tinymce-vue -S
步骤二:git bash here中输入:npm i tinymce -S(防止富文本编辑器加载缓慢和每次打开都会有一个烦人的弹窗的问题)
步骤三:下载完成之后,需要把node_modules下的tinymce包下的资源拷贝到项目本地,以便本地访问这些资源。或者直接使用cdn(推荐)。
步骤四:下载汉化包:https://cdn.jsdelivr.net/gh/wt-sml/wutong_cdn/js/tinymce-lang-zh@5.2.2.js
步骤五:引入汉化包:
步骤六:组件中使用:
<template>
    <div><tinymce-editor :init="init" v-model="content"></tinymce-editor></div>
</template>
<script>
    import Editor from "@tinymce/tinymce-vue";
    export default{
        components: {"tinymce-editor": Editor},
        data(){
            return{
                content:'',
                init: {
                    height: 200,
                    plugins:"link lists image code table colorpicker textcolor wordcount contextmenu",
                    branding: false,
                    images_upload_handler:(blobInfo, success,failure)=> {success('data:image/jpeg;base64,' + blobInfo.base64())},
                    //编辑器的汉化部分,引入汉化包后,配置language和language_url即可
                    language_url: "/lib/js/zh_CN.js",
                    language: "zh_CN",
                    //使用toolbar来配置工具栏上可用的按钮,多个控件使用空格分隔,使用“|”来创建分组
                    //常见配置:
                    //newdocument(新文档)、bold(加粗)、italic(斜体)、underline(下划线)、strikethrough(删除线)、
                    //alignleft(左对齐)、aligncenter(居中对齐)、alignright(右对齐)、alignjustify(两端对齐)、
                    //styleselect(格式设置)、formatselect(段落格式)、fontselect(字体选择)、fontsizeselect(字号选择)、
                    //cut(剪切)、copy(复制)、paste(粘贴)、bullist(项目列表UL)、numlist(编号列表OL)、
                    //outdent(减少缩进)、indent(增加缩进)、blockquote(引用)、undo(撤销)、redo(重做/重复)、
                    //removeformat(清除格式)、subscript(下角标)、superscript(上角标)
                    toolbar:"bold italic underline strikethrough | fontsizeselect | forecolor backcolor | alignleft aligncenter alignright alignjustify|bullist numlist |outdent indent blockquote | undo redo | link unlink image code | removeformat",
                    //想预防xss攻击,同时不希望用户直接粘贴进来一些富文本
                    paste_preprocess: (pl, o) => {
                        o.content = $stripTags(o.content, "sup,sub");
                    },
                 },
            }
        }
    }
</script>
<style>
    /deep/ .tox .tox-notifications-container .tox-notification {display: none;} //消除来自 api-key 的警告,隐藏 tinymce alert
</style>
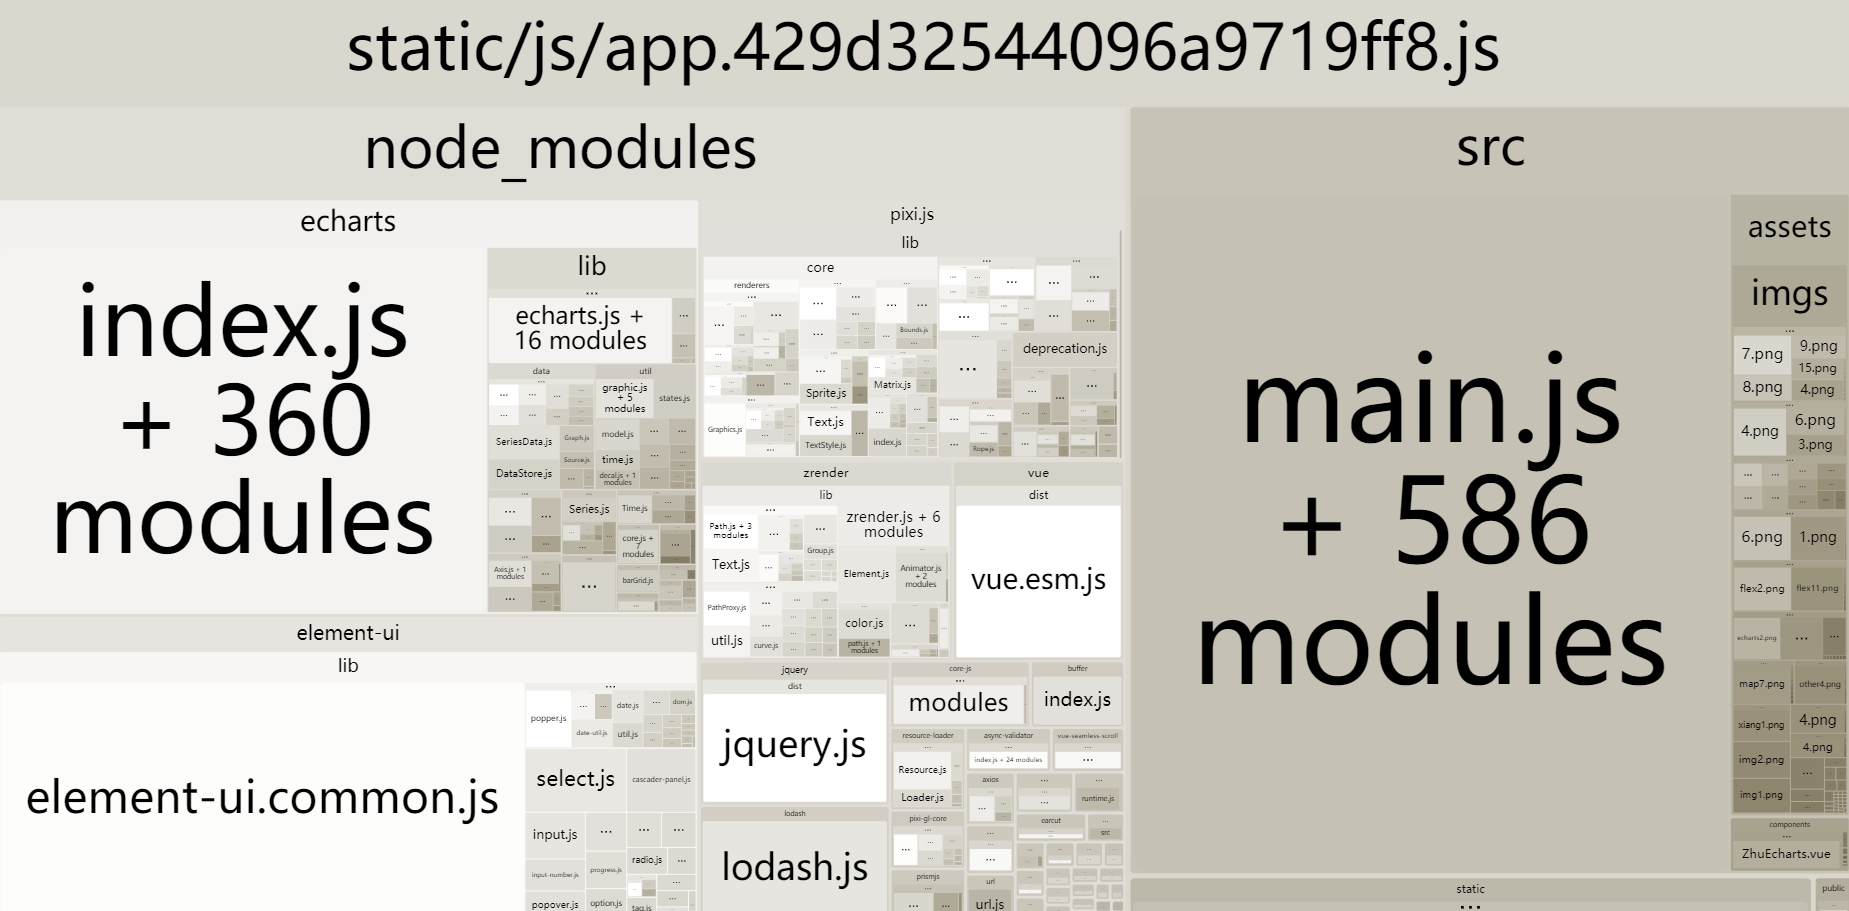
11.安装webpack-bundle-analyzer(打包分析工具)
步骤一:安装:npm install --save-dev webpack-bundle-analyzer
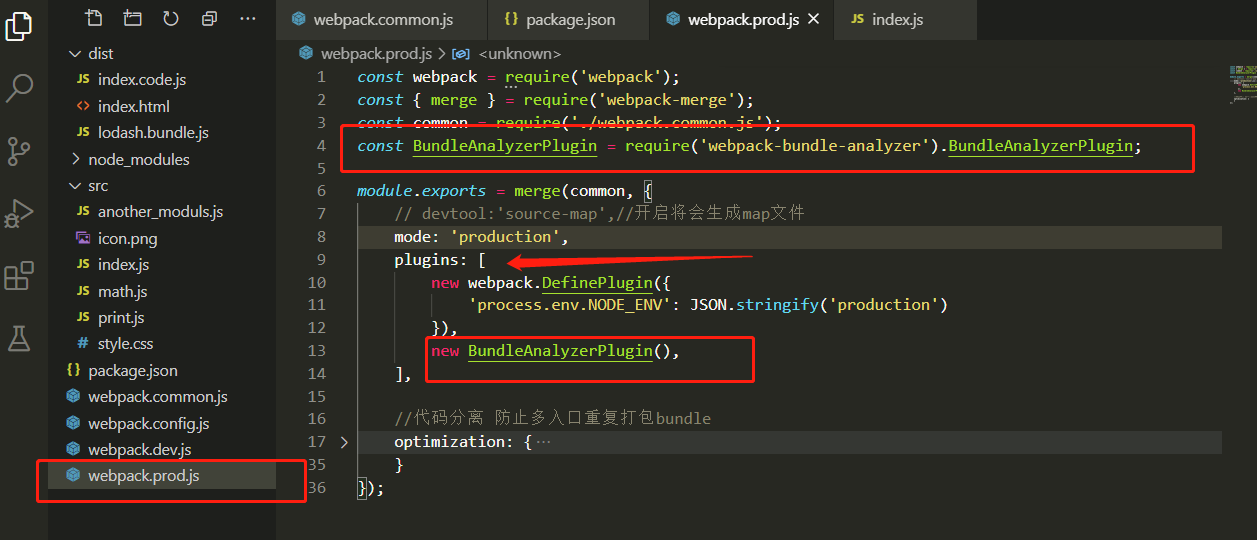
步骤二:在webpack配置文件,如果有生产配置文件放入生产配置文件里。require方式引入进来,然后在plugins配置项new一个实例即可。
const BundleAnalyzerPlugin=require('webpack-bundle-analyzer').BundleAnalyzerPlugin;
new BundleAnalyzerPlugin(),
步骤三:执行npm run build
12.安装pixi(快速2D渲染)
步骤一:安装:npm install --save pixi.js
步骤二:引入
import * as PIXI from "pixi.js";
import smokeSpritepng from "../../assets/imgs/za/smokeSprite.png"; //图片必须以导入的形式使用
13.安装gasp(动画库)
gasp官网:https://greensock.com/
步骤一:安装:npm install gsap
步骤二:引入:import gsap from 'gsap'
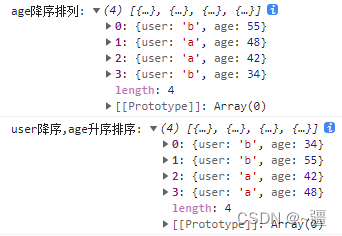
14.安装Lodash
作用:Lodash是一个意在提高开发者效率,提高JS原生方法性能的JS库。简单的说就是,很多方法lodash已经帮你写好了,直接调用就行,不用自己费尽心思去写了,而且可以统一方法的一致性。Lodash使用了一个简单的 _ 符号,就像Jquery的 $ 一样,十分简洁。
步骤一:安装:npm i -S lodash
步骤二:引入:
import _ from 'lodash'
Vue.prototype._ = _
步骤三:使用:在任何地方使用_或者this._即可调用lodash

15.安装vue-waves-effect(水波纹)
步骤一:安装: npm install vue-waves-effect --save
步骤二:在main.js中引入
import Waves from 'vue-waves-effect';
import 'vue-waves-effect/dist/vueWavesEffect.css';
Vue.use(Waves);
步骤三:使用
<template>
  <el-button type='primary' v-waves></el-button>
</template>
转载请注明原文链接:https://www.cnblogs.com/chenJieLing/

 浙公网安备 33010602011771号