01 Tensorflow 基础
基本概念
- 使用图(graphs)来表示计算任务
- 在被称之为会话(Session)的上下文(context)中执行图
- 使用张量(tensor)表示数据
- 通过变量(Variable)维护状态
- 使用 feed 和 fetch 可以为任意的操作赋值或者从其中获取数据
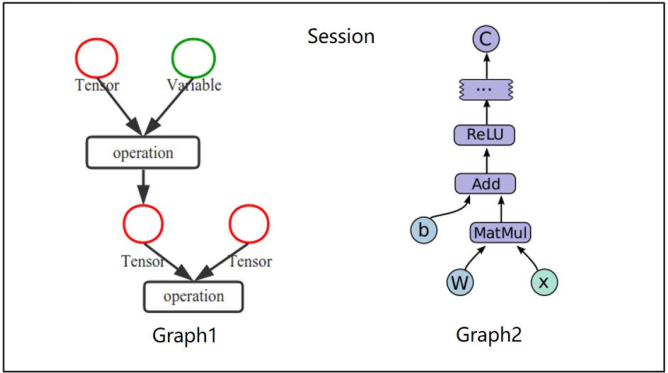
Tensorflow 是一个编程系统,使用图(graphs)来表示计算任务,图(graphs)中的节点称之为 op (operation),一个 op 获得 0 个或多个 Tensor输入,执行计算,产生 0 个或多个 Tensor。Tensor 看作是 一个 n 维的数组或列表。图必须在会话(Session)里被启动。Tensorflow 结构如下:

张量
张量是一种组合类型的数据类型,表示为一个多维数组。
TensorFlow 中的所有数据都是以张量这种数据结构的形式表示的。
张量(tensor)的属性:维数(阶)、形状和数据类型。
张量的维数(Rank)
张量的维数又叫张量的阶,是张量维数的一个数量描述。如下分别表示 0 维、1 维、2 维和 3 维的张量:
| 维数 | 举例 | 说明 |
|---|---|---|
| 0 | 1 | 维度为0,表示标量 |
| 1 | [1,2,3] | 维度为1,表示一维向量 |
| 2 | [[1,2],[3,4]] | 维度为2,表示二维矩阵 |
| 3 | [[[1,2],[3,4]],[[1,2],[3,4]]] | 维度为3,表示三维空间矩阵 |
技巧: 维度看张量的最左边有多少个左中括号,有 n 个,则这个张量就是 n 维张量。
张量的形状(Shape)
张量的形状以 [D0, D1, … Dn-1] 的形式表示,D0 到 Dn 是任意的正整数。
在运行程序查看结果常能注意到,比如:shape=(1, 2),即表示形状为[1, 2],第一维度有 1 个元素,第二维度 2 个元素。
| 举例 | 形状 |
|---|---|
| 1 | 形状为[] |
| [1,2,3] | 形状为[3] |
| [[1,2],[3,4]] | 形状为[2,2] |
| [[[1,2],[3,4]],[[1,2],[3,4]]] | 形状为[2,2,2] |
数据类型(Type)
数据类型的定义在文件tensorflow\python\framework\dtypes.py中。
| Dtype对象 | Tensorflow数据类型 | 说明 |
|---|---|---|
| DT_HALF | tf.float16 | 半精度浮点数 |
| DT_FLOAT | tf.float32 | 32 位浮点数 |
| DT_DOUBLE | tf.float64 | 64 位浮点数 |
| DT_BFLOAT16 | tf.bfloat16 | 截短浮点数 |
| DT_INT8 | tf.int8 | 8 位有符号整型 |
| DT_INT16 | tf.int16 | 16 位有符号整型 |
| DT_INT32 | tf.int32 | 32 位有符号整型 |
| DT_INT64 | tf.int64 | 64 位有符号整型 |
| DT_UINT8 | tf.uint8 | 8 位无符号整型 |
| DT_UINT16 | tf.uint16 | 16 位无符号整型 |
| DT_STRING | tf.string | 字符串 |
| DT_BOOL | tf.bool | 布尔型 |
| DT_COMPLEX64 | tf.complex64 | 单精度复数(实部和虚部都是单精度浮点数) |
| DT_COMPLEX128 | tf.complex128 | 双精度复数(实部和虚部都是双精度浮点数) |
| DT_QINT8 | tf.qint8 | 量化的8位有符号整型 |
| DT_QINT16 | tf.qint16 | 量化的16位有符号整型 |
| DT_QINT32 | tf.qint32 | 量化的32位有符号整型 |
| DT_QUINT8 | tf.uqint8 | 量化的8位无符号整型 |
| DT_QUINT16 | tf.uqint16 | 量化的16位无符号整型 |
基本执行流程
# 导入Tensorflow
import tensorflow as tf

#定义两个常量矩阵
m1 = tf.constant([[3,3]])
m2 = tf.constant([[2],[3]])

#计算矩阵乘积
product = tf.matmul(m1,m2)

#直接打印并不会输出矩阵乘积的结果
print(product)

#创建一个会话
sess = tf.Session()
#在会话中执行矩阵乘法
result = sess.run(product)
print(result)
#关闭会话,释放资源
sess.close()


#除了上面显示的关闭会话外,还可以使用with模块自动关闭
with tf.Session(config=tf.ConfigProto(allow_soft_placement=True, log_device_placement=True)) as sess:
    result = sess.run(product)
    print(result)
执行结果:
Tensor("MatMul_1:0", shape=(1, 1), dtype=int32)
[[15]]
[[15]]
选择运行设备
如果是使用 GPU,默认会在第一块 GPU 上执行,下面展示了指定在CPU 0上执行时程序代码:
import tensorflow as tf

m1 = tf.constant([[3,3]])
m2 = tf.constant([[2],[3]])

product = tf.matmul(m1,m2)
with tf.device('/cpu:0'):
    sess = tf.Session()
    result = sess.run(product)
    print(result)
    sess.close()
执行结果:
[[15]]
device 中的各个字符串含义如下:
- "/cpu:0":你机器的 CPU;
- "/gpu:0":你机器的第一个 GPU;
- "/gpu:1":你机器的第二个 GPU;
变量
需要注意的是,如果使用了变量,那么需要使用tf.global_variables_initializer()来初始化全局变量。
示例1
import tensorflow as tf

# 创建一个变量,初始化为[1,2]
x = tf.Variable([1,2])
y = tf.constant([3,3])

sub = tf.subtract(x,y)
add = tf.add(x,y)

# 增加一个变量初始化op
init = tf.global_variables_initializer()

with tf.Session() as sess:
    # 先运行变量初始化op
    sess.run(init)
    print(sess.run(sub))
    print(sess.run(add))
执行结果:
[-2 -1]
[4 5]
示例2
import tensorflow as tf

# 给变量起一个别名
state = tf.Variable(0,name='counter')
new_value  = tf.add(state,1)
# 赋值操作
update = tf.assign(state,new_value)

init = tf.global_variables_initializer()

with tf.Session() as sess:
    sess.run(init)
    print(sess.run(state))
    for _ in range(5):
        sess.run(update)
        print(sess.run(state))
执行结果:
0
1
2
3
4
5
Fetch 和 Feed
Fetch 操作
Fetch 指的是在一个会话中执行多个语句op:
import tensorflow as tf

input1 = tf.constant(3.0)
input2 = tf.constant(2.0)
input3 = tf.constant(5.0)

add = tf.add(input2,input3)
mul = tf.multiply(input1,add)

with tf.Session() as sess:
    #  同时取回多个计算结果
    result = sess.run([mul,add])
    print(result)
执行结果:
[21.0, 7.0]
Feed 操作
Feed 的数据以字典的形式传入。
import tensorflow as tf

# 使用占位符,只给出数据的类型,不指明数值
input1 = tf.placeholder(tf.float32)
input2 = tf.placeholder(tf.float32)
output = tf.multiply(input1,input2)

with tf.Session() as sess:
    print(sess.run(output,feed_dict={input1:[8.],input2:[2.]}))
执行结果:
[ 16.]


 浙公网安备 33010602011771号