【知识】CNN,因果卷积,拓展卷积和反卷积
CNN

通过上面的动态图片可以很好的理解卷积的过程。图中绿色的大矩阵是我们的输入,黄色的小矩阵是卷积核(kernel,filter),旁边的小矩阵是卷积后的输入,通常称为feature map。
从动态图中,我们可以很明白的看出卷积实际上就是加权叠加。
同时,从这个动态图可以很明显的看出,输出的维度小于输入的维度。如果我们需要输出的维度和输入的维度相等,这就需要填充(padding)。
在tensorflow中,我们一般直接调用API,以二维卷积为例:
tf.layers.conv2d(
    inputs,
    filters,
    kernel_size,
    strides=(1, 1),
    padding='valid',
    data_format='channels_last',
    dilation_rate=(1, 1),
    activation=None,
    use_bias=True,
    kernel_initializer=None,
    bias_initializer=tf.zeros_initializer(),
    kernel_regularizer=None,
    bias_regularizer=None,
    activity_regularizer=None,
    kernel_constraint=None,
    bias_constraint=None,
    trainable=True,
    name=None,
    reuse=None
)
其中inputs是一个4维的tensor,每维的含义由data_format参数决定。默认的是'channels_last',即老版API中的'NHWC',对应(batch, height, width, channels)。
filters也是一个4维的tensor,也就是我们CNN中的核心——卷积核。其每维与inputs意义不同:[filter_height, filter_width, in_channels, out_channels]。即[卷积核高度,卷积核宽度,输入通道数,输出通道数]。其中输入通道数就是inputs的通道数,表明我们每个卷积核进行in_channels次数次卷积,然后把这些结果都对位相加到一起形成最终结果。out_channels则表示我们有几个卷积核,有几个卷积核就输出几个图像。
所以对应上面的inputs和filter,其结果维度为:[batch,out_height,out_width,out_channels]。其中out_height,out_width由filters.shape,strides,padding方式共同决定。
具体可以参考:TF-卷积函数 tf.nn.conv2d 介绍。
因果卷积(causal convolution)
在处理序列问题时,因为要考虑时间,即时刻t只能考虑t时刻及之前的输入,所以不能使用普通的CNN卷积,于是因果卷积随即产生。
我们知道序列问题可以抽象为,根据x1......xt和y1.....yt-1去预测yt,使得yt接近于实际值。
它的样子是这样的:
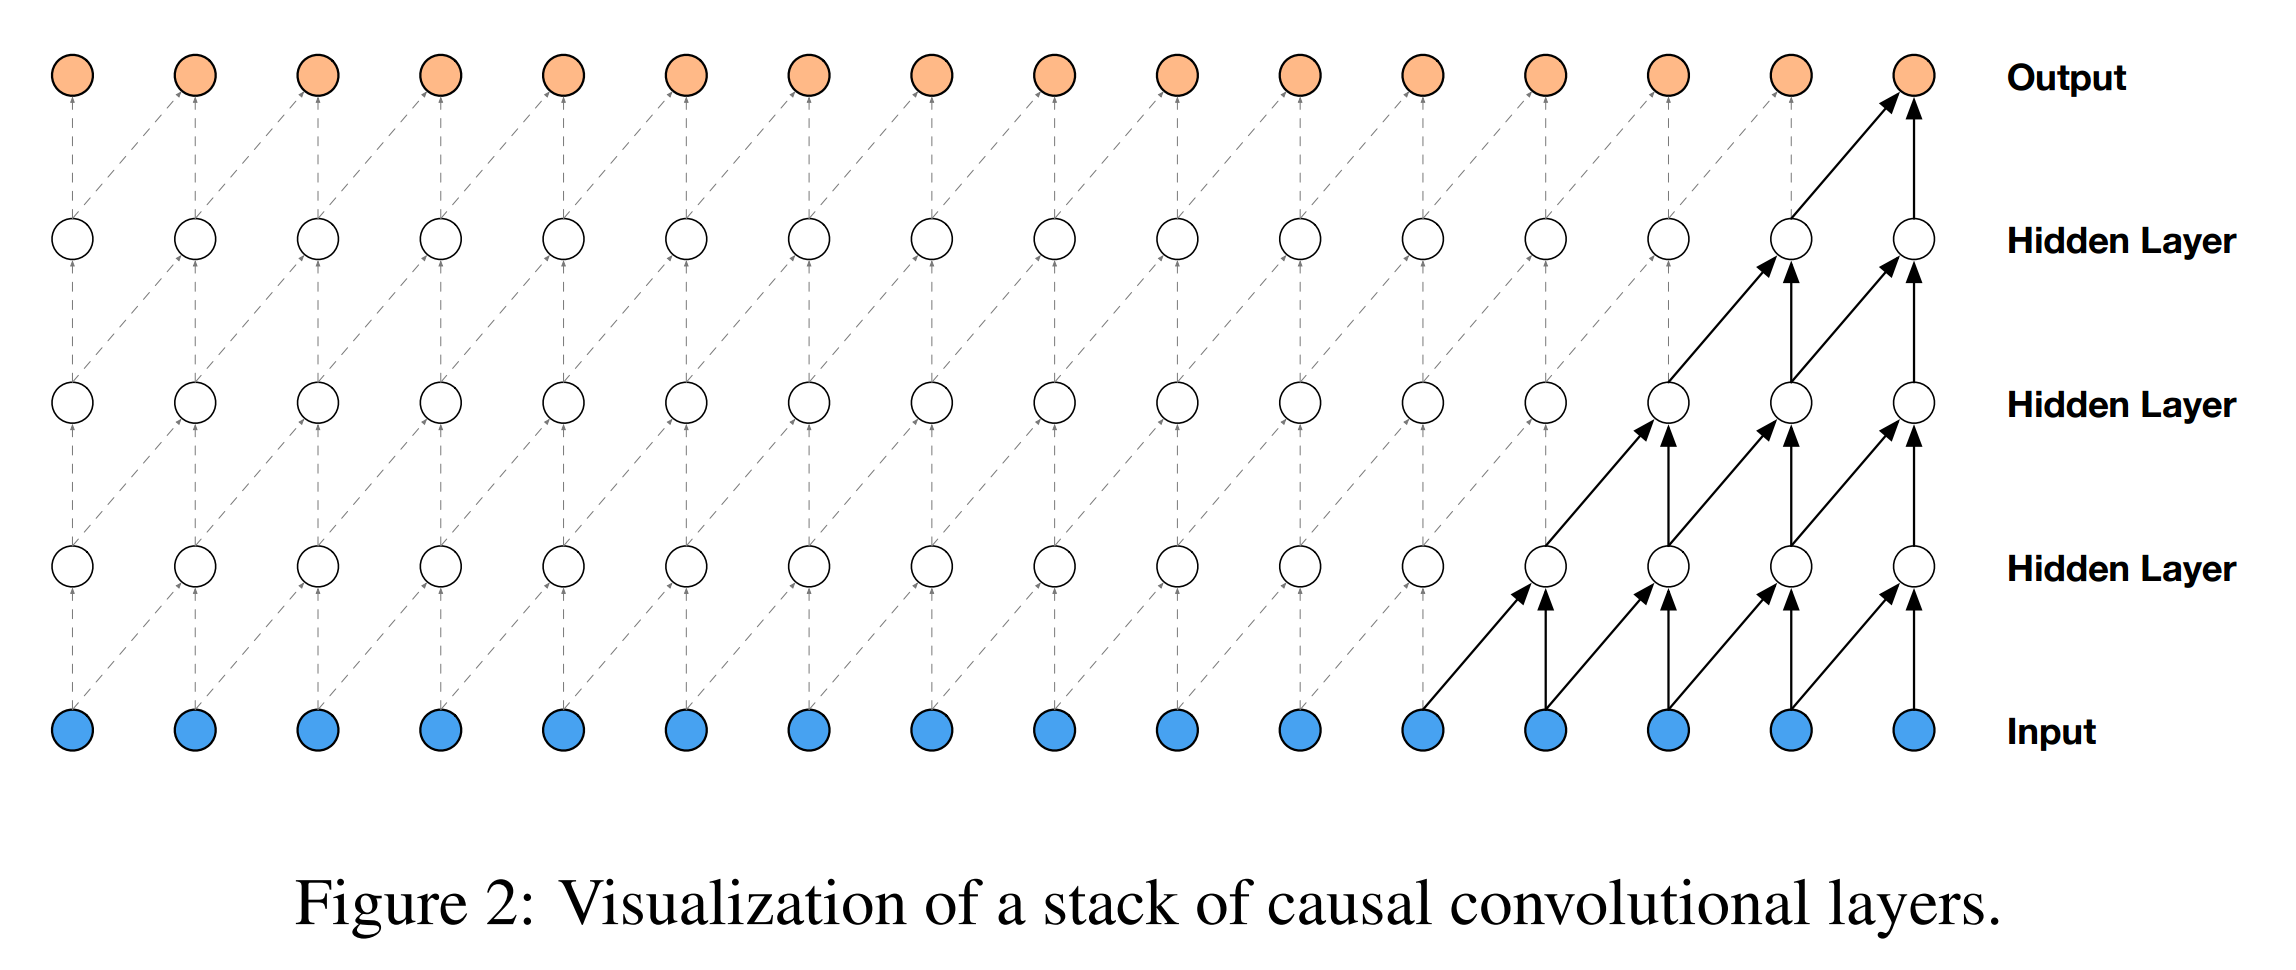
其中input中每个位置对应一个时间步,时间步内可以是多维的数据。
先按一维数据比较容易理解,则图中,卷积核就是一个2*1的卷积核,然后在第一层依次移动,最左边做padding,得到第二层,然后依层传递下去,即得到因果的效果。
但是这样会带来一个问题:想要感受野(receptive field)增大,要么增大卷积核,要么加深网络。卷积核增大会带来参数量,加深网络则会带来梯度消失,Internal Covariate Shift,训练不稳定难收敛等问题。
于是就有了因果拓展卷积,是因果卷积和拓展卷积和合体。
拓展卷积(dilated convolution)
前面也提到了,dilate convolution 可以使用较少的计算就能 cover 到较大的 receptive field。
其实其原理也很简单:
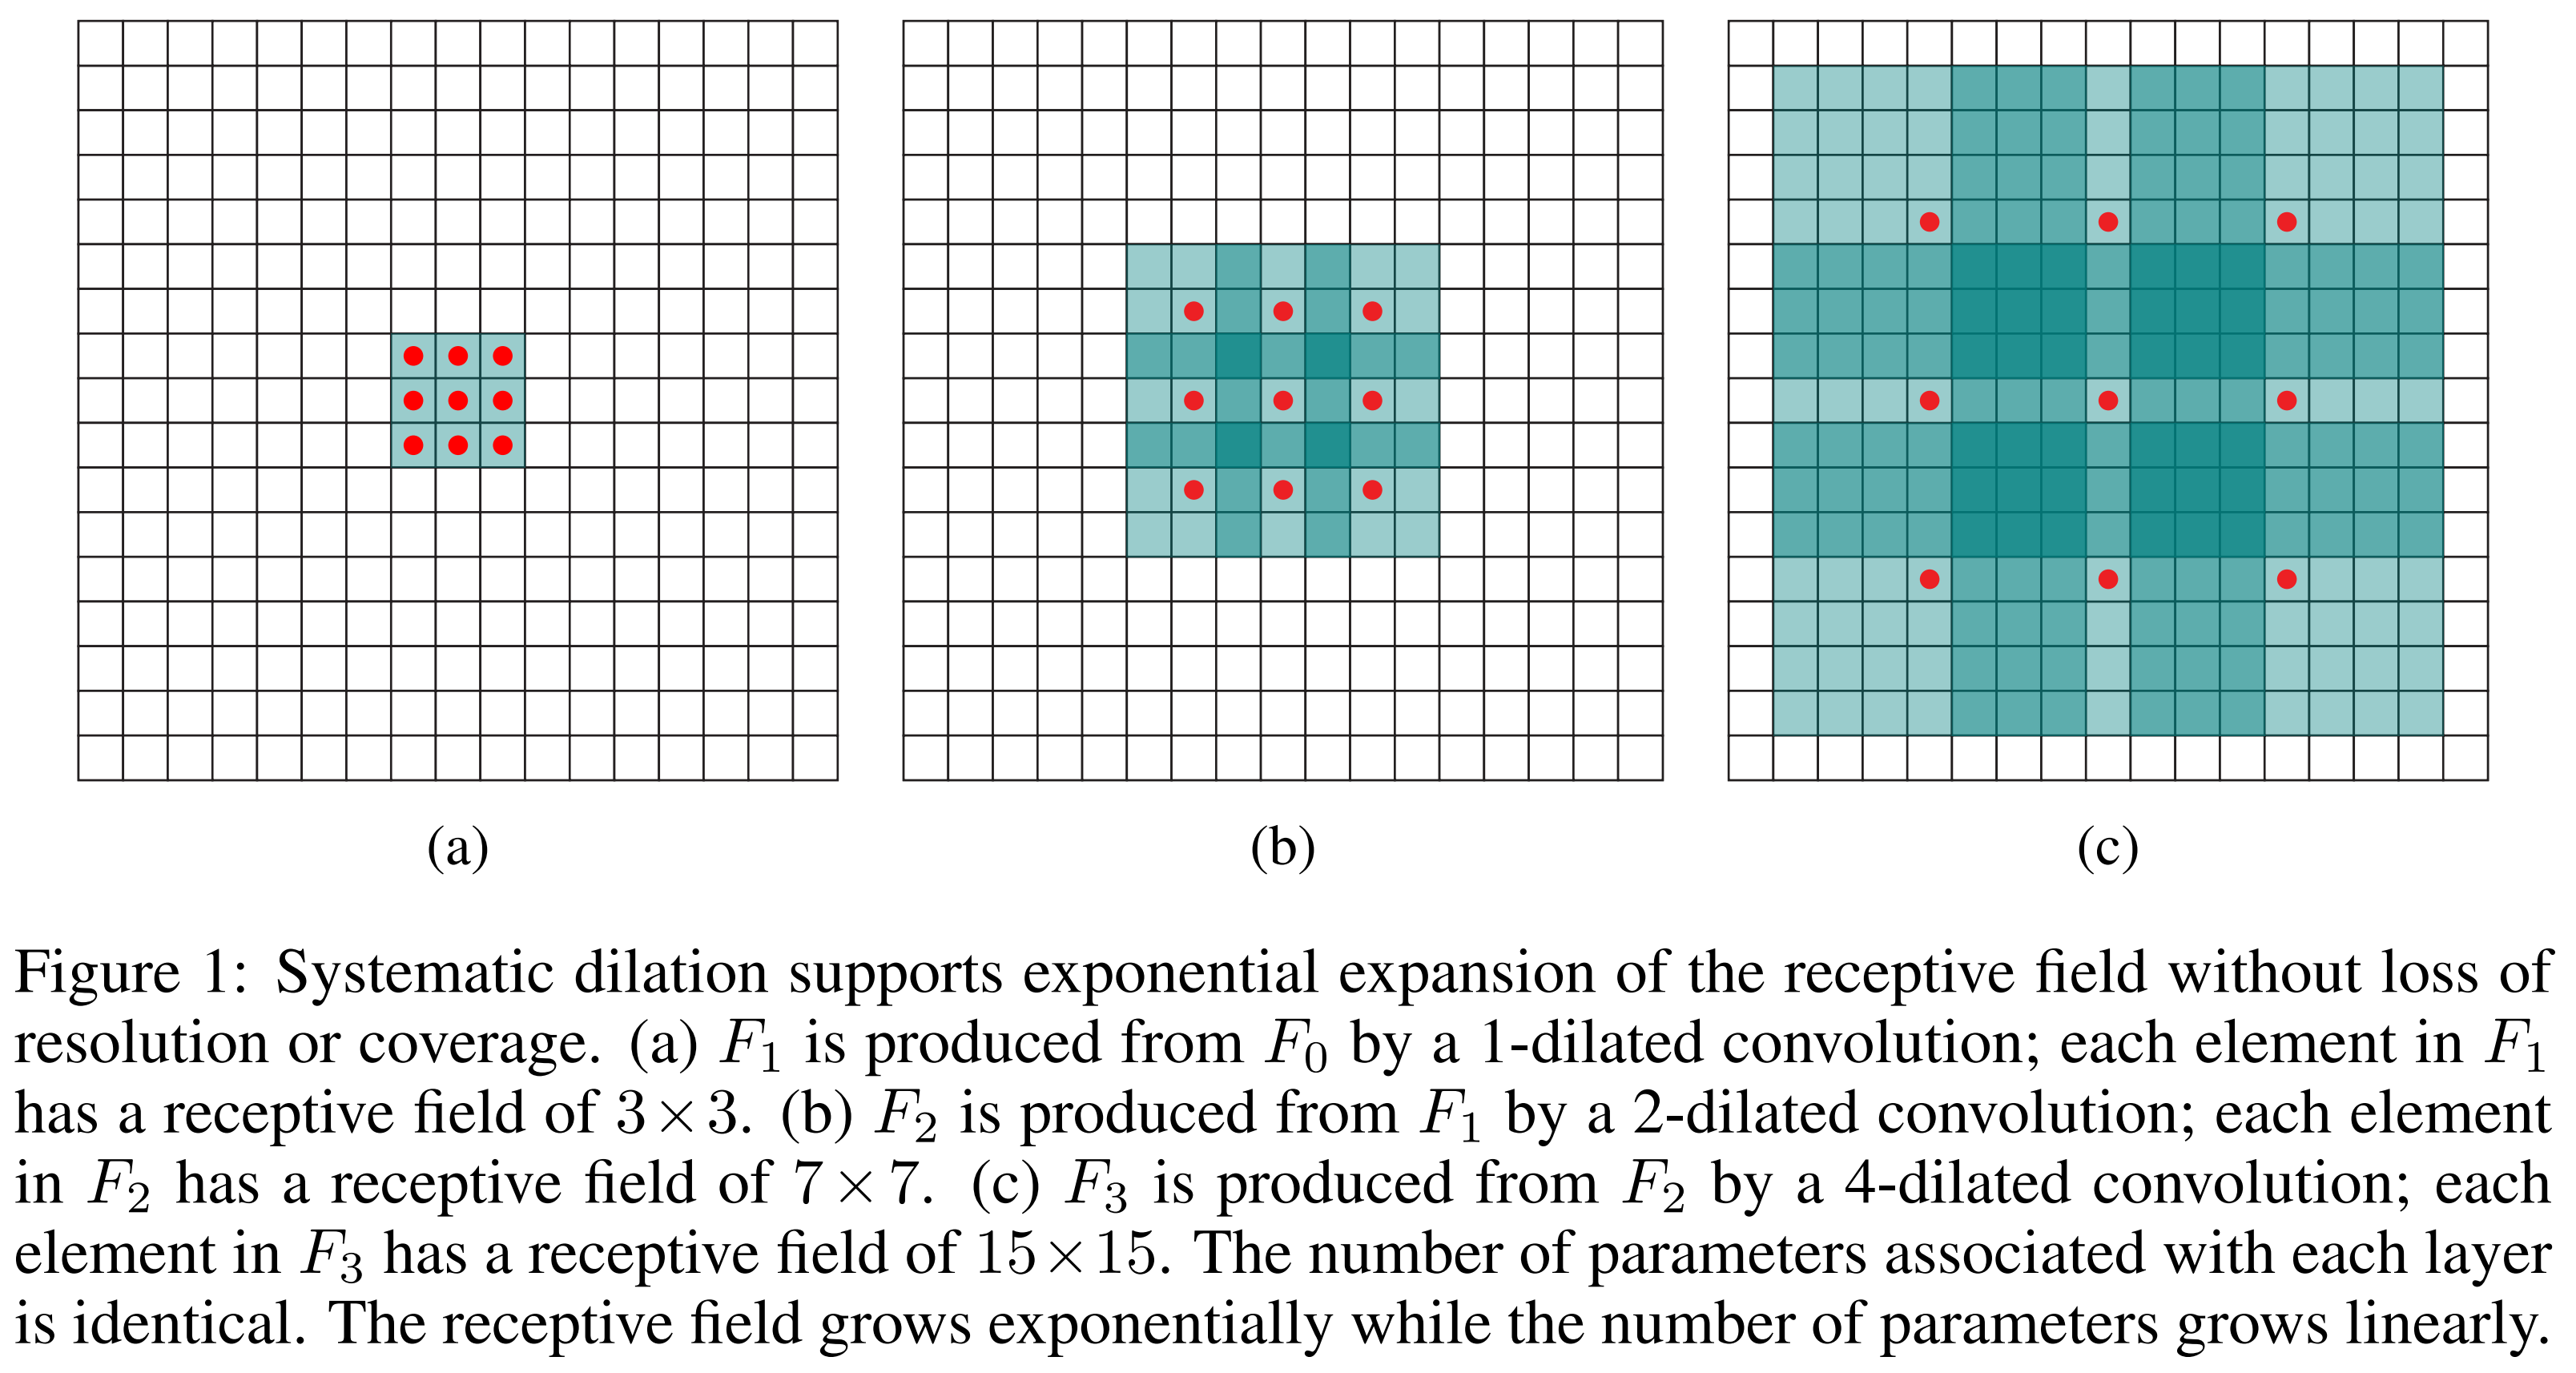
简单来说, dilate convolution 引入一个新的 hyper-parameter, dilate, 这个 hyper-parameter 的涵义是:每隔 dilate-1 个像素取一个” 像素”, 做卷积操作。
因果拓展卷积
这就可以解决因果卷积带来的问题,在示意图中,卷积感受野扩大了1,2,4,8倍。扩大卷积(dilated convolution)可以使模型在层数不大的情况下有非常大的感受野。
那么这个是怎么实现的呢?
因果拓展卷积出于Google DeepMind 2016论文WaveNet,所以源码参见:WaveNet源码。
不过源码可能略为晦涩,有个注释版本:谷歌WaveNet 源码详解
下面则是我个人的理解:
我先摘抄上面知乎大佬的含注释代码,并纠正其中padding方式和shape的错误。
def time_to_batch(value, dilation, name=None):
    with tf.name_scope('time_to_batch'):
        #测试中,传入的value的shape为(1,9,1)
        #dilation=4
        shape = tf.shape(value)
        #pad_elements计算为3
        pad_elements = dilation - 1 - (shape[1] + dilation - 1) % dilation
        #padded后的shape为(1,12,1)即在第二个维度后加3个零
        padded = tf.pad(value, [[0, 0], [0, pad_elements], [0, 0]])
        #reshape后的shape为(3,4,1)
        reshaped = tf.reshape(padded, [-1, dilation, shape[2]])
        #转置后的shape为(4,3,1)
        transposed = tf.transpose(reshaped, perm=[1, 0, 2])
        #最后返回的shape为(4,3,1)
        return tf.reshape(transposed, [shape[0] * dilation, -1, shape[2]])


def batch_to_time(value, dilation, name=None):
    with tf.name_scope('batch_to_time'):
        #(4,2,1)
        shape = tf.shape(value)
        prepared = tf.reshape(value, [dilation, -1, shape[2]])
        transposed = tf.transpose(prepared, perm=[1, 0, 2])
        #最后返回的是前面time_to_batch的最初输入数值的shape
        #(1,8,1)
        return tf.reshape(transposed,
                          [tf.div(shape[0], dilation), -1, shape[2]])

def causal_conv(value, filter_, dilation, name='causal_conv'):
    with tf.name_scope(name):
        # Pad beforehand to preserve causality.
        #测试中,filter_width=2
        filter_width = tf.shape(filter_)[0]
        #测试中,dilation设定为4
        #因此,padding为padding=[[0, 0], [4, 0], [0, 0]]
        padding = [[0, 0], [(filter_width - 1) * dilation, 0], [0, 0]]
        #测试中,value的shape为(1,5,1)
        #测试中,padding为在value的第二维度前面加4个零
        #padded的shape变为(1,9,1)
        padded = tf.pad(value, padding)
        if dilation > 1:
            #见time_to_batch函数测试
            #测试中,最后返回来的shape为(4,3,1)
            transformed = time_to_batch(padded, dilation)
            #(4,2,1)
            conv = tf.nn.conv1d(transformed, filter_, stride=1, padding='VALID')
            #最后返回最开始的shape形式
            restored = batch_to_time(conv, dilation)
        else:
            restored = tf.nn.conv1d(padded, filter_, stride=1, padding='VALID')
        # Remove excess elements at the end.
        result = tf.slice(restored,
                          [0, 0, 0],
                          [-1, tf.shape(value)[1], -1])
        #最后返回的结果形式和padding后的即padded数据shape一样
        return result
这里causal_conv方法就实现了一个因果拓展卷积。另外两个则是辅助方法。
怎么样,看完是不是一脸懵逼,这是啥啊。
其实没那么难,思想很简单。
我们从简单的测试数据出发:
value : [1,5,1],即timewindow设为了5,我们一次只处理5个时间步的数据。然后把它整理成卷积的形式,一个batch,里面有5个时间步,一个通道。
然后对它padding,前面pad4个0,后面pad3个0,前面不应该pad3个0就够了吗?后面又pad3个0什么意思?
其实是这样的,我们无法通过正常的卷积操作来完成隔几个像素点挑一个像素来卷积的操作,所以我们只能通过reshape的方法来完成这个操作。
我们假设原来的5个元素都是1,则开始(忽略batch和channel):
dilation=4 filter=2
value:[1,1,1,1,1]
padded: [0,0,0,0,1,1,1,1,1,0,0,0]
reshape:
0,0,0,0,
1,1,1,1,
1,0,0,0.
transform:
0,1,1,
0,1,0,
0,1,0,
0,0,0
我们去对应上面因果拓展卷积的图,我们是想要得到一个[1,5,1]的第二层结果的。第二层第一个元素就是只对第一层第一个元素和填补元素做卷积,后面第2,3,4个元素类似,第5个元素才是第一层1,5元素的卷积。
那么我们通过reshape+transfrom,做VALID填补方式的卷积,就可以得到满足要求的结果:[4,2,1]。展开就是[1,8,1],最后三个元素纯粹是为了让transform后的数据规整,最后通过tf.slice切片操作去掉即可。
所以可以看出,填补前4后3只是为了让数据规整,这样就可以理解上面的代码了。
至此我们实现了因果卷积,虽然在新版tensorflow API中,已经实现了这个,直接调用就好了。
后面WaveNet还借助这个卷积加入了Residual and Skipped Connection,完成了一个拓展卷积层,让模型更快收敛。该层的网络结构如注释中所示。
    def _create_dilation_layer(self, input_batch, layer_index, dilation):
        '''Creates a single causal dilated convolution layer.

        The layer contains a gated filter that connects to dense output
        and to a skip connection:

               |-> [gate]   -|        |-> 1x1 conv -> skip output
               |             |-> (*) -|
        input -|-> [filter] -|        |-> 1x1 conv -|
               |                                    |-> (+) -> dense output
               |------------------------------------|

        Where `[gate]` and `[filter]` are causal convolutions with a
        non-linear activation at the output.
        '''
        variables = self.variables['dilated_stack'][layer_index]

        weights_filter = variables['filter']
        weights_gate = variables['gate']

        #filter卷积
        conv_filter = causal_conv(input_batch, weights_filter, dilation)
        #gate卷积
        conv_gate = causal_conv(input_batch, weights_gate, dilation)

        #是否使用bias
        if self.use_biases:
            filter_bias = variables['filter_bias']
            gate_bias = variables['gate_bias']
            conv_filter = tf.add(conv_filter, filter_bias)
            conv_gate = tf.add(conv_gate, gate_bias)

        #gate和filter共同输出
        out = tf.tanh(conv_filter) * tf.sigmoid(conv_gate)

        # The 1x1 conv to produce the residual output
        #采用1×1卷积实现残差输出
        weights_dense = variables['dense']
        transformed = tf.nn.conv1d(
            out, weights_dense, stride=1, padding="SAME", name="dense")

        # The 1x1 conv to produce the skip output
        #采用1×1卷积实现skip输出
        weights_skip = variables['skip']
        #skip output
        skip_contribution = tf.nn.conv1d(
            out, weights_skip, stride=1, padding="SAME", name="skip")

        if self.use_biases:
            dense_bias = variables['dense_bias']
            skip_bias = variables['skip_bias']
            transformed = transformed + dense_bias
            skip_contribution = skip_contribution + skip_bias


        layer = 'layer{}'.format(layer_index)
        #加入summary
        tf.histogram_summary(layer + '_filter', weights_filter)
        tf.histogram_summary(layer + '_gate', weights_gate)
        tf.histogram_summary(layer + '_dense', weights_dense)
        tf.histogram_summary(layer + '_skip', weights_skip)
        if self.use_biases:
            tf.histogram_summary(layer + '_biases_filter', filter_bias)
            tf.histogram_summary(layer + '_biases_gate', gate_bias)
            tf.histogram_summary(layer + '_biases_dense', dense_bias)
            tf.histogram_summary(layer + '_biases_skip', skip_bias)

        #返回skip output作为本层的输出保存下来,最后所有层的输出sum起来,得到最终结果(见_create_network方法)和(残差+input)作为下层的输入
        return skip_contribution, input_batch + transformed

 #建立模型
    def _create_network(self, input_batch):
        '''Construct the WaveNet network.'''
        outputs = []
        current_layer = input_batch

        # Pre-process the input with a regular convolution
        if self.scalar_input:
            initial_channels = 1
        else:
            initial_channels = self.quantization_channels

        #初始层
        current_layer = self._create_causal_layer(current_layer)

        # Add all defined dilation layers.
        #建立dilated层,总共18层
        with tf.name_scope('dilated_stack'):
            for layer_index, dilation in enumerate(self.dilations):
                with tf.name_scope('layer{}'.format(layer_index)):
                    output, current_layer = self._create_dilation_layer(
                        current_layer, layer_index, dilation)
                    outputs.append(output)

        #postprocess层
        with tf.name_scope('postprocessing'):
            # Perform (+) -> ReLU -> 1x1 conv -> ReLU -> 1x1 conv to
            # postprocess the output.
            #创建后续处理层变量
            w1 = self.variables['postprocessing']['postprocess1']
            w2 = self.variables['postprocessing']['postprocess2']
            if self.use_biases:
                b1 = self.variables['postprocessing']['postprocess1_bias']
                b2 = self.variables['postprocessing']['postprocess2_bias']

            tf.histogram_summary('postprocess1_weights', w1)
            tf.histogram_summary('postprocess2_weights', w2)
            if self.use_biases:
                tf.histogram_summary('postprocess1_biases', b1)
                tf.histogram_summary('postprocess2_biases', b2)

            # We skip connections from the outputs of each layer, adding them
            # all up here.
            #将每一层的skip connection输出累加
            total = sum(outputs)
            transformed1 = tf.nn.relu(total)
            conv1 = tf.nn.conv1d(transformed1, w1, stride=1, padding="SAME")
            if self.use_biases:
                conv1 = tf.add(conv1, b1)
            transformed2 = tf.nn.relu(conv1)
            conv2 = tf.nn.conv1d(transformed2, w2, stride=1, padding="SAME")
            if self.use_biases:
                conv2 = tf.add(conv2, b2)

        return conv2
Reference
http://shuokay.com/2016/10/15/wavenet/
http://www.cnblogs.com/yangperasd/p/7071657.html
https://zhuanlan.zhihu.com/p/24568596
https://blog.csdn.net/a1154761720/article/details/53411365 1*1卷积核的作用

 浙公网安备 33010602011771号