

功能介绍
在Spring boot开发过程中,需要在配置文件里配置许多信息,如数据库的连接信息等,如果不加密,传明文,数据库就直接暴露了,相当于"裸奔"了,因此需要进行加密处理才行。
在项目中使用jasypt-1.9.4.jar包,能够实现对明文进行加密,对密文进行解密。配置相关加密信息,就能够实现在项目运行的时候,自动把配置文件中已经加密的信息解密成明文,供程序使用
使用说明
1.pom引入依赖
<dependency>
    <groupId>com.github.ulisesbocchio</groupId>
    <artifactId>jasypt-spring-boot-starter</artifactId>
    <version>2.1.1</version>
</dependency>
2.配置文件application.yaml
******************加解密相关配置*******************
jasypt:
    encrytor:
        #用来加解密的salt值
        password: 123456
        #用来使用新的算法,默认为org.jasypt.salt.NoOPIVGenerator,这样的话我们就无法使用命令行中生成的密文
        ivGeneratorClassname: org.jasypt.salt.RandomIVGenerator
参数解释:
- password:加密时候要使用salt值
- 对于ivGeneratorClassname,jara包中封装类默认为org.jasypt.salt.NoOpIVGenerator,这个时候我们如果使用Junit生成密文,那么只会生成24位密钥,与命令行中用命令生成的不一样,后面会详细讲解。
3.代码解析
首先我们需要知道的事加解密的方法,只有知道了如何加密才能够在配置文件中设置相关参数的密文,这里涉及到两种方式的加密:
a.命令行加密
如果我们项目上线了,需要修改配置文件中的信息,这个时候我们可能要通过命令行的方式去加密(前提:保证你的salt值和你的项目中定义的一致)
I.找到maven仓库本地地址,如:C:\Users\xxxxxxx\.m2\repository 在这里面找到jasypt-1.9.4.jar所在位置

II.进入文件夹,运行cmd命令
加密: java -cp jasypt-1.9.4.jar org.jasypt.intf.cli.JasyptPBEStringEncryptionCLI input=pass1234 password=12345 algorithm=PBEWithMD5AndDES
参数说明:
- input:加上需要加密的明文
- password:加上salt值(需要和项目中的application.yaml的password 一致)
- algorithm:加上加密算法(默认使用的就是PBEWithMD5AndDES)
这个时候我们可以看到下面的加密结果:
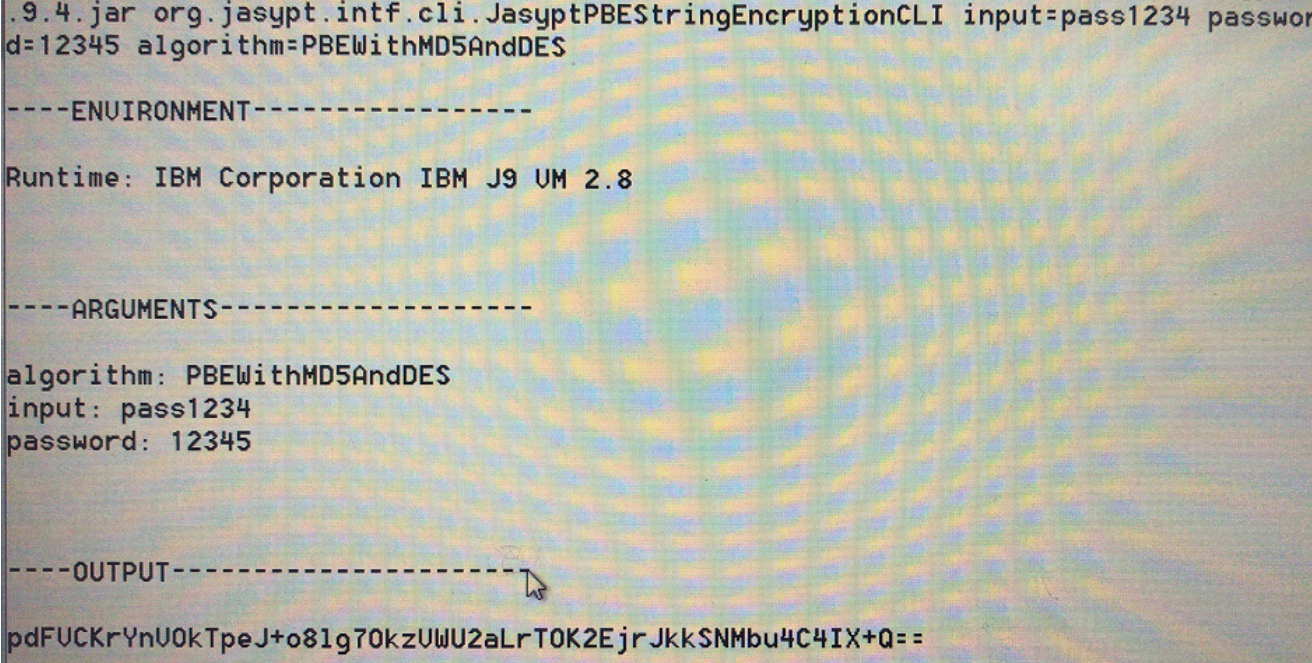
下面的output中就是我们对明文pass1234使用salt值为12345加密的结果
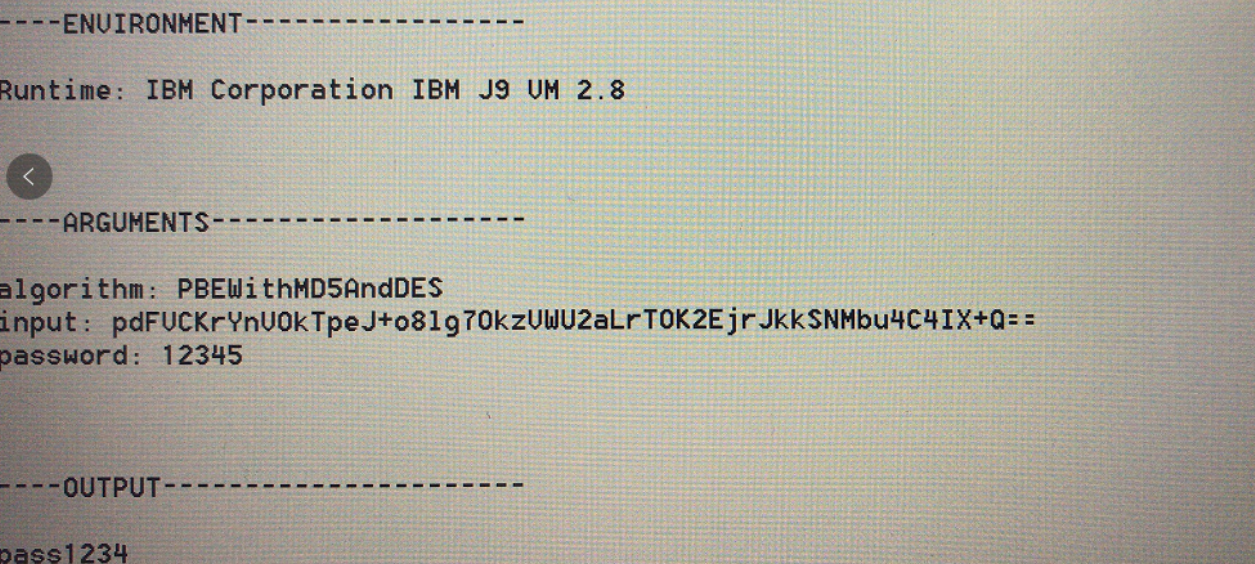
解密:java -cp jasypt-1.9.4.jar org.jasypt.intf.cli.JasyptPBEStringDecryptionCLI input=pdFVCKrYnVOkTpeJ+081g70kzVWV2aLrTOK2EjrJkkSNMbu4C4IX+Q== password=12345 algorithm=PBEWithMD5AndDES
这个时候我们可以看到解密结果:
b.在eclipse中用Junit运行代码对明文加密解密
前提已经在配置文件中配置了jasypt相关信息
jasypt提供了封装类StringEncryptor,可以通过代码来加解密,我们可以使用这个类运行相关方法
Junit相关代码:
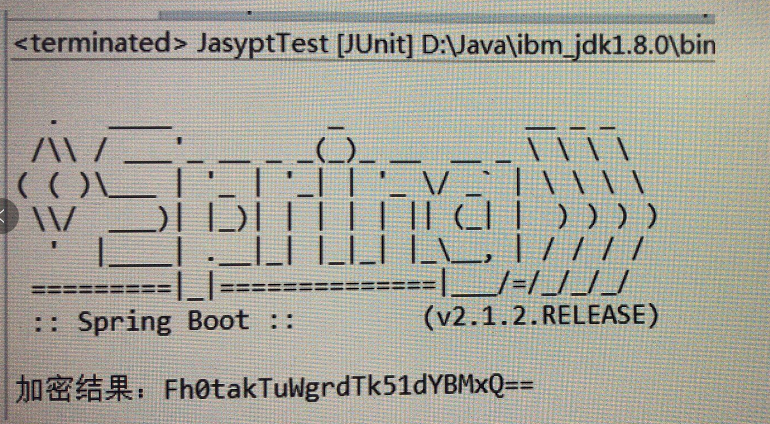
import org.jasypt.encryption.StringEncryptor;
import org.junit.Test;
import org.junit.runner.RunWith;
import org.springframework.beans.factory.annotation.Autowired;
import org.springframework.boot.context.embedded.EmbeddedServletContainerCustomizer;
import org.springframework.boot.test.context.SpringBootTest;
import org.springframework.test.context.junit4.SpringJUnit4ClassRunner;

import static sun.plugin.javascript.navig.JSType.Embed;

@RunWith(SpringJUnit4ClassRunner.class)
@SpringBootTest
public class JasyptTest {

    @Autowired
    StringEncryptor encryptor;
    //加密
    @Test
    public void getPass(){
        String name = encryptor.encrypt("hello");
        System.out.println("加密结果:"+name);//解密
    @Test
    public void passDecrypt(){
        String username = encryptor.decrypt("7uBC9fVLpL05ipEPzgsDT6Qcjuq9HvDYc0VUIgP4hY=");
        System.out.println("解密结果:"+username);
    }
}
运行结果如下:
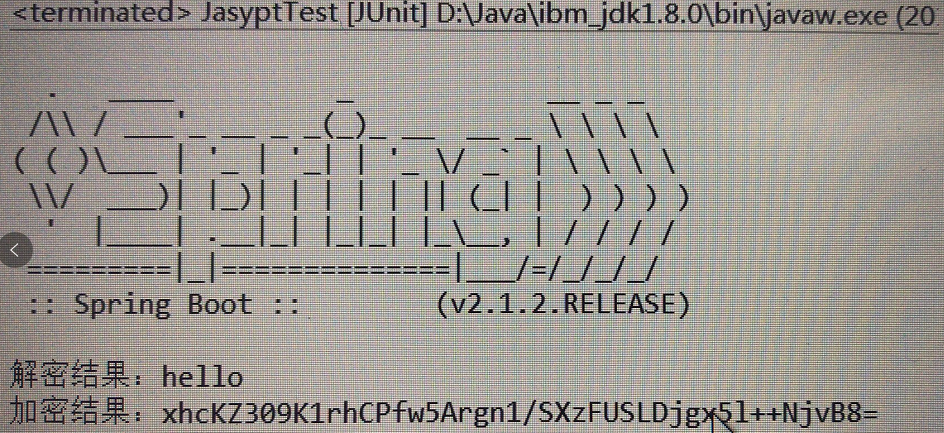
这个时候我们就得到了想要的密文,直接粘贴到配置文件中即可
使用方法如下:
I.在配置文件application.yaml相关位置把明文替换成密文,用ENC()包裹:
************** 加解密相关测试配置信息***************
test:
    code:
        username: ENC(pdFVCKrYnVOkTpeJ+081g70kzVWV2aLrTOK2EjrJkkSNMbu4C4IX+Q==)
II.在相应的位置直接读取使用即可,下面我们写一个controller类测试一下运行解密的效果:
import org.springframework.beans.factory.annotation.Value;
import org.springframework.web.bind.annotation.RequestMapping;
import org.springframework.web.bind.annotation.RestController;

@Controller
public class JasyptController {

     @Value("${cmd.username}")
    private String cmdUsername;

    @RequestMapping("/hello")
    public String testJasypt() {
        return cmdUserName;
    }
}
这个时候我们启动项目就能够看到我们再配置中设置的密文对应的明文
至此配置文件的加解密的使用方法就介绍完了
4.补充说明
对于上述配置文件中的ivGeneratorClassname再进行一个详细的介绍
对于上述的Junit中使用的StringEncryptor封装类,他是可以通过读取配置文件中的信息进行加解密相关参数进行初始化,通过阅读远吗,我们可以发现,初始化config的时候会跳转到如下的地方进行设置:
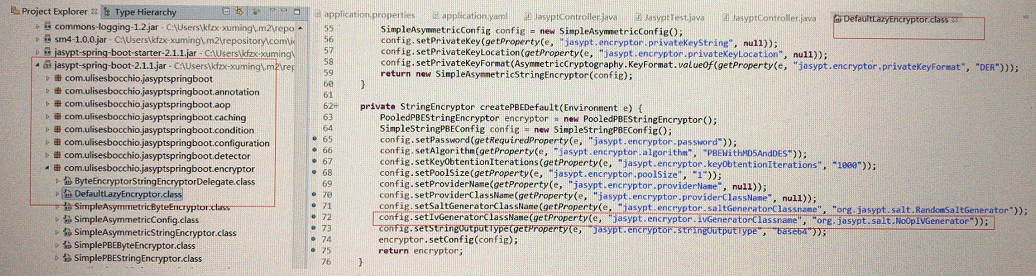
如果在配置参数中没有设置ivGeneratorClassname,那么默认就是org.jasypt.salt.NoOpIVGenerator,那么在运行加解密的时候就会生成一个24位的密文,如图:
但是我们可以看到上面用命令行生成的却比这个厂,这个时候如果我们把命令行中生成的密文粘贴到配置文件中则springboot就会启动不了,Junit也会报错解析,把这个密文用命令解析发现也会报错
这个说明命令行中的加解密不是通过StringEncryptor类来操作的,那是走那边的呢?
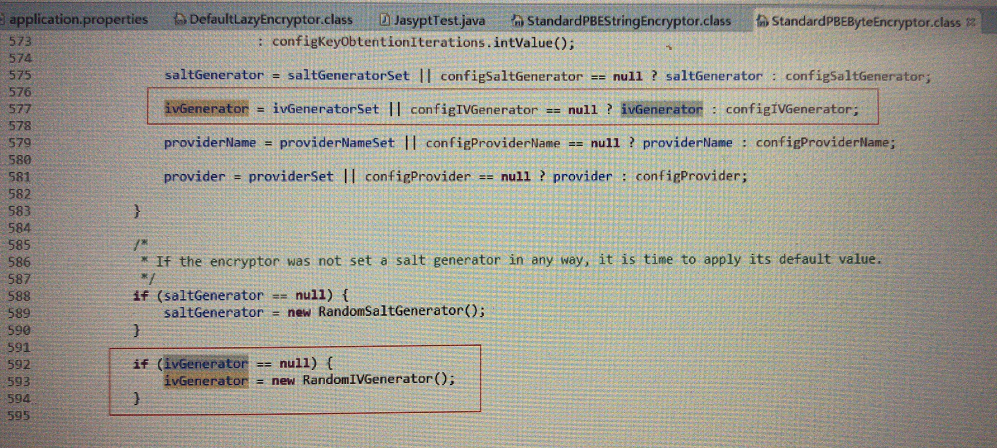
通过查阅资料我们发现了下面的代码:
package cn.linjk.ehome;

import org.jasypt.encryption.pbe.StandardPBEStringEncryptor;
import org.jasypt.encryption.pbe.config.EnvironmentPBEConfig;
import org.junit.Test;

public class JasyptTest {
    @Test
    public void testEncrypt() throws Exception {
        StandardPBEStringEncryptor standardPBEStringEncryptor = new StandardPBEStringEncryptor();
        EnvironmentPBEConfig config = new EnvironmentPBEConfig();

        config.setAlgorithm("PBEWithMD5AndDES");          // 加密的算法,这个算法是默认的
        config.setPassword("12345");                        // 加密的密钥
        standardPBEStringEncryptor.setConfig(config);
        String plainText = "hello";
        String encryptedText = standardPBEStringEncryptor.encrypt(plainText);
        System.out.println(encryptedText);
    }
}
这个时候我们运行一下,得到下面的结果:

把这个密文用命令进行解密发现也是成功的,查看源码(下图):可以看出,命令行如果没有设置ivGeneratorClassname那么默认就会new RandomIVGenerator,就是这一步导致了生成了不一样的密文:
综上所述,结合场景,如果我们是项目需要上线了,不方便运行Junit去生成密文,填入配置文件,需要用命令行对明文加密,那一定要在配置文件中设置ivGeneratorClassname值!!!
公司电脑没有办法用外网上,图片用手机拍的,如果感觉模糊,请见谅,大家相互学习~~~~~~
