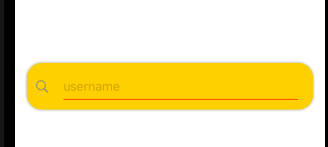
SwiftUI 中自定义输入框样式
效果图


import SwiftUI

struct ContentView: View {
    @State private var username:String = ""
    var body: some View {
        VStack {
            Text("输出:\(username)")
            TextField("username", text: $username)
//                .textContentType(.emailAddress)
//                .keyboardType(.emailAddress)//键盘样式
//                .autocapitalization(.none)//自动大写
//                .disableAutocorrection(true)//不自动提示
//                .accentColor(Color.red)//光标颜色
//                .border(Color.gray)
                .padding()
                .textFieldStyle(myTextFieldStyle())
                .textFieldStyle(UnderlineTextFieldStyle())
                .textFieldStyle(TextFieldCleanButtonStyle(text: $username))
        }

    }
}

struct TextFieldCleanButtonStyle: TextFieldStyle{
    @Binding var text: String
    func _body(configuration:TextField<Self._Label>)->some View{
        HStack{
            configuration
                .padding()
            if !text.isEmpty{
                Button {
                    self.text = ""
                } label: {
                    Image(systemName: "xmark.circle.fill")
                        .foregroundColor(Color.gray)
                }
                .padding(.trailing , 10)

            }
        }
//        .overlay(
//            RoundedRectangle(cornerRadius: 12)
//                .stroke(Color.gray,lineWidth: 1)
//        )
//        .padding(.horizontal , 10)
    }
}

struct myTextFieldStyle : TextFieldStyle{
    func _body(configuration:TextField<Self._Label>)->some View{
        HStack{
            Image(systemName: "magnifyingglass")
                .foregroundColor(Color.gray)
            configuration
//                .padding(.vertical,10)
        }
        .padding(.horizontal,10)
        .background(Color.yellow)
        .cornerRadius(20)
        .shadow(color: .gray, radius: 2)
    }
}


struct UnderlineTextFieldStyle: TextFieldStyle{
    func _body(configuration:TextField<Self._Label>)->some View{
        configuration
            .overlay(
                Rectangle()
                .frame(height:1).padding(.top ,35)
            )
            .foregroundColor(Color.pink)
//            .padding(10)
    }
}

struct ContentView_Previews: PreviewProvider {
    static var previews: some View {
        ContentView()
    }
}

