Apache(LAMP)网站升级配置https全流程详解
基本概念:
HTTP: 是互联网上应用最为广泛的一种网络协议,是一个客户端和服务器端请求和应答的标准,用于从WWW服务器传输超文本到本地浏览器的传输协议,它可以使浏览器更加高效,使网络传输减少。
HTTPS:是以安全为目标的HTTP通道,简单讲是HTTP的安全版。即HTTP下加入SSL层,HTTPS的安全基础是SSL,因此加密的详细内容就需要SSL。
谷歌、火狐等浏览器厂商也已经扛起HTTPS大旗,对于HTTP站点会提示不安全警告。而且像谷歌、百度等搜索引擎也早已响应HTTPS号召,都声称对HTTPS站点页面友好甚至优先抓取,排名靠前,当然具体实际实施情况就另当别论了。要让互联网站点都升级到HTTPS协议还需一段时间,但不可否认HTTPS是大势所趋。
网站环境:
操作系统:centos6.5 x64 (阿里云ECS服务器)
web服务:Apache 2.4+
免费证书商家:Let's Encrypt SSL
网站程序: ZSITE企业门户系统
操作流程:
1.安装证书
Let's Encrypt SSL免费证书,有效期3个月,需要定期更新。( 更多国内外免费SSL证书推荐参考)
安装SSL证书可以使用 certbot 工具,操作十分简单方便。
下载 certbot,并设置权限:
wget https://dl.eff.org/certbot-auto
chmod a+x certbot-auto
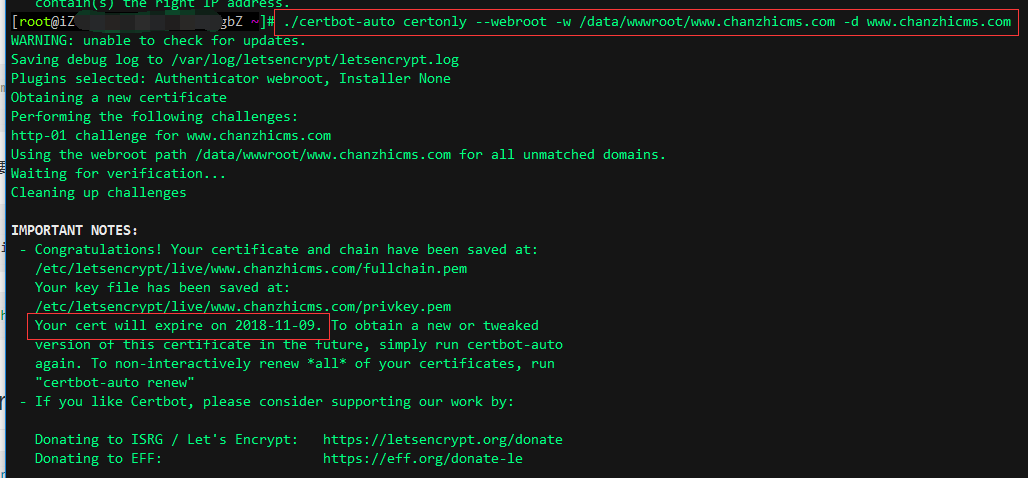
使用certbot申请安装证书:
./certbot-auto certonly --webroot --apache -w /data/wwwroot/www.chanzhicms.com -d www.chanzhicms.com --no-self-upgrade
-w后面是网站的根目录路径,-d后面是申请证书的域名,多个域名的话,在后面继续添加设置多个-d即可。

申请成功后,可以查看到SSL证书的有效截止日期。申请的证书默认存放在 /etc/letsencrypt 目录下。

2.修改Apache配置文件
设置apache的配置文件 /usr/local/apache/conf/httpd.conf,要修改两个地方,找到下面两行将其前面的#去掉即可。
LoadModule ssl_module modules/mod_ssl.so
Include conf/extra/httpd-ssl.conf
然后修改/usr/local/apache/conf/extra/httpd-ssl.conf 文件,将里面内容清空,放入下面内容:
Listen 443
AddType application/x-x509-ca-cert .crt
AddType application/x-pkcs7-crl .crl
SSLCipherSuite EECDH+CHACHA20:EECDH+CHACHA20-draft:EECDH+AES128:RSA+AES128:EECDH+AES256:RSA+AES256:EECDH+3DES:RSA+3DES:!MD5
SSLProxyCipherSuite EECDH+CHACHA20:EECDH+CHACHA20-draft:EECDH+AES128:RSA+AES128:EECDH+AES256:RSA+AES256:EECDH+3DES:RSA+3DES:!MD5
SSLHonorCipherOrder on
SSLProtocol all -SSLv2 -SSLv3
SSLProxyProtocol all -SSLv2 -SSLv3
SSLPassPhraseDialog builtin
SSLSessionCache "shmcb:/usr/local/apache/logs/ssl_scache(512000)"
SSLSessionCacheTimeout 300
Mutex sysvsem default
SSLStrictSNIVHostCheck on
最后修改网站的单独配置文件,/usr/local/apache/conf/vhost/www.chanzhicm.com.conf ,原本只有80端口配置,这里需要我们加上443端口的配置:
    ServerAdmin admin@linuxeye.com
    DocumentRoot "/data/wwwroot/www.chanzhicms.com"
    ServerName www.chanzhicms.com
    ServerAlias chanzhicms.com
    ErrorLog "/data/wwwlogs/www.chanzhicms.com_error_apache.log"
    CustomLog "/data/wwwlogs/www.chanzhicms.com_apache.log" combined    SetOutputFilter DEFLATE
    Options FollowSymLinks ExecCGI
    Require all granted
    AllowOverride All
    Order allow,deny
    Allow from all
    DirectoryIndex index.html index.phpListen 443    DocumentRoot "/data/wwwroot/www.chanzhicms.com"
    ServerName www.chanzhicms.com:443
    ServerAlias www.chanzhicms.com
    ErrorLog "/data/wwwlogs/www.chanzhicms.com_error_apache.log"
    ServerAdmin admin@linuxeye.com
    SSLEngine on
    SSLCertificateFile /etc/letsencrypt/live/www.chanzhicms.com/fullchain.pem
    SSLCertificateKeyFile /etc/letsencrypt/live/www.chanzhicms.com/privkey.pem
            SetOutputFilter DEFLATE
        Options FollowSymLinks
        AllowOverride All
        Order allow,deny
        Allow from all
        DirectoryIndex index.html index.php
        Require all granted
上面配置中的网站名称、网站路径、证书路径等信息,大家根据自己的具体情况填写。
注意:
这里必须要特别强调一点,因为我的Apache版本是2.4+的,在Directory中,一定要加上一条 Require all granted ,否侧会出现网站HTTP访问正常,但https访问提示 403 forbidden。这条命令是apache2.4新增加的,用以替代allow,deny以及order指令。
最后, 重启Apache!重启Apache!重启Apache!
使用https访问网站,查看是否生效。
3.更新证书
证书快到期时,我在使用 certbot-auto renew 命令进行证书更新:
certbot-auto renew --no-self-upgrade
成功后,检查更新到期日期
./certbot-auto certificates
证书到期之前会有邮件提醒,这里介绍修改新订阅邮箱的方法:
./certbot-auto update_account --email 963370407@qq.com --no-self-upgrade
使用 crontab 自动续期证书
每隔两三个月更新一次证书,万一忘了怎么办?有木有版本让系统自动定期更新呢?当然可以,这里就需要用到 crontab 工具。
如果系统没有 crontab ,则先安装:
yum install vixie-cron crontabs //安装Crontab
chkconfig crond on //设为开机自启动
service crond start //启动
/var/spool/cron 这里是所有的自动执行任务的 cron 文件存放位置(root文件)
在/var/spool/cron/root文件里添加:
30 20 1 * * /root/certbot-auto renew --no-self-upgrade
即每月1号晚上8点半更新证书。
重启服务生效:
service crond restart
查看crontab定时执行任务列表
crontab -l
4.常见问题
1.升级HTTPS后,前台界面样式错乱。
蝉知系统用户升级https后,如果前台界面样式错乱,可以尝试在后台--站点--网络 中关闭 CDN 功能。
2.安装证书时提示错误,无法对网站进行验证。
这个问题折腾了半天,最后在stackoverflow上看到类似问题,有人提及跟cdn有关,因为我把域名都添加了百度CDN云加速,所以就把CDN去除试了下,没想到问题真的解决了。这里也记一下,或许对大家有帮助。
3.网站http://访问正常,但https://访问提示 403 forbidden。
因为我的Apache版本是2.4+的,在Directory中,一定要加上一条 Require all granted ,否侧会出现网站HTTP访问正常,但https访问提示 403 forbidden。这条命令是apache2.4新增加的,用以替代allow,deny以及order指令。
4.更新SSL证书时卡住在Installing Python packages...不动。
证书只能免费试用3个月,后期更新ssl证书时出现了问题,卡在Installing Python packages不动,如下图:
我用的是阿里云的ECS服务器centos6.5 x64。解决这个问题只需要修改下pip.conf文件,将阿里云的镜像改为清华的镜即可。方法如下:
vim ~/.pip/pip.conf
[global]
index-url=https://pypi.tuna.tsinghua.edu.cn/simple/
[install]
trusted-host=pypi.tuna.tsinghua.edu.cn
改保存后,再试试 ./certbot-auto renew --no-self-upgrade 就正常了。
5.更新证书时,提示错误 The manual plugin is not working。
更新证书时,如果提示如下错误:
Attempting to renew cert (www.chanzhicms.com) from /etc/letsencrypt/renewal/www.chanzhicms.com.conf produced an unexpected error: The manual plugin is not working; there may be problems with your existing configuration.
The error was: PluginError('An authentication script must be provided with --manual-auth-hook when using the manual plugin non-interactively.',). Skipping.
All renewal attempts failed. The following certs could not be renewed:
  /etc/letsencrypt/live/www.chanzhicms.com/fullchain.pem (failure)
解决方法:
创建手动授权脚本,输入如下命令
vim /etc/letsencrypt/renewal/www.chanzhicms.com.sh
#!/bin/bash
echo $CERTBOT_VALIDATION > /path/to/wwwroot/.well-known/acme-challenge/$CERTBOT_TOKEN
其中,/path/to/wwwroot/ 为您域名验证的网站根目录
使脚本可执行:
chmod +x /etc/letsencrypt/renewal/www.chanzhicms.com.sh
带参数执行命令
certbot-auto renew --no-self-upgrade --manual-auth-hook /etc/letsencrypt/renewal/www.chanzhicms.com.sh
成功后,检查更新到期日期
./certbot-auto certificates --no-self-upgrade
小结:
网站升级https其实并不复杂,只是一些细节问题上可能会因环境而异,所以不要盲目地仿照他人操作流程,一定要先看服务器环境。其次,因为https使用443端口,所以服务器防火墙要放开443端口访问,我用的阿里云服务器,还会涉及到安全策略设置,所以在操作时,注意检查端口是否监听。


【推荐】编程新体验,更懂你的AI,立即体验豆包MarsCode编程助手
【推荐】凌霞软件回馈社区,博客园 & 1Panel & Halo 联合会员上线
【推荐】抖音旗下AI助手豆包,你的智能百科全书,全免费不限次数
【推荐】博客园社区专享云产品让利特惠,阿里云新客6.5折上折
【推荐】轻量又高性能的 SSH 工具 IShell:AI 加持,快人一步
· 一个奇形怪状的面试题:Bean中的CHM要不要加volatile?
· [.NET]调用本地 Deepseek 模型
· 一个费力不讨好的项目,让我损失了近一半的绩效!
· .NET Core 托管堆内存泄露/CPU异常的常见思路
· PostgreSQL 和 SQL Server 在统计信息维护中的关键差异
· DeepSeek “源神”启动!「GitHub 热点速览」
· 我与微信审核的“相爱相杀”看个人小程序副业
· 上周热点回顾(2.17-2.23)
· 如何使用 Uni-app 实现视频聊天(源码,支持安卓、iOS)
· C# 集成 DeepSeek 模型实现 AI 私有化(本地部署与 API 调用教程)
2017-10-12 浅析PHP中处理HTML特殊字符转换