点亮你的Vue技术栈,万字Nuxt.js实践笔记来了
前言#
作为一位 Vuer(vue开发者),如果还不会这个框架,那么你的 Vue 技术栈还没被点亮。
Nuxt.js 是什么
Nuxt.js 官方介绍:
Nuxt.js 是一个基于 Vue.js 的通用应用框架。
通过对客户端/服务端基础架构的抽象组织,Nuxt.js 主要关注的是应用的 UI渲染。
我们的目标是创建一个灵活的应用框架,你可以基于它初始化新项目的基础结构代码,或者在已有 Node.js 项目中使用 Nuxt.js。
Nuxt.js 预设了利用 Vue.js 开发服务端渲染的应用所需要的各种配置。
如果你熟悉 Vue.js 的使用,那你很快就可以上手 Nuxt.js。开发体验也和 Vue.js 没太大区别,相当于为 Vue.js 扩展了一些配置。当然你对 Node.js 有基础,那就再好不过了。
Nuxt.js 解决什么问题
现在 Vue.js 大多数用于单页面应用,随着技术的发展,单页面应用已不足以满足需求。并且一些缺点也成为单页面应用的通病,单页面应用在访问时会将所有的文件进行加载,首屏访问需要等待一段时间,也就是常说的白屏,另外一点是总所周知的 SEO 优化问题。
Nuxt.js 的出现正好来解决这些问题,如果你的网站是偏向社区需要搜索引擎提供流量的项目,那就再合适不过了。
我的第一个 Nuxt.js 项目
我在空闲的时间也用 Nuxt.js 仿掘金 web 网站:
nuxt-juejin-project 是一个使用 Nuxt.js 仿写掘金的学习项目,主要使用 :nuxt + koa + vuex + axios + element-ui。该项目所有数据与掘金同步,因为接口都是通过 koa 作为中间层转发。主要页面数据通过服务端渲染完成。
在项目完成后的几天,我将记录的笔记整理一下,并加入一些常用的技术点,最后有了这篇文章,希望能够帮到正在学习的小伙伴。
项目介绍里有部分截图,如果jio得可以,请来个 star😜~
项目地址:https://github.com/ChanWahFung/nuxt-juejin-project
基础应用与配置#
项目的搭建参照官网指引,跑个项目相信难不到你们,这里不赘述了。
🏃♀️跑起来 https://www.nuxtjs.cn/guide/installation
关于项目的配置,我选择的是:
- 服务端:Koa
- UI框架:Element UI
- 测试框架:None
- Nuxt模式:Universal
- 使用集成的 Axios
- 使用 EsLint
context
context 是从 Nuxt 额外提供的对象,在"asyncData"、"plugins"、"middlewares"、"modules" 和 "store/nuxtServerInit" 等特殊的 Nuxt 生命周期区域中都会使用到 context。
所以,想要使用 Nuxt.js,我们必须要熟知该对象的有哪些可用属性。
context 官方文档描述戳这里 https://www.nuxtjs.cn/api/context
下面我列举几个在实际应用中比较重要且常用的属性:
app
app 是 context 中最重要的属性,就像我们 Vue 中的 this,全局方法和属性都会挂载到它里面。因为服务端渲染的特殊性,很多Nuxt提供的生命周期都是运行在服务端,也就是说它们会先于 Vue 实例的创建。因此在这些生命周期中,我们无法通过 this 去获取实例上的方法和属性。使用 app 可以来弥补这点,一般我们会把全局的方法同时注入到 this 和 app 中,在服务端的生命周期中使用 app 去访问该方法,而在客户端中使用 this,保证方法的共用。
举个例子:
假设 $axios 已被同时注入,一般主要数据通过 asyncData (该生命周期发起请求,将获取到的数据交给服务端拼接成html返回) 去提前请求做服务端渲染,而次要数据通过客户端的 mounted 去请求。
export default {
async asyncData({ app }) {
// 列表数据
let list = await app.$axios.getIndexList({
pageNum: 1,
pageSize: 20
}).then(res => res.s === 1 ? res.d : [])
return {
list
}
},
data() {
return {
list: [],
categories: []
}
},
async mounted() {
// 分类
let res = await this.$axios.getCategories()
if (res.s === 1) {
this.categories = res.d
}
}
}
store
store 是 Vuex.Store 实例,在运行时 Nuxt.js 会尝试找到是应用根目录下的 store 目录,如果该目录存在,它会将模块文件加到构建配置中。
所以我们只需要在根目录的 store 创建模块js文件,即可使用。
/store/index.js :
export const state = () => ({
list: []
})
export const mutations = {
updateList(state, payload){
state.list = payload
}
}
而且 Nuxt.js 会很贴心的帮我们将 store 同时注入,最后我们可以在组件这样使用::
export default {
async asyncData({ app, store }) {
let list = await app.$axios.getIndexList({
pageNum: 1,
pageSize: 20
}).then(res => res.s === 1 ? res.d : [])
// 服务端使用
store.commit('updateList', list)
return {
list
}
},
methods: {
updateList(list) {
// 客户端使用,当然你也可以使用辅助函数 mapMutations 来完成
this.$store.commit('updateList', list)
}
}
}
为了明白 store 注入的过程,我翻阅 .nuxt/index.js 源码(.nuxt 目录是 Nuxt.js 在构建运行时自动生成的),大概知道了流程。首先在 .nuxt/store.js 中,对 store 模块文件做出一系列的处理,并暴露 createStore 方法。然后在 .nuxt/index.js 中,createApp方法会对其同时注入:
import { createStore } from './store.js'
async function createApp (ssrContext) {
const store = createStore(ssrContext)
// ...
// here we inject the router and store to all child components,
// making them available everywhere as `this.$router` and `this.$store`.
// 注入到this
const app = {
store
// ...
}
// ...
// Set context to app.context
// 注入到context
await setContext(app, {
store
// ...
})
// ...
return {
store,
app,
router
}
}
除此之外,我还发现 Nuxt.js 会通过 inject 方法为其挂载上 plugin(plugin 是挂载全局方法的主要途径,后面会讲到,不知道可以先忽略),也就是说在 store 里,我们可以通过 this 访问到全局方法:
export const mutations = {
updateList(state, payload){
console.log(this.$axios)
state.list = payload
}
}
params、query
params 和 query 分别是 route.params 和 route.query 的别名。它们都带有路由参数的对象,使用方法也很简单。这个没什么好说的,用就完事了。
export default {
async asyncData({ app, params }) {
let list = await app.$axios.getIndexList({
id: params.id,
pageNum: 1,
pageSize: 20
}).then(res => res.s === 1 ? res.d : [])
return {
list
}
}
}
redirect
该方法重定向用户请求到另一个路由,通常会用在权限验证。用法:redirect(params),params 参数包含 status(状态码,默认为302)、path(路由路径)、query(参数),其中 status 和 query 是可选的。当然如果你只是单纯的重定向路由,可以传入路径字符串,就像 redirect('/index')。
举个例子:
假设我们现在有个路由中间件,用于验证登录身份,逻辑是身份没过期则不做任何事情,若身份过期重定向到登录页。
export default function ({ redirect }) {
// ...
if (!token) {
redirect({
path: '/login',
query: {
isExpires: 1
}
})
}
}
error
该方法跳转到错误页。用法:error(params) ,params 参数应该包含 statusCode 和 message 字段。在实际场景中,总有一些不按常理的操作,页面因此无法展示真正想要的效果,使用该方法进行错误提示还是有必要的。
举个例子:
标签详情页面请求数据依赖于 query.name,当 query.name 不存在时,请求无法返回可用的数据,此时跳转到错误页
export default {
async asyncData({ app, query, error }) {
const tagInfo = await app.$api.getTagDetail({
tagName: encodeURIComponent(query.name)
}).then(res => {
if (res.s === 1) {
return res.d
} else {
error({
statusCode: 404,
message: '标签不存在'
})
return
}
})
return {
tagInfo
}
}
}
Nuxt常用页面生命周期
asyncData
你可能想要在服务器端获取并渲染数据。Nuxt.js添加了asyncData方法使得你能够在渲染组件之前异步获取数据。
asyncData 是最常用最重要的生命周期,同时也是服务端渲染的关键点。该生命周期只限于页面组件调用,第一个参数为 context。它调用的时机在组件初始化之前,运作在服务端环境。所以在 asyncData 生命周期中,我们无法通过 this 引用当前的 Vue 实例,也没有 window 对象和 document 对象,这些是我们需要注意的。
一般在 asyncData 会对主要页面数据进行预先请求,获取到的数据会交由服务端拼接成 html 返回前端渲染,以此提高首屏加载速度和进行 seo 优化。
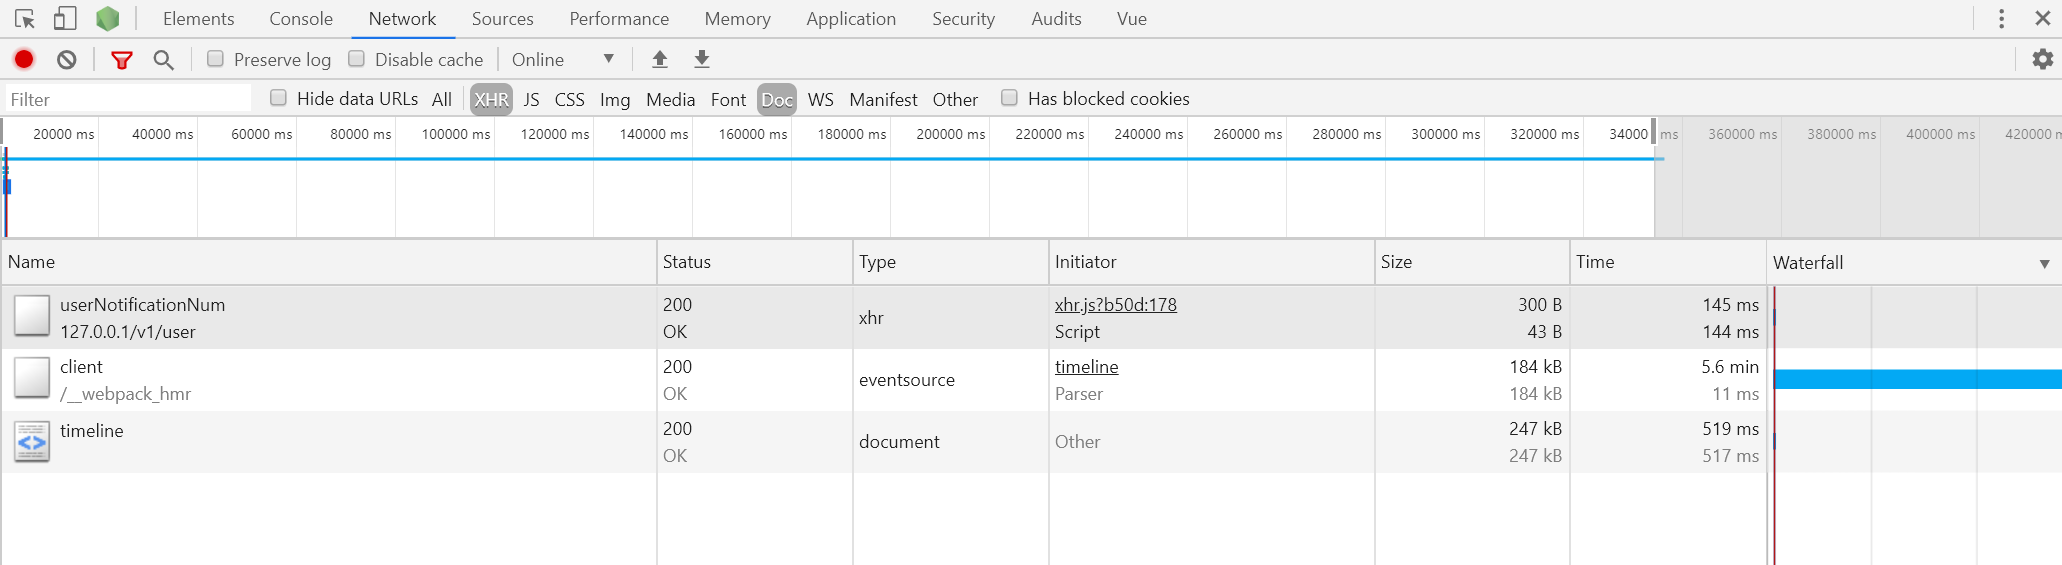
看下图,在谷歌调试工具中,看不到主要数据接口发起请求,只有返回的 html 文档,证明数据在服务端被渲染。
最后,需要将接口获取到的数据返回:
export default {
async asyncData({ app }) {
let list = await app.$axios.getIndexList({
pageNum: 1,
pageSize: 20
}).then(res => res.s === 1 ? res.d : [])
// 返回数据
return {
list
}
},
data() {
return {
list: []
}
}
}
值得一提的是,asyncData 只在首屏被执行,其它时候相当于 created 或 mounted 在客户端渲染页面。
什么意思呢?举个例子:
现在有两个页面,分别是首页和详情页,它们都有设置 asyncData。进入首页时,asyncData 运行在服务端。渲染完成后,点击文章进入详情页,此时详情页的 asyncData 并不会运行在服务端,而是在客户端发起请求获取数据渲染,因为详情页已经不是首屏。当我们刷新详情页,这时候详情页的 asyncData 才会运行在服务端。所以,不要走进这个误区(诶,不是说服务端渲染吗,怎么还会发起请求?)。
fetch
fetch 方法用于在渲染页面前填充应用的状态树(store)数据, 与 asyncData 方法类似,不同的是它不会设置组件的数据。
查看官方的说明,可以得知该生命周期用于填充 Vuex 状态树,与 asyncData 同样,它在组件初始化前调用,第一个参数为 context。
为了让获取过程可以异步,你需要返回一个 Promise,Nuxt.js 会等这个 promise 完成后再渲染组件。
export default {
fetch ({ store, params }) {
return axios.get('http://my-api/stars')
.then((res) => {
store.commit('setStars', res.data)
})
}
}
你也可以使用 async 或 await 的模式简化代码如下:
export default {
async fetch ({ store, params }) {
let { data } = await axios.get('http://my-api/stars')
store.commit('setStars', data)
}
}
但这并不是说我们只能在 fetch 中填充状态树,在 asyncData 中同样可以。
validate
Nuxt.js 可以让你在动态路由对应的页面组件中配置一个校验方法用于校验动态路由参数的有效性。
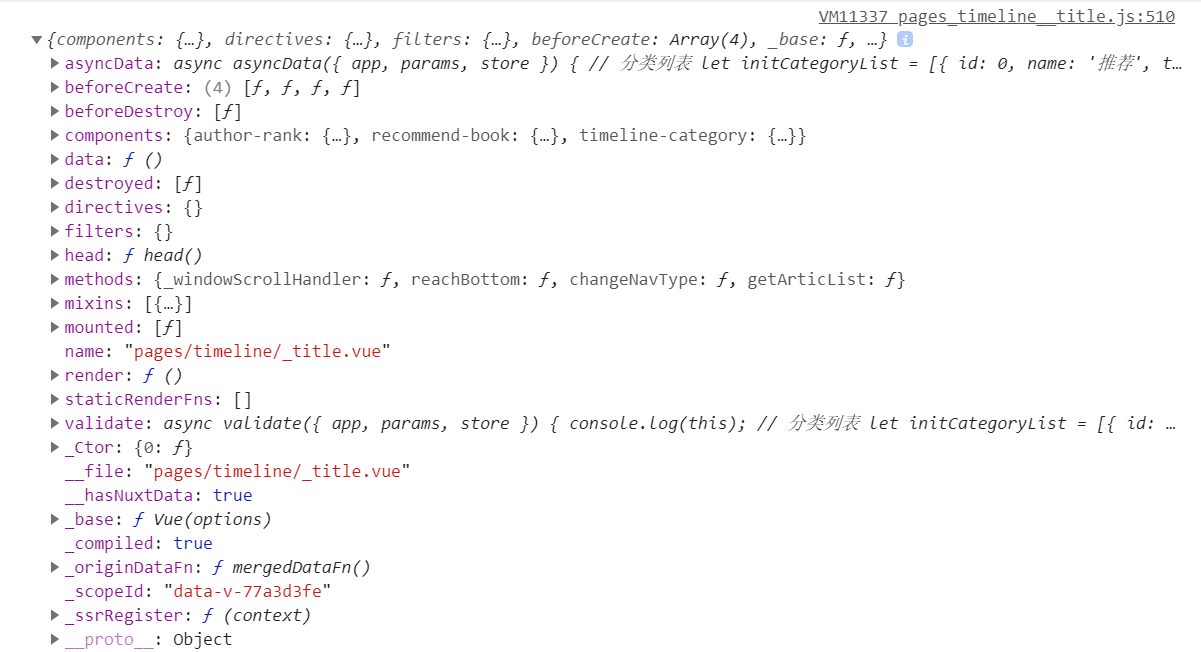
在验证路由参数合法性时,它能够帮助我们,第一个参数为 context。与上面有点不同的是,我们能够访问实例上的方法 this.methods.xxx。
打印 this 如下:
生命周期可以返回一个 Boolean,为真则进入路由,为假则停止渲染当前页面并显示错误页面:
export default {
validate({ params, query }) {
return this.methods.validateParam(params.type)
},
methods: {
validateParam(type){
let typeWhiteList = ['backend', 'frontend', 'android']
return typeWhiteList.includes(type)
}
}
}
或者返回一个Promise:
export default {
validate({ params, query, store }) {
return new Promise((resolve) => setTimeout(() => resolve()))
}
}
还可以在验证函数执行期间抛出预期或意外错误:
export default {
async validate ({ params, store }) {
// 使用自定义消息触发内部服务器500错误
throw new Error('Under Construction!')
}
}
watchQuery
监听参数字符串更改并在更改时执行组件方法 (asyncData, fetch, validate, layout, ...)
watchQuery 可设置 Boolean 或 Array (默认: [])。使用 watchQuery 属性可以监听参数字符串的更改。 如果定义的字符串发生变化,将调用所有组件方法(asyncData, fetch, validate, layout, ...)。 为了提高性能,默认情况下禁用。
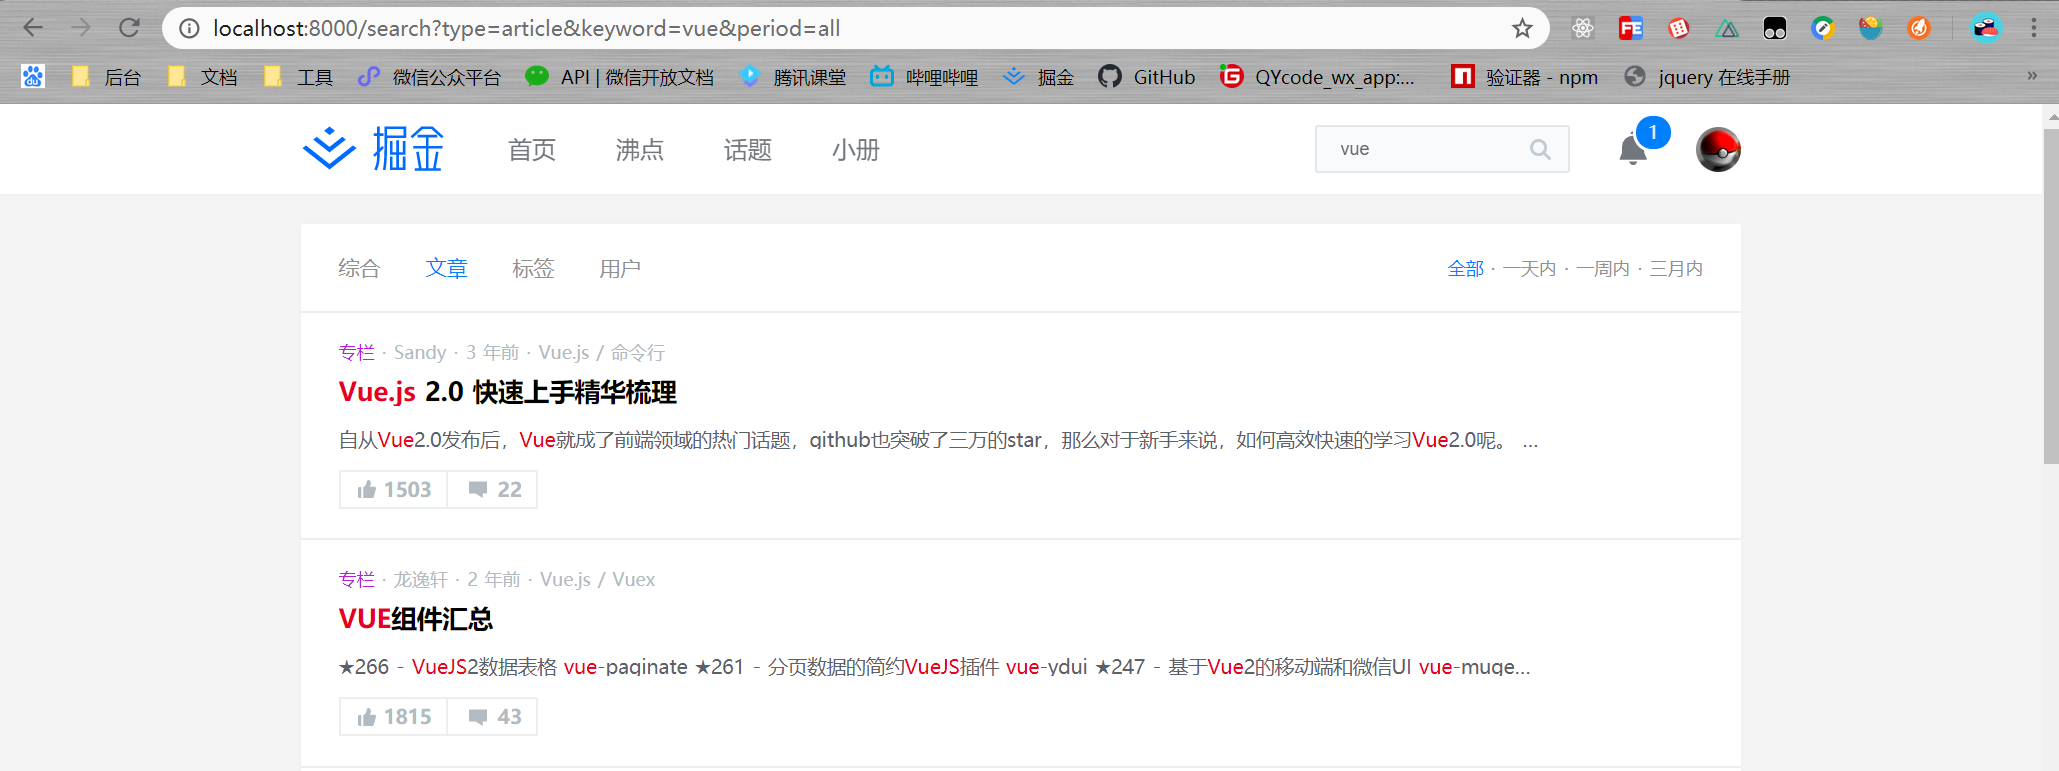
在 nuxt-juejin-project 项目的搜索页中,我也用到了这个配置:
<template>
<div class="search-container">
<div class="list__header">
<ul class="list__types">
<li v-for="item in types" :key="item.title" @click="search({type: item.type})">{{ item.title }}</li>
</ul>
<ul class="list__periods">
<li v-for="item in periods" :key="item.title" @click="search({period: item.period})">{{ item.title }}</li>
</ul>
</div>
</div>
</template>
export default {
async asyncData({ app, query }) {
let res = await app.$api.searchList({
after: 0,
first: 20,
type: query.type ? query.type.toUpperCase() : 'ALL',
keyword: query.keyword,
period: query.period ? query.period.toUpperCase() : 'ALL'
}).then(res => res.s == 1 ? res.d : {})
return {
pageInfo: res.pageInfo || {},
searchList: res.edges || []
}
},
watchQuery: ['keyword', 'type', 'period'],
methods: {
search(item) {
// 更新路由参数,触发 watchQuery,执行 asyncData 重新获取数据
this.$router.push({
name: 'search',
query: {
type: item.type || this.type,
keyword: this.keyword,
period: item.period || this.period
}
})
}
}
}
使用 watchQuery有点好处就是,当我们使用浏览器后退按钮或前进按钮时,页面数据会刷新,因为参数字符串发生了变化。
head
Nuxt.js 使用了 vue-meta 更新应用的 头部标签(Head) 和 html 属性。
使用 head 方法设置当前页面的头部标签,该方法里能通过 this 获取组件的数据。除了好看以外,正确的设置 meta 标签,还能有利于页面被搜索引擎查找,进行 seo 优化。一般都会设置 description(简介) 和 keyword(关键词)。
title:

meta:
export default {
head () {
return {
title: this.articInfo.title,
meta: [
{ hid: 'description', name: 'description', content: this.articInfo.content }
]
}
}
}
为了避免子组件中的 meta 标签不能正确覆盖父组件中相同的标签而产生重复的现象,建议利用 hid 键为 meta 标签配一个唯一的标识编号。
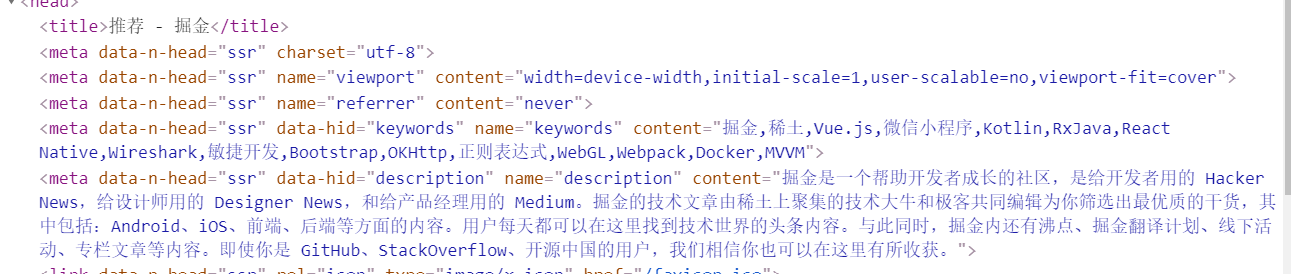
在 nuxt.config.js 中,我们还可以设置全局的 head:
module.exports = {
head: {
title: '掘金',
meta: [
{ charset: 'utf-8' },
{ name: 'viewport', content: 'width=device-width,initial-scale=1,user-scalable=no,viewport-fit=cover' },
{ name: 'referrer', content: 'never'},
{ hid: 'keywords', name: 'keywords', content: '掘金,稀土,Vue.js,微信小程序,Kotlin,RxJava,React Native,Wireshark,敏捷开发,Bootstrap,OKHttp,正则表达式,WebGL,Webpack,Docker,MVVM'},
{ hid: 'description', name: 'description', content: '掘金是一个帮助开发者成长的社区,是给开发者用的 Hacker News,给设计师用的 Designer News,和给产品经理用的 Medium。掘金的技术文章由稀土上聚集的技术大牛和极客共同编辑为你筛选出最优质的干货,其中包括:Android、iOS、前端、后端等方面的内容。用户每天都可以在这里找到技术世界的头条内容。与此同时,掘金内还有沸点、掘金翻译计划、线下活动、专栏文章等内容。即使你是 GitHub、StackOverflow、开源中国的用户,我们相信你也可以在这里有所收获。'}
],
}
}
补充
下面是这些生命周期的调用顺序,某些时候可能会对我们有帮助。
validate => asyncData => fetch => head
配置启动端口
以下两者都可以配置启动端口,但我个人更喜欢第一种在 nuxt.config.js 配置,这比较符合正常的逻辑。
第一种
nuxt.config.js :
module.exports = {
server: {
port: 8000,
host: '127.0.0.1'
}
}
第二种
package.json :
"config": {
"nuxt": {
"port": "8000",
"host": "127.0.0.1"
}
},
加载外部资源
全局配置
nuxt.config.js :
module.exports = {
head: {
link: [
{ rel: 'stylesheet', href: '//cdn.jsdelivr.net/gh/highlightjs/cdn-release@9.18.1/build/styles/atom-one-light.min.css' },
],
script: [
{ src: '//cdn.jsdelivr.net/gh/highlightjs/cdn-release@9.18.1/build/highlight.min.js' }
]
}
}
组件配置
组件内可在 head 配置,head 可以接受 object 或 function。官方例子使用的是 object 类型,使用 function 类型同样生效。
export default {
head () {
return {
link: [
{ rel: 'stylesheet', href: '//cdn.jsdelivr.net/gh/highlightjs/cdn-release@9.18.1/build/styles/atom-one-light.min.css' },
],
script: [
{ src: '//cdn.jsdelivr.net/gh/highlightjs/cdn-release@9.18.1/build/highlight.min.js' }
]
}
}
}
环境变量
nuxt.config.js提供env选项进行配置环境变量。但此前我尝试过根目录创建 .env 文件管理环境变量,发现是无效的。
创建环境变量
nuxt.config.js :
module.exports = {
env: {
baseUrl: process.env.NODE_ENV === 'production' ? 'http://test.com' : 'http://127.0.0.1:8000'
},
}
以上配置我们创建了一个 baseUrl 环境变量,通过 process.env.NODE_ENV 判断环境来匹配对应的地址
使用环境变量
我们可以通过以下两种方式来使用 baseUrl 变量:
- 通过
process.env.baseUrl - 通过
context.env.baseUrl
举个例子, 我们可以利用它来配置 axios 的自定义实例。
/plugins/axios.js:
export default function (context) {
$axios.defaults.baseURL = process.env.baseUrl
// 或者 $axios.defaults.baseURL = context.env.baseUrl
$axios.defaults.timeout = 30000
$axios.interceptors.request.use(config => {
return config
})
$axios.interceptors.response.use(response => {
return response.data
})
}
plugins
plugins 作为全局注入的主要途径,关于一些使用的方式是必须要掌握的。有时你希望在整个应用程序中使用某个函数或属性值,此时,你需要将它们注入到 Vue 实例(客户端), context (服务器端)甚至 store(Vuex) 。
plugin 函数参数
plugin 一般向外暴露一个函数,该函数接收两个参数分别是 context 和 inject
context: 上下文对象,该对象存储很多有用的属性。比如常用的 app 属性,包含所有插件的 Vue 根实例。例如:在使用 axios 的时候,你想获取 $axios 可以直接通过 context.app.$axios 来获取。
inject: 该方法可以将 plugin 同时注入到 context, Vue 实例, Vuex 中。
例如:
export default function (context, inject) {}
注入 Vue 实例
定义
plugins/vue-inject.js :
import Vue from 'vue'
Vue.prototype.$myInjectedFunction = string => console.log('This is an example', string)
使用
nuxt.config.js :
export default {
plugins: ['~/plugins/vue-inject.js']
}
这样在所有 Vue 组件中都可以使用该函数
export default {
mounted() {
this.$myInjectedFunction('test')
}
}
注入 context
context 注入方式和在其它 vue 应用程序中注入类似。
定义
plugins/ctx-inject.js :
export default ({ app }) => {
app.myInjectedFunction = string => console.log('Okay, another function', string)
}
使用
nuxt.config.js :
export default {
plugins: ['~/plugins/ctx-inject.js']
}
现在,只要你获得 context ,你就可以使用该函数(例如在 asyncData 和 fetch 中)
export default {
asyncData(context) {
context.app.myInjectedFunction('ctx!')
}
}
同时注入
如果需要同时在 context , Vue 实例,甚至 Vuex 中同时注入,可以使用 inject 方法,它是 plugin 导出函数的第二个参数。系统会默认将 $ 作为方法名的前缀。
定义
plugins/combined-inject.js :
export default ({ app }, inject) => {
inject('myInjectedFunction', string => console.log('That was easy!', string))
}
使用
nuxt.config.js :
export default {
plugins: ['~/plugins/combined-inject.js']
}
现在你就可以在 context ,或者 Vue 实例中的 this ,或者 Vuex 的 actions / mutations 方法中的 this 来调用 myInjectedFunction 方法
export default {
mounted() {
this.$myInjectedFunction('works in mounted')
},
asyncData(context) {
context.app.$myInjectedFunction('works with context')
}
}
store/index.js :
export const state = () => ({
someValue: ''
})
export const mutations = {
changeSomeValue(state, newValue) {
this.$myInjectedFunction('accessible in mutations')
state.someValue = newValue
}
}
export const actions = {
setSomeValueToWhatever({ commit }) {
this.$myInjectedFunction('accessible in actions')
const newValue = 'whatever'
commit('changeSomeValue', newValue)
}
}
plugin相互调用
当 plugin 依赖于其他的 plugin 调用时,我们可以访问 context 来获取,前提是 plugin 需要使用 context 注入。
举个例子:现在已存在 request 请求的 plugin ,有另一个 plugin 需要调用 request
plugins/request.js :
export default ({ app: { $axios } }, inject) => {
inject('request', {
get (url, params) {
return $axios({
method: 'get',
url,
params
})
}
})
}
plugins/api.js :
export default ({ app: { $request } }, inject) => {
inject('api', {
getIndexList(params) {
return $request.get('/list/indexList', params)
}
})
}
值得一提的是,在注入 plugin 时要注意顺序,就上面的例子来看, request 的注入顺序要在 api 之前
module.exports = {
plugins: [
'./plugins/axios.js',
'./plugins/request.js',
'./plugins/api.js',
]
}
路由配置
在Nuxt.js中,路由是基于文件结构自动生成,无需配置。自动生成的路由配置可在 .nuxt/router.js 中查看。
动态路由
在 Vue 中是这样配置动态路由的
const router = new VueRouter({
routes: [
{
path: '/users/:id',
name: 'user',
component: User
}
]
})
Nuxt.js 中需要创建对应的以下划线作为前缀的 Vue 文件 或 目录
以下面目录为例:
pages/
--| users/
-----| _id.vue
--| index.vue
自动生成的路由配置如下:
router:{
routes: [
{
name: 'index',
path: '/',
component: 'pages/index.vue'
},
{
name: 'users-id',
path: '/users/:id?',
component: 'pages/users/_id.vue'
}
]
}
嵌套路由
以下面目录为例, 我们需要一级页面的 vue 文件,以及和该文件同名的文件夹(用于存放子页面)
pages/
--| users/
-----| _id.vue
-----| index.vue
--| users.vue
自动生成的路由配置如下:
router: {
routes: [
{
path: '/users',
component: 'pages/users.vue',
children: [
{
path: '',
component: 'pages/users/index.vue',
name: 'users'
},
{
path: ':id',
component: 'pages/users/_id.vue',
name: 'users-id'
}
]
}
]
}
然后在一级页面中使用 nuxt-child 来显示子页面,就像使用 router-view 一样
<template>
<div>
<nuxt-child></nuxt-child>
</div>
</template>
自定义配置
除了基于文件结构生成路由外,还可以通过修改 nuxt.config.js 文件的 router 选项来自定义,这些配置会被添加到 Nuxt.js 的路由配置中。
下面例子是对路由添加重定向的配置:
module.exports = {
router: {
extendRoutes (routes, resolve) {
routes.push({
path: '/',
redirect: {
name: 'timeline-title'
}
})
}
}
}
axios
安装
Nuxt 已为我们集成好 @nuxtjs/axios,如果你在创建项目时选择了 axios,这步可以忽略。
npm i @nuxtjs/axios --save
nuxt.config.js :
module.exports = {
modules: [
'@nuxtjs/axios'
],
}
SSR使用Axios
服务器端获取并渲染数据, asyncData 方法可以在渲染组件之前异步获取数据,并把获取的数据返回给当前组件。
export default {
async asyncData(context) {
let data = await context.app.$axios.get("/test")
return {
list: data
};
},
data() {
return {
list: []
}
}
}
非SSR使用Axios
这种使用方式就和我们平常一样,访问 this 进行调用
export default {
data() {
return {
list: []
}
},
async created() {
let data = await this.$axios.get("/test")
this.list = data
},
}
自定义配置Axios
大多时候,我们都需要对 axios 做自定义配置(baseUrl、拦截器),这时可以通过配置 plugins 来引入。
定义
/plugins/axios.js :
export default function({ app: { $axios } }) {
$axios.defaults.baseURL = 'http://127.0.0.1:8000/'
$axios.interceptors.request.use(config => {
return config
})
$axios.interceptors.response.use(response => {
if (/^[4|5]/.test(response.status)) {
return Promise.reject(response.statusText)
}
return response.data
})
}
使用
nuxt.config.js :
module.exports = {
plugins: [
'./plugins/axios.js'
],
}
完成后,使用方式也和上面的一样。
css预处理器
以 scss 为例子
安装
npm i node-sass sass-loader scss-loader --save--dev
使用
无需配置,模板内直接使用
<style lang="scss" scoped>
.box{
color: $theme;
}
</style>
全局样式
在编写布局样式时,会有很多相同共用的样式,此时我们可以将这些样式提取出来,需要用到时只需要添加一个类名即可。
定义
global.scss :
.shadow{
box-shadow: 0 1px 2px 0 rgba(0,0,0,.05);
}
.ellipsis{
text-overflow: ellipsis;
white-space: nowrap;
overflow: hidden;
}
.main{
width: 960px;
margin: 0 auto;
margin-top: 20px;
}
使用
nuxt.config.js :
module.exports = {
css: [
'~/assets/scss/global.scss'
],
}
全局变量
为页面注入 变量 和 mixin 而且不用每次都去导入他们,可以使用 @nuxtjs/style-resources 来实现。
安装
npm i @nuxtjs/style-resources --save--dev
定义
/assets/scss/variable.scss:
$theme: #007fff;
$success: #6cbd45;
$success-2: #74ca46;
使用
nuxt.config.js :
module.exports = {
modules: [
'@nuxtjs/style-resources'
],
styleResources: {
scss: [
'./assets/scss/variable.scss'
]
},
}
element-ui 自定义主题
定义
/assets/scss/element-variables.scss :
/* 改变主题色变量 */
/* $theme 在上面的 scss 文件中定义并使用 */
$--color-primary: $theme;
/* 改变 icon 字体路径变量,必需 */
$--font-path: '~element-ui/lib/theme-chalk/fonts';
/* 组件样式按需引入 */
@import "~element-ui/packages/theme-chalk/src/select";
@import "~element-ui/packages/theme-chalk/src/option";
@import "~element-ui/packages/theme-chalk/src/input";
@import "~element-ui/packages/theme-chalk/src/button";
@import "~element-ui/packages/theme-chalk/src/notification";
@import "~element-ui/packages/theme-chalk/src/message";
使用
nuxt.config.js :
module.exports = {
modules: [
'@nuxtjs/style-resources'
],
styleResources: {
scss: [
/*
* 这里需要注意使用的顺序,因为 element-variables.scss 里用到 variable.scss 里定义的变量
* 如果顺序反过来,在启动编译时会导致变量找不到报错
*/
'~/assets/scss/variable.scss',
'~/assets/scss/element-variables.scss'
]
},
}
还有另一个方法可以使用,那就是 plugin
import Vue from 'vue'
import myComponentsInstall from '~/components/myComponentsInstall'
import eleComponentsInstall from '~/components/eleComponentsInstall'
import '~/assets/scss/element-variables.scss' // elementUI 自定义主题色
Vue.use(myComponentsInstall)
Vue.use(eleComponentsInstall)
前端技术点#
asyncData请求并行
看到这里你应该能感觉到 asyncData 的重要性,对于这种经常会使用到的生命周期,一些细节上的修改就显得尤为重要。通常, asyncData 中不只发起一个请求,可能是很多个:
export default {
async asyncData({ app }) {
// 文章列表
let indexData = await app.$api.getIndexList({
first: 20,
order: 'POPULAR',
category: 1
}).then(res => res.s == 1 ? res.d : {})
// 推荐作者
let recommendAuthors = await app.$api.getRecommendAuthor({
limit: 5
}).then(res => res.s == 1 ? res.d : [])
// 推荐小册
let recommendBooks = await app.$api.getRecommendBook().then(res => res.s === 1 ? res.d.data : [])
return {
indexData,
recommendAuthors,
recommendBooks
}
}
}
上面的操作看起来没什么问题,但其实有个细节可以优化一下。现在来盘一盘,我们都知道 async/await 会将异步任务去同步化执行,上一个异步任务没结束之前,下一个异步任务处于等待状态中。这样需要等待3个异步任务,假设这些请求均耗时1秒,也就是说页面至少要等待3秒后才会出现内容。原本我们想利用服务端渲染来优化首屏,现在却因为等待请求而拖慢页面渲染,岂不是得不偿失。
最好的方案应该是多个请求同时发送,可能聪明的小伙伴已经想到 Promise.all。没错,利用 Promise.all 将这些请求并行发送,就能解决上述的问题。Promise.all 接受一个 Promise 数组作为参数,当全部 Promise 成功时会返回一个结果数组。最终的耗时会以最久的 Promise 为准,所以说原本3秒的耗时可以降低到1秒。需要注意的是,如果其中有一个请求失败了,会返回最先被 reject 失败状态的值,导致获取不到数据。在项目封装基础请求时我已经做了 catch 错误的处理,所以确保请求都不会被 reject。
export default {
asyncData() {
// 数组解构获得对应请求的数据
let [indexData, recommendAuthors, recommendBooks] = await Promise.all([
// 文章列表
app.$api.getIndexList({
first: 20,
order: 'POPULAR',
category: 1
}).then(res => res.s == 1 ? res.d : {}),
// 推荐作者
app.$api.getRecommendAuthor({
limit: 5
}).then(res => res.s == 1 ? res.d : []),
// 推荐小册
app.$api.getRecommendBook().then(res => res.s === 1 ? res.d.data : []),
])
return {
indexData,
recommendAuthors,
recommendBooks
}
}
}
token的设置与存储
一个应用必不可少的功能就是 token 验证,通常我们在登录后把返回的验证信息存储起来,之后请求带上 token 供后端验证状态。在前后端分离的项目中,一般都会存放到本地存储中。但 Nuxt.js 不同,由于服务端渲染的特点,部分请求在服务端发起,我们无法获取 localStorage 或 sessionStorage。
这时候,cookie 就派上了用场。cookie 不仅能在客户端供我们操作,在请求时也会带上发回给服务端。使用原生操作 cooike 是非常麻烦的,借助 cookie-universal-nuxt 模块(该模块只是帮助我们注入,主要实现依赖 cookie-universal),我们能够更方便的使用 cookie。不管在服务端还是客户端,cookie-universal-nuxt 都为我们提供一致的 api,它内部会帮我们去适配对应的方法。
安装
安装 cookie-universal-nuxt
npm run cookie-universal-nuxt --save
nuxt.config.js :
module.exports = {
modules: [
'cookie-universal-nuxt'
],
}
基础使用
同样的, cookie-universal-nuxt 会同时注入,访问 $cookies 进行使用。
服务端:
// 获取
app.$cookies.get('name')
// 设置
app.$cookies.set('name', 'value')
// 删除
app.$cookies.remove('name')
客户端:
// 获取
this.$cookies.get('name')
// 设置
this.$cookies.set('name', 'value')
// 删除
this.$cookies.remove('name')
更多使用方法戳这里 https://www.npmjs.com/package/cookie-universal-nuxt
实际应用流程
像掘金的登录,我们在登录后验证信息会被长期存储起来,而不是每次使用都要进行登录。但 cookie 生命周期只存在于浏览器,当浏览器关闭后也会随之销毁,所以我们需要为其设置一个较长的过期时间。
在项目中我将设置身份信息封装成工具方法,在登录成功后会调用此方法:
/utils/utils.js :
setAuthInfo(ctx, res) {
let $cookies, $store
// 客户端
if (process.client) {
$cookies = ctx.$cookies
$store = ctx.$store
}
// 服务端
if (process.server) {
$cookies = ctx.app.$cookies
$store = ctx.store
}
if ($cookies && $store) {
// 过期时长 new Date(Date.now() + 8.64e7 * 365 * 10)
const expires = $store.state.auth.cookieMaxExpires
// 设置cookie
$cookies.set('userId', res.userId, { expires })
$cookies.set('clientId', res.clientId, { expires })
$cookies.set('token', res.token, { expires })
$cookies.set('userInfo', res.user, { expires })
// 设置vuex
$store.commit('auth/UPDATE_USERINFO', res.user)
$store.commit('auth/UPDATE_CLIENTID', res.clientId)
$store.commit('auth/UPDATE_TOKEN', res.token)
$store.commit('auth/UPDATE_USERID', res.userId)
}
}
之后需要改造下 axios,让它在请求时带上验证信息:
/plugins/axios.js :
export default function ({ app: { $axios, $cookies } }) {
$axios.defaults.baseURL = process.env.baseUrl
$axios.defaults.timeout = 30000
$axios.interceptors.request.use(config => {
// 头部带上验证信息
config.headers['X-Token'] = $cookies.get('token') || ''
config.headers['X-Device-Id'] = $cookies.get('clientId') || ''
config.headers['X-Uid'] = $cookies.get('userId') || ''
return config
})
$axios.interceptors.response.use(response => {
if (/^[4|5]/.test(response.status)) {
return Promise.reject(response.statusText)
}
return response.data
})
}
权限验证中间件
上面提到身份信息会设置一个长期的时间,接下来当然就需要验证身份是否过期啦。这里我会使用路由中间件来完成验证功能,中间件运行在一个页面或一组页面渲染之前,就像路由守卫一样。而每一个中间件应放置在 middleware 目录,文件名的名称将成为中间件名称。中间件可以异步执行,只需要返回 Promise 即可。
定义
/middleware/auth.js:
export default function (context) {
const { app, store } = context
const cookiesToken = app.$cookies.get('token')
if (cookiesToken) {
// 每次跳转路由 验证登录状态是否过期
return app.$api.isAuth().then(res => {
if (res.s === 1) {
if (res.d.isExpired) { // 过期 移除登陆验证信息
app.$utils.removeAuthInfo(context)
} else { // 未过期 重新设置存储
const stateToken = store.state.auth.token
if (cookiesToken && stateToken === '') {
store.commit('auth/UPDATE_USERINFO', app.$cookies.get('userInfo'))
store.commit('auth/UPDATE_USERID', app.$cookies.get('userId'))
store.commit('auth/UPDATE_CLIENTID', app.$cookies.get('clientId'))
store.commit('auth/UPDATE_TOKEN', app.$cookies.get('token'))
}
}
}
})
}
}
上面 if (cookiesToken && stateToken === '') 中的处理,是因为一些页面会新开标签页,导致 vuex 中的信息丢失,这里需要判断一下重新设置状态树。
使用
nuxt.config.js :
module.exports = {
router: {
middleware: ['auth']
},
}
这种中间件使用是注入到全局的每个页面中,如果你希望中间件只运行于某个页面,可以配置页面的 middleware 选项:
export default {
middleware: 'auth'
}
路由中间件文档戳这里 https://www.nuxtjs.cn/guide/routing#%E4%B8%AD%E9%97%B4%E4%BB%B6
组件注册管理
先来个最简单的例子,在 plugins 文件夹下创建 vue-global.js 用于管理全局需要使用的组件或方法:
import Vue from 'vue'
import utils from '~/utils'
import myComponent from '~/components/myComponent.vue'
Vue.prototype.$utils = utils
Vue.use(myComponent)
nuxt.config.js :
module.exports = {
plugins: [
'~/plugins/vue-global.js'
],
}
自定义组件
对于一些自定义全局共用组件,我的做法是将它们放入 /components/common 文件夹统一管理。这样可以使用 require.context 来自动化的引入组件,该方法是由 webpack 提供的,它能够读取文件夹内所有文件。如果你不知道这个方法,真的很强烈你去了解并使用一下,它能大大提高你的编程效率。
定义
/components/myComponentsInstall.js :
export default {
install(Vue) {
const components = require.context('~/components/common', false, /\.vue$/)
// components.keys() 获取文件名数组
components.keys().map(path => {
// 获取组件文件名
const fileName = path.replace(/(.*\/)*([^.]+).*/ig, "$2")
// components(path).default 获取 ES6 规范暴露的内容,components(path) 获取 Common.js 规范暴露的内容
Vue.component(fileName, components(path).default || components(path))
})
}
}
使用
/plugins/vue-global.js :
import Vue from 'vue'
import myComponentsInstall from '~/components/myComponentsInstall'
Vue.use(myComponentsInstall)
经过上面的操作后,组件已在全局被注册,我们只要按短横线命名使用即可。而且每新建一个组件都无需再去引入,真的是一劳永逸。同样在其他实际应用中,如果 api 文件是按功能分模块,也可以使用这个方法去自动化引入接口文件。
第三方组件库(element-UI)
全部引入
/plugins/vue-global.js :
import Vue from 'vue'
import elementUI from 'element-ui'
Vue.use(elementUI)
nuxt.config.js :
module.exports = {
css: [
'element-ui/lib/theme-chalk/index.css'
]
}
按需引入
借助 babel-plugin-component,我们可以只引入需要的组件,以达到减小项目体积的目的。
npm install babel-plugin-component -D
nuxt.config.js :
module.exports = {
build: {
plugins: [
[
"component",
{
"libraryName": "element-ui",
"styleLibraryName": "theme-chalk"
}
]
],
}
}
接下来引入我们需要的部分组件,同样创建一个 eleComponentsInstall.js 管理 elementUI 的组件:
/components/eleComponentsInstall.js :
import { Input, Button, Select, Option, Notification, Message } from 'element-ui'
export default {
install(Vue) {
Vue.use(Input)
Vue.use(Select)
Vue.use(Option)
Vue.use(Button)
Vue.prototype.$message = Message
Vue.prototype.$notify = Notification
}
}
/plugins/vue-global.js:
import Vue from 'vue'
import eleComponentsInstall from '~/components/eleComponentsInstall'
Vue.use(eleComponentsInstall)
页面布局切换
在我们构建网站应用时,大多数页面的布局都会保持一致。但在某些需求中,可能需要更换另一种布局方式,这时页面 layout 配置选项就能够帮助我们完成。而每一个布局文件应放置在 layouts 目录,文件名的名称将成为布局名称,默认布局是 default。下面的例子是更换页面布局的背景色。其实按照使用 Vue 的理解,感觉就像切换 App.vue。
定义
/layouts/default.vue :
<template>
<div style="background-color: #f4f4f4;min-height: 100vh;">
<top-bar></top-bar>
<main class="main">
<nuxt />
</main>
<back-top></back-top>
</div>
</template>
/layouts/default-white.vue :
<template>
<div style="background-color: #ffffff;min-height: 100vh;">
<top-bar></top-bar>
<main class="main">
<nuxt />
</main>
<back-top></back-top>
</div>
</template>
使用
页面组件文件:
export default {
layout: 'default-white',
// 或
layout(context) {
return 'default-white'
}
}
自定义错误页
自定义的错误页需要放在 layouts 目录中,且文件名为 error。虽然此文件放在 layouts 目录中, 但应该将它看作是一个页面(page)。这个布局文件不需要包含 <nuxt/> 标签。你可以把这个布局文件当成是显示应用错误(404,500等)的组件。
定义
<template>
<div class="error-page">
<div class="error">
<div class="where-is-panfish">
<img class="elem bg" src="https://b-gold-cdn.xitu.io/v3/static/img/bg.1f516b3.png">
<img class="elem panfish" src="https://b-gold-cdn.xitu.io/v3/static/img/panfish.9be67f5.png">
<img class="elem sea" src="https://b-gold-cdn.xitu.io/v3/static/img/sea.892cf5d.png">
<img class="elem spray" src="https://b-gold-cdn.xitu.io/v3/static/img/spray.bc638d2.png">
</div>
<div class="title">{{statusCode}} - {{ message }}</div>
<nuxt-link class="error-link" to="/">回到首页</nuxt-link>
</div>
</div>
</template>
export default {
props: {
error: {
type: Object,
default: null
}
},
computed: {
statusCode () {
return (this.error && this.error.statusCode) || 500
},
message () {
return this.error.message || 'Error'
}
},
head () {
return {
title: `${this.statusCode === 404 ? '找不到页面' : '呈现页面出错'} - 掘金`,
meta: [
{
name: 'viewport',
content: 'width=device-width,initial-scale=1.0,minimum-scale=1.0,maximum-scale=1.0,user-scalable=no'
}
]
}
}
}
error对象
错误页面中 props 接受一个 error 对象,该对象至少包含两个属性 statusCode 和 message。
除了这两个属性,我们还可以传过去其他的属性,这里又要说起上面提到的 error 方法:
export default {
async asyncData({ app, query, error }) {
const tagInfo = await app.$api.getTagDetail({
tagName: encodeURIComponent(query.name)
}).then(res => {
if (res.s === 1) {
return res.d
} else {
// 这样我们在 error 对象中又多了 query 属性
error({
statusCode: 404,
message: '标签不存在',
query
})
return
}
})
return {
tagInfo
}
}
}
还有页面的 validate 生命周期:
export default {
async validate ({ params, store }) {
throw new Error('页面参数不正确')
}
}
这里传过去的 statusCode 为 500,message 就是 new Error 中的内容。如果想传对象过去的话,message 会转为字符串 [object Object],你可以使用 JSON.stringify 传过去,错误页面再处理解析出来。
export default {
async validate ({ params, store }) {
throw new Error(JSON.stringify({
message: 'validate错误',
params
}))
}
}
封装触底事件
项目中基本每个页面的都会有触底事件,所以我将这块逻辑抽离成 mixin,需要的页面引入使用即可。
/mixins/reachBottom.js :
export default {
data() {
return {
_scrollingElement: null,
_isReachBottom: false, // 防止进入执行区域时 重复触发
reachBottomDistance: 80 // 距离底部多远触发
}
},
mounted() {
this._scrollingElement = document.scrollingElement
window.addEventListener('scroll', this._windowScrollHandler)
},
beforeDestroy() {
window.removeEventListener('scroll', this._windowScrollHandler)
},
methods: {
_windowScrollHandler() {
let scrollHeight = this._scrollingElement.scrollHeight
let currentHeight = this._scrollingElement.scrollTop + this._scrollingElement.clientHeight + this.reachBottomDistance
if (currentHeight < scrollHeight && this._isReachBottom) {
this._isReachBottom = false
}
if (this._isReachBottom) {
return
}
// 触底事件触发
if (currentHeight >= scrollHeight) {
this._isReachBottom = true
typeof this.reachBottom === 'function' && this.reachBottom()
}
}
},
}
实现的核心当然是触发时机: scrollTop(页面滚动距离)+ clientHeight(页面可视高度)>= scrollHeight(页面总高度,包括滚动区域)。但这种需要完全触底才能触发事件,所以在此基础上,我添加 reachBottomDistance 用于控制触发事件的距离。最终,触发事件会调用页面 methods 的 reachBottom 方法。
命令式弹窗组件
命令式组件是什么?element-UI 的 Message 组件就是很好的例子,当我们需要弹窗提示时,只需要调用一下 this.message(),而不是通过 v-if 切换组件。这种的好处就是不用引入组件,使用起来便捷,哪里需要调哪里。
nuxt-juejin-project 项目中我也封装了两个公用的弹窗组件,登录弹窗和预览大图弹窗,技术点是手动挂载组件。实现代码并不多,几行足矣。
定义
/components/common/picturesModal/picturesModal.vue :
export default {
data() {
return {
url: '', // 当前图片链接
urls: '' // 图片链接数组
}
},
methods: {
show(cb) {
this.cb = cb
return new Promise((resolve, reject) => {
document.body.style.overflow = 'hidden'
this.resolve = resolve
this.reject = reject
})
},
// 销毁弹窗
hideModal() {
typeof this.cb === 'function' && this.cb()
document.body.removeChild(this.$el)
document.body.style.overflow = ''
// 销毁组件实例
this.$destroy()
},
// 关闭弹窗
cancel() {
this.reject()
this.hideModal()
},
}
}
/components/common/picturesModal/index.js
import Vue from 'vue'
import picturesModal from './picturesModal'
let componentInstance = null
// 构造子类
let ModalConstructor = Vue.extend(picturesModal)
function createModal(options) {
// 实例化组件
componentInstance = new ModalConstructor()
// 合并选项
Object.assign(componentInstance, options)
// $mount可以传入选择器字符串,表示挂载到该选择器
// 如果不传入选择器,将渲染为文档之外的的元素,你可以想象成 document.createElement()在内存中生成dom
// $el获取的是dom元素
document.body.appendChild(componentInstance.$mount().$el)
}
function caller (options) {
// 单例 全局只存在一个弹窗
if (!componentInstance) {
createModal(options)
// 调用组件内的show方法 传入的callback在组件销毁时调用
return componentInstance.show(() => { componentInstance = null })
}
}
export default {
install(Vue) {
// 注册调起弹窗方法,方法返回Promise then为登录成功 catch为关闭弹窗
Vue.prototype.$picturesModal = caller
}
}
使用
/plugins/vue-global.js:
import picturesModal from '~/components/common/picturesModal'
Vue.use(picturesModal)
这里传入的对象,就是上面 createModal 接收到的 options 参数,最后合并覆盖到组件的 data。
this.$picturesModal({
url: 'b.jpg'
urls: ['a.jpg', 'b.jpg', 'c.jpg']
})
中间层技术点#
中间层工作的大概流程是在前端发送请求到中间层,中间层在发送请求到后端获取数据。这样做的好处是在前端到后端的交互过程中,我们相当于获得了代理的控制权。利用这一权利,我们能做的事情就更多。比如:
- 代理:在开发环境下,我们可以利用代理来,解决最常见的跨域问题;在线上环境下,我们可以利用代理,转发请求到多个服务端。
- 缓存:缓存其实是更靠近前端的需求,用户的动作触发数据的更新,node中间层可以直接处理一部分缓存需求。
- 日志:相比其他服务端语言,node中间层的日志记录,能更方便快捷的定位问题。
- 监控:擅长高并发的请求处理,做监控也是合适的选项。
- 数据处理:返回所需的数据,数据字段别名,数据聚合。
中间层的存在也让前后端职责分离的更加彻底,后端只需要管理数据和编写接口,需要哪些数据都交给中间层去处理。
nuxt-juejin-project 项目中间层使用的是 koa 框架,中间层的 http 请求方法是基于 request 库简单封装一下,代码实现在 /server/request/index.js。因为后面需要用到,这里就提一下。
请求转发
安装相关中间件
npm i koa-router koa-bodyparser --save
koa-router: 路由器中间件,能快速的定义路由以及管理路由
koa-bodyparser: 参数解析中间件,支持解析 json、表单类型,常用于解析 POST 请求
相关中间件的使用方法在 npm 上搜索,这里就赘述怎么使用了
路由设计
正所谓无规矩不成方圆,路由设计的规范,我参考的是阮一峰老师的 RESTful API 设计指南。
路由目录
路由文件我会存放在 /server/routes 目录中,按照规范还需要一个规定 api 版本号的文件夹。最终路由文件存放在 /server/routes/v1 中。
路由路径
在 RESTful 架构中,每个网址代表一种资源(resource),所以网址中不能有动词,只能有名词,而且所用的名词往往与数据库的表格名对应。一般来说,数据库中的表都是同种记录的"集合"(collection),所以 API 中的名词也应该使用复数。
例如:
- 文章相关接口文件命名为
articles - 标签相关接口文件命名为
tag - 沸点相关接口文件命名为
pins
路由类型
路由操作资源的具体类型,由 HTTP 动词表示
- GET(SELECT):从服务器取出资源(一项或多项)。
- POST(CREATE):在服务器新建一个资源。
- PUT(UPDATE):在服务器更新资源(客户端提供改变后的完整资源)。
- DELETE(DELETE):从服务器删除资源。
路由逻辑
下面是用户专栏列表接口的例子
/server/router/articles.js
const Router = require('koa-router')
const router = new Router()
const request = require('../../request')
const { toObject } = require('../../../utils')
/**
* 获取用户专栏文章
* @param {string} targetUid - 用户id
* @param {string} before - 最后一条的createdAt,下一页传入
* @param {number} limit - 条数
* @param {string} order - rankIndex:热门、createdAt:最新
*/
router.get('/userPost', async (ctx, next) => {
// 头部信息
const headers = ctx.headers
const options = {
url: 'https://timeline-merger-ms.juejin.im/v1/get_entry_by_self',
method: "GET",
params: {
src: "web",
uid: headers['x-uid'],
device_id: headers['x-device-id'],
token: headers['x-token'],
targetUid: ctx.query.targetUid,
type: ctx.query.type || 'post',
limit: ctx.query.limit || 20,
before: ctx.query.before,
order: ctx.query.order || 'createdAt'
}
};
// 发起请求
let { body } = await request(options)
// 请求后获取到的数据为 json,需要转为 object 进行操作
body = toObject(body)
ctx.body = {
s: body.s,
d: body.d.entrylist || []
}
})
module.exports = router
注册路由
/server/index.js 是 Nuxt.js 为我们生成好的服务端的入口文件,我们的中间件使用和路由注册都需要在这个文件内编写。下面的应用会忽略部分代码,只展示主要的逻辑。
/server/index.js :
const Koa = require('koa')
const Router = require('koa-router')
const bodyParser = require('koa-bodyparser')
const app = new Koa()
const router = new Router()
// 使用中间件
function useMiddleware(){
app.use(bodyParser())
}
// 注册路由
function useRouter(){
let module = require('./routes/articles')
router.use('/v1/articles', module.routes())
app.use(router.routes()).use(router.allowedMethods())
}
function start () {
useMiddleware()
useRouter()
app.listen(8000, '127.0.0.1')
}
start()
最后接口的调用地址是: http://127.0.0.1:8000/v1/articles/userPost
路由自动化注册
没错,它又来了。自动化就是香,一劳永逸能不香吗。
const fs = require('fs')
const Koa = require('koa')
const Router = require('koa-router')
const bodyParser = require('koa-bodyparser')
const app = new Koa()
const router = new Router()
// 注册路由
function useRouter(path){
path = path || __dirname + '/routes'
// 获取 routes 目录下的所有文件名,urls为文件名数组
let urls = fs.readdirSync(path)
urls.forEach((element) => {
const elementPath = path + '/' + element
const stat = fs.lstatSync(elementPath);
// 是否为文件夹
const isDir = stat.isDirectory();
// 文件夹递归注册路由
if (isDir) {
useRouter(elementPath)
} else {
let module = require(elementPath)
let routeRrefix = path.split('/routes')[1] || ''
//routes里的文件名作为 路由名
router.use(routeRrefix + '/' + element.replace('.js', ''), module.routes())
}
})
//使用路由
app.use(router.routes()).use(router.allowedMethods())
}
function start () {
useMiddleware()
useRouter()
app.listen(8000, '127.0.0.1')
}
start()
上面的代码以 routes 作为路由的主目录,向下寻找 js 文件注册路由,最终以 js 文件路径作为路由名。例如,/server/routes/v1/articles.js 中有个搜索接口 /search,那么该接口的调用地址为 localhost:8000/v1/articles/search。
路由参数验证
参数验证是接口中一定会有的功能,不正确的参数会导致程序意外错误。我们应该提前对参数验证,中止错误的查询并告知使用者。项目中我基于 async-validator 封装了一个路由中间件来验证参数。如果你不知道 koa 中间件的工作流程,那有必要去了解下洋葱模型。
定义
/server/middleware/validator/js :
const { default: Schema } = require('async-validator')
module.exports = function (descriptor) {
return async function (ctx, next) {
let validator = new Schema(descriptor)
let params = {}
// 获取参数
Object.keys(descriptor).forEach(key => {
if (ctx.method === 'GET') {
params[key] = ctx.query[key]
} else if (
ctx.method === 'POST' ||
ctx.method === 'PUT' ||
ctx.method === 'DELETE'
) {
params[key] = ctx.request.body[key]
}
})
// 验证参数
const errors = await validator.validate(params)
.then(() => null)
.catch(err => err.errors)
// 如果验证不通过 则返回错误
if (errors) {
ctx.body = {
s: 0,
errors
}
} else {
await next()
}
}
}
使用
使用方法请参考 async-validator
const Router = require('koa-router')
const router = new Router()
const request = require('../../request')
const validator = require('../../middleware/validator')
const { toObject } = require('../../../utils')
/**
* 获取用户专栏文章
* @param {string} targetUid - 用户id
* @param {string} before - 最后一条的createdAt,下一页传入
* @param {number} limit - 条数
* @param {string} order - rankIndex:热门、createdAt:最新
*/
router.get('/userPost', validator({
targetUid: { type: 'string', required: true },
before: { type: 'string' },
limit: {
type: 'string',
required: true,
validator: (rule, value) => Number(value) > 0,
message: 'limit 需传入正整数'
},
order: { type: 'enum', enum: ['rankIndex', 'createdAt'] }
}), async (ctx, next) => {
const headers = ctx.headers
const options = {
url: 'https://timeline-merger-ms.juejin.im/v1/get_entry_by_self',
method: "GET",
params: {
src: "web",
uid: headers['x-uid'],
device_id: headers['x-device-id'],
token: headers['x-token'],
targetUid: ctx.query.targetUid,
type: ctx.query.type || 'post',
limit: ctx.query.limit || 20,
before: ctx.query.before,
order: ctx.query.order || 'createdAt'
}
};
let { body } = await request(options)
body = toObject(body)
ctx.body = {
s: body.s,
d: body.d.entrylist || []
}
})
module.exports = router
type代表参数类型,required代表是否必填。当 type 为 enum(枚举)类型时,参数值只能为 enum 数组中的某一项。
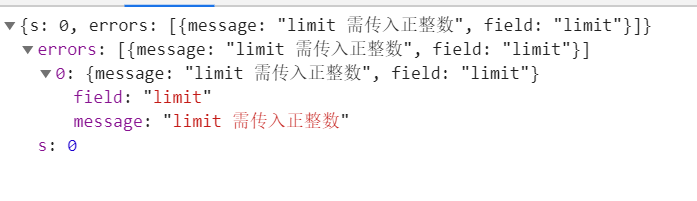
需要注意的是,number 类型在这里是无法验证的,因为参数在传输过程中会被转变为字符串类型。但是我们能通过 validator 方法自定义验证规则,就像上面的 limit 参数。
以下是当 limit 参数错误时接口返回的内容:
网站安全性
cors
设置 cors 来验证请求的安全合法性,可以让你的网站提高安全性。借助 koa2-cors 能够帮助我们更便捷的做到这些。koa2-cors 的源码也不多,建议去看看,只要你有点基础都能看懂,不仅要懂得用也要知道实现过程。
安装
npm install koa2-cors --save
使用
/server/index.js :
const cors = require('koa2-cors')
function useMiddleware(){
app.use(helmet())
app.use(bodyParser())
//设置全局返回头
app.use(cors({
// 允许跨域的域名
origin: function(ctx) {
return 'http://localhost:8000';
},
exposeHeaders: ['WWW-Authenticate', 'Server-Authorization'],
maxAge: 86400,
// 允许携带头部验证信息
credentials: true,
// 允许的方法
allowMethods: ['GET', 'POST', 'PUT', 'DELETE', 'HEAD', 'OPTIONS'],
// 允许的标头
allowHeaders: ['Content-Type', 'Authorization', 'Accept', 'X-Token', 'X-Device-Id', 'X-Uid'],
}))
}
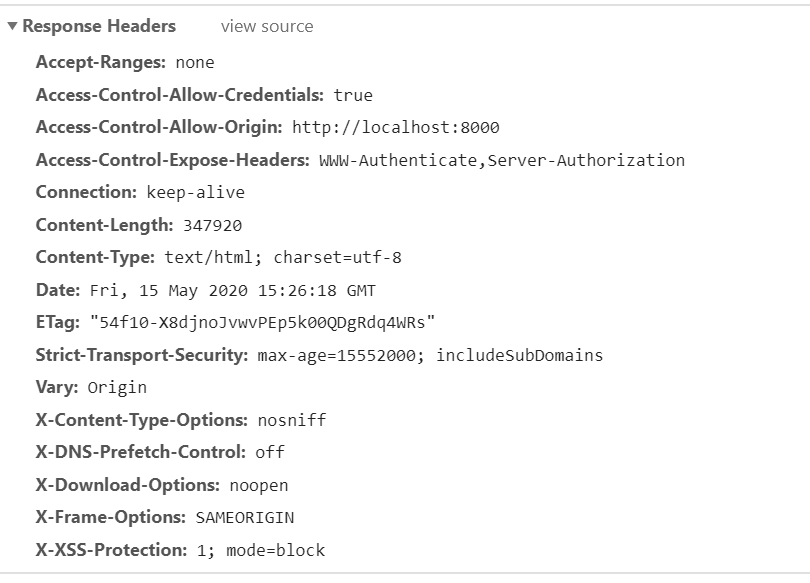
如果不符合请求的方式,或带有未允许的标头。发送请求时会直接失败,浏览器抛出 cors 策略限制的错误。下面是带有未允许标头错误的例子:

koa-helmet
koa-helmet 提供重要的安全标头,使你的应用程序在默认情况下更加安全。
安装
npm install koa-helmet --save
使用
const helmet = require('koa-helmet')
function useMiddleware(){
app.use(helmet())
// .....
}
默认为我们做了以下安全设置:
- X-DNS-Prefetch-Control: 禁用浏览器的
DNS预取。 - X-Frame-Options: 缓解点击劫持攻击。
- X-Powered-By:删除了
X-Powered-By标头,使攻击者更难于查看使网站受到潜在威胁的技术。 - Strict-Transport-Security:使您的用户使用
HTTPS。 - X-Download-Options:防止
Internet Explorer在您的站点上下文中执行下载。 - X-Content-Type-Options: 设置为
nosniff,有助于防止浏览器试图猜测(“嗅探”)MIME类型,这可能会带来安全隐患。 - X-XSS-Protection:防止反射的
XSS攻击。
更多说明和配置戳这里 https://www.npmjs.com/package/koa-helmet
最后#
感觉中间层的相关知识点还是不够全,能做的还有很多,还是得继续学习。项目后续还会更新一段时间,更多会靠近服务端这块,比如缓存优化、异常捕获这类的。
如果你有任何建议或改进,请告诉我~
😄看到这里还不来个小星星吗? https://github.com/ChanWahFung/nuxt-juejin-project
参考资料#
-
其它常见问题:https://www.nuxtjs.cn/faq
-
官方github文档:https://github.com/nuxt/docs/tree/master/zh(里面有全面配置和例子使用,部分在 Nuxt.js 文档中没有提及,很建议看下)
作者: WahFung
出处:https://www.cnblogs.com/chanwahfung/p/12899714.html
版权:本文采用「署名-非商业性使用-相同方式共享 4.0 国际」知识共享许可协议进行许可。


【推荐】国内首个AI IDE,深度理解中文开发场景,立即下载体验Trae
【推荐】编程新体验,更懂你的AI,立即体验豆包MarsCode编程助手
【推荐】抖音旗下AI助手豆包,你的智能百科全书,全免费不限次数
【推荐】轻量又高性能的 SSH 工具 IShell:AI 加持,快人一步
· 10年+ .NET Coder 心语,封装的思维:从隐藏、稳定开始理解其本质意义
· .NET Core 中如何实现缓存的预热?
· 从 HTTP 原因短语缺失研究 HTTP/2 和 HTTP/3 的设计差异
· AI与.NET技术实操系列:向量存储与相似性搜索在 .NET 中的实现
· 基于Microsoft.Extensions.AI核心库实现RAG应用
· TypeScript + Deepseek 打造卜卦网站:技术与玄学的结合
· 阿里巴巴 QwQ-32B真的超越了 DeepSeek R-1吗?
· 【译】Visual Studio 中新的强大生产力特性
· 10年+ .NET Coder 心语 ── 封装的思维:从隐藏、稳定开始理解其本质意义
· 【设计模式】告别冗长if-else语句:使用策略模式优化代码结构