Vue - 简单实现一个命令式弹窗组件
前言#
在日常工作中弹窗组件是很常用的组件,但用得多还是别人的,空闲时间就自己来简单实现一个弹窗组件
涉及知识点:extend、$mount、$el
使用方式:
this.$Confirm({
  title:'自定义标题'
}).then(res=>{
    console.log(res)
})
目录结构#

index.vue:组件布局、样式、交互逻辑
index.js:挂载组件、暴露方法
知识点#
在此之前,了解下涉及的知识点
1. extend

使用这个api,可以将引入的vue组件变成vue构造函数,实例化后方便进行扩展
2. $mount
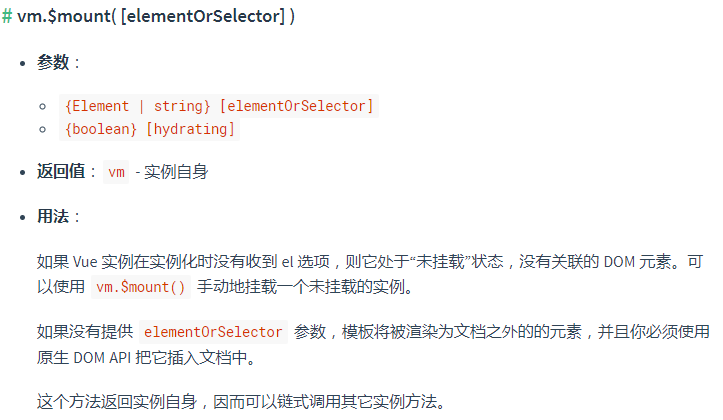
我们希望弹窗组件是在使用时才显示出来,那么就需要动态的向body中添加元素。使用$mount方法可以手动挂载一个vue实例,和 extend 刚好搭配使用,这个也是弹窗组件命令式的关键。
3. $el
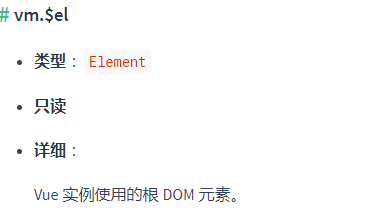
既然要添加dom元素,通过实例的$el属性,正好可以取到dom元素,之后就是使用原生方法进行添加节点啦~
代码实现#
index.vue

<template>
    <div class="wrap">
        <div class="main">
            <div class="content">
                {{title}}
            </div>
            <div class="btn-grounp">
                <div class="btn cancel" @click="cancel">{{cancelText}}</div>
                <div class="btn confirm" @click="confirm">{{confirmText}}</div>
            </div>
        </div>
    </div>
</template>

<script>
export default {
    name:'',
    data () {
        return {
            title:'这是一个弹窗',
            confirmText:'确定',
            cancelText:'取消'
        };
    },
    methods: {
        show(cb){
            typeof cb === 'function' && cb.call(this,this)
            return new Promise(resolve=>{
                this.resolve = resolve
            })
        },
        confirm(){
            this.resolve('confirm')
            this.hide()
        },
        cancel(){
            this.resolve('cancel')
            this.hide()
        },
        hide(){
            document.body.removeChild(this.$el)
            this.$destroy()
        }
    },
}

</script>

<style scoped>
.wrap{
    position: fixed;
    top: 0;
    bottom:0;
    left:0;
    right:0;
    display:flex;
    justify-content: center;
    align-items: center;
    background: rgba(0,0,0,.3);
}
.main{
    width: 30%;
    padding: 10px;
    background: #fff;
    box-shadow: 0 0 10px 1px #ddd;
    border-radius: 5px;
}
.content{
    color:#424242;
    font-size: 20px;
}
.btn-grounp{
    margin-top: 15px;
    display:flex;
    justify-content: flex-end;
}
.btn{
    margin-left: 15px;
    padding: 5px 20px;
    border-radius: 5px;
    font-size: 16px;
    color:#fff;
}
.confirm{
    background: lightblue;
}
.cancel{
    background: lightcoral;
}
</style>
index.js
import Vue from 'vue'
import comfirm from './index.vue'

let newInstance = null

//将vue组件变为构造函数
let ConfirmConstructor = Vue.extend(comfirm)

let init = (options)=>{
    //实例化组件
    newInstance = new ConfirmConstructor()
   //合并配置选项
    Object.assign(newInstance,options)
   //使用$mount()后  可以理解为创建虚拟的dom
    document.body.appendChild(newInstance.$mount().$el)
}
let caller = (options)=>{
    //options 为调用组件方法时传入的配置选项
    if(!newInstance){
        init(options)
    }
    return newInstance.show(vm =>{newInstance = null})
}
export default {
    install(vue){
        vue.prototype.$Confirm = caller
    }
}
main.js
上面我对外暴露的对象中含有install方法,这里可以使用Vue.use注册组件(使用Vue.use后,会查找install方法进行调用),将组件调用方法挂载到Vue原型上。
import Confirm from './components/confirm'
Vue.use(Confirm)
写在最后#
这个弹窗组件比较简陋,还有很多地方可以完善
作者: WahFung
出处:https://www.cnblogs.com/chanwahfung/p/11575621.html
版权:本文采用「署名-非商业性使用-相同方式共享 4.0 国际」知识共享许可协议进行许可。
标签:
vue


【推荐】国内首个AI IDE,深度理解中文开发场景,立即下载体验Trae
【推荐】编程新体验,更懂你的AI,立即体验豆包MarsCode编程助手
【推荐】抖音旗下AI助手豆包,你的智能百科全书,全免费不限次数
【推荐】轻量又高性能的 SSH 工具 IShell:AI 加持,快人一步
· 10年+ .NET Coder 心语,封装的思维:从隐藏、稳定开始理解其本质意义
· .NET Core 中如何实现缓存的预热?
· 从 HTTP 原因短语缺失研究 HTTP/2 和 HTTP/3 的设计差异
· AI与.NET技术实操系列:向量存储与相似性搜索在 .NET 中的实现
· 基于Microsoft.Extensions.AI核心库实现RAG应用
· TypeScript + Deepseek 打造卜卦网站:技术与玄学的结合
· 阿里巴巴 QwQ-32B真的超越了 DeepSeek R-1吗?
· 【译】Visual Studio 中新的强大生产力特性
· 10年+ .NET Coder 心语 ── 封装的思维:从隐藏、稳定开始理解其本质意义
· 【设计模式】告别冗长if-else语句:使用策略模式优化代码结构