安装MySQL
安装MySQL 5.7#
CentOS 7上安装#
YUM安装MySQL#
1.下载MySQL5.7的yum源:
wget https://dev.mysql.com/get/mysql57-community-release-el7-11.noarch.rpm
2.安装该rpm包:
rpm -ivh mysql57-community-release-el7-11.noarch.rpm
3.再次使用yum来安装mysql-server:
yum install -y mysql-server
4.安装完成后,启动mysqld服务:
systemctl start mysqld
5.查看是否成功启动:
ps aux|grep mysqld
6. 设置mysqld服务开机自启动:
systemctl enable mysqld
7. 使用初始密码登录
由于MySQL从5.7开始不允许首次安装后,使用空密码进行登录,系统会随机生成一个密码以供管理员首次登录使用,这个密码记录在/var/log/mysqld.log文件中,使用下面的命令可以查看此密码:
cat /var/log/mysqld.log|grep 'A temporary password'
2017-11-12T13:35:37.013617Z 1 [Note] A temporary password is generated for root@localhost: bkv,dy,)o7Ss
最后一行冒号后面的部分bkv,dy,)o7Ss就是初始密码。
使用此密码登录MySQL: mysql -u root -p
8. 更改默认密码:
切换数据库: use mysql;
修改root密码: alter user 'root'@'localhost' identified by 'your_password';
这个密码是强密码,要求密码包含大小写字母、数字及标点符号,长度应该在6位以上。
重新使用新的密码登录,如果可以正常登录说明MySQL已经成功安装
*设置简易密码(MySQL5.7已经不支持简易密码,所以需要卸载插件)
卸载插件: uninstall plugin validate_password;
更改密码: update user set authentication_string=password('123abc') where user='root'
更改Group By默认设置 set sql_mode='STRICT_TRANS_TABLES,NO_ZERO_IN_DATE,NO_ZERO_DATE,ERROR_FOR_DIVISION_BY_ZERO,NO_ENGINE_SUBSTITUTION';
允许root远程登录:
GRANT ALL PRIVILEGES ON *.* TO 'myuser'@'%'IDENTIFIED BY 'mypassword' WITH GRANT OPTION;
FLUSH PRIVILEGES;
CentOS上离线安装MySQL#
首先需要卸载mariadb
1 2 3 4 5 | # 查看当前的数据库rpm -qa | grep mariadb# 卸载当前所安装的数据库rpm -e --nodeps mariadb-libs-5.5.35-3.el7.x86_64 |
卸载旧版本的MySQL
1 2 3 4 5 | # 查询当前旧版本的数据库rpm -qa|grep mysql# 卸载rpm –ev mysql-community-client-5.7.26-1.el7.x86_64 |
查询旧版本的MySQL安装目录并删除
1 2 | find / -name mysql<br>whereis mysqlrm –rf {目录名} |
MySQL用户设置
1 2 3 4 5 6 7 | # 查看有无MySQL用户组和用户,有则删除,无则跳过cat /etc/group | grep mysqlcat /etc/passwd | grep mysql# 创建MySQL用户组和用户groupadd mysqluseradd -r -g mysql mysql |
安装MySQL
1 2 3 4 5 6 7 8 9 10 11 12 13 14 15 16 17 18 19 20 | # 下载安装包wget https://repo.huaweicloud.com/mysql/Downloads/MySQL-5.7/mysql-5.7.38-linux-glibc2.12-x86_64.tar.gz# 解压安装包tar -xzvf mysql-5.7.38-linux-glibc2.12-x86_64.tar.gz# 新建文件用以存放MySQL程序mkdir /usr/local/mysql57# 将解压后的文件夹移动到 /usr/local 下mv mysql-5.7.38-linux-glibc2.12-x86_64/* /usr/local/mysql57# 更改MySQL程序文件夹所属用户和所属组chown -R mysql:mysql /usr/local/mysql57chmod -R 755 /usr/local/mysql57# 进入/usr/local/mysql57/bin/目录,编译安装并初始化mysql,务必记住数据库管理员临时密码./mysqld --initialize --user=mysql --datadir=/usr/local/mysql57/data --basedir=/usr/local/mysql57# 2022-07-23T23:31:17.761415Z 1 [Note] A temporary password is generated for root@localhost: -:jZVt8jpf2中,jZVt8jpf2就是密码 |
编辑MySQL配置文件/etc/my.cnf
1 2 3 4 5 6 7 | [mysqld]basedir=/usr/local/mysql57/datadir=/usr/local/mysql57/data/port=3306symbolic-links=0max_connections=400innodb_file_per_table=1 |
为MySQL配置文件授权
1 | chmod 775 /etc/my.cnf |
修改/usr/local/mysql57/support-files/目录下的mysql.server文件,如下图中5个位置的/usr/local/mysql全部修改成/usr/local/mysql57
修改之后
启动MySQL服务器
1 2 3 4 5 6 | # 查询MySQL是否启动ps -ef | grep mysqlps -ef | grep mysqld# 启动服务/usr/local/mysql57/support-files/mysql.server start |
服务启动制作
1 2 3 4 5 6 7 8 9 10 11 12 13 14 15 16 17 18 19 20 21 22 23 24 25 26 27 28 29 30 | # 添加MySQL软连接重新启动ln -s /usr/local/mysql57/support-files/mysql.server /etc/init.d/mysqlln -s /usr/local/mysql57/bin/mysql /usr/bin/mysql# 重新启动service mysql restart# 制作systemctl启动vim /usr/lib/systemd/system/mysql.service# 填入如下内容[Unit]Description=mysql57After=network.target[Service]Type=forkingPIDFile=/usr/local/mysql57/data/pythonServer.pidExecStart=/usr/local/mysql57/support-files/mysql.server startExecReload=/usr/local/mysql57/support-files/mysql.server restartExecStop=/usr/local/mysql57/support-files/mysql.server stopPrivateTmp=true[Install]WantedBy=multi-user.target# 刷新系统的服务systemctl daemon-reload# 然后就可以用systemctl来启动服务了 |
登录MySQL服务器,使用之前记录的密码登录
1 2 3 4 5 6 7 8 9 10 11 12 13 14 15 16 17 18 19 20 21 22 | # 修改root密码alter user 'root'@'localhost' identified by 'your_password'; # 这个密码是强密码,要求密码包含大小写字母、数字及标点符号,长度应该在6位以上。重新使用新的密码登录,如果可以正常登录说明MySQL已经成功安装#设置简易密码(MySQL5.7已经不支持简易密码,所以需要卸载插件)# 切换数据库use mysql; # 卸载插件uninstall plugin validate_password; # 更改密码update user set authentication_string=password('0') where user='root'# 更改Group By默认设置set sql_mode='STRICT_TRANS_TABLES,NO_ZERO_IN_DATE,NO_ZERO_DATE,ERROR_FOR_DIVISION_BY_ZERO,NO_ENGINE_SUBSTITUTION'; # 允许root远程登录:GRANT ALL PRIVILEGES ON *.* TO 'myuser'@'%'IDENTIFIED BY 'mypassword' WITH GRANT OPTION;FLUSH PRIVILEGES; |
Ubuntu 16 上安装#
这里使用apt安装,官网传送门
sudo apt-get install mysql-server
等待安装完成之后,执行脚本
sudo mysql_secure_installation
具体如下

chancey@PythonServer:~$ sudo mysql_secure_installation

Securing the MySQL server deployment.

Connecting to MySQL using a blank password.

VALIDATE PASSWORD PLUGIN can be used to test passwords
and improve security. It checks the strength of password
and allows the users to set only those passwords which are
secure enough. Would you like to setup VALIDATE PASSWORD plugin?

Press y|Y for Yes, any other key for No: n
Please set the password for root here.

New password:

Re-enter new password:
By default, a MySQL installation has an anonymous user,
allowing anyone to log into MySQL without having to have
a user account created for them. This is intended only for
testing, and to make the installation go a bit smoother.
You should remove them before moving into a production
environment.

Remove anonymous users? (Press y|Y for Yes, any other key for No) : n

 ... skipping.


Normally, root should only be allowed to connect from
'localhost'. This ensures that someone cannot guess at
the root password from the network.

Disallow root login remotely? (Press y|Y for Yes, any other key for No) : n

 ... skipping.
By default, MySQL comes with a database named 'test' that
anyone can access. This is also intended only for testing,
and should be removed before moving into a production
environment.


Remove test database and access to it? (Press y|Y for Yes, any other key for No) : n

 ... skipping.
Reloading the privilege tables will ensure that all changes
made so far will take effect immediately.

Reload privilege tables now? (Press y|Y for Yes, any other key for No) : y
Success.

All done!
启动服务
sudo systemctl start mysql
更改Group By默认设置 set sql_mode='STRICT_TRANS_TABLES,NO_ZERO_IN_DATE,NO_ZERO_DATE,ERROR_FOR_DIVISION_BY_ZERO,NO_ENGINE_SUBSTITUTION';
Windows上安装#
访问地址MySQL下载,选择适合自己版本的MySQL
运行msi文件
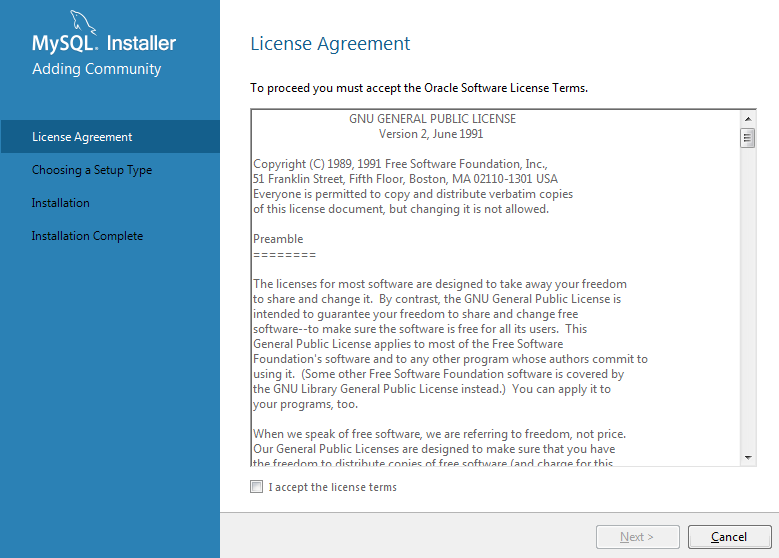
勾选 I accept the license terms 之后下一步
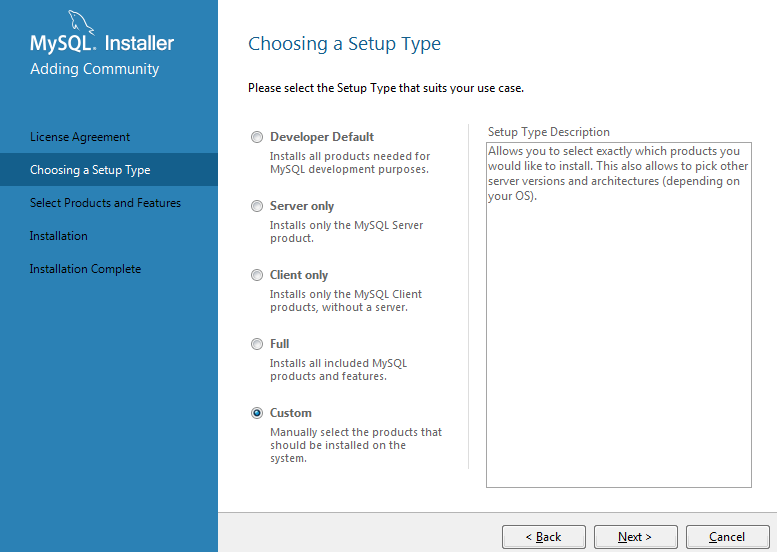
这里选择Custom,即自定义安装
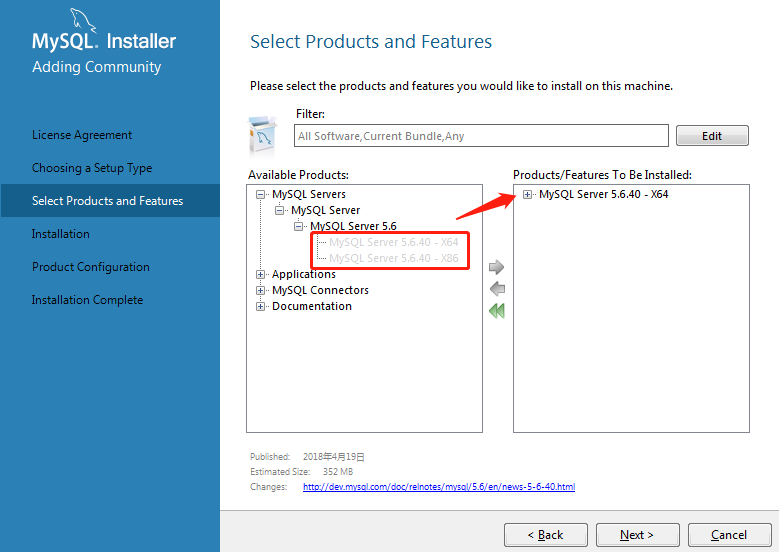
选择合适的版本
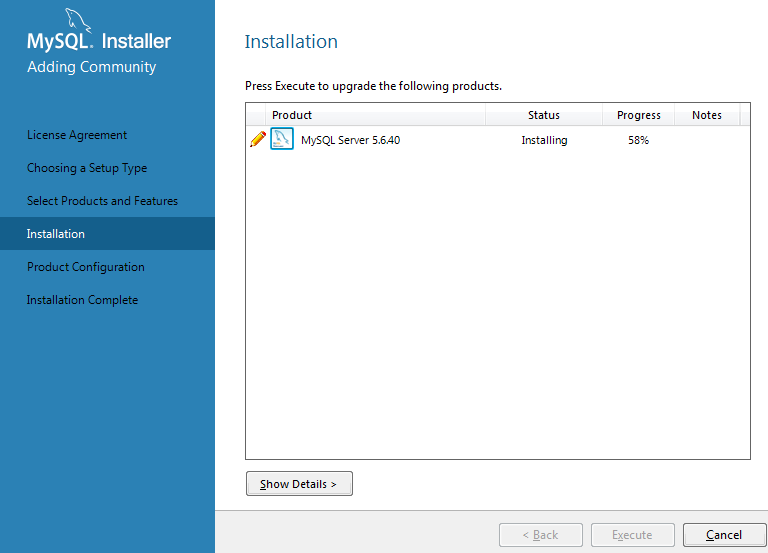
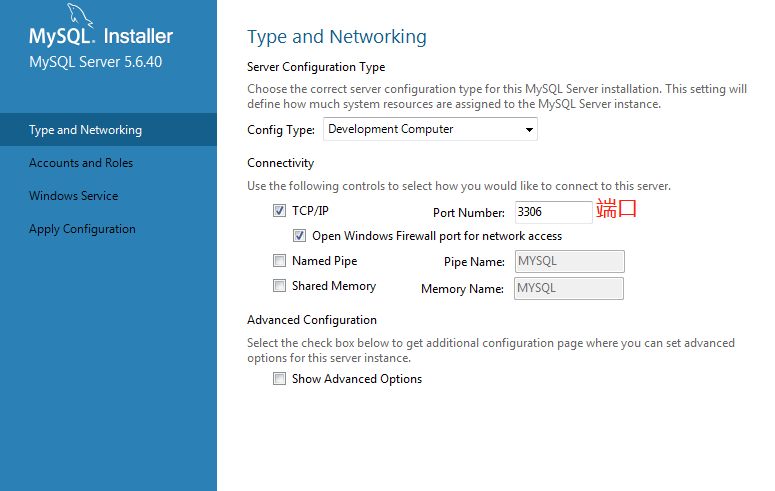
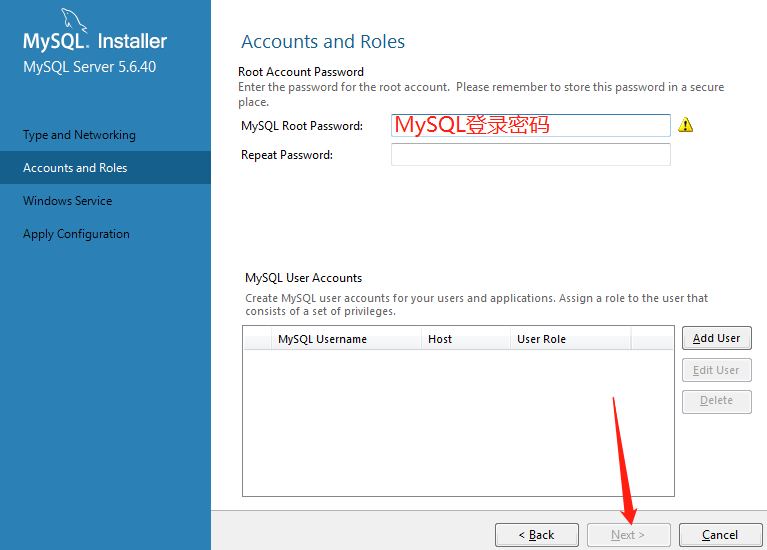
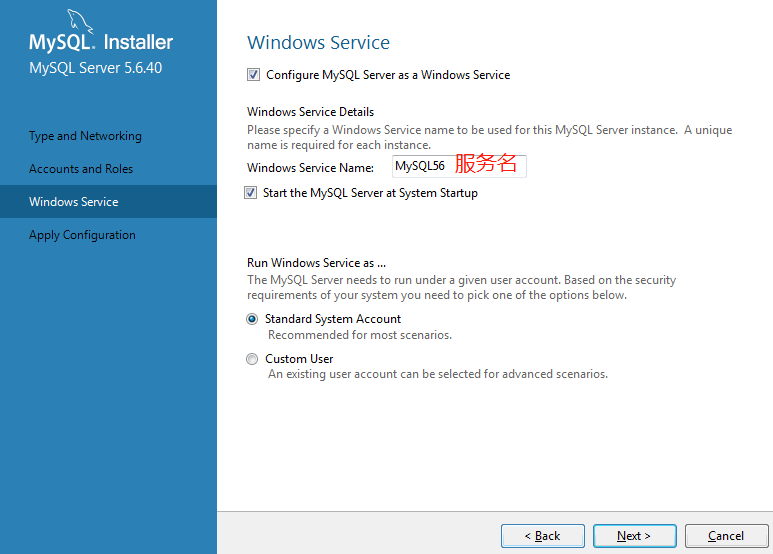
安装完毕后配置用户信息
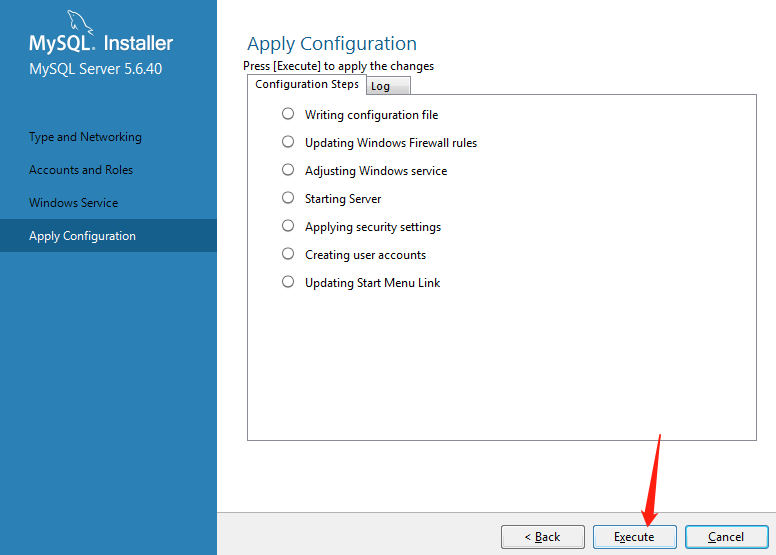
开始配置
安装完成
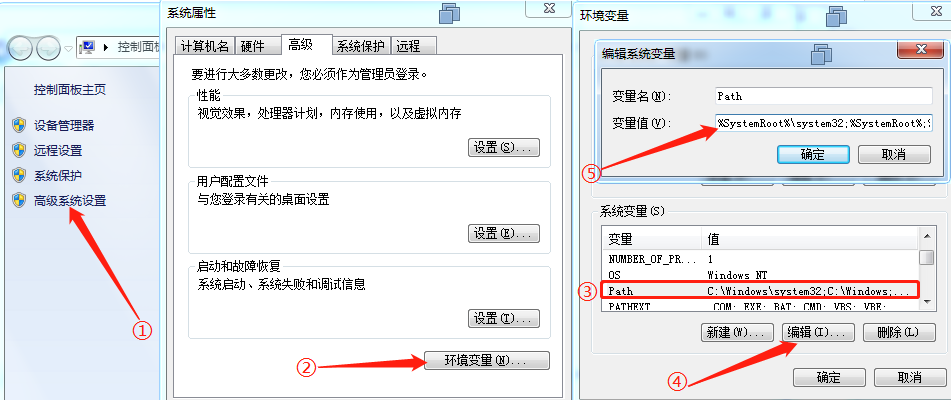
******配置环境变量*****
将MySQL的安装路径添加进去,以分号隔开
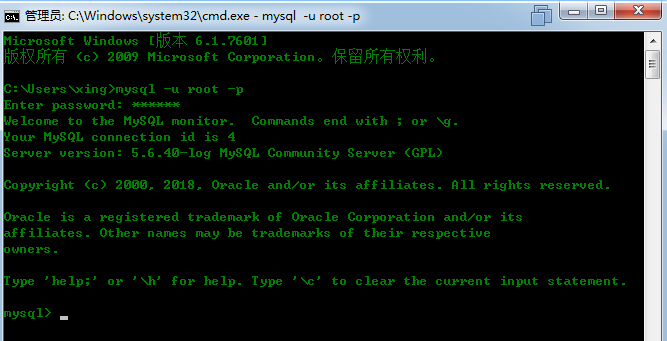
成功访问
作者:ChanceySolo
出处:https://www.cnblogs.com/chancey/p/9848878.html
版权:本作品采用「ChanceySolo-非商业性使用-相同方式共享 4.0 国际」许可协议进行许可。





【推荐】国内首个AI IDE,深度理解中文开发场景,立即下载体验Trae
【推荐】编程新体验,更懂你的AI,立即体验豆包MarsCode编程助手
【推荐】抖音旗下AI助手豆包,你的智能百科全书,全免费不限次数
【推荐】轻量又高性能的 SSH 工具 IShell:AI 加持,快人一步
· AI与.NET技术实操系列:基于图像分类模型对图像进行分类
· go语言实现终端里的倒计时
· 如何编写易于单元测试的代码
· 10年+ .NET Coder 心语,封装的思维:从隐藏、稳定开始理解其本质意义
· .NET Core 中如何实现缓存的预热?
· 25岁的心里话
· 闲置电脑爆改个人服务器(超详细) #公网映射 #Vmware虚拟网络编辑器
· 基于 Docker 搭建 FRP 内网穿透开源项目(很简单哒)
· 零经验选手,Compose 一天开发一款小游戏!
· 一起来玩mcp_server_sqlite,让AI帮你做增删改查!!