
centos7通过kubeadm快速部署kubernetes 1.22.0集群
一、K8S集群规划
本文以安装K8S V1.22.0为例。
K8S集群节点规划:
K8S-master01、K8S-master02、K8S-master03:K8S集群控制节点;
K8S-node01、K8S-node02:K8S集群工作节点;
K8S集群硬件要求:
K8S-master01~03:CPU 2*2C;MEM 2G;DISK 100G;网络:nat模式;系统:centos7;IP:192.168.1.201~203/24;
K8S-node01、K8S-node02:CPU 2*2C;MEM 4G;DISK 100G;网络:nat模式;系统:centos7;IP:192.168.1.204~205/24;
k8s-master0lb:192.168.1.236;该VIP不要和公司内网IP重复;
docker版本:19.03.*;
pod网段:172.168.0.0./12;
service网段:10.96.0.0/12;
部署注意事项:
centos7需升级最新版本,避免与K8S高版本出现不兼容情况;
pod,service,宿主机网段不能重复;
VIP不能与公司内网(包括宿主机)其他IP重复;
centos7需要升级最新,centos8可按需升级系统,但尽量更新软件版本;
内核必须升级4.18以上,否则会引起各种问题,如:磁盘空间不足但实际有空间,pod网络不通;
二、kubeadm工具进行K8S集群部署
×××××××××××××××××××××××××××以下内容在master01执行×××××××××××××××××××××××××××
1、创建centos7虚拟机;
2、安装centos7系统;
3、设置系统IP、网关、DNS等;
BOOTPROTO=none
IPADDR=192.168.1.201
PREFIX=24
GATEWAY=192.168.1.254
DNS1=192.168.1.254
4、xshell连接K8S-master01主机,进行集群部署。
hostnamectl set-hostname k8s-master01
×××××××××××××××××××××××××××以下内容在master02执行×××××××××××××××××××××××××××
1、创建centos7虚拟机;
2、安装centos7系统;
3、设置系统IP、网关、DNS等;
BOOTPROTO=none
IPADDR=192.168.1.202
PREFIX=24
GATEWAY=192.168.1.254
DNS1=192.168.1.254
4、xshell连接K8S-master02主机,进行集群部署。
hostnamectl set-hostname K8S-master02
×××××××××××××××××××××××××××以下内容在master03执行×××××××××××××××××××××××××××
1、创建centos7虚拟机;
2、安装centos7系统;
3、设置系统IP、网关、DNS等;
BOOTPROTO=none
IPADDR=192.168.1.203
PREFIX=24
GATEWAY=192.168.1.254
DNS1=192.168.1.254
4、xshell连接K8S-master03主机,进行集群部署。
hostnamectl set-hostname K8S-master03
×××××××××××××××××××××××××××以下内容在node01执行×××××××××××××××××××××××××××
1、创建centos7虚拟机;
2、安装centos7系统;
3、设置系统IP、网关、DNS等;
BOOTPROTO=none
IPADDR=192.168.1.204
PREFIX=24
GATEWAY=192.168.1.254
DNS1=192.168.1.254
4、xshell连接K8S-node01主机,进行集群部署。
hostnamectl set-hostname K8S-node01
×××××××××××××××××××××××××××以下内容在node02执行×××××××××××××××××××××××××××
1、创建centos7虚拟机;
2、安装centos7系统;
3、设置系统IP、网关、DNS等;
BOOTPROTO=none
IPADDR=192.168.1.205
PREFIX=24
GATEWAY=192.168.1.254
DNS1=192.168.1.254
4、xshell连接K8S-node02主机,进行集群部署。
hostnamectl set-hostname K8S-node02


×××××××××××××××××××××××××××以下内容在所有节点执行×××××××××××××××××××××××××××
echo '
192.168.1.201  k8s-master01
192.168.1.202  k8s-master02
192.168.1.203  k8s-master03
192.168.1.204  k8s-node01
192.168.1.205  k8s-node02
192.168.1.236  k8s-master01-lb
' >>/etc/hosts
hostname;cat /etc/hosts
###添加centos7及k8s的国内repo源
cd;mv /etc/yum.repos.d{,.bak.`date +%y%m%d`};mkdir /etc/yum.repos.d/;cd /etc/yum.repos.d/
curl -o /etc/yum.repos.d/epel.repo http://mirrors.aliyun.com/repo/epel-7.repo
curl -o /etc/yum.repos.d/centos7.repo http://mirrors.aliyun.com/repo/Centos-7.repo
curl -o /etc/yum.repos.d/docker-ce.repo https://mirrors.aliyun.com/docker-ce/linux/centos/docker-ce.repo
cat <<eof> kubernetes.repo
[kubernetes]
name=kubernetes
baseurl=https://mirrors.aliyun.com/kubernetes/yum/repos/kubernetes-el7-x86_64
enabled=1
gpgchek=1
gpgkey=https://mirrors.aliyun.com/kubernetes/yum/doc/yum-key.gpg https://mirrors.aliyun.com/kubernetes/yum/doc/rpm-package-key.gpg
eof
yum clean all;yum makecache fast;yum repolist all

yum -y install yum-utils device-mapper-persistent-data lvm2  #安装docker必备工具;
yum -y install conntrack-tools wget jq psmisc vim-enhanced net-tools telnet git ntpdate ntp ipvsadm ipset iptables curl sysstat libseccomp #安装系统所需工具;

##设置防火墙为iptables并设置空规则
systemctl stop firewalld && systemctl disable firewalld;yum -y install iptables-services && systemctl start iptables && systemctl enable iptables && iptables -F && service iptables save
systemctl status firewalld;systemctl status iptables

##关闭selinux
setenforce 0 && sed -i 's/SELINUX=enforcing/SELINUX=disabled/g' /etc/selinux/config
getenforce;grep -Ev '^#|^$' /etc/selinux/config

##关闭虚拟内存;
swapoff -a && sed -i '/ swap /s/^\(.*\)$/#\1/g' /etc/fstab

##设置系统时区
timedatectl set-timezone Asia/Shanghai
timedatectl set-local-rtc 0                 #将当前UTC时间写入硬件时钟;

##同步各节点时间,若时间不同步可能引起证书不可用的情况;
yum -y install ntpdate                                              #centos7.9及以后版本不再使用该工具;
ntpdate ntp1.aliyun.com;hwclock --systohc                           #同步系统时钟及硬件时钟;
date;hwclock
cat <<eof>> /etc/crontab                                            #若是非root账户,则手动crontab -e添加定期同步时钟任务;
0 10 * * * root /usr/sbin/ntpdate ntp1.aliyun.com                   #各节点每天早上10:00同步时钟;
10 10 * * * root hwclock --systohc  #各节点每天早上10:10同步时钟;
eof

##设置所有节点limit并使之永久生效;
ulimit -SHn 65535
cat <<eof>> /etc/security/limits.conf
* soft nofile 655360
* hard nofile 131072
* soft nproc 655350
* hard nproc 655350
* soft memlock unlimited
* hard memlock unlimited
eof
tail /etc/security/limits.conf


×××××××××××××××××××××××××××以下内容在master01执行×××××××××××××××××××××××××××
###生成ssh密钥对
ssh-keygen -t rsa
    # ~~~默认enter
    # ~~~默认enter
cd /root/.ssh
for i in K8S-master01 K8S-master02 K8S-master03 K8S-node01 K8S-node02;do ssh-copy-id -i id_rsa.pub $i;done
    # ~~~yes
    #       目的主机密码;

×××××××××××××××××××××××××××以下内容在所有节点执行×××××××××××××××××××××××××××
yum -y update --exclude=kernel*             #centos7需要升级最新,centos8可按需升级系统;
cat /etc/system-release                     #centos版本升级为最新7.9;
wget http://193.49.22.109/elrepo/kernel/el7/x86_64/RPMS/kernel-ml-devel-4.19.12-1.el7.elrepo.x86_64.rpm
wget http://193.49.22.109/elrepo/kernel/el7/x86_64/RPMS/kernel-ml-4.19.12-1.el7.elrepo.x86_64.rpm
yum -y localinstall kernel-ml*
awk -F \' '$1=="menuentry " {print i++ " : " $2}' /etc/grub2.cfg  #查看所有内核启动顺序;kernel-ml-4.19.12-1.el7.elrepo.x86_64
grub2-set-default 0         #设置序号为0的内核为默认启动项;
grub2-editenv list          #确认当前的默认启动内核;
reboot      #重启后使内核生效;
cat /etc/system-release && uname -a

##所有节点配置ipvs模块;内核4.18-版本为nf_conntrack_ipv4;内核4.19+版本已经修改为nf_conntrack;生产环境建议使用ipvs,不使用iptables;
#安装ipvsadm相关软件,已执行;
cat <<eof> /etc/sysconfig/modules/ipvs.modules
#!/bin/bash
modprobe -- ip_vs
modprobe -- ip_vs_rr
modprobe -- ip_vs_wrr
modprobe -- ip_vs_sh
modprobe -- nf_conntrack
eof
chmod 755 /etc/sysconfig/modules/ipvs.modules && bash /etc/sysconfig/modules/ipvs.modules
cat <<eof> /etc/modules-load.d/ipvs.conf
ip_vs
ip_vs_lc
ip_vs_wlc
ip_vs_wrr
ip_vs_lblc
ip_vs_lblcr
ip_vs_dh
ip_vs_sh
ip_vs_fo
ip_vs_nq
ip_vs_sed
ip_vs_ftp
ip_vs_sh
nf_contrack
ip_tables
ip_set
xt_set
ipt_set
ipt_rpfilter
ipt_REJECT
ipip
eof
systemctl enable --now systemd-modules-load.service
systemctl status systemd-modules-load.service

##开启K8S必需的内核参数,除前3条外其他为优化项。
cat  <<eof> /etc/sysctl.d/kubernetes.conf
net.bridge.bridge-nf-call-iptables=1    #前2条为开启网桥模式,必做,否则安装K8S会报错。
net.bridge.bridge-nf-call-ip6tables=1   #前2条为开启网桥模式,必做,否则安装K8S会报错。
net.ipv6.conf.all.disable_ipv6=1        #关闭IPv6,必做,否则安装K8S会报错。
net.ipv4.ip_forward=1
net.ipv4.tcp_tw_recycle=0
net.ipv4.tcp_keepalive_time=600
net.ipv4.tcp_keepalive_probes=3
net.ipv4.tcp_keepalive_intvl=15
net.ipv4.tcp_max_tw_buckets=36000
net.ipv4.tcp_tw_reuse=1
net.ipv4.tcp_max_orphans=327680
net.ipv4.tcp_orphans_retries=3
net.ipv4.tcp_syncookies=1
net.ipv4.tcp_max_syn_backlog=16384
net.ipv4.ip_conntrack_max=65536
net.ipv4.tcp_max_syn_backlog=16384
net.ipv4.tcp_timestamps=0
net.core.somaxconn=16384
vm.swappiness=0                         #禁止使用swap空间,只有当系统OOM时才允许使用它;
vm.overcommit_memory=1                  #不检查物理内存是否够用;
vm.panic_on_oom=0                       #开启OOM;
fs.may_detach_mounts=1
fs.inotify.max_user_instances=8192
fs.inotify.max_user_watches=89100
fs.file-max=52706963
fs.nr_open=52706963
net.netfilter.nf_conntrack_max=2310720
eof
modprobe br_netfilter #加载模块,使得/proc/sys/net/bridge/bridge-nf-call-iptables、/proc/sys/net/bridge/bridge-nf-call-ip6tables文件存在:
sysctl -p /etc/sysctl.d/kubernetes.conf #加载指定文件;
sysctl --system #从所有系统目录中加载;
reboot
ls /proc/sys/net/bridge && lsmod |grep --color=auto -e ip_vs -e nf_conntrack    #检测是否加载成功;


##安装docker软件
#添加docker-ce.repo,已执行;
yum list --showduplicates docker-ce*
yum -y install docker-ce-19.03* docker-client-19.03*
mkdir /etc/docker
##native.cgroupdriver=systemd表示交由systemd进行cgroup执行隔离;日志修改为json-file存储类型,大小为100M;
cat > /etc/docker/daemon.json <<eof
{
    "exec-opts":["native.cgroupdriver=systemd"],
    "log-driver":"json-file",
    "log-opts":{
        "max-size":"100m"
    }
}
eof
mkdir -p /etc/systemd/system/docker.service.d
systemctl daemon-reload && systemctl --now enable docker
systemctl status docker
docker version

×××××××××××××××××××××××××××以下内容在所有master节点执行×××××××××××××××××××××××××××
##安装高可用组件
######若为单节点则无需执行,本节采用haproxy+keepalived进行高可用配置;如果使用云上的lb,则也不需执行该节(如腾讯云elb---》apiserver),但是阿里云slb因回环设置防止路由黑洞的原因,需要执行该节进行haproxy+keepalived安装(阿里云slb---》haproxy---》apiserver);
yum -y install haproxy keepalived
cp /etc/haproxy/haproxy.cfg{,.bak}
cat <<eof> /etc/haproxy/haproxy.cfg
global
    maxconn     2000
    ulimit-n    16384
    log         127.0.0.1 local0 err
    stats timeout 30s

defaults
    mode                    http
    log                     global
    option                  httplog
    timeout connect         5000
    timeout client          50000
    timeout server          50000
    timeout http-request    15s
    timeout http-keep-alive 15s

frontend monitor-in
    bind *:33305
    mode http
    option httplog
    monitor-uri /monitor

frontend K8S-master
    bind 0.0.0.0:16443
    bind 127.0.0.1:16443
    mode tcp
    option tcplog
    tcp-request inspect-delay 5s
    default_backend k8s-master

backend k8s-master
    mode tcp
    option tcplog
    option tcp-check
    balance roundrobin
    default-server inter 10s downinter 5s rise 2 fall 2 slowstart 60s maxconn 250 maxqueue 256 weight 100
    server k8s-master01 192.168.1.201:6443 check
    server k8s-master02 192.168.1.202:6443 check
    server k8s-master03 192.168.1.203:6443 check
eof


systemctl restart haproxy;systemctl status haproxy
##########k8s-master01执行如下内容#################################
cp /etc/keepalived/keepalived.conf{,.bak}
cat <<eof> /etc/keepalived/keepalived.conf
! Configuration File for keepalived

global_defs {
   # notification_email {
   #   13802883042@139.com
   # }
   # smtp_server 127.0.0.1
   # smtp_connect_timeout 30
   router_id LVS_DEVEL
   script_user root
   enable_script_security
}

vrrp_script chk_apiserver {
    script "/etc/keepalived/check_apiserver.sh"
    interval 5
    weight -5
    fall 2
    rise 1
}

vrrp_instance VI_1 {
    state MASTER
    interface ens33            #根据实际节点修改;
    mcast_src_ip 192.168.1.201 #根据实际节点修改;
    virtual_router_id 51
    priority 100
    advert_int 2
    # smtp alert
    # nopreempt
    # track_interface {
    #     bond0.736
    # }
    track_script {
        chk_apiserver #开启健康检查
    }
    authentication {
        auth_type PASS
        auth_pass K8SHA_KA_AUTH
    }
    virtual_ipaddress {
        192.168.1.236
    }
}
eof
##########k8s-master02执行如下内容#################################
cp /etc/keepalived/keepalived.conf{,.bak}
cat <<eof> /etc/keepalived/keepalived.conf
! Configuration File for keepalived

global_defs {
   # notification_email {
   #   13802883042@139.com
   # }
   # smtp_server 127.0.0.1
   # smtp_connect_timeout 30
   router_id LVS_DEVEL
   script_user root
   enable_script_security
}

vrrp_script chk_apiserver {
    script "/etc/keepalived/check_apiserver.sh"
    interval 5
    weight -5
    fall 2
    rise 1
}

vrrp_instance VI_1 {
    state MASTER
    interface ens33            #根据实际节点修改;
    mcast_src_ip 192.168.1.202 #根据实际节点修改;
    virtual_router_id 51
    priority 101
    advert_int 2
    # smtp alert
    # nopreempt
    # track_interface {
    #     bond0.736
    # }
    track_script {
        chk_apiserver #开启健康检查
    }
    authentication {
        auth_type PASS
        auth_pass K8SHA_KA_AUTH
    }
    virtual_ipaddress {
        192.168.1.236
    }
}
eof

##########k8s-master03执行如下内容#################################
cp /etc/keepalived/keepalived.conf{,.bak}
cat <<eof> /etc/keepalived/keepalived.conf
! Configuration File for keepalived

global_defs {
   # notification_email {
   #   13802883042@139.com
   # }
   # smtp_server 127.0.0.1
   # smtp_connect_timeout 30
   router_id LVS_DEVEL
   script_user root
   enable_script_security
}

vrrp_script chk_apiserver {
    script "/etc/keepalived/check_apiserver.sh"
    interval 5
    weight -5
    fall 2
    rise 1
}

vrrp_instance VI_1 {
    state MASTER
    interface ens33            #根据实际节点修改;
    mcast_src_ip 192.168.1.203 #根据实际节点修改;
    virtual_router_id 51
    priority 102
    advert_int 2
    # smtp alert
    # nopreempt
    # track_interface {
    #     bond0.736
    # }
    track_script {
        chk_apiserver       #开启健康检查
    }
    authentication {
        auth_type PASS
        auth_pass K8SHA_KA_AUTH
    }
    virtual_ipaddress {
        192.168.1.236
    }
}
eof

×××××××××××××××××××××××××××以下内容在所有master节点执行×××××××××××××××××××××××××××
cat <<eof> /etc/keepalived/check_apiserver.sh
#!/bin/bash
err=0
for k in $(seq 1 3)
do
    check_code=$(pgrep haproxy)
    if [[ $check_code == "" ]];then
        err=$(expr $err + 1)
        sleep 1
        continue
    else
        err=0
        break
    fi
done

if [[ $err != "0" ]];then
    echo "systemctl stop keepalived"
    /usr/bin/systemctl stop keepalived
    exit 1
else
    exit 0
fi
eof
chmod +x /etc/keepalived/check_apiserver.sh
systemctl enable --now haproxy;systemctl enable --now keepalived
systemctl status haproxy;systemctl status keepalived
ping 192.168.1.236 -c 5
netstat -anptu |grep 16443
telnet 192.168.1.201 6443
telnet 192.168.1.236 16443  #如果vip端口不通,则需排查防火墙,selinux、网络及软件配置问题。


×××××××××××××××××××××××××××以下内容在所有节点执行×××××××××××××××××××××××××××
##安装kubeadm;在前面已添加kubernetes.repo;
yum list kubeadm --showduplicates | sort -r
yum -y install kubeadm-1.22.0 kubectl-1.22.0 kubelet-1.22.0 #生产环境一般使用小版本≥5;该版本会要求下载K8S 1.15.*镜像;
yum list kube*
#默认配置的pause镜像使用改成人gcr.io仓库,以下修改kubelet为阿里云的pause镜像源;
cat <<eof> /etc/sysconfig/kubelet
KUBELET_EXTRA_ARGS="--cgroup-driver=systemd --pod-infra-container-image=registry.cn-hangzhou.aliyuncs.com/google_containers/pause-amd64:3.2"
eof
cat /etc/sysconfig/kubelet
systemctl enable --now kubelet.service
systemctl status kubelet.service
kubeadm version;kubelet --version;kubectl version

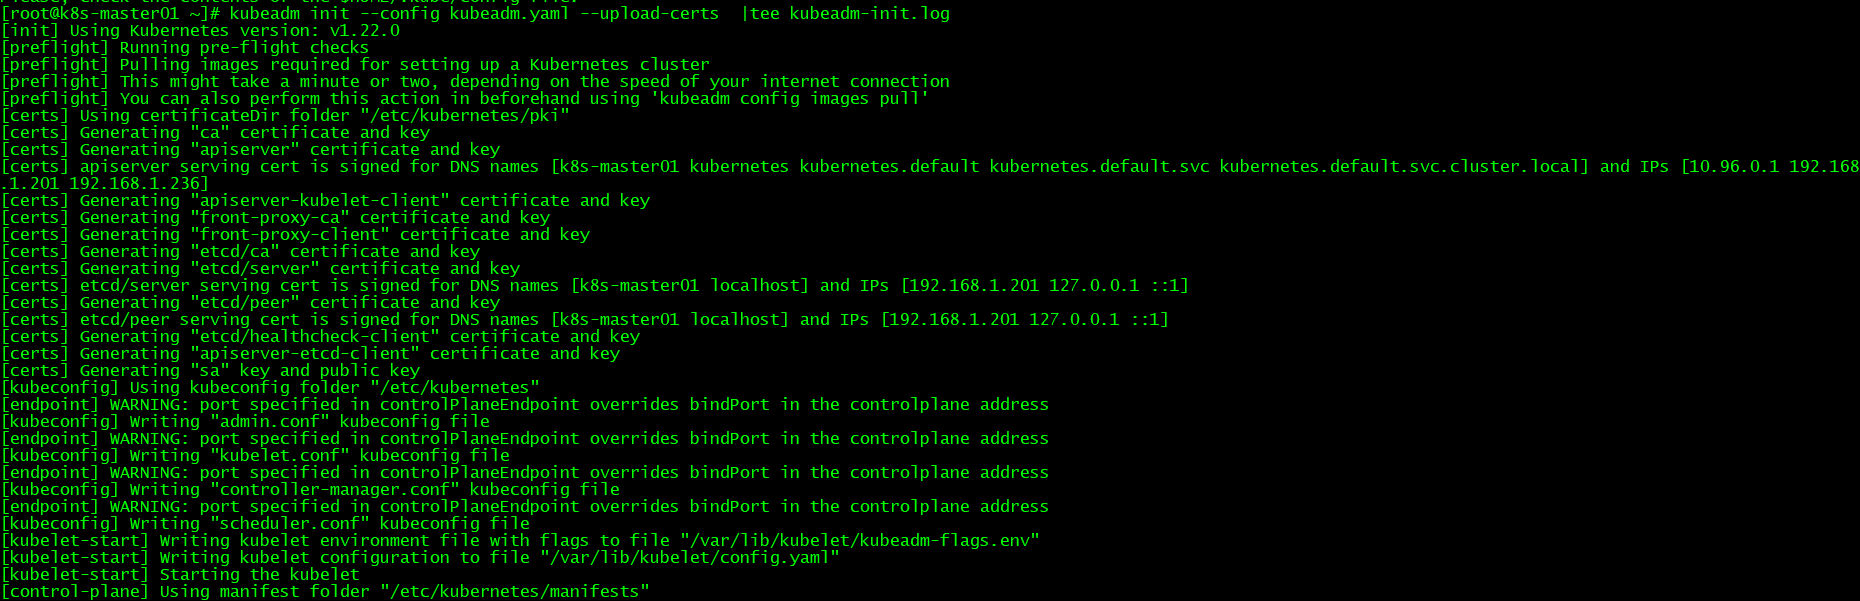
###初始化主节点;
×××××××××××××××××××××××××××以下内容在master01节点执行×××××××××××××××××××××××××××
cat <<EOF> kubeadm.yaml
apiVersion: kubeadm.k8s.io/v1beta2
kind: ClusterConfiguration
kubernetesVersion: v1.22.0
imageRepository: registry.cn-hangzhou.aliyuncs.com/google_containers
controlPlaneEndpoint: "192.168.1.236:16443"
networking:
  dnsDomain: cluster.local
  podSubnet: 172.168.0.0/12
  serviceSubnet: 10.96.0.0/12
---
apiVersion: kubeproxy.config.k8s.io/v1alpha1
kind: KubeProxyConfiguration
featureGates:
  SupportIPVSProxyMode: true
mode: ipvs
EOF
for i in K8S-master02 K8S-master03;do scp kubeadm.yaml  $i:/root/kubeadm.yaml ;done

×××××××××××××××××××××××××××以下内容在所有master节点执行×××××××××××××××××××××××××××
###提前拉取镜像
kubeadm config images pull --config kubeadm.yaml
docker pull registry.aliyuncs.com/google_containers/coredns:1.8.4 && docker tag registry.aliyuncs.com/google_containers/coredns:1.8.4 registry.cn-hangzhou.aliyuncs.com/google_containers/coredns:v1.8.4 #K8S拉取coredns:v1.8.4;使用K8S拉取coredns并重新标记即可;
docker images

×××××××××××××××××××××××××××以下内容在master01节点执行×××××××××××××××××××××××××××
kubeadm init --config kubeadm.yaml --upload-certs  |tee kubeadm-init.log #初始化成功后,会产生token值,用于其他节点加入时使用,需要记录下来,但有时间限制;
systemctl status kubelet
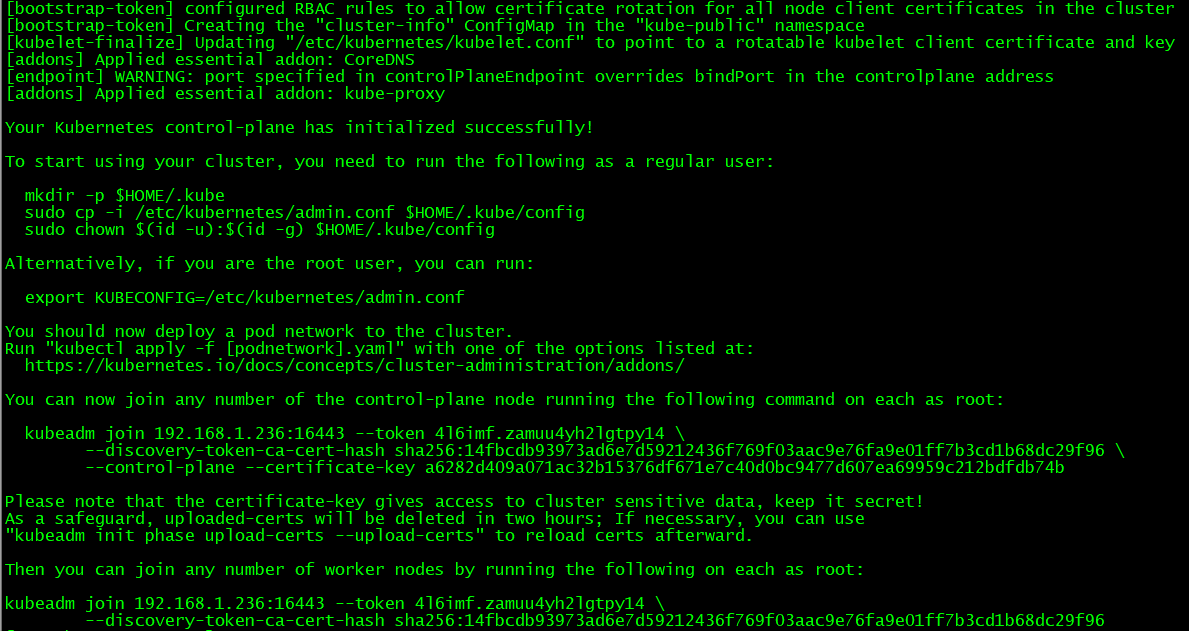
×××××××××××××××××××××××××××以下内容在其他master节点执行×××××××××××××××××××××××××××
kubeadm join 192.168.1.236:16443 --token 4l6imf.zamuu4yh2lgtpy14 \
      --discovery-token-ca-cert-hash sha256:14fbcdb93973ad6e7d59212436f769f03aac9e76fa9e01ff7b3cd1b68dc29f96 \
      --control-plane --certificate-key a6282d409a071ac32b15376df671e7c40d0bc9477d607ea69959c212bdfdb74b
×××××××××××××××××××××××××××以下内容在所有worker节点执行×××××××××××××××××××××××××××
kubeadm join 192.168.1.236:16443 --token 4l6imf.zamuu4yh2lgtpy14 \
        --discovery-token-ca-cert-hash sha256:14fbcdb93973ad6e7d59212436f769f03aac9e76fa9e01ff7b3cd1b68dc29f96
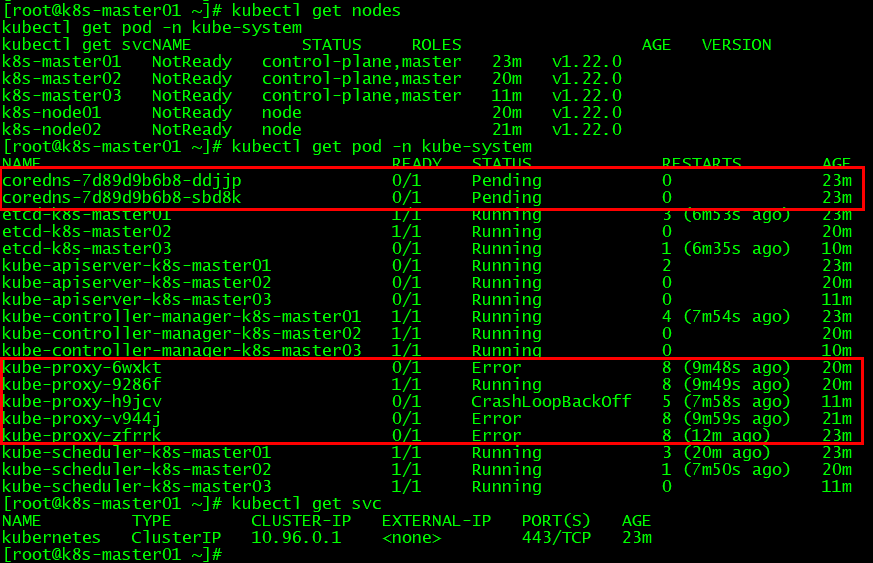
×××××××××××××××××××××××××××以下内容在master01节点执行×××××××××××××××××××××××××××
mkdir -p $HOME/.kube
cp -i /etc/kubernetes/admin.conf $HOME/.kube/config
chown $(id -u):$(id -g) $HOME/.kube/config                      #查询K8S集群有哪些node;由于采用扁平化网络,且未安装flannel插件,故status为NotReady;
kubectl label node k8s-node01 node-role.kubernetes.io/node=node #修改node的role标签;
kubectl label node k8s-node02 node-role.kubernetes.io/node=node #修改node的role标签;
kubectl get nodes
kubectl get pod -n kube-system
kubectl get svc

 浙公网安备 33010602011771号