Creating a Custom Mesh Component in UE4 | Part 0: Intro
转自: https://medium.com/realities-io/creating-a-custom-mesh-component-in-ue4-part-0-intro-2c762c5f0cd6
Introduction
This is a series of posts that will cover the process of creating a custom mesh component using C++ in Unreal Engine 4. If you don’t know what a mesh component is, or you can’t see the advantage of creating a custom one (Spoiler: you gain control over the Vertex Shader and the Vertex Buffer), this introduction article will put you in perspective and help you understand the purpose of this. So when you finish reading it, you can decide whether the rest of this series is of interest to you or not.

Mesh Components:
Let’s start with this diagram that is based on the official docs of UE4. Note that the UActorComponent is the parent of all components and the arrow annotates inheritance.

As you can see, the more we go down the inheritance tree of the components, the more we add capabilities or specialize in the behavior.
Mesh Components inherit from the abstract base class UMeshComponenet, so they are components that 1) can be attached to actors, 2) have a transform, and 3) can render a collection of triangles. A perfect example of this type of component is UStaticMeshComponent which is responsible for rendering StaticMesh assets. In this case, the mesh data is static and doesn’t change during runtime, but mesh components can also render dynamic mesh data, which is the case for the UProceduralMeshComponent.
Check the whole inheritance hierarchy here, so you can have an idea on all the built-in mesh components in UE4.
So now we know what a mesh component is, but what can we do with a custom one?
The Use Cases of Custom Mesh Components:
Creating a custom component will give almost complete control over the rendering process of the mesh. Depending on your goal, you can use that control to make optimized solutions or even achieve things that can’t be achieved using the built-in mesh components.
Here are the main aspects of the mesh rendering that the custom mesh component will allow you to control:
- The Vertex Shader: full control of the per-vertex processing, which will allow you to do tricks that are not possible using the material editor; for example you want to transform each set of vertices with their own transform, or you want a custom deformation that you can’t achieve using the USkinnedMeshComponent or the USplineMeshComponent.
- The Parameters and Resources used by the Vertex Shader: Depending on the logic that you want to implement in the vertex shader, you can pass the parameters, create resources, and bind them to the shader.
- The Vertex Buffer and the Vertex Layout: you can decide what elements will be included in the vertex layout, that way you can minimize the memory footprint of the vertex buffer, or you can add extra attributes to pass per-vertex data that is not supported by the built-in components.
- Geometry preprocessing: Since you’ll be managing all the mesh resources and creating the buffers, you can also preprocess your mesh before using it. You can do this on the CPU, or delegate it to a compute shader on the GPU.
More About the Series:
Alright, after that being cleared, let’s answer some general questions about the series.
What to expect from this series of posts?
- A step by step guide to creating a mesh component.
- An example project that you can use as a reference while reading the articles. (The repo will be published with Part 2 because for the Intro and Part 1 no code sample is needed other than the engine code)
- An in-depth explanation of how meshes are handled and rendered in UE4.
What to NOT expect from this series of posts?
- A line by line explanation of the code. The required code for the implementation is a LOT, so I won’t explain everything here, but the example project will have comments on almost everything.
What are the different articles?
- Part0: Intro
- Part1: An In-depth Explanation of Vertex Factories
- Part2: Implementing the Vertex Factory
- Part3: The Mesh Component’s Scene Proxy
- Part4: The Custom Mesh Component
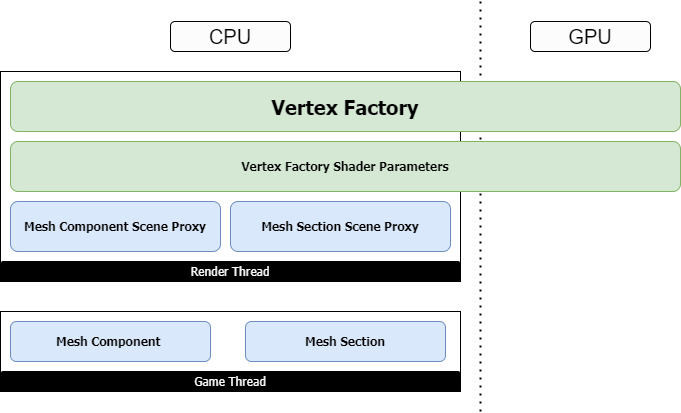
An overview of the different entities that we’ll need to implement:
Here’s an over-simplified diagram that includes the main entities and the domain that they’ll operate in. If you’re not familiar with the names below, don’t worry, we’ll explain them in the next posts, that’s the whole purpose of these articles.

The vertex factory is a UE4 concept that is somewhat not well explored. Therefore, the first post is dedicated to explaining vertex factories and the second post will cover how we can implement them. The last two posts will go over the mesh component, the mesh section, and their scene proxies.


 浙公网安备 33010602011771号