游戏开发中的红点提示
前言
当我们的游戏开发进度接近尾声的时候,不仅要做教学引导的事情,还有一件对于中大型游戏来说非常重要的事情就是红点提示。它有别于教学引导,但也是引导的作用,指引性更明确,而且不会影响UI外观和体验的流畅。
开始
- 通过配置两张数据表来记录红点提示的相关数据。
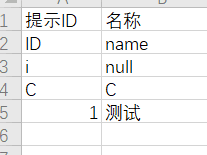
提示信息表,仅表明都有哪些提示类型。

每个红点提示使用的界面及控件名称。
第二列为属于哪个提示,所以声明为索引类型。比如1来说,就是由GridLayerListViewTest的buttonBack和ItemView的bg两个按钮组成,也就是当有新道具添加时,GridLayerListViewTest的buttonBack和ItemView两个控件都应该有红点。
第三列和第四列声明为类名和控件名
第五列标识控件是否为道具,因为道具和普通控件的记录方式不同。 - 读取配置数据,初始化信息。
    init() {
        let redtipData: XlsxData = ModuleManager.dataManager.get(RedTipItemModel.CLASS_NAME)
        redtipData.forEach((key, data) => {
            let item = new RedTipItemModel()
            item.init(key, data)
            this.redtipMap.set(key, item)
        })

        let redtipStep: XlsxData = ModuleManager.dataManager.get(RedTipStepModel.CLASS_NAME)
        let indexs = redtipStep.getIndex(Redtip_step_dataEnum.tipID);
        for (const key in indexs) {
            if (indexs.hasOwnProperty(key)) {
                const list = indexs[key];
                for (let index = 0; index < list.length; index++) {
                    const stepID = list[index];
                    let step = new RedTipStepModel()
                    step.init(stepID, redtipStep.getRowData(stepID))
                    this.redtipMap.get(step.getTipID()).addStep(step)
                    // if (index == 0) {
                    let className = step.getClassName();
                    let classMap = this.classNameMap.get(className)
                    if (!classMap) {
                        classMap = []
                        this.classNameMap.set(className, classMap)
                    }
                    classMap.push(step.getTipID())
                }
            }
        }

    }
初始化函数中主要做了两件事情:
一是 产生提示所对应的界面和控件数据。

二是 产生界面对应的提示id信息。主要是为了快速判定某个界面是否存在某个提示

- 当获得新物品时调用添加函数
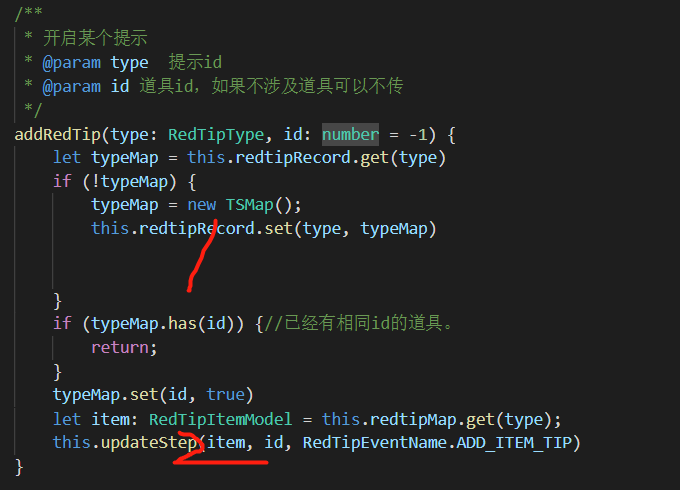
添加函数也是做了两件事情
一是排重:记录哪些正在进行中的提示,如果已经存在将不再添加。

二是更新记录数据并通知界面处理红点操作。

-
当一个新物品被点击时,移除红点提示
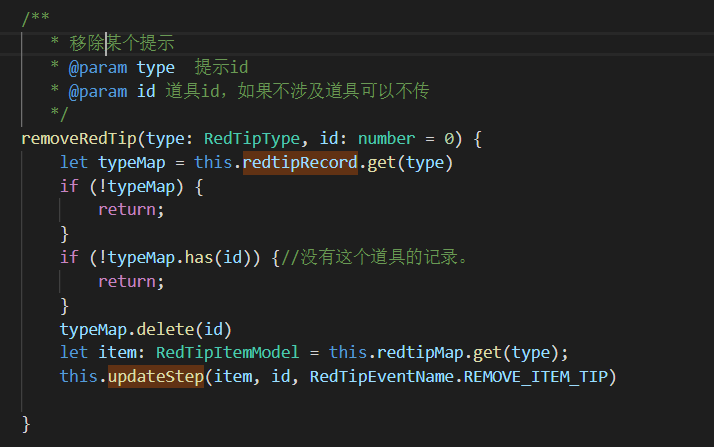
此方法与添加提示的方法是相对的。也做了更新记录数据和通知ui的事情。 -
在添加和移除时更新记录的数据
    /**
     *
     * @param eventName 事件名称
     * @param step 哪个控件
     * @param id 道具id
     */
    private updateRecordCount(eventName: string, step: RedTipStepModel, id: number = -1) {
        let className = step.getClassName();
        let widgetName = step.getWidgetName();
        let tipID = step.getTipID();
        let widgetMap = this.getWidgetMap(className, widgetName)

        if (eventName == RedTipEventName.ADD_ITEM_TIP) {//添加
            if (!step.isItem()) {//如果控件不是道具,只是界面上的按钮
                let list = widgetMap.get(tipID)
                if (!list) {
                    list = []
                    widgetMap.set(tipID, list)
                }
                list.push(id)
                if (list.length == 1) {
                    this.emit(eventName + className, step, id)
                }
            } else {//如果是道具
                let list = widgetMap.get(id)
                if (!list) {
                    list = []
                    widgetMap.set(id, list)
                }
                list.push(tipID)
                if (list.length == 1) {
                    this.emit(eventName + className, step, id)
                }
            }

        } else {//移除
            if (!step.isItem()) {
                let list = widgetMap.get(tipID)
                if (list.length > 0) {
                    list.shift()
                    if (this.isWidgetMapNull(widgetMap)) {
                        this.emit(eventName + className, step, id)
                    }
                }
            } else {
                let list = widgetMap.get(id)
                let index = list.indexOf(tipID)
                if (index >= 0) {
                    list.splice(index, 1)
                    if (list.length <= 0) {
                        this.emit(eventName + className, step, id)
                    }
                }
            }

        }
    }
使用
-
如果是普通的控件,将WidgetRedTip托到 界面的预制体的根节点上即可。
-
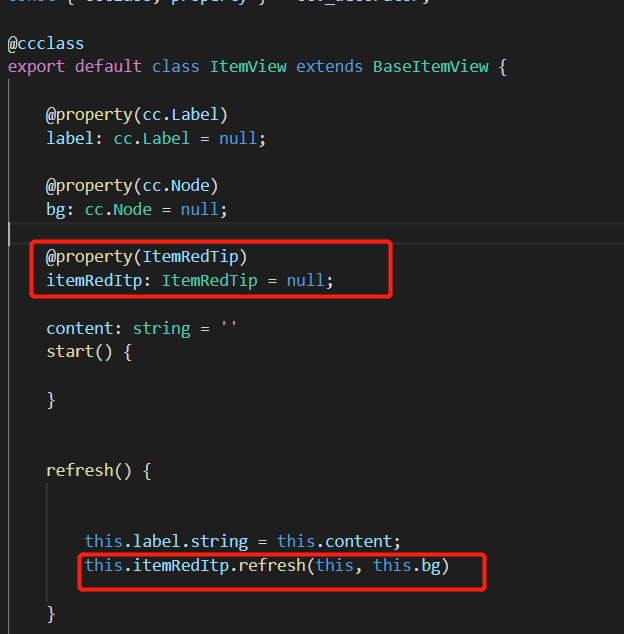
如果是道具首先需要将ItemRedTip组件拖到道具预制体的根节点上。然后在道具中声明一个ItemRedTip类型的属性,在更新数据时调用。
-
产生新道具时调用提示管理器的添加函数

-
点击道具时移除提示

-
demo展示
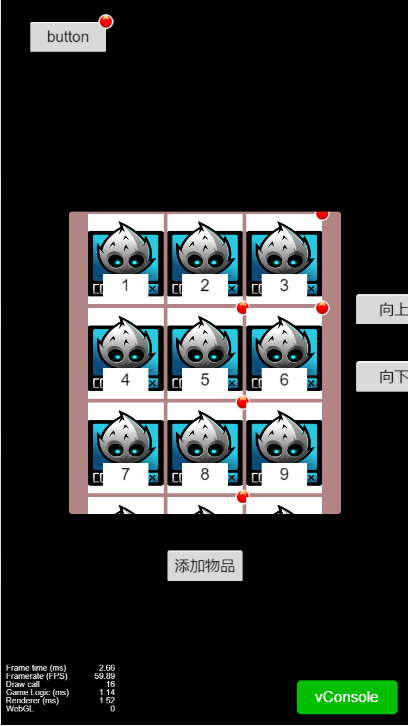
只是一个简单的demo,点击添加物品按钮,登陆按钮上会出现红点;直接点击道具红点会消失,所有道具都点过一遍后左上角按钮的红点才会消失。
注意事项
- 由于使用了事件通知的方式,所以需要注意监听者的数量,如果道具成百上千,而且并没有使用ListView的方式,那么最好不要使用这种通知的方式,监听者太多。
- 由于使用的是控件名称的方式,所以同一界面中的控件不可以重名
- 如果滑动层没有做分层管理,需要注意红点图片产生的dc数量。
结语
制作红点的方式很多,我见过有人把所有红点手动添加到指定的按钮上,然后再通过代码显示和隐藏。我比较懒,所以我选择动态添加红点图片。
欢迎关注公众号《微笑游戏》,浏览更多内容。

欢迎扫码关注公众号《微笑游戏》,浏览更多内容。

