Spring Security Oauth2整合JWT
Spring Security Oauth2 整合JWT
整合JWT
我们拿之前Spring Security Oauth2的完整代码进行修改
添加配置文件JwtTokenStoreConfig.java
package com.yjxxt.springsecurityoauth2demo.config;

import org.springframework.context.annotation.Bean;
import org.springframework.context.annotation.Configuration;
import org.springframework.security.oauth2.provider.token.TokenStore;
import org.springframework.security.oauth2.provider.token.store.JwtAccessTokenConverter;
import org.springframework.security.oauth2.provider.token.store.JwtTokenStore;

/**
 * 使用Jwt存储token的配置
 * @author ylc
 * @since 1.0.0
 */
@Configuration
public class JwtTokenStoreConfig {

   @Bean
   public TokenStore jwtTokenStore(){
      return new JwtTokenStore(jwtAccessTokenConverter());
   }

   @Bean
   public JwtAccessTokenConverter jwtAccessTokenConverter(){
      JwtAccessTokenConverter accessTokenConverter = new JwtAccessTokenConverter();
      //配置JWT使用的秘钥
      accessTokenConverter.setSigningKey("test_key");
      return accessTokenConverter;
   }
}
在认证服务器配置中指定令牌的存储策略为JWT
package com.yjxxt.springsecurityoauth2demo.config;

import com.yjxxt.springsecurityoauth2demo.service.UserService;
import org.springframework.beans.factory.annotation.Autowired;
import org.springframework.beans.factory.annotation.Qualifier;
import org.springframework.context.annotation.Configuration;
import org.springframework.security.authentication.AuthenticationManager;
import org.springframework.security.crypto.password.PasswordEncoder;
import org.springframework.security.oauth2.config.annotation.configurers.ClientDetailsServiceConfigurer;
import org.springframework.security.oauth2.config.annotation.web.configuration.AuthorizationServerConfigurerAdapter;
import org.springframework.security.oauth2.config.annotation.web.configuration.EnableAuthorizationServer;
import org.springframework.security.oauth2.config.annotation.web.configurers.AuthorizationServerEndpointsConfigurer;
import org.springframework.security.oauth2.provider.token.TokenStore;
import org.springframework.security.oauth2.provider.token.store.JwtAccessTokenConverter;

/**
 * 授权服务器配置
 * @author ylc
 * @since 1.0.0
 */
@Configuration
@EnableAuthorizationServer
public class AuthorizationServerConfig extends AuthorizationServerConfigurerAdapter {

    @Autowired
    private PasswordEncoder passwordEncoder;

    @Autowired
    private AuthenticationManager authenticationManager;

    @Autowired
    private UserService userService;

    @Autowired
    @Qualifier("jwtTokenStore")
    private TokenStore tokenStore;

    @Autowired
    private JwtAccessTokenConverter jwtAccessTokenConverter;


    /**
     * 使用密码模式需要配置
     */
    @Override
    public void configure(AuthorizationServerEndpointsConfigurer endpoints) {
        endpoints.authenticationManager(authenticationManager)
                .userDetailsService(userService)
                //配置存储令牌策略
                .tokenStore(tokenStore)
                .accessTokenConverter(jwtAccessTokenConverter);
    }

    @Override
    public void configure(ClientDetailsServiceConfigurer clients) throws Exception {
        clients.inMemory()
                //配置client_id
                .withClient("admin")
                //配置client-secret
                .secret(passwordEncoder.encode("112233"))
                //配置访问token的有效期
                .accessTokenValiditySeconds(3600)
                //配置刷新token的有效期
                .refreshTokenValiditySeconds(864000)
                //配置redirect_uri,用于授权成功后跳转
                .redirectUris("http://www.baidu.com")
                //配置申请的权限范围
                .scopes("all")
                //配置grant_type,表示授权类型
                .authorizedGrantTypes("authorization_code","password");
    }
}
用密码模式测试:

发现获取到的令牌已经变成了JWT令牌,将access_token拿到https://jwt.io/ 网站上去解析下可以获得其中内容。

扩展JWT中存储的内容
有时候我们需要扩展JWT中存储的内容,这里我们在JWT中扩展一个key为enhance,value为enhance info的数据。
继承TokenEnhancer实现一个JWT内容增强器
package com.yjxxt.springsecurityoauth2demo.config;

import org.springframework.security.oauth2.common.DefaultOAuth2AccessToken;
import org.springframework.security.oauth2.common.OAuth2AccessToken;
import org.springframework.security.oauth2.provider.OAuth2Authentication;
import org.springframework.security.oauth2.provider.token.TokenEnhancer;

import java.util.HashMap;
import java.util.Map;

/**
 * JWT内容增强器
 * @author ylc
 * @since 1.0.0
 */
public class JwtTokenEnhancer implements TokenEnhancer {

   @Override
   public OAuth2AccessToken enhance(OAuth2AccessToken accessToken, OAuth2Authentication authentication) {
      Map<String,Object> info = new HashMap<>();
      info.put("enhance","enhance info");
      ((DefaultOAuth2AccessToken)accessToken).setAdditionalInformation(info);
      return accessToken;
   }
}
创建一个JwtTokenEnhancer实例
package com.yjxxt.springsecurityoauth2demo.config;

import org.springframework.context.annotation.Bean;
import org.springframework.context.annotation.Configuration;
import org.springframework.security.oauth2.provider.token.TokenStore;
import org.springframework.security.oauth2.provider.token.store.JwtAccessTokenConverter;
import org.springframework.security.oauth2.provider.token.store.JwtTokenStore;

/**
 * 使用Jwt存储token的配置
 * @author ylc
 * @since 1.0.0
 */
@Configuration
public class JwtTokenStoreConfig {

   @Bean
   public TokenStore jwtTokenStore(){
      return new JwtTokenStore(jwtAccessTokenConverter());
   }

   @Bean
   public JwtAccessTokenConverter jwtAccessTokenConverter(){
      JwtAccessTokenConverter accessTokenConverter = new JwtAccessTokenConverter();
      //配置JWT使用的秘钥
      accessTokenConverter.setSigningKey("test_key");
      return accessTokenConverter;
   }

   @Bean
   public JwtTokenEnhancer jwtTokenEnhancer() {
      return new JwtTokenEnhancer();
   }
}
在认证服务器配置中配置JWT的内容增强器
package com.yjxxt.springsecurityoauth2demo.config;

import com.yjxxt.springsecurityoauth2demo.component.JwtTokenEnhancer;
import com.yjxxt.springsecurityoauth2demo.service.UserService;
import org.springframework.beans.factory.annotation.Autowired;
import org.springframework.beans.factory.annotation.Qualifier;
import org.springframework.context.annotation.Configuration;
import org.springframework.security.authentication.AuthenticationManager;
import org.springframework.security.crypto.password.PasswordEncoder;
import org.springframework.security.oauth2.config.annotation.configurers.ClientDetailsServiceConfigurer;
import org.springframework.security.oauth2.config.annotation.web.configuration.AuthorizationServerConfigurerAdapter;
import org.springframework.security.oauth2.config.annotation.web.configuration.EnableAuthorizationServer;
import org.springframework.security.oauth2.config.annotation.web.configurers.AuthorizationServerEndpointsConfigurer;
import org.springframework.security.oauth2.provider.token.TokenEnhancer;
import org.springframework.security.oauth2.provider.token.TokenEnhancerChain;
import org.springframework.security.oauth2.provider.token.TokenStore;
import org.springframework.security.oauth2.provider.token.store.JwtAccessTokenConverter;

import java.util.ArrayList;
import java.util.List;

/**
 * 授权服务器配置
 * @author ylc
 * @since 1.0.0
 */
@Configuration
@EnableAuthorizationServer
public class AuthorizationServerConfig extends AuthorizationServerConfigurerAdapter {

    @Autowired
    private PasswordEncoder passwordEncoder;

    @Autowired
    private AuthenticationManager authenticationManager;

    @Autowired
    private UserService userService;

    @Autowired
    @Qualifier("jwtTokenStore")
    private TokenStore tokenStore;
    @Autowired
    private JwtAccessTokenConverter jwtAccessTokenConverter;
    @Autowired
    private JwtTokenEnhancer jwtTokenEnhancer;

    /**
     * 使用密码模式需要配置
     */
    @Override
    public void configure(AuthorizationServerEndpointsConfigurer endpoints) {
        TokenEnhancerChain enhancerChain = new TokenEnhancerChain();
        List<TokenEnhancer> delegates = new ArrayList<>();
        //配置JWT的内容增强器
        delegates.add(jwtTokenEnhancer);
        delegates.add(jwtAccessTokenConverter);
        enhancerChain.setTokenEnhancers(delegates);
        endpoints.authenticationManager(authenticationManager)
                .userDetailsService(userService)
                //配置存储令牌策略
                .tokenStore(tokenStore)
                .accessTokenConverter(jwtAccessTokenConverter)
                .tokenEnhancer(enhancerChain);
    }

    @Override
    public void configure(ClientDetailsServiceConfigurer clients) throws Exception {
        clients.inMemory()
                //配置client_id
                .withClient("admin")
                //配置client-secret
                .secret(passwordEncoder.encode("112233"))
                //配置访问token的有效期
                .accessTokenValiditySeconds(3600)
                //配置刷新token的有效期
                .refreshTokenValiditySeconds(864000)
                //配置redirect_uri,用于授权成功后跳转
                .redirectUris("http://www.baidu.com")
                //配置申请的权限范围
                .scopes("all")
                //配置grant_type,表示授权类型
                .authorizedGrantTypes("authorization_code","password");
    }
}
运行项目后使用密码模式来获取令牌,之后对令牌进行解析,发现已经包含扩展的内容。

Java中解析JWT中的内容
添加依赖
<!--jwt 依赖-->
<dependency>
   <groupId>io.jsonwebtoken</groupId>
   <artifactId>jjwt</artifactId>
   <version>0.9.0</version>
</dependency>
修改UserController类,使用jjwt工具类来解析Authorization头中存储的JWT内容
package com.yjxxt.springsecurityoauth2demo.controller;

import io.jsonwebtoken.Jwts;
import org.springframework.security.core.Authentication;
import org.springframework.web.bind.annotation.GetMapping;
import org.springframework.web.bind.annotation.RequestMapping;
import org.springframework.web.bind.annotation.RestController;

import javax.servlet.http.HttpServletRequest;
import java.nio.charset.StandardCharsets;

/**
 * @author ylc
 * @since 1.0.0
 */
@RestController
@RequestMapping("/user")
public class UserController {

   @GetMapping("/getCurrentUser")
   public Object getCurrentUser(Authentication authentication, HttpServletRequest request) {
      String header = request.getHeader("Authorization");
      String token = header.substring(header.indexOf("bearer") + 7);
      return Jwts.parser()
            .setSigningKey("test_key".getBytes(StandardCharsets.UTF_8))
            .parseClaimsJws(token)
            .getBody();
   }
}
将令牌放入Authorization头中,访问如下地址获取信息:
http://localhost:8080/user/getCurrentUser

刷新令牌
在Spring Cloud Security 中使用oauth2时,如果令牌失效了,可以使用刷新令牌通过refresh_token的授权模式再次获取access_token。
只需修改认证服务器的配置,添加refresh_token的授权模式即可。
@Override
public void configure(ClientDetailsServiceConfigurer clients) throws Exception {
    clients.inMemory()
            //配置client_id
            .withClient("admin")
            //配置client-secret
            .secret(passwordEncoder.encode("112233"))
            //配置访问token的有效期
            .accessTokenValiditySeconds(3600)
            //配置刷新token的有效期
            .refreshTokenValiditySeconds(86400)
            //配置redirect_uri,用于授权成功后跳转
            .redirectUris("http://www.baidu.com")
            //配置申请的权限范围
            .scopes("all")
            //配置grant_type,表示授权类型
            .authorizedGrantTypes("authorization_code","password","refresh_token");
}
使用刷新令牌模式来获取新的令牌,访问如下地址:
http://localhost:8080/oauth/token

Spring Security Oauth2 整合单点登录(SSO)
创建客户端


添加依赖
<?xml version="1.0" encoding="UTF-8"?>
<project xmlns="http://maven.apache.org/POM/4.0.0" xmlns:xsi="http://www.w3.org/2001/XMLSchema-instance"
         xsi:schemaLocation="http://maven.apache.org/POM/4.0.0 https://maven.apache.org/xsd/maven-4.0.0.xsd">
   <modelVersion>4.0.0</modelVersion>
   <parent>
      <groupId>org.springframework.boot</groupId>
      <artifactId>spring-boot-starter-parent</artifactId>
      <version>2.2.2.RELEASE</version>
      <relativePath/> <!-- lookup parent from repository -->
   </parent>
   <groupId>com.yjxxt</groupId>
   <artifactId>oauth2client01demo</artifactId>
   <version>0.0.1-SNAPSHOT</version>
   <name>oauth2client01demo</name>
   <description>Demo project for Spring Boot</description>

   <properties>
      <java.version>1.8</java.version>
      <spring-cloud.version>Greenwich.SR2</spring-cloud.version>
   </properties>

   <dependencies>
      <dependency>
         <groupId>org.springframework.cloud</groupId>
         <artifactId>spring-cloud-starter-oauth2</artifactId>
      </dependency>
      <dependency>
         <groupId>org.springframework.cloud</groupId>
         <artifactId>spring-cloud-starter-security</artifactId>
      </dependency>
      <dependency>
         <groupId>org.springframework.boot</groupId>
         <artifactId>spring-boot-starter-web</artifactId>
      </dependency>
      <dependency>
         <groupId>io.jsonwebtoken</groupId>
         <artifactId>jjwt</artifactId>
         <version>0.9.0</version>
      </dependency>

      <dependency>
         <groupId>org.springframework.boot</groupId>
         <artifactId>spring-boot-starter-test</artifactId>
         <scope>test</scope>
      </dependency>
   </dependencies>

   <dependencyManagement>
      <dependencies>
         <dependency>
            <groupId>org.springframework.cloud</groupId>
            <artifactId>spring-cloud-dependencies</artifactId>
            <version>${spring-cloud.version}</version>
            <type>pom</type>
            <scope>import</scope>
         </dependency>
      </dependencies>
   </dependencyManagement>

   <build>
      <plugins>
         <plugin>
            <groupId>org.springframework.boot</groupId>
            <artifactId>spring-boot-maven-plugin</artifactId>
         </plugin>
      </plugins>
   </build>
</project>
修改配置文件
application.properties
server.port=8081
#防止Cookie冲突,冲突会导致登录验证不通过
server.servlet.session.cookie.name=OAUTH2-CLIENT-SESSIONID01
#授权服务器地址
oauth2-server-url: http://localhost:8080
#与授权服务器对应的配置
security.oauth2.client.client-id=admin
security.oauth2.client.client-secret=112233
security.oauth2.client.user-authorization-uri=${oauth2-server-url}/oauth/authorize
security.oauth2.client.access-token-uri=${oauth2-server-url}/oauth/token
security.oauth2.resource.jwt.key-uri=${oauth2-server-url}/oauth/token_key
在启动类上添加@EnableOAuth2Sso注解来启用单点登录功能
package com.yjxxt.oauth2client01demo;

import org.springframework.boot.SpringApplication;
import org.springframework.boot.autoconfigure.SpringBootApplication;
import org.springframework.boot.autoconfigure.security.oauth2.client.EnableOAuth2Sso;

@SpringBootApplication
@EnableOAuth2Sso
public class Oauth2client01demoApplication {

   public static void main(String[] args) {
      SpringApplication.run(Oauth2client01demoApplication.class, args);
   }

}
添加接口用于获取当前登录用户信息
package com.yjxxt.oauth2client01demo.controller;

import org.springframework.security.core.Authentication;
import org.springframework.web.bind.annotation.GetMapping;
import org.springframework.web.bind.annotation.RequestMapping;
import org.springframework.web.bind.annotation.RestController;

@RestController
@RequestMapping("/user")
public class UserController {

    @GetMapping("/getCurrentUser")
    public Object getCurrentUser(Authentication authentication) {
        return authentication;
    }

}
修改认证服务器配置
修改授权服务器中的AuthorizationServerConfig类,将绑定的跳转路径为
http://localhost:8081/login,并添加获取秘钥时的身份认证
@Override
public void configure(ClientDetailsServiceConfigurer clients) throws Exception {
    clients.inMemory()
            //配置client_id
            .withClient("admin")
            //配置client-secret
            .secret(passwordEncoder.encode("112233"))
            //配置访问token的有效期
            .accessTokenValiditySeconds(3600)
            //配置刷新token的有效期
            .refreshTokenValiditySeconds(864000)
            //配置redirect_uri,用于授权成功后跳转
            // .redirectUris("http://www.baidu.com")
            //单点登录时配置
            .redirectUris("http://localhost:8081/login")
            //配置申请的权限范围
            .scopes("all")
            //自动授权配置
            .autoApprove(true)
            //配置grant_type,表示授权类型
            .authorizedGrantTypes("authorization_code","password","refresh_token");
}

@Override
public void configure(AuthorizationServerSecurityConfigurer security) {
    // 获取密钥需要身份认证,使用单点登录时必须配置
    security.tokenKeyAccess("isAuthenticated()");
}
测试
启动授权服务和客户端服务;
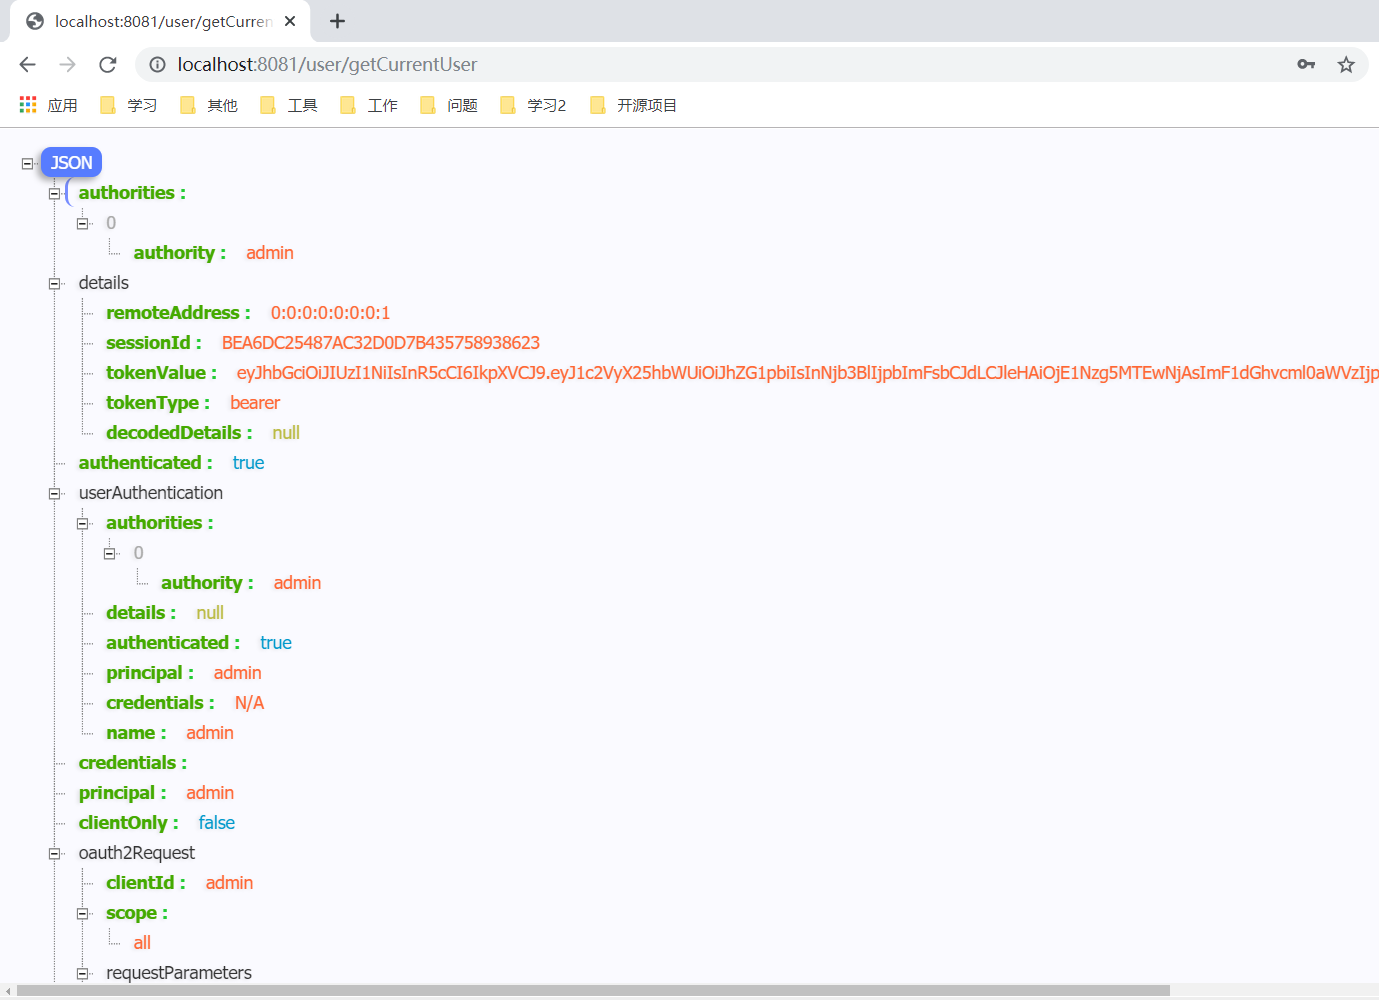
访问客户端需要授权的接口http://localhost:8081/user/getCurrentUser
会跳转到授权服务的登录界面;

授权后会跳转到原来需要权限的接口地址,展示登录用户信息;