spring框架
1,新建一个java的动态web工程;
2,建立一个user类


package cn.nsf.bean;

public class User {
    private String name;
    private Integer age;
    public String getName() {
        return name;
    }
    public void setName(String name) {
        this.name = name;
    }
    public Integer getAge() {
        return age;
    }
    public void setAge(Integer age) {
        this.age = age;
    }
    @Override
    public String toString() {
        return "User [name=" + name + ", age=" + age + "]";
    }


}
3,在类的同级目录中创建一个applicationContext.xml文件
<?xml version="1.0" encoding="UTF-8"?>
<beans xmlns:xsi="http://www.w3.org/2001/XMLSchema-instance" xmlns="http://www.springframework.org/schema/beans" xsi:schemaLocation="http://www.springframework.org/schema/beans http://www.springframework.org/schema/beans/spring-beans-4.2.xsd ">
<!-- 将User对象交给Spring容器管理 -->
    <bean name="user" class="cn.nsf.bean.User"></bean>
</beans>
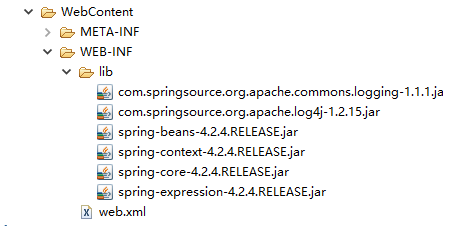
4,在webContent的lib下导入spring的核心包
5,创建一个测试类
package cn.nsf.a_hello;

import org.junit.Test;
import org.springframework.context.ApplicationContext;
import org.springframework.context.support.ClassPathXmlApplicationContext;

import cn.nsf.bean.User;

public class Demo {
    @Test
    public void fun1(){
        //11,创建容器对象
        ApplicationContext ac = new ClassPathXmlApplicationContext("applicationContext.xml");

        //2,向容器要容器对对象
        User u = (User) ac.getBean("user");
        //3,打印User对象
        System.out.println(u);
    }
}
测试方法:测试返回的结果是否为空,默认返回的是空。
整个项目的目录结构为


 浙公网安备 33010602011771号