Ansible自动化运维工具(1)
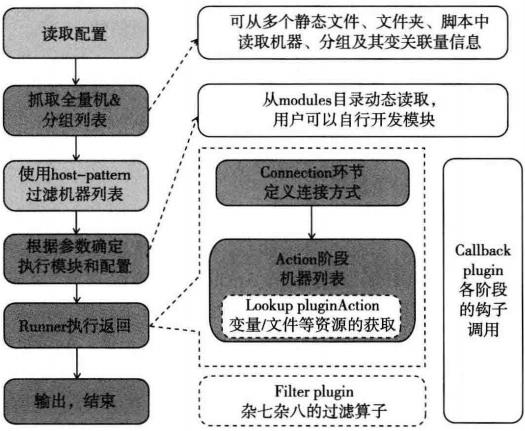
1. Ansible的架构

Ansible的帮助文档:
http://www.ansible.com.cn/index.html
2. YAML语言简介
- 基本规则
列表(list, [, , , ...])中的所有成员都开始与相同的缩进级别,并且使用“-”开头。要求-后边必须跟一个空格。
- apple
- banana
- orange
- pear
相应python输出
['apple', 'banana', 'orange', 'pear']
字典(dictionary, {key1:value1, key2:value2, key3:value3, ...})由一组“键:值”构成,且:后边必须跟一个空格。
node_a:
    conntimeout: 300
    external:
    iface: eth0
    port: 556
    internal:
    iface: eth0
    port: 778
    broadcast:
    client: 1000
    server: 2000
node_b:
    0:
    ip: 10.0.0.1
    name: b1
    1:
    ip: 10.0.0.2
    name: b2
相应python输出
{
    'node_b': {                       #注意嵌套层次。
        0: None,                      #注意空值。
        'ip': '10.0.0.2',             #注意key不能重复,重复则覆盖。
        'name': 'b2',
        1: None
    },
    'node_a': {
        'iface': 'eth0',
        'port': 778,
        'server': 2000,
        'broadcast': None,
        'client': 1000,
        'external': None,
        'conntimeout': 300,
        'internal': None
    }
}
建议yaml文件以---最为开始行。
- 说明示例
test.yaml
---
name: Tom Smith
age: 37
spouse:
    name: Jane Smith
    age: 35
children:
    - name1: Jimmy Smith
      age1: 15
    - name2: Jenny Smith
      age2: 12
- python的读取代码
#!/usr/bin/python

import yaml

file = open("test.yaml")
x = yaml.load(file)
print x
执行结果
{
    'age': 37,
    'spouse': {
        'age': 25,
        'name': 'Jane Smith'
    },
    'name': 'Tom Smith',
    'children': [
        {
            'age1': 15,
            'name1':  'Jimmy Smith'
        },
        {
            'age2': 12,
            'name2': 'Jenny Smith'
        }
    ]
}
- 再一个综合示例
---
name: Example Developer
job: Developer
skill: Elite
employed: True
foods:
    - Apple
    - Orange
    - Strawberry
    - Mango
languages:
    ruby: Elite
    python: Elite
    dotnet: Lame
python的显示
{
    'name': 'Example Developer',
    'job': 'Developer',
    'skill': 'Elite',
    'employed': True,
    'foods': [
        'Apple', 'Orange', 'Strawberry', 'Mango'
    ],
    'languages': {
        'ruby': 'Elite',
        'python': 'Elite',
        'dotnet': 'Lame'
    }
}
3. Ansible的安装
- CentOS YUM的安装
先安装EPEL源
在主控端机器上安装
yum install -y ansible
ansible --version
测试安装是否成功
ansible 192.168.12.1 -m ping -k -u beeworkshop
注意:
-k 表示ssh使用密码认证(否则为密钥认证)
-u 指定ssh登陆的用户名
或者通过/etc/ansible/hosts配置
192.168.12.1 ansible_ssh_user=bee
来指定ssh登陆用户。
/etc/ansible/hosts文件中要配置192.168.12.1地址——相当于做白名单,否则不执行命令。
- Ubuntu的安装
$ sudo apt-get install software-properties-common
$ sudo apt-add-repository ppa:ansible/ansible
$ sudo apt-get update
$ sudo apt-get install ansible
- pip安装
$ sudo pip install ansible
4. Ansible的配置文件
- /etc/ansible/hosts
# Ex 1: Ungrouped hosts, specify before any group headers.

## green.example.com
## blue.example.com
## 192.168.100.1
## 192.168.100.10

# Ex 2: A collection of hosts belonging to the 'webservers' group

## [webservers]
## alpha.example.org
## beta.example.org
## 192.168.1.100
## 192.168.1.110

# If you have multiple hosts following a pattern you can specify
# them like this:

## www[001:006].example.com

# Ex 3: A collection of database servers in the 'dbservers' group

## [dbservers]
##
## db01.intranet.mydomain.net
## db02.intranet.mydomain.net
## 10.25.1.56
## 10.25.1.57

# Here's another example of host ranges, this time there are no
# leading 0s:

## db-[99:101]-node.example.com
Ansible通过定义号的主机和组规则Inventory指定了Ansible起作用的主机列表。Ansible默认读取/etc/ansible/hosts文件,以获得控制的主机。
如果不是默认位置的hosts文件需要使用-i选项指明:
ansible -i /home/beeworkshop/hosts bidder -m ping
localhost会被默认地添加到Inventory中。
一台主机可以属于多个组,但需使用优先级来避免冲突。
如果不是使用SSH的默认端口22,需要指定端口
bee.example.com:5555
别名的使用
jumper ansible_ssh_port=5555 ansible_ssh_host=192.168.1.50
指定连接类型和用户名
localhost ansible_connection=local
abc.exam.com ansible_connection=ssh ansible_ssh_user=abc
def.exam.com ansible_connection=ssh ansible_ssh_user=def
- 主机变量
供playbook配置使用。
[atlanta]
host1 http_port=80 maxRequestsPerChild=808
host2 http_port=303 maxRequestsPerChild=909
- 组变量
组变量的作用是覆盖组中的所有成员。
[atlanta]
host1
host2
[atlanta:vars]
ntp_server=ntp.atlanta.example.com
proxy=proxy.atlanta.example.com
- 组嵌套
[atlanta]
host1
host2
[raleigh]
host2
host3
[southeast:children]
atlanta
raleigh
[usa:children]
southeast
northeast
southwest
northwest
- 分离主机和组变量
为了更好的规范定义主机和组变量,Ansible支持将hosts文件定义的主机名与组变量单独分离出来,并用YAML文件存储。其中Inventory目录和playbook目录均可以存放group_vars,host_vars,但playbook优先级更高。
5. Ansible常用模块
- 帮助
ansible-doc -l
ansible-doc -s <module>
ansible 操作目标 -m 模块名 -a 模块参数
- 常用模块的使用
(1) setup
获取客户机详细信息
ansible webserver -m setup

(2) copy
向客户机发送文件
关闭客户机的SELinux
ansible webserver -m command -a "yum install -y install libselinux-python"
ansible webserver -m copy -a "src=/usr/local/src/test.py dest=/tmp owner=root group=root mode 0755 force=yes"

force:
yes 覆盖
no 不存在时才复制文件

backup:
yes 覆盖之前备份原文件,备份文件包含时间
no 不备份

路径包含/  复制不包含该目录,只涉及目录中的内容
路径不包含/  复制包含该目录

(3) synchronize
需提前安装rsync
复制文件及目录至客户机
ansible 192.168.1.21 -m synchronize -a "src=/usr/local/src/ dest=/usr/local/src/ delete=yes compress=yes"
delete=yes 使两边内容一样——客户端不存在的新建,客户端不同的删除。
compress=yes 开启压缩
路径包含/  复制不包含该目录,只涉及目录中的内容
路径不包含/  复制包含该目录

(4) file
设置文件目录属性
group 定义文件目录的组
mode 定义文件目录的权限
owner 定义文件目录的属主
path 必选项,路径
recurse 递归设置文件属性,只对目录有效
src 链接原文件,只用于state=link
dest 链接目标,只用于state=link
force yes:覆盖,no:不覆盖
state 链接文件状态
link 创建软链接
directory 目录不存在则创建目录
file 即使文件不存在也不创建
absent 删除目录,文件,链接文件
touch 同touch命令

ansible 192.168.2.1 -m file -a "src=/usr/local/src/test.py dest=/tmp/test.py state=link"
ansible 192.168.2.1 -m command -a 'll /tmp/test.py'
ansible 192.168.2.1 -m file -a "path=/tmp/test.py state=absent"
ansible 192.168.2.1 -m file -a 'path=/tmp/test.py state=touch owner=root group=root mode=0755'
ansible webserver -m file -a  'path=/tmp/test state=directory owner=root group=root mode=0755'


