
elasticsearch kibana 安装 配置
二.Elasticsearch 配置信息
2.1 因为 Elasticsearch 可以执行脚本文件,为了安全性,默认不允许通过 root 用户启动服务。
我们需要新创建用户名和用户组启动服务
2.2 默认情况下,Elasticsearch 只允许本机访问,如果需要远程访问,需要修改其配置文件
vim config/elasticsearch.yml
# 去掉 network.host 前边的注释,将它的值改成0.0.0.0
network.host: 0.0.0.0
2.3 常用命令
curl -i XGET "http://192.168.141.3:9200/_count?" #统计当前的信息
2.4 为了方便实用 安装Elasticsearch head 模块
elasticsearch-head 安装
安装插件
访问 http://x.x.x.x:9200 查看内容显示效果不友好,因此,我们需要安装一个名为 elasticsearch-head 的插件,让内容显示效果比较舒适。
登陆 GitHub 网站,搜索 mobz/elasticsearch-head ,将其下载到本地
wget https://github.com/mobz/elasticsearch-head/archive/master.zip
unzip master.zip
cd elasticsearch-head-master
npm install
npm run start
提示没有npm 命令 ,安装 npm
获取nodejs 资源
# 4.x
curl --silent --location https://rpm.nodesource.com/setup_4.x | bash -
# 5.x
curl --silent --location https://rpm.nodesource.com/setup_5.x | bash -
# 0.10
curl --silent --location https://rpm.nodesource.com/setup | bash -
我这里安装的是 v4.x

安装
yum install -y nodejs

测试是否安装成功
node -v
 # v4.4.0
npm -v
# 2.14.20
npm install 时报错报错:
npm ERR! phantomjs-prebuilt@2.1.16 install: `node install.js`
npm ERR! Exit status 1
解决:
安装 phantomjs
1、获取安装包

wget https://bitbucket.org/ariya/phantomjs/downloads/phantomjs-2.1.1-linux-x86_64.tar.bz2
或者
wget https://bbuseruploads.s3.amazonaws.com/fd96ed93-2b32-46a7-9d2b-ecbc0988516a/downloads/396e7977-71fd-4592-8723-495ca4cfa7cc/phantomjs-2.1.1-linux-x86_64.tar.bz2?Signature=yWIrMK09KI8r24QSHFdkuSIlR3A%3D&Expires=1523867378&AWSAccessKeyId=AKIAIQWXW6WLXMB5QZAQ&versionId=null&response-content-disposition=attachment%3B%20filename%3D%22phantomjs-2.1.1-linux-x86_64.tar.bz2%22

2、将bz2格式装换成tar格式
bzip2 -d phantomjs-2.1.1-linux-x86_64.tar.bz2
3、解压缩到/usr/local目录下
tar xvf phantomjs-2.1.1-linux-x86_64.tar -C /usr/local/
4、安装依赖
yum -y install wget fontconfig
5、重命名
mv /usr/local/phantomjs-2.1.1-linux-x86_64/ /usr/local/phantomjs
6、进入目录中,为PhantomJS添加可执行权限
cd /usr/local/phantomjs/bin
chmod 777 phantomjs
7、建立软链接
ln -s /usr/local/phantomjs/bin/phantomjs /bin/phantomjs
8、测试是否可执行 [root@iz2zea6jqvyc0mokqu9jyaz bin]# phantomjs
phantomjs>
2.5
注意:在请求URL中要用127.0.0.1 或者 绑定的具体IP地址,用localhost不起作用(以下问题原因在此)
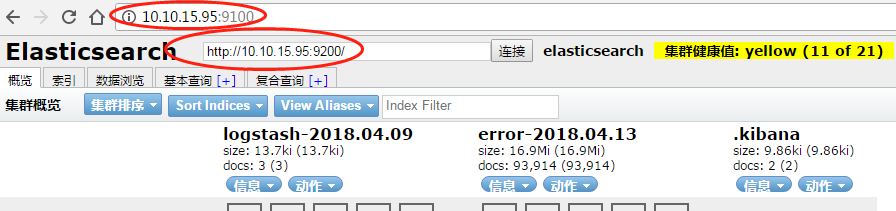
- 绿色表示主分片和副本分片都可用;
- 黄色表示只有主分片可用,没有副本分片;
- 红色表示主分片中的部分索引不可用,但是不耽误某些索引的访问。
- 灰色代表连接失败

图中我们发现 elasticsearch-head 插件和 Elasticsearch 服务并没有建立连接,所以我们还需要修改 Elasticsearch 的配置文件:
cd /etc/elasticsearch-5.6.1
vi elasticsearch.yml
# 在文件末尾添加 2 段配置
http.cors.enabled: true
http.cors.allow-origin: "*"
2.6修改服务器监听地址(并不一定需要)
还是显示未连接,修改服务器监听地址

[root@linux-node1 elasticsearch-head]# pwd
/usr/local/elasticsearch-head/
[root@linux-node1 elasticsearch-head]# vim Gruntfile.js #添加上下面的内容
connect: {
server: {
options: {
port: 9100,
hostname: '*',
base: '.',
keepalive: true
}
}
}
增加hostname属性,设置为*
2.7 以上两个方法都试了,还是连接不上
考虑下可能是 ip地址的问题,因为 elasticsearch-head 和elasticsearch 在一台机器上,
只不过elasticsearch 运行在容器内,elasticsearch-head在系统上运行
将localhost 换位内网ip地址
3.Kibana 配置信息
/opt/kibana/config/kibana.yml

server.port: 5601  (默认)
server.host: "localhost"
server.host: "0.0.0.0"
elasticsearch.url: "http://elk1:9200"

 浙公网安备 33010602011771号