vitual dom实现(转)
1. 通过JavaScript来构建虚拟的DOM树结构,并将其呈现到页面中;
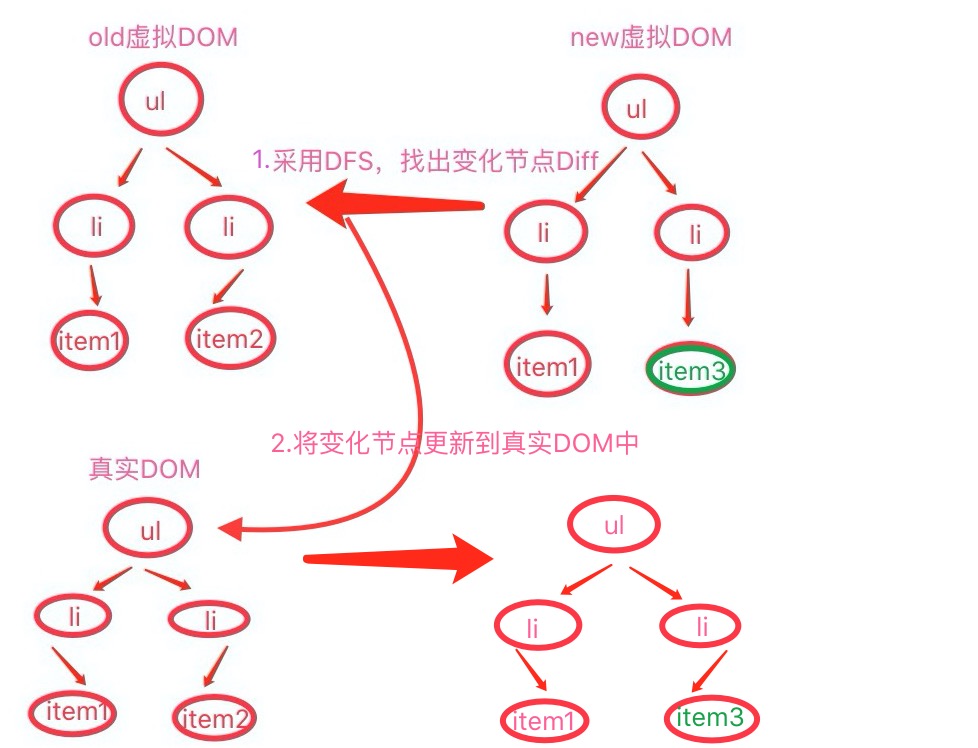
2. 当数据改变,引起DOM树结构发生改变,从而生成一颗新的虚拟DOM树,将其与之前的DOM对比,将变化部分应用到真实的DOM树中,即页面中。
为什么要使用vitual dom?(转自:https://www.jianshu.com/p/616999666920)
一、构建虚拟DOM
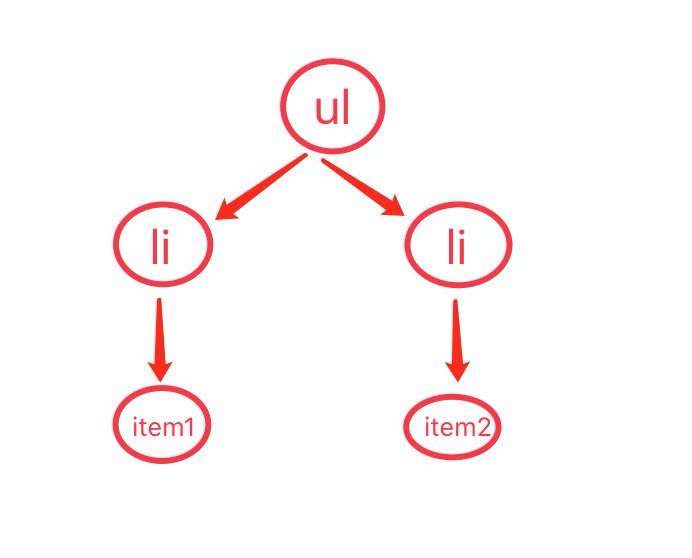
虚拟DOM,其实就是用JavaScript对象来构建DOM树,

通过JavaScript,我们可以很容易构建它,如下:
var elem = Element({
                tagName: 'ul',
                props: {'class': 'list'},
                children: [
                    Element({tagName: 'li', children: ['item1']}),
                    Element({tagName: 'li', children: ['item2']})
                ]
            });
// Element构造函数
function Element({tagName, props, children}){
    if(!(this instanceof Element)){
        return new Element({tagName, props, children})
    }
    this.tagName = tagName;
    this.props = props || {};
    this.children = children || [];
}
通过Element我们可以任意地构建虚拟DOM树了。但是有个问题,虚拟的终归是虚拟的,我们得将其呈现到页面中。
怎么呈现呢?
从上面得知,这是一颗树嘛,那我们就通过遍历,逐个节点地创建真实DOM节点:
1. createElement;
2. createTextNode.
怎么遍历呢?
因为这是一颗树嘛,对于树形结构无外乎两种遍历:
1. 深度优先遍历(DFS)
2. 广度优先遍历(BFS)
下面我们就来回顾下《数据结构》中,这两种遍历的思想:
1. DFS利用栈来遍历数据
2. BFS利用队列来遍历数据
(为了将孩子节点append到父节点中,采用DFS)
Element.prototype.render = function(){
    var el = document.createElement(this.tagName),
        props = this.props,
        propName,
        propValue;
    for(propName in props){
        propValue = props[propName];
        el.setAttribute(propName, propValue);
    }
    this.children.forEach(function(child){
        var childEl = null;
        if(child instanceof Element){
            childEl = child.render();
        }else{
            childEl = document.createTextNode(child);
        }
        el.appendChild(childEl);
    });
    return el;
};
此时,我们就可以轻松地将虚拟DOM呈现到指定真实DOM中。假设,我们将上诉ul虚拟DOM呈现到页面body中,如下:
var elem = Element({
                tagName: 'ul',
                props: {'class': 'list'},
                children: [
                    Element({tagName: 'li', children: ['item1']}),
                    Element({tagName: 'li', children: ['item2']})
                ]
            });
document.querySelector('body').appendChild(elem.render());
二、处理DOM更新
在前一小结,我们成功地实现了虚拟DOM,并将其转化为真实DOM,呈现在页面中。
接下来,我们就处理当DOM更新时,怎样通过新旧虚拟DOM对比,然后将变化部分更新到真实DOM中的问题。
DOM更新,无外乎四种情况,如下:
1. 新增节点;
2. 删除节点;
3. 替换节点;
4. 父节点相同,对比子节点.
毫无疑问,遍历DOM树仍然采用DFS遍历。
因为我们要将变化的节点更新到真实DOM中,所以还得传入真实的DOM根节点,并且真实的DOM节点与虚拟的DOM节点,树形结构一致,故通过标记可以记录节点变化位置,如下:

实现函数如下:
function updateElement($root, newElem, oldElem, index = 0) {
    if (!oldElem){
        $root.appendChild(newElem.render());
    } else if (!newElem) {
        $root.removeChild($root.childNodes[index]);
    } else if (changed(newElem, oldElem)) {
        if (typeof newElem === 'string') {
            $root.childNodes[index].textContent = newElem;
        } else {
            $root.replaceChild(newElem.render(), $root.childNodes[index]);
        }
    } else if (newElem.tagName) {
        let newLen = newElem.children.length;
        let oldLen = oldElem.children.length;
        for (let i = 0; i < newLen || i < oldLen; i++) {
            updateElement($root.childNodes[index], newElem.children[i], oldElem.children[i], i)
        }
    }
}
其中的changed方法,简单实现如下:
function changed(elem1, elem2) {
    return (typeof elem1 !== typeof elem2) ||
           (typeof elem1 === 'string' && elem1 !== elem2) ||
           (elem1.type !== elem2.type);
}
好了,一个简单的虚拟DOM就实现了。
三、效果展示
通过JS构建一颗虚拟DOM(如上诉ul),并将其呈现到页面中,然后替换其子节点,动态更新到真实DOM中,如下:
<body>
        <button id="refresh">refresh element</button>
        <div id="root"></div>
        <script src="./virtualDom.js"></script>
        <script>
            var elem = Element({
                tagName: 'ul',
                props: {'class': 'list'},
                children: [
                    Element({tagName: 'li', children: ['item1']}),
                    Element({tagName: 'li', children: ['item2']})
                ]
            });
            var newElem =  Element({
                tagName: 'ul',
                props: {'class': 'list'},
                children: [
                    Element({tagName: 'li', children: ['item1']}),
                    Element({tagName: 'li', children: ['hahaha']})
                ]
            });
            var $root = document.querySelector('#root');
            var $refresh = document.querySelector('#refresh');
            updateElement($root, elem);
            $refresh.addEventListener('click', () => {
                updateElement($root, newElem, elem);
            });
        </script>
    </body>


 浙公网安备 33010602011771号