WPF TextBox搜索框&自定义TextBox样式
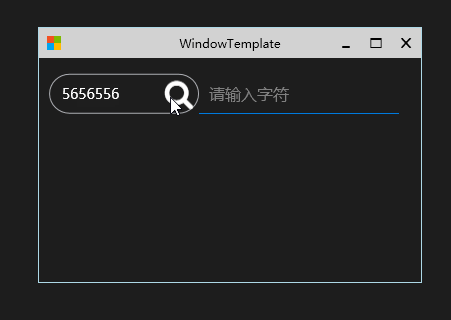
先看效果图咯:

前面的文章中,button样式告一段落。接下来分享几个TextBox样式。
后续持续更新中~
代码都在git上同步。有需要的可以下载查看。项目地址在之前的文章中都有写哦。
依旧是老规矩,话不多说,上代码咯。
首先要做搜索框当然要有一个搜索的图标啦,幸运的是,fontawesome里面有的~
在Fonts.xaml里面加上这个 图标资源

<system:String x:Key="FontAwesomeSearch"></system:String>
显示出来就是上面这个。
在Texts.xaml里面写样式,代码如下 :
<Style x:Key="SearchTextBox" TargetType="TextBox">
        <Setter Property="FontSize" Value="{StaticResource FontSizeRegular}"/>
        <Setter Property="Width" Value="150"/>
        <Setter Property="Height" Value="40"/>
        <Setter Property="Foreground" Value="White"/>
        <Setter Property="CaretBrush" Value="White"/>
        <Setter Property="Text" Value="66"/>
        <Setter Property="Template" >
            <Setter.Value>
                <ControlTemplate TargetType="{x:Type TextBoxBase}">
                    <Grid>
                        <Border x:Name="border"
                                BorderBrush="{TemplateBinding BorderBrush}"
                                BorderThickness="{TemplateBinding BorderThickness}"
                                CornerRadius="20">
                            <Grid>
                                <ScrollViewer x:Name="PART_ContentHost"
                                              HorizontalAlignment="Left"
                                              VerticalAlignment="Center"
                                              Width="100"
                                              Margin="10 0 0 0"
                                              Focusable="False"
                                              HorizontalScrollBarVisibility="Hidden"
                                              VerticalScrollBarVisibility="Hidden"/>
                                <Button Style="{StaticResource IconGrowButton}"
                                        Content="{StaticResource FontAwesomeSearch}"
                                        HorizontalAlignment="Right"/>
                            </Grid>
                        </Border>
                    </Grid>

                    <ControlTemplate.Triggers>
                        <Trigger Property="IsKeyboardFocused" Value="True">

                        </Trigger>
                    </ControlTemplate.Triggers>
                </ControlTemplate>
            </Setter.Value>
        </Setter>
</Style>
效果是这样滴:

哈哈,成功了。再写一个textbox样式
代码如下 :
<Style TargetType="{x:Type TextBox}" x:Key="LineTextBox">
        <Setter Property="FontSize" Value="{StaticResource FontSizeLarge}"/>
        <Setter Property="Padding" Value="10"/>
        <Setter Property="Margin" Value="0 5 0 5"/>
        <Setter Property="BorderBrush" Value="#007Add"/>
        <Setter Property="BorderThickness" Value="0 0 0 1"/>
        <Setter Property="CaretBrush" Value="White"/>
        <Setter Property="Background" Value="Transparent"/>
        <Setter Property="Foreground" Value="White"/>

        <Setter Property="Template" >
            <Setter.Value>
                <ControlTemplate TargetType="{x:Type TextBoxBase}">
                    <Grid>
                        <Border x:Name="border"
                                BorderBrush="{TemplateBinding BorderBrush}"
                                BorderThickness="{TemplateBinding BorderThickness}"
                                Background="{TemplateBinding Background}"
                                SnapsToDevicePixels="True">
                            <ScrollViewer x:Name="PART_ContentHost" Focusable="False" HorizontalScrollBarVisibility="Hidden" VerticalScrollBarVisibility="Hidden"/>
                        </Border>

                        <TextBlock IsHitTestVisible="False"
                                   Text="{TemplateBinding Tag}"
                                   x:Name="placeholder"
                                   FontFamily="{TemplateBinding FontFamily}"
                                   Padding="{TemplateBinding Padding}"
                                   VerticalAlignment="Center"
                                   HorizontalAlignment="{TemplateBinding HorizontalAlignment}"
                                   Foreground="Gray"
                                   >
                            <TextBlock.Style>
                                <Style TargetType="{x:Type TextBlock}">
                                    <Setter Property="Visibility" Value="Collapsed" />
                                    <Style.Triggers>
                                        <DataTrigger Binding="{Binding Text, RelativeSource={RelativeSource TemplatedParent}}" Value="">
                                            <Setter Property="Visibility" Value="Visible" />
                                        </DataTrigger>
                                    </Style.Triggers>
</Style>
                            </TextBlock.Style>

                        </TextBlock>

                    </Grid>

                    <ControlTemplate.Triggers>
                        <Trigger Property="IsEnabled" Value="False">
                            <Setter Property="Opacity" TargetName="border" Value="0.56"/>
                        </Trigger>
                        <Trigger Property="IsMouseOver" Value="True">
                            <Setter Property="BorderBrush" TargetName="border" Value="#FF7EB4EA"/>
                        </Trigger>
                        <Trigger Property="IsKeyboardFocused" Value="True">
                            <Setter Property="BorderBrush" TargetName="border" Value="#FF569DE5"/>
                        </Trigger>
                    </ControlTemplate.Triggers>
                </ControlTemplate>
            </Setter.Value>
        </Setter>
    </Style>
效果是这样滴:

下面就是在MainWindow.xaml中使用样式~
<TextBox Style="{StaticResource SearchTextBox}"/>
<TextBox Width="200" Style="{StaticResource LineTextBox}"
    Tag="请输入字符"/>
动态效果见文章顶部动图~
看到这里明白了吧,Tag就是水印~
编程是个人爱好


 浙公网安备 33010602011771号