【WPF】Brush画刷
概览

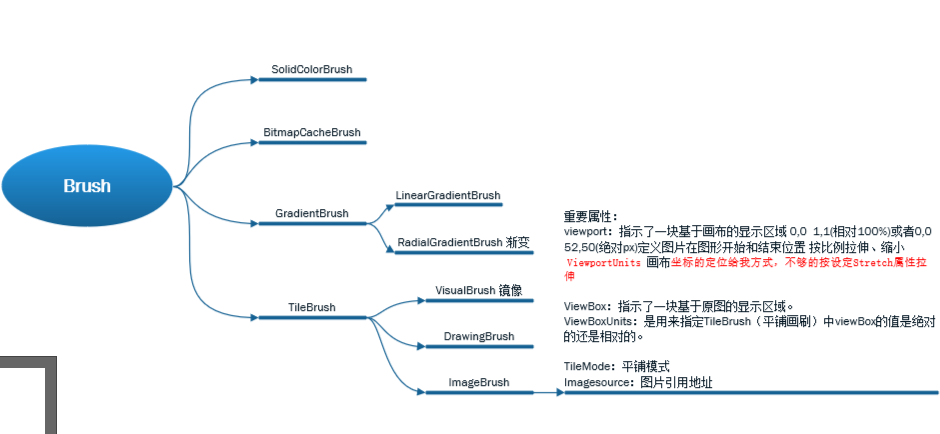
其他画刷直接看wpf编程宝典,以下是书上将的不透彻的做一下笔记
TileBrush(ImageBrush,DrawingBrush和VisualBrush)
我们知道TileBrush是WPF中一个战斗力爆表的虚基类,从它派生出的DrawingBrush,ImageBrush和VisualBrush在WPF图形编程中发挥着重要作用。然而关于TileBrush的Viewbox、Viewport两大重要属性经常令人感到迷惑,Stretch、AlignmentX/Y两种对齐方式也往往让人搞混。这些知识在MSDN上讲得过于模棱两可,网上似乎也没有能够很清晰并且有条理地讲述它们之间关系的文章。于是今天下午我又牺牲了一下午的大好时光,做了一些实验来研究这个问题。
Silverlight把TileBrush的Viewbox和Viewport去掉了,于是战斗力暴减。
在讲述之前,我假设读这篇文章的你已经知道了这四个玩意的基本用法,若需要入门的话请参阅参考资料[1]和MSDN上的相关内容。本文主要分析TileBrush是如何利用Viewbox,Viewport以及Stretch,AlignmentX/Y来进行绘制的。
左下角表示的是我们的Brush用来绘制的原始素材(以下简称为原图,虽然它不一定来自图片文件)。左上角发亮的部分就是Viewbox区域。右边四个方框就是Viewport区域。可能有人认为右边发灰的部分是不显示的,其实不然,右边的发光部分只是为了突出Viewbox相对于Viewport的位置(默认设置AlignmentX/Y都为Center)。
Viewbox指示了一块基于原图的显示区域。请注意TileBrush并不会在原图中裁减掉Viewbox之外的内容,Viewbox只是起到提示作用,只有和另外三种属性结合到一起才能决定最终的显示效果。
ViewboxUnits: 基于原图的显示区域,定位方式,是采用百分比还是像素
Viewport指示了一块基于画布的显示区域。这里的画布就是包含了这个TileBrush的区域,如果画布开启了ClipToBounds(也在Silverlight中被砍掉了),则不管Viewport如何,超出画布区域之外的像素就都被和谐掉了,不会被绘制。
ViewportUnits:基于画布的显示区域,定位方式,是采用百分比还是像素
当指定了Viewbox和Viewport之后,就是Stretch、AlignmentX/Y登场了,它俩决定了Viewbox相对于Viewport的拉伸方式和相对位置。
先看Stretch,它决定了Viewbox相对于Viewport的拉伸方式。Stretch有四种取值:
1、None。取None时,就和什么都没发生一样,没有任何的伸缩调整。此时若Viewbox和Viewport的大小不同,则会根据AlignmentX/Y的取值来调整Viewbox相对于Viewport的位置。参见上图右边左上角的小图。
2、Fill。取Fill时,AlignmentX/Y失去作用,然后将Viewbox拉伸以填满Viewport,原图中Viewbox区域以外的部分将不可见。参见上图右边右上角的小图。
3、Uniform。取Uniform时,将把Viewbox拉伸,直到Viewbox的一个边抵达Viewport的边界为止。此时若Viewbox和Viewport的纵横比不同,则会根据AlignmentX/Y的取值来调整Viewbox相对于Viewport的位置。参见上图右边左下角的小图。
4、UniformToFill。取Uniform时,将把Viewbox拉伸,直到Viewbox的另一个边抵达Viewport的边界为止。此时若Viewbox和Viewport的纵横比不同,则会根据AlignmentX/Y的取值来调整Viewbox相对于Viewport的位置。原图中Viewbox区域以外的部分将不可见。参见上图右边右下角的小图。
再来看AlignmentX/Y。仅当
1、Stretch为Uniform或UniformToFill,并且Viewbox和Viewport具有不同的纵横比
2、Stretch为None并且Viewbox和Viewport具有不同的大小
这两种情况时,才会应用AlignmentX/Y来调整Viewbox相对于Viewport的位置。需要注意的是Viewbox相当于原图的一个把手,AlignmentX/Y移动Viewbox的同时也会移动原图。
ImageBrush画刷
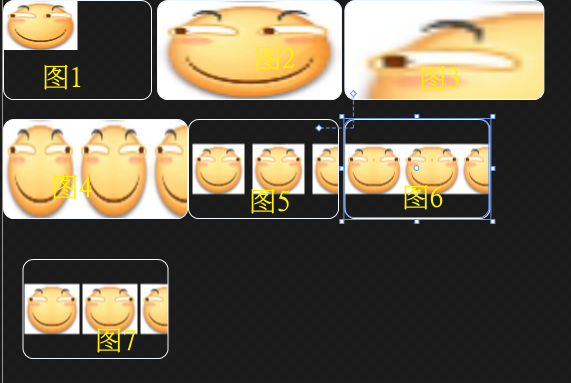
ImageBrush 是一种将自身内容定义为图像的 TileBrush,图像通过它的 ImageSource 属性指定。 您可以控制图像的拉伸、对齐和平铺方式,因此可以生成图案和其他效果。 下面的图像演示使用 ImageBrush 可以实现的一些效果。
各种属性设置如下:

代码如下:
<Window Style="{DynamicResource WindowStyle1}" x:Class="WpfApp4.MainWindow"
        xmlns="http://schemas.microsoft.com/winfx/2006/xaml/presentation"
        xmlns:x="http://schemas.microsoft.com/winfx/2006/xaml"
        xmlns:d="http://schemas.microsoft.com/expression/blend/2008"
        xmlns:mc="http://schemas.openxmlformats.org/markup-compatibility/2006"
        xmlns:local="clr-namespace:WpfApp4"
        Width="800" Height="600"

        mc:Ignorable="d"
        Title="MainWindow"

        Background="Transparent"
        WindowStartupLocation="CenterScreen"
        AllowsTransparency="True"
        WindowStyle="None"
        ResizeMode="CanResizeWithGrip"

        >
    <Window.Resources>

        <GeometryGroup x:Key="geo">
            <RectangleGeometry Rect="0,0,100,100"></RectangleGeometry>
            <EllipseGeometry Center="150,150" RadiusX="35" RadiusY="25"></EllipseGeometry>
        </GeometryGroup>


    </Window.Resources>
    <Grid >
        <Grid.ColumnDefinitions>
            <ColumnDefinition Width="109*"/>
            <ColumnDefinition Width="291*"/>
        </Grid.ColumnDefinitions>
        <Grid.RowDefinitions>
            <RowDefinition Height="3*"/>
            <RowDefinition Height="7*"/>
        </Grid.RowDefinitions>
        <Canvas Grid.Column="1" Grid.Row="1"  >
            <!-- Viewport 图1对比图2-->
            <!--使用Viewbox完整的图片 ,Viewport 使用一半的画布Vs使用完全画布  不够的按设定Stretch属性拉伸-->
            <Rectangle Height="100" Width="149" RadiusX="10" RadiusY="10" Stroke="AliceBlue">
                <!--图1 横向-->
                <Rectangle.Fill>
                    <ImageBrush ImageSource="/QQ截图20220813082913.png" Viewbox="0,0 1,1"  Viewport="0,0 0.5,0.5" ></ImageBrush>
                </Rectangle.Fill>
            </Rectangle>
            <Rectangle Height="100" Width="185" RadiusX="10" RadiusY="10" Stroke="AliceBlue" Canvas.Left="154">
                <Rectangle.Fill>
                    <!--图2 横向-->
                    <ImageBrush ImageSource="/QQ截图20220813082913.png" Viewbox="0,0 1,1"   ></ImageBrush>
                </Rectangle.Fill>
            </Rectangle>


            <!--Viewbox 图1图2对比图3  -->
            <!--Viewbox 对比 使用一半图片Vs使用完整画布 不够的按设定Stretch属性拉伸-->
            <Rectangle Height="100" Width="200" RadiusX="10" RadiusY="10" Stroke="AliceBlue" Canvas.Left="341.37">
                <Rectangle.Fill>
                    <!--图3 横向-->
                    <ImageBrush ImageSource="/QQ截图20220813082913.png" Viewbox="0,0 0.5,0.5"   ></ImageBrush>
                </Rectangle.Fill>
            </Rectangle>


            <!--Viewbox 图1 对比图4  -->
            <!--Viewbox 对比 整个画布填充方式  不够的按设定Stretch属性拉伸-->
            <Rectangle Height="100" Width="185" RadiusX="10" RadiusY="10" Stroke="AliceBlue" Canvas.Top="119">
                <!--图4 横向-->
                <Rectangle.Fill>
                    <ImageBrush ImageSource="/QQ截图20220813082913.png" Viewbox="0,0 0.5,1" Viewport="0,0 0.2,1"     TileMode="FlipXY"  ></ImageBrush>
                </Rectangle.Fill>
            </Rectangle>


            <!--Viewbox 图4 对比图5  -->
            <!--Stretch="None" 不拉伸图片,不沟用不填充,保证图片不变形 -->
            <Rectangle Height="100" Width="151" RadiusX="10" RadiusY="10" Stroke="AliceBlue" Canvas.Top="119" Canvas.Left="185">
                <Rectangle.Fill>
                    <!--图5 横向-->
                    <ImageBrush ImageSource="/QQ截图20220813082913.png" Viewbox="0,0 0.5,1" Viewport="0,0 0.2,1"  Stretch="None"  AlignmentX="Right" TileMode="FlipXY"  ></ImageBrush>
                </Rectangle.Fill>
            </Rectangle>


            <!--Viewbox 图4图5 对比图6  -->
            <Rectangle Height="100" Width="146" RadiusX="10" RadiusY="10" Stroke="AliceBlue" Canvas.Top="119" Canvas.Left="341.37">
                <Rectangle.Fill>
                    <!--图6 横向-->
                    <ImageBrush ImageSource="/QQ截图20220813082913.png" Viewbox="0,0 0.5,1" Viewport="0,0 0.2,1"  Stretch="None"  AlignmentX="Left" TileMode="FlipXY"  ></ImageBrush>
                </Rectangle.Fill>
            </Rectangle>
            <Rectangle Height="100" Width="146" RadiusX="10" RadiusY="10" Stroke="AliceBlue" Canvas.Top="259" Canvas.Left="19.5">
                <Rectangle.Fill>
                    <!--图7 横向-->
                    <ImageBrush ImageSource="/QQ截图20220813082913.png" Viewbox="0,0 0.5,1" Viewport="0,0 0.2,1"  Stretch="None"  AlignmentX="Center" TileMode="FlipXY"  ></ImageBrush>
                </Rectangle.Fill>
            </Rectangle>
        </Canvas>

    </Grid>

</Window>
VisualBrush(镜像笔刷)
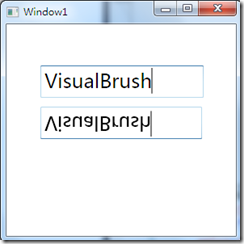
作用:做放大镜、做倒影、做窗口缩略图
VisualBrush是一种比较特殊的笔刷,它的功能仍然是用来给元素填充图案,但它的内容却可以是各种控件。
你可以将其理解为一个普通的容器,但在其内部的所有控件都会失去交互能力,而只保留显示能力。
倒影

下面看代码:
<Grid>
        <TextBox Height="40" Margin="42,51,40,0" Name="textBox1" VerticalAlignment="Top" FontSize="24" />
        <Rectangle Margin="42,102,42,0" Name="rectangle1" Stroke="Black" Height="40" VerticalAlignment="Top" StrokeThickness="0">
            <Rectangle.Fill>
                <VisualBrush Visual="{Binding ElementName=textBox1}">
                    <VisualBrush.RelativeTransform>
                        <TransformGroup>
                            <ScaleTransform ScaleX="1" ScaleY="-1" />
                            <TranslateTransform Y="1" />
                        </TransformGroup>
                    </VisualBrush.RelativeTransform>
                </VisualBrush>
            </Rectangle.Fill>
        </Rectangle>
    </Grid>
这里的ScaleX是:
获取或设置 x 方向的缩放比例。这是一个依赖项属性。
返回值:
x 方向的缩放比例。默认值为 1。
ScaleY是:
获取或设置 y 方向的缩放比例。这是一个依赖项属性。
返回值:
y 方向的缩放比例。默认值为 1。


