【WPF】Border 边框
从技术角度看,Border是一个装饰元素(decorator),装饰元素是特定类型的元素,通常用于在一个对象周围添加某些种类的图形装饰。所有装饰元素都继承自System.Windows.Controls.Decorator类。大多数装饰元素设计用于特定控件。例如,Button控件使用ButtonChrome装饰元素,以获取其特有的圆角和阴影背景效果;而ListBox控件使用ListBoxChrome装饰元素。还有两个更通用的装饰元素,当构造用户界面时它们非常有用。
Border 是一个装饰的控件,此控件绘制边框及背景,在 Border 中只能有一个子控件,若要显示多个子控件,需要将一个附加的 Panel 控件放置在父 Border 中。然后可以将子控件放置在该 Panel控件中。
Border 的几个重要属性:
Background:用用一个 Brush 对象来绘制背景 ;
BorderBrush:用一个Brush 对象来绘制边框 ;
BorderThickness:此属性设置 Border 边框的大小;
CornerRadius:此属性设置 Border 的每一个角圆的半径;
Padding:此r属性设置 Border 里的内容与边框的之间的间隔。
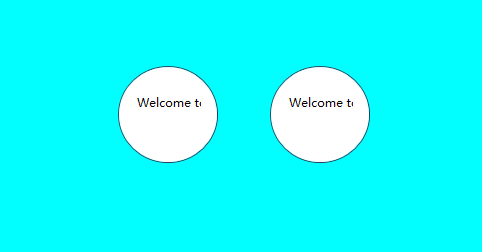
接下来我们使用XAML代码做个示例,通过对Border的属性设置做出扑克牌的效果。
设计时 添加border

<Window x:Class="WpfApp4.MainWindow"
        xmlns="http://schemas.microsoft.com/winfx/2006/xaml/presentation"
        xmlns:x="http://schemas.microsoft.com/winfx/2006/xaml"
        xmlns:d="http://schemas.microsoft.com/expression/blend/2008"
        xmlns:mc="http://schemas.openxmlformats.org/markup-compatibility/2006"
        xmlns:local="clr-namespace:WpfApp4"
        xmlns:Lin="clr-namespace:LinDefind"
        mc:Ignorable="d"
        Title="MainWindow" Height="450" Width="800">
    <Grid>
        <Canvas  Background="Aqua" Name="root" />
        <Border CornerRadius="100" Background="#ffffff" BorderBrush="#2a3b57"
                BorderThickness="1" Height="97" Width="100" Margin="257,107,445,0"
                Name="Border1" VerticalAlignment="Top" >
            <TextBlock Background="#ffffff" HorizontalAlignment="Right"
                    VerticalAlignment="Center" Height="39" Width="64" Margin="0,0,16,0"
                        ><Run Text="Welcome to AuthorCode"/></TextBlock>
        </Border>
        <Border CornerRadius="100" Width="100" Background="#ffffff" BorderBrush="#2a3b57"
                BorderThickness="1" Height="97" Margin="106,107,598,0"
                x:Name="Border1_Copy1" VerticalAlignment="Top" >
            <TextBlock Background="#ffffff" HorizontalAlignment="Right"
                    VerticalAlignment="Center" Height="39" Width="64" Margin="0,0,16,0"
                        ><Run Text="Welcome to AuthorCode"/></TextBlock>
        </Border>
    </Grid>
</Window>
代码实现边框
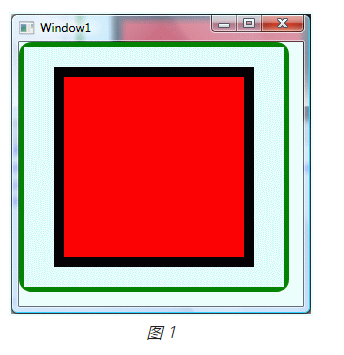
输出如图 1 所示,您可以在其中看到带有圆角的绿色边框。

WPF 中的 Border 类表示一个 Border 元素。清单 2 中列出的代码片段是 C# 代码,用于创建 Border、设置其属性并将其放置在 Canvas 元素周围。
    private void CreateDynamicBorder()
    {
        Border border = new Border();
        border.Background = new SolidColorBrush(Colors.LightGray);
        border.BorderThickness = new Thickness(5);
        border.BorderBrush = new SolidColorBrush(Colors.Green);
        border.CornerRadius = new CornerRadius(15);
        border.Width = 270;
        border.Height = 250;
        Canvas cnvas = new Canvas();
        Rectangle rect = new Rectangle();
        rect.Width = 200;
        rect.Height = 200;
        rect.Fill = new SolidColorBrush(Colors.Black);
        rect.StrokeThickness = 10 d;
        cnvas.Children.Add(rect);
        border.Child = cnvas;
        RootLayout.Content = border;
    }
小说边框只能有一个子元素。如果需要在多个元素周围放置边框,则必须在每个元素周围放置边框。
边框背景
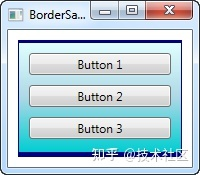
Background 属性属于 Brush 类型,它开辟了许多很酷的可能性。正如在最初的例子中看到的,使用简单的颜色作为背景很容易,但实际上你也可以使用渐变,而且做起来并不难:
<Window x:Class="WpfTutorialSamples.Misc_controls.BorderSample"
        xmlns="http://schemas.microsoft.com/winfx/2006/xaml/presentation"
        xmlns:x="http://schemas.microsoft.com/winfx/2006/xaml"
        Title="BorderSample" Height="175" Width="200">
    <Grid Margin="10">
        <Border BorderBrush="Navy" BorderThickness="1,3,1,5">
            <Border.Background>
                <LinearGradientBrush StartPoint="0.5,0" EndPoint="0.5,1">
                    <GradientStop Color="LightCyan" Offset="0.0" />
                    <GradientStop Color="LightBlue" Offset="0.5" />
                    <GradientStop Color="DarkTurquoise" Offset="1.0" />
                </LinearGradientBrush>
            </Border.Background>
            <StackPanel Margin="10">
                <Button>Button 1</Button>
                <Button Margin="0,10">Button 2</Button>
                <Button>Button 3</Button>
            </StackPanel>
        </Border>
    </Grid>
</Window>

在本例中,我指定了用于边框背景的LinearGradientBrush,然后是更合适的边框颜色。LinearGradientBrush 可能没有最明显的语法,因此我将在后面的章节中解释它,包括其他画笔类型,但现在,您可以尝试我的示例并更改值以查看结果。


